Mastering the API Assembly
The API assembly provides a powerful flow engine to secure, transform, rate limit and enrich API services on a robust and secure API gateway platform. In this tutorial, you will learn how to use the API assembly to securely expose an existing REST service as API services. Using the API assembly will provide API owners with detailed API usage analytics and operational metrics for API health and enable API consumers to discover APIs using a developer portal.
Create an API definition
In this section, you will create a quick API definition to expose an existing REST service as an API service.
- Let's try to catch some virtual Pokemon (this is what everyone is doing in 2016!). You will create an API definition to proxy an existing Pokemon service. Let's first directly call the backend service to make sure it is available, https://pokemons.mybluemix.net/api/pokemons/. You can use any test client (even a Web browser). It should return the following (just showing the first item in the response for brevity):
 {
 "data":{
 "moves":"slow"
 },
 "height":"7",
 "name":"bulbasaur",
 "weight":69,
 "id":1,
 "base_experience":64
 }
You will simply proxy the same request now using API Connect.
- Login to Bluemix with your IBM credentials and select the Catalog link. In the search box, type API Connect and click on the API Connect link.
- Select the Essentials plan and click Create and follow the prompts to provision the service. The provisioning steps may take a few moments to complete.
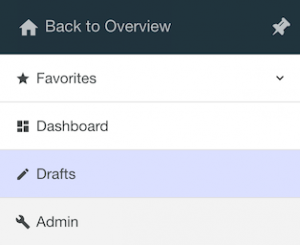
- In the Bluemix dashboard, under Services, click your recently created API Connect instance. Wait for the automatic login to complete and then click the >> icon and then Drafts.
- Click the APIs tab.
- Create a REST API definition - click + Add and then click New API from scratch. The "Add a new API" window opens.
- In the Title field, enter
pokemon. This will enter default values for other fields.
- Change the Base Path to
/api. Make a note of the URI as you will need this when testing.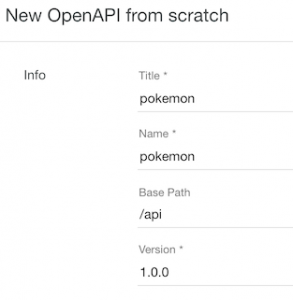
- For deployment, you will need to create an API product (package multiple APIs together) directly from this panel. Click Additional properties.
- Click Add Product and leave the defaults.
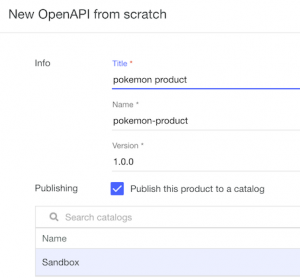
- Click Create API.
This will create an API product with the REST API definition for the Pokemon service.
- For easier testing via a Web browser, change the method to extract the client ID from the query parameter instead of an HTTP header. Select Security Definitions in the left panel, change the clientIdHeader (API Key) location from Header to Query. For your own application, you should standardize on an approach for client id and secret extraction.

- Select Paths in the left panel, Click + Add and enter
/pokemons for the path. Leave the GET parameter. You can add more operations (PUT, POST, DELETE, etc..) if needed, but for now, let's use the GET operation only. This is the second-level URI (ie /api/pokemons). You had defined the global URI (/api) in a previous step.
- Click the Assemble link at the top. A default action called invoke is pre-configured. Select the invoke action and change the URL to https://pokemons.mybluemix.net/api/pokemons. Click "X" to close the panel.

- Click Save (icon at top right-hand corner) to persist your changes.
Publish an API definition
- Click All APIs to back to the Drafts page. Click Products and the existing pokemon product. In the top right corner, click
 to stage the API product to the Sandbox. This step enables API consumers to register and test the API service.Note: Once a product is staged, it's not formally available until it has been published. This step is usually performed by an API administrator. Since we are playing all the roles, you will complete this step.
- Click the Hamburger icon >> on the left-hander corner and select Dashboard. Click the Sandbox catalog.
- In the pokemon product row, click the ... and select Publish. Leave the default visibility values and click the Publish button. Any changes to the API definition requires you to repeat these steps. You may want to keep this page open in a separate tab to make it easier to publish.
Test an API definition
API Connect provides a developer portal to discover and test APIs. It allows API consumers (ie Mobile Applications) to discover, subscribe and test API definitions. Once they are satisfied with the API, they can then embed the API into their application.
For simplicity, you will use the built-in test application instead of the developer portal to test the pokemon API definition. The last section of the tutorial will walk you through the developer portal so you can understand the full API experience.
- In the Sandbox catalog, click on Settings.
- Make sure Overview is selected in the left panel. The Automatic subscription toggle should already be selected. Click the Show button to note the client ID and client secret (the client secret is not needed for the initial test but note it anyways). For example, a sample client id value is
d03c438a-2010-4f21-8520-c111a86a9f16 and client secret value is rH1lA6wO5nL6gC5uD5tV0pE1hV4gO5lV2yN2uG5hB1hR3iT6jF.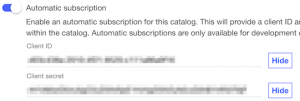
- Before you can test the application, you will need the API endpoint for testing. Click on Gateways in the left panel and note the API Endpoint. The API endpoint you will use is https://api.us.apiconnect.ibmcloud.com/ibmid-dev/sb/api/pokemons, where URI (/api/pokemons) is defined in your API policy definition and
ibmid-dev will be your id assigned by Bluemix.
- The URL will look like the following: https://api.us.apiconnect.ibmcloud.com/ibmid-dev/sb/api/pokemons?client_id=63de0b20-c044-4be3-9b9b-b4321acea089.
 Make sure you get the same JSON response. You know what they say about Pokemon - Catch 'Em All!
Note: You can also use the built-in test client within the API Connect assembly to test API definitions. This uses the default application subscription above so you don't need to republish your product everytime you make changes. Go ahead and try the same test using the built-in Test tool (play icon at the top left hand corner).
Secure and optimize API message flows with an API assembly
The API Assembly feature within API Connect provides a collection of policies which are enforced and executed on the API Gateway. Policies include actions like modifying the logging behaviour and altering the message content or headers. Additionally, if the out-of-the-box policies do not meet your specific needs, you may create your own policy and have it available for API designers through the API Connect UI.
Add API logging to the API assembly
In this section, you will log the API message into the API analytics engine to gain insight into your API.
- Go back to the Drafts page >>and select APIS -> pokemon 1.0.0 API. Click the Assemble tab.
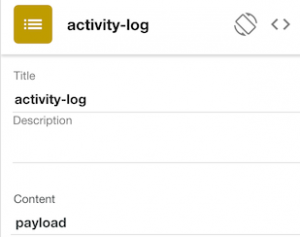
- Add an activity-log policy to the assembly: Drag the activity-log policy from the list of available policies to the right of the invoke policy already created in your assembly.
- Configure it to log API payload: Select the newly added activity-log step. A properties menu will open on the right of your screen. Under Content select payload from the drop-down list.
- Click on the X icon to close the activity-log editor menu.
- Save your changes.
- Restage and deploy the pokemon product. If your using the built-in test tool, you don't need to perform this step since it will automatically publish them for you.
Verify activity logging in the API Analytics
- Send a sample message to return Pokemon data.
- The Analytics data is collected under the common Dashboards. Click the >> icon on the left-hander corner and select Dashboard.
- Click the Analytics tab to view the results.
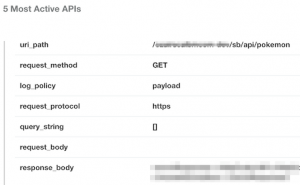
- Scroll down to 5 Most Active APIs.
- At the bottom of the section, hover over the graph, and click the ^ arrow (bottom left corner) and then click View Events.
- Click the most recent event. In the default (Table) tab, scroll down until you see the response_body attribute. You should see the same JSON body in the response.
Use conditional actions to dynamically control flows
In this section, you will create a new operation and add assembly logic to enforce different actions based on the runtime operation (Get All Pokemon vs Get single Pokemon)
Let's first directly call the backend service to make sure its available,
https://pokemons.mybluemix.net/api/pokemons/1.
- Switch to the API designer view (All APIs -> pokemon 1.0.0 -> Design).
- On the left side of the page, under Paths, select
/pokemons.
- Click the + button to create a new path named
/pokemons/{id}.
- Click Add Parameter and describe the
{id} parameter with the following:
- Name: id
- Located in: Path
- Click the GET /pokemons/{id} box and scroll down to the response schema. Notice that the response is a object (ie JSON). If you wanted to define a more specific JSON schema, you can create a definition object with the Pokemon attributes. For now, let's leave the defaults so you don't let those Pokemon run away!

- Save the changes.
- Click the Assembly tab at the top.
- Drag the Operation Switch to the action before the Invoke.
- Select the dropdown beside Case and select
get /pokemons.
- Click + Case and select
get /pokemons/{id}.
- Click the X button to close the action. At this point both operations use the same assembly. The
get /pokemons/{id} requires a different endpoint to be invoked that obtains an individual pokemon instead of all pokemons.
- Drag the existing Invoke action to the
get /pokemons operation.
- Clone the existing Invoke or drag another Invoke action into the case for
get /pokemons/{id}. When you drag the action into this case, an orange box will appear to indicate the action can be added. Move around the Invoke action until you get the orange box. Enter the URL https://pokemons.mybluemix.net/api/pokemons/{id}. Uncheck Stop on error since you won't define any error handling logic.
- Both cases should use the activity-log. In the next section, you will add an action specific to the
get /pokemons/{id} flow.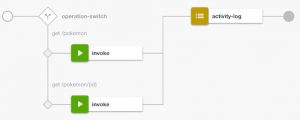
- Save your changes.
- Restage and deploy the pokemon product.
- Test and validate your API with the following URL: https://api.us.apiconnect.ibmcloud.com/ibmid-dev/sb/api/pokemons/1?client_id=63de0b20-c044-4be3-9b9b-b4321acea089. You can try different integers (1-5) to retrieve other Pokemon.
Control and enrich API messages using JavaScript
In this section, you will enrich the runtime
response API payload using JavaScript by configuring a GatewayScript action.
- Make sure your in the Assembly tab.
- Add a GatewayScript action to the
get /pokemons/{id} case.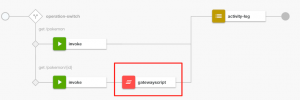
- Copy the following code into the GatewayScript action:
//APIC: get the payload
var json = apim.getvariable('message.body');
console.error("json %s", JSON.stringify(json));

//same: code to inject new attribute
json.platform = 'Powered by IBM API Connect';

//APIC: set the payload
apim.setvariable('message.body', json);
The API Connect framework takes care of reading the input message and setting the response back to the consumer. The API framework documentation is available here.
The message context variable (from message.body) is a default context that tracks the modified message.
- Click on the X to close the editor menu.
- Save your changes.
- Restage and deploy the pokemon product.
- Test your service again and make sure it returns the same Pokemon data but with a new attribute,
platform containing Powered by IBM Connect. Make sure you either clear the cache or perform a force refresh
- Windows: ctrl + F5
- Mac/Apple: Apple + R or command + R
- Linux: F5
Important Context variables in the API assembly allow you to access runtime information:
- request: pre-built context variable provides the original request message
- message: pre-built context variable provides access to the current message in the assembly
- custom: context variable that is created in an Invoke action and used in subsequent actions, such as GatewayScript.
Each context variable has additional attributes such as
body,
headers, etc... that provide information about different runtime context.
Advance: Inject HTTP headers into a response
- In the same GatewayScript file, you can also inject HTTP request or response headers dynamically. You will need to use a test tool that can view the request and response headers. If your using Chrome, you can use the built-in debugging tools to view header information.
- Insert the following code at the end of the GatewayScript action.
apim.setvariable('message.headers.platform', 'Powered by IBM API Connect');
- If you need to perform any error handling, the following code allows you to throw an error into the assembly that can be caught with a catch handler (will be discussed next).
apim.error('MyError', 500, 'Internal Error', 'Some error message');
Discover remaining API assembly actions
There are several other assembly actions that you can explore, we will discuss them here quickly, so you can explore them on your own time.
- The
switch and if actions allow you to specify conditional actions in the assembly flow, similar to the operation-switch but with more flexibility to define the conditions based on the runtime context (e.g. HTTP method, operation name, message body details, etc...
- You can define a catch block that will act as a global error handler in your assembly. Select the Show Catches toggle. Click inside the Catch area to define assembly logic for common error conditions. The default errors are defined here.
- The
throw action triggers an error message to be returned to the client. Use this action when you have reached an error condition in your assembly flow. This action can subsequently trigger the global error handler via the catch block.
- The
set-variable action allows you to create or modify runtime assembly variables. This is similar to the GatewayScript code you wrote previously but is available as an Assembly action.
The following actions are unique to the DataPower gateway:
- Several policies are available for performing message transformations, such as
Map (schema to schema), xslt (transform xml), xml-to-json (transform via badgerfish) and json-to-xml (transform via badgerfish). Once you have transformed the message, you could use a Validate action to validate the message contents, or simply validate the original request or response.
- Several security actions exist, such as:
jwt-generate: generate jwt token with identity assertion claims
jwt-validate: validate the identity assertion claims from a jwt token
validate-username: validate the username token
redact: remove or mask values inside a messageFor more information about JWT, you can read the link here
Discover API services using the developer portal
In this section, you will learn the consumer experience for APIs that have been exposed to your developer organization. Since you are playing the role of the consumer, you cannot use the same IBM ID to access the developer portal. You will need to create a new account to play the role of an API consumer.
- Click on Dashboard -> Sandbox -> Settings -> Portal.
- Change the URL from none to the pre-defined Developer portal link.
- Click Save. This step triggers a provisioning step that may take about a few minutes to complete. You will get an email once its done.
- In the Portal section, click the link to open the Developer Portal.
- In the top-right corner of the portal, click on Create an Account to register for the developer portal.
- Follow the email prompts to create an account and login to the developer portal.
- Click on the API Products link to see the available products published to the portal.
- You should see the published Pokemon API in the list of products.
- Click the Pokemon link and examine the available API operations. Each API definition provides sample commands / snippets to quickly test your API service.
- Click on the Apps link and follow the prompts to create a new application . This action will provide you with a new client id and secret.
- Perform steps to subscribe to the Pokemon product. Follow the prompts to subscribe to the default plan.
- You can now test the Pokemon API as you have done using the built-in test tool but using a different client id. You should get the same response.
Summary
In this tutorial, you learned the basics of creating, publishing and testing an API definition. This API definition exposed an existing REST service and applied assembly actions to secure and optimize JSON payloads. Finally, you discovered API services as an API consumer using the developer portal.
#GettingStarted