IBM MQ Managed File Transfer (MFT) transfers files between systems in a managed and auditable way, regardless of file size or the operating systems used. You can use Managed File Transfer to build a customized, scalable, and automated solution that enables you to manage, trust, and secure file transfers. Managed File Transfer eliminates costly redundancies, lowers maintenance costs, and maximizes your existing IT investments.
IBM MQ Managed File Transfer is available along with IBM MQ Advanced package, it also available as redistributable package, which can be put it to use just by unzipping the package.
Install MFT through Advanced IBM MQ
Step 1:
(i) Download the image using the above link, Unzip the downloaded image and take note of the location of your MQ Server folder.
(ii) IBM MQ Advanced:
Go the extracted folder that was noted in the previous.
Right click on Setup.exe and run as administrator. This will start the Launchpad that will take you through installation steps. Select custom option and select the MFT components along with MQ components.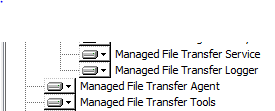
Step 2:
Create Qmgr required for Managed File Transfer
(i) Create Qmgr and Start it using 'strmqm'
 (ii) Set queue manager as coordination queue manager
fteSetupCoordination -coordinationQMgr MFTDEMO -f
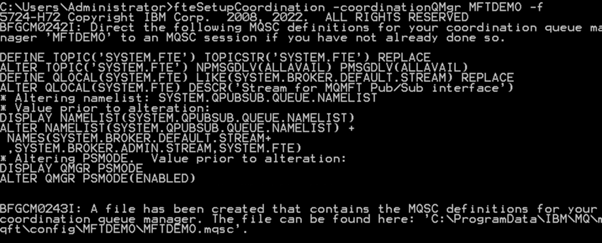
'fteSetupCoordination' creates coordination queue manager directory, properties file and generates the MQSC script which contains the MQSC commands to create required objects for configuring coordination queue manager (MFTDEMO). MQSC scripts should be run against the coordination queue manager
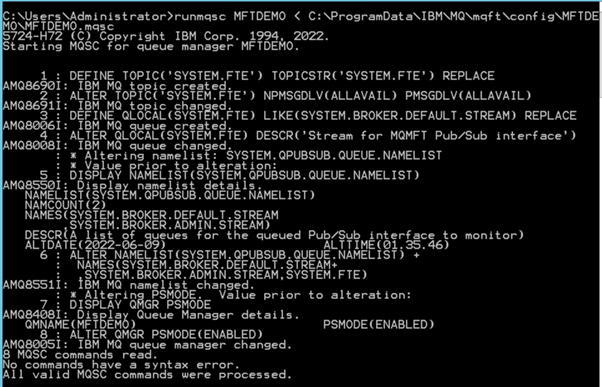
Using runmqsc execute the below script and create the required objects.
runmqsc MFTDEMO < C:\ProgramData\IBM\MQ\mqft\config\MFTDEMO\MFTDEMO.mqsc
(iii) Create command queue manager
Set the command queue manager using 'fteSetupCommands'

Step 3: Create and start an Agent
'fteCreateAgent' command creates the agents.
Need to have two agents (source agent and destination agent) for transfering files.
fteCreateAgent -p MFTDEMO -agentName SA -agentQMgr MFTDEMO -f
Execute MQSC script file to create the MQ objects required for source agent (SA ).
runmqsc MFTDEMO < C:\ProgramData\IBM\MQ\mqft\config\MFTDEMO\agents\SA\SA_create.mqsc
In the same way create destination agent (DA ).
fteCreateAgent -p MFTDEMO -agentName DA -agentQMgr MFTDEMO -f
Execute the MQSC script file as below Copy.
runmqsc MFTDEMO < C:\ProgramData\IBM\MQ\mqft\config\MFTDEMO\agents\DA\DA_create.mqsc
We have now created all the required objects. Now it’s time to start the agents.
fteStartAgent SA -p MFTDEMO
fteStartAgent DA -p MFTDEMO
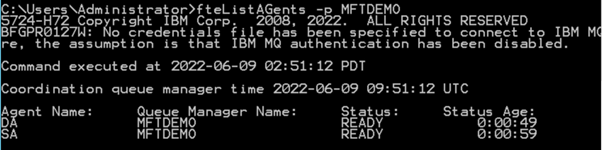
Execute the below command to verify the agent status.
fteListAgents -p MFTDEMO
Step 4: Do simple MFT transfer
Now the set up is done for a MFT file transfer .
'fteCreateTransfer' command transfer files from C:\source_dir\file.txt to C:\dest_dir\dest.txt with overwrite option at the destination agent.
Note : create a source and destination directory (say. source_dir and dest_dir). Create a source file which needs to be transfered (say file.txt) in source_dir directory.
fteCreateTransfer -p MFTDEMO -t text -sa SA -sm MFTDEMO -da DA -dm MFTDEMO -de overwrite -df "C:\dest_dir\dest.txt" “C:\source_dir\file.txt”

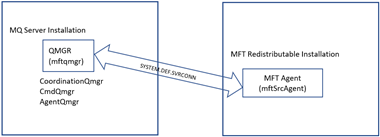
Redistributable Managed File Transfer Agent
Redistributable Managed File Transfer Agent, which can be configured to connect to an existing IBM® MQ infrastructure and enable users to transfer files without install IBM MQ.
Queue managers required for file transfer will exist where IBM® MQ Server is installed and Managed file transfer agent will connect to qmgr in clients mode.
Step 1:
(i) Download the Redistributable Managed File Transfer Agent from the previous table
(ii) Create a directory for data, where managed file transfer data is stored (say c:\mftRedis\data)
(iii) Set the MQ Server installation name. (i.e BFG_INSTALLATION_NAME)
(iv) Set the Data path (i.e BFG_DATA)
“fteCreateEnvironment.cmd” will set the configurations.
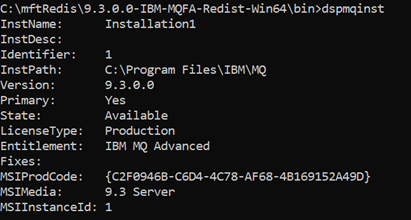
To get the server installation name execute “dspmqinst” where qmgr is available.
Here are the steps to do the configuration:
a) Get the server installation Name
 b) set BFG_INSTALLATION_NAME and BFG_DATA

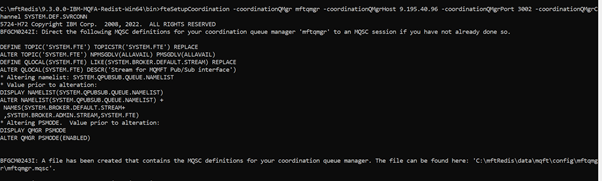
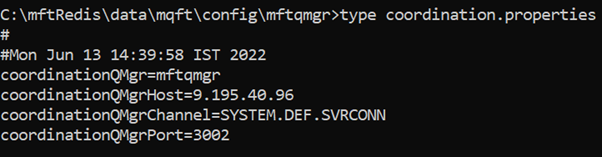
Step 2: Set-up coordination qmgr.
(i) set the coordination qmgr (fteSetupCoordination) .
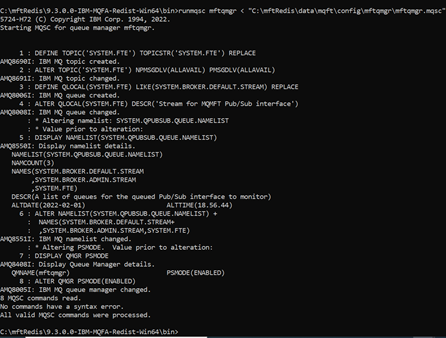
 (ii) Verify Coordination qmgr is set.
 (iii) create required objects in coordnination qmgr using runmqsc file generated by fteSetupCoordination
Step 4: Setting-up command qmgr
i) Set command qmgr using 'fteSetupCommand'

ii) Verify command qmgr is set

Step 5: Create Agent and start them
(i) Create agent using fteCreateAgent
Tja (ii) Create the required objects in the qmgr which are required for the agents.

(iii) Start the agent using fteStartAgent
(iv) Do simple MFT transfer
Now the set up is done for a MFT file transfer. 'fteCreateTransfer' mentioned earlier can be used to initiate the transfer.