-
Introduction
IBM Cloud Pak System can help accelerate your implementation of on-premises Kubernetes platforms. It comes with support for automated deployment and configuration of Red Hat OpenShift Container Platform (OCP). This makes it the perfect platform for on-premises deployment of IBM Cloud Paks and Red Hat OpenShift clusters!
This tutorial focuses on the deployment of Red Hat OpenShift Container Platform 4.3.
For details on 4.2 version, see the IBM Developer article, Deploying Red Hat OpenShift 4 on IBM Cloud Pak System 2.3.2.0.
For Red Hat OpenShift, it is important to know that there are several different offerings available:
A fully managed public cloud offering for quickly deploying applications.
- OpenShift Hosted Services
OpenShift clusters hosted on IBM Cloud, Amazon Web Services (AWS) and Azure.
- OpenShift Container Platform (OCP)
An enterprise OpenShift cluster deployed on your own on-premises infrastructure (OpenShift Container Platform was previously called OpenShift Enterprise, but the name was changed with the release of version 3.3.).
A more detailed comparison of these offerings can be found on the OpenShift website. As IBM Cloud Pak System is an on-premises appliance, it only provides support for the OpenShift Container Platform offering. In this tutorial, you will learn how to deploy OpenShift Container Platform on a Cloud Pak System. The tutorial assumes that the IBM Cloud Pak System is at 2.3.2.0 firmware without direct access to the internet.
-
Prerequisites
Before you deploy your first OpenShift 4.3 cluster on IBM Cloud Pak System, few prerequisites need to be in place. IBM Knowledge Center provides a good starting point for those prerequisites:
-
IBM Cloud Pak System 2.3.2.0 or higher
Intel based IBM Cloud Pak System models W2500, W3500 and W3550 are supported. Unfortunately, there is currently no support for the Power based IBM Cloud Pak System model W3700.
-
IBM OS image for Red Hat Linux Systems (RHEL 7.7 X64) Version 7.7
Scenarios using a custom OS image are also supported, as long as it is Red Hat Enterprise Linux (RHEL) 7.7 or higher
-
IBM OS image for Red Hat Enterprise Linux CoreOS Version 4.3.0
This is included with BYOL for OpenShift Container Platform V4.3.1.0.
-
Docker Accelerator 1.0.12.0
Docker Accelerator 1.0.12.0 Docker registry is required for accessing OpenShift Container Platform images. Obtain Docker registry accelerator V1.0.12.0 from IBM FixCentral
-
OpenShift Container Platform Accelerator 4.3.1.0
OpenShift Container Platform accelerator is used for deploying OpenShift Container Platform cluster in IBM Cloud Pak System. Get OpenShift Container Platform accelerator V4.3.1.0 from IBM FixCentral
-
Red Hat Satellite Server 6 shared service deployed
The shared service should be connected to an existing Red Hat Satellite Server (RHSS) or to RHSS deployed on IBM Cloud Pak System with access to repositories rhel-7-server-rpms & rhel-7-server-extras-rpms. Note that the IBM Cloud Pak System comes with Red Hat subscriptions for RHEL and RHSS.
-
Active subscription with Red Hat for the OpenShift Container Platform
Unlike the Red Hat subscription for RHEL and RHSS, the OpenShift Container Platform (OCP) subscription is not included with IBM Cloud Pak System.*
-
Sufficient compute, memory and storage resources on IBM Cloud Pak System
A single OCP cluster requires at least 28 virtual CPUs, 112 GB of RAM, and 1624 GB of storage.
We will take you through the details of what is exactly needed for Red Hat Satellite Server in “Step 4 – Prepare Red Hat Satellite Server“. As this tutorial assumes that you are working on an environment without direct internet access, see “Step 5 – Deploy a Private Docker Registry on IBM Cloud Pak System“. It describes how to deploy your own private Docker registry to support the offline installation of OpenShift.
Step-by step
-
Loading and validating content loaded on IBM Cloud Pak System 2.3.2.0
By default, IBM Cloud Pak System 2.3.2.0 comes loaded with most of the content that you need. For sake of completeness, the following table lists the prerequisites:
Now, you should verify and/or import the Virtual Images, BYOL Binaries and Pattern Types.
A. Verifying and importing Virtual Images
By logging in to the IBM Cloud Pak System, you can easily determine whether the required Virtual Images are loaded and enabled. Go to Catalog > Virtual Images and filter for the name of the pattern, for example, “IBM OS Image for Red Hat Linux”. Make sure that the correct version of the Virtual Image is present in the catalog as shown in Figure 1.
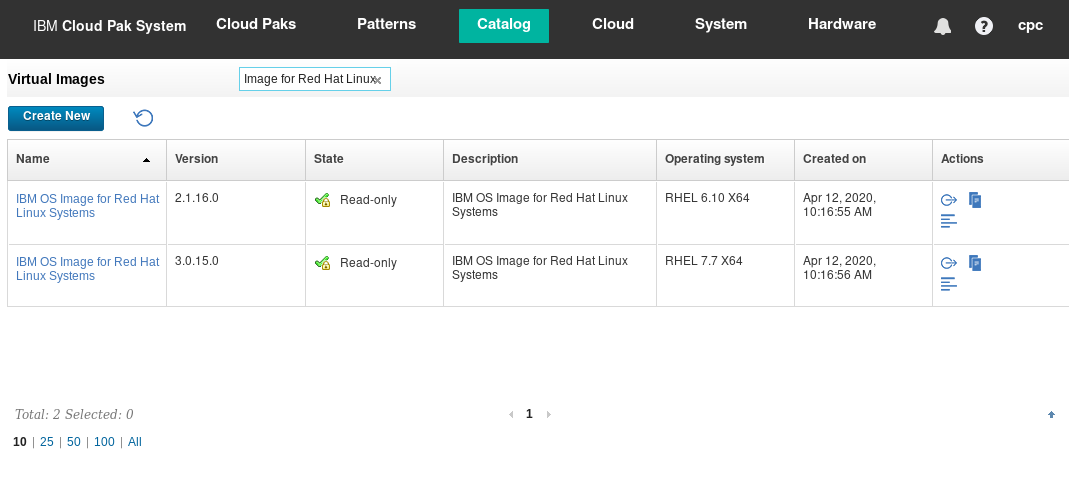
Figure 1: IBM OS Image for Red Hat Linux V3.0.15.0 loaded in the catalog
Load the Virtual Image if it is not present. This is best done through the IBM Cloud Pak System Command Line Interface (CLI). See below for the commands to import the Virtual Image and accept the associated licenses.
-bash-4.2# ./pure -h 172.72.72.72 -u admin
Password:
Welcome to the IBM PureApplication Software CLI. Enter 'help' if you
need help getting started.
>>> deployer.virtualimages.create('/content/MAESTRO_RHEL7_X64.ova').waitFor()
>>> deployer.virtualimages.list({'name': 'IBM OS Image for Red Hat Linux Systems', 'version': '3.0.15.0'})[0].acceptLicense()
B. Verifying and importing BYOL binaries
The “BYOL binaries for Red Hat Openshift V4.3.1 on IBM Cloud Pak System Images” are not installed by default. You can confirm this by logging onto the IBM Cloud Pak System and go to System > Storehouse Browser. If you do not see an entry for /admin/files/RedHatOpenShift as shown in Figure 2, the binaries have not been installed yet.
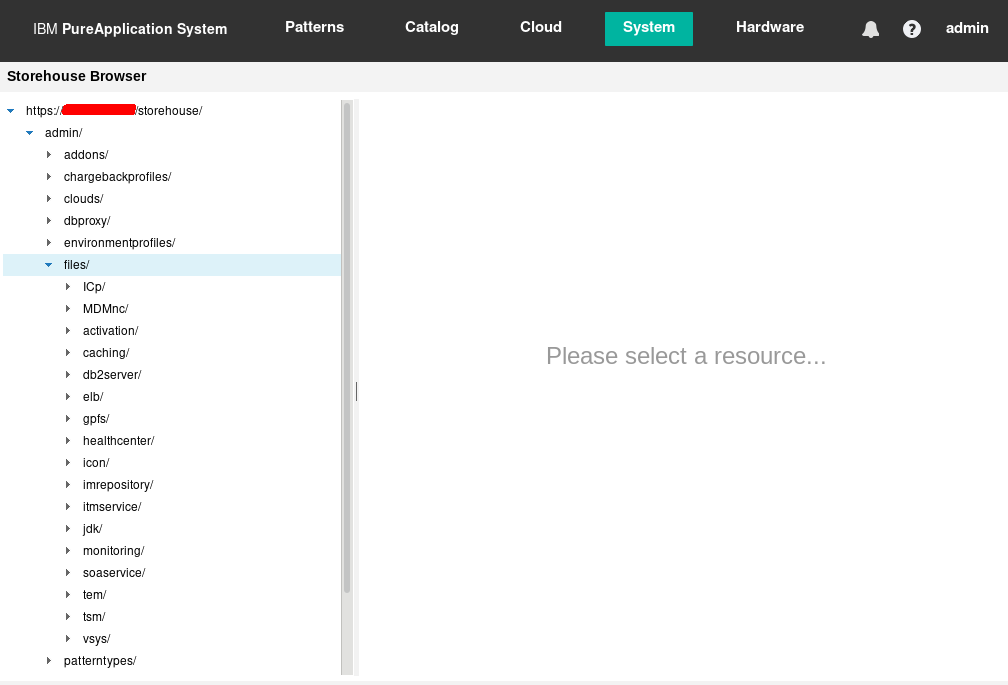
Figure 2: BYOL binaries for Red Hat Openshift V1.0.0 on IBM Cloud Pak System Images have not been loaded
The process for loading the binaries has been documented here in the IBM Cloud Pak System Knowledge Center.
-bash-4.2# ./cloudpakupload.sh -h 172.72.72.72 -u admin -p password
IBM Cloud Pak System : Cloud Pak upload utility
*********************************************
 Cloud Pak: Redhat Openshift4 4.3.1 on IBM Cloud Pak System
*********************************************
Checking cloud pak binaries
 - MD5 match: IBM_OS_Image_for_Red_Hat_Enterprise_Linux_CoreOS_16G_4_3_0.ova
 - Permissions match: IBM_OS_Image_for_Red_Hat_Enterprise_Linux_CoreOS_16G_4_3_0.ova
 - MD5 match: ocp4.3.1-x86_64.tgz
 - Permissions match: ocp4.3.1-x86_64.tgz
 - MD5 match: ocp4.3.1-x86_64-extra.tar
 - Permissions match: ocp4.3.1-x86_64-extra.tar
 - MD5 match: ocp4.2.18-x86_64.tgz
 - Permissions match: ocp4.2.18-x86_64.tgz
 - MD5 match: jq-linux64
 - Permissions match: jq-linux64
 - MD5 match: openshift-client-linux-4.3.1.tar.gz
 - Permissions match: openshift-client-linux-4.3.1.tar.gz
 - MD5 match: openshift-install-linux-4.3.1.tar.gz
 - Permissions match: openshift-install-linux-4.3.1.tar.gz
 - MD5 match: openshift-client-linux-4.2.18.tar.gz
 - Permissions match: openshift-client-linux-4.2.18.tar.gz
 - MD5 match: openshift-install-linux-4.2.18.tar.gz
 - Permissions match: openshift-install-linux-4.2.18.tar.gz
Verifying Cloud Pak System accelerator binaries
1) openshift-client-linux-4.2.18.tar.gz: verified successfully
2) openshift-install-linux-4.3.1.tar.gz: verified successfully
3) ocp4.2.18-x86_64.tgz: verified successfully
4) IBM_OS_Image_for_Red_Hat_Enterprise_Linux_CoreOS_16G_4_2_0.ova: found locally but not on server
5) ocp4.3.1-x86_64.tgz: verified successfully
6) openshift-install-linux-4.2.18.tar.gz: verified successfully
7) IBM_OS_Image_for_Red_Hat_Enterprise_Linux_CoreOS_16G_4_3_0.ova: verified successfully
8) ocp4.3.1-x86_64-extra.tar: verified successfully
9) jq-linux64: verified successfully
10) openshift-client-linux-4.3.1.tar.gz: verified successfully
Uploading needed files...
 - openshift-client-linux-4.2.18.tar.gz is already on the server
 - openshift-install-linux-4.3.1.tar.gz is already on the server
 - ocp4.2.18-x86_64.tgz is already on the server
starting upload of IBM_OS_Image_for_Red_Hat_Enterprise_Linux_CoreOS_16G_4_2_0.ova
 - IBM_OS_Image_for_Red_Hat_Enterprise_Linux_CoreOS_16G_4_2_0.ova uploaded
 - ocp4.3.1-x86_64.tgz is already on the server
 - openshift-install-linux-4.2.18.tar.gz is already on the server
 - IBM_OS_Image_for_Red_Hat_Enterprise_Linux_CoreOS_16G_4_3_0.ova is already on the server
 - ocp4.3.1-x86_64-extra.tar is already on the server
 - jq-linux64 is already on the server
 - openshift-client-linux-4.3.1.tar.gz is already on the server
Verifying files on remote Cloud Pak System
 - MD5 match: IBM_OS_Image_for_Red_Hat_Enterprise_Linux_CoreOS_16G_4_3_0.ova
 - Permissions match: IBM_OS_Image_for_Red_Hat_Enterprise_Linux_CoreOS_16G_4_3_0.ova
 - MD5 match: IBM_OS_Image_for_Red_Hat_Enterprise_Linux_CoreOS_16G_4_2_0.ova
 - MD5 match: ocp4.3.1-x86_64.tgz
 - Permissions match: ocp4.3.1-x86_64.tgz
 - MD5 match: ocp4.3.1-x86_64-extra.tar
 - Permissions match: ocp4.3.1-x86_64-extra.tar
 - MD5 match: ocp4.2.18-x86_64.tgz
 - Permissions match: ocp4.2.18-x86_64.tgz
 - MD5 match: jq-linux64
 - Permissions match: jq-linux64
 - MD5 match: openshift-client-linux-4.3.1.tar.gz
 - Permissions match: openshift-client-linux-4.3.1.tar.gz
 - MD5 match: openshift-install-linux-4.3.1.tar.gz
 - Permissions match: openshift-install-linux-4.3.1.tar.gz
 - MD5 match: openshift-client-linux-4.2.18.tar.gz
 - Permissions match: openshift-client-linux-4.2.18.tar.gz
 - MD5 match: openshift-install-linux-4.2.18.tar.gz
 - Permissions match: openshift-install-linux-4.2.18.tar.gz
Verifying Cloud Pak System pattern binaries
1) openshift-client-linux-4.2.18.tar.gz: verified successfully
2) openshift-install-linux-4.3.1.tar.gz: verified successfully
3) ocp4.2.18-x86_64.tgz: verified successfully
4) IBM_OS_Image_for_Red_Hat_Enterprise_Linux_CoreOS_16G_4_2_0.ova: verified successfully
5) ocp4.3.1-x86_64.tgz: verified successfully
6) openshift-install-linux-4.2.18.tar.gz: verified successfully
7) IBM_OS_Image_for_Red_Hat_Enterprise_Linux_CoreOS_16G_4_3_0.ova: verified successfully
8) ocp4.3.1-x86_64-extra.tar: verified successfully
9) jq-linux64: verified successfully
10) openshift-client-linux-4.3.1.tar.gz: verified successfully
All binaries verified successfully.
Confirm whether the following files are now visible from the IBM Cloud Pak System. Go to System > Storehouse browser and confirm that you see what is shown in Figure 3.
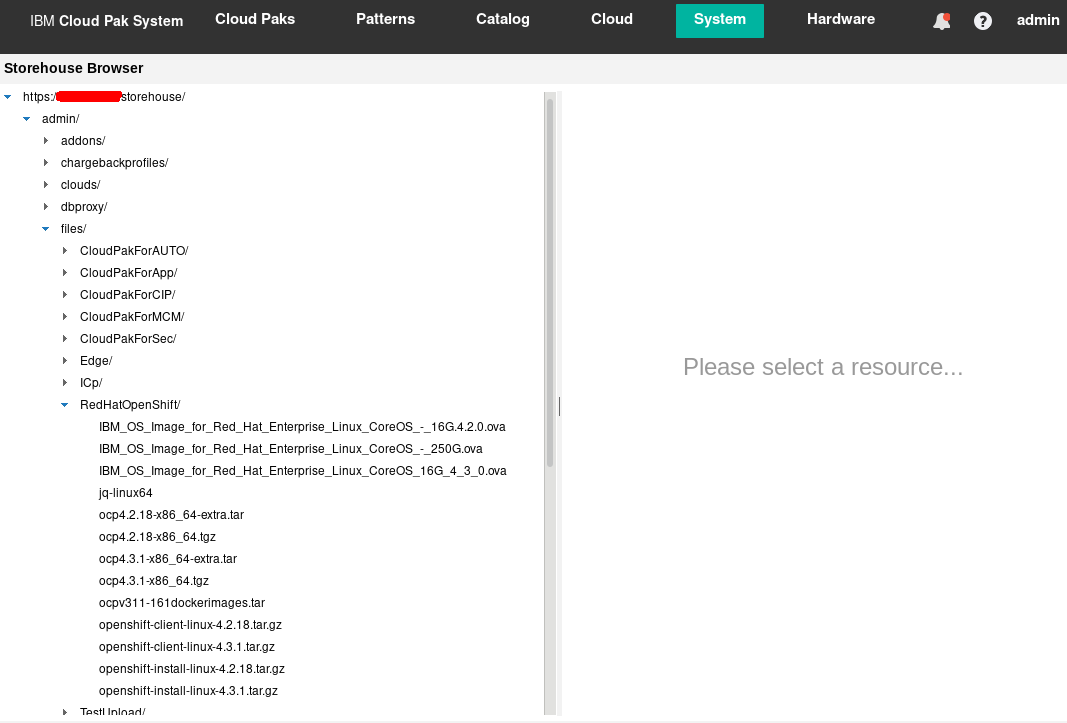
Figure 3: BYOL binaries for Red Hat Openshift V4.3.1 on IBM Cloud Pak System Images have been loaded
Now, import and clone the Red Hat Enterprise Linux CoreOS OVA to IBM Cloud Pak System Virtual Images. With the updated cloudpakimages utility for OpenShift Container Platform V4.3.1.0 for IBM Cloud Pak System, a user no longer needs to clone Red Hat Enterprise Linux CoreOS images manually. Executing this utility automatically loads images to storehouse and clones the Red Hat Enterprise Linux CoreOS OVA to three variants with different disk size of 16 GB, 120 GB and 250 GB. Also, it makes them available in the IBM Cloud Pak System Virtual Images catalog as seen in Figure 6.
-bash-4.2:/BYOL_OCP/byol_openshift # bash ./cloudpakimages.sh -h 172.72.72.72 -u (system_user) -p (system_password)
***************************************************
Cloud Pak Virtual Images Import utility
***************************************************
Virtual Images will be created from files uploaded to ICPS Storehouse
 - Verifying Image binaries in ICPS Storehouse
 - Verifying file
 Name: IBM_OS_Image_for_Red_Hat_Enterprise_Linux_CoreOS_16G_4_3_0.ova
 - File is available in ICPS storehouse and checksum matches
 - Verifying file
 Name: IBM_OS_Image_for_Red_Hat_Enterprise_Linux_CoreOS_16G_4_2_0.ova
 - File is available in ICPS storehouse and checksum matches
Error: Could not find or load main class com.ibm.workloaddeployer.cli.bootstrap.CLI
 - Downloading and extracting CLI
 - Connecting to ICPS to import Virtual Images
OpenJDK 64-Bit Server VM warning: You have loaded library /tmp/jna1487969422811475144.tmp which might have disabled
stack guard. The VM will try to fix the stack guard now.
It's highly recommended that you fix the library with 'execstack -c <libfile>', or link it with '-z noexecstack'.
 - Working with image
 Name: IBM OS Image for Red Hat Enterprise Linux CoreOS - 16G
 Version: 4.3.0
 - Image exists. Skipping importing the image
 - Cloned Image exists. Skipping cloning of image
 Name: IBM OS Image for Red Hat Enterprise Linux CoreOS - 120G
 - Cloned Image exists. Skipping cloning of image
 Name: IBM OS Image for Red Hat Enterprise Linux CoreOS - 250G
 - Completed image IBM_OS_Image_for_Red_Hat_Enterprise_Linux_CoreOS_16G_4_3_0.ova
 - Working with image
 Name: IBM OS Image for Red Hat Enterprise Linux CoreOS - 16G
 Version: 4.2.0
 - Image exists. Skipping importing the image
 - Cloned Image exists. Skipping cloning of image
 Name: IBM OS Image for Red Hat Enterprise Linux CoreOS - 120G
 - Cloned Image exists. Skipping cloning of image
 Name: IBM OS Image for Red Hat Enterprise Linux CoreOS - 250G
 - Completed image IBM_OS_Image_for_Red_Hat_Enterprise_Linux_CoreOS_16G_4_2_0.ova
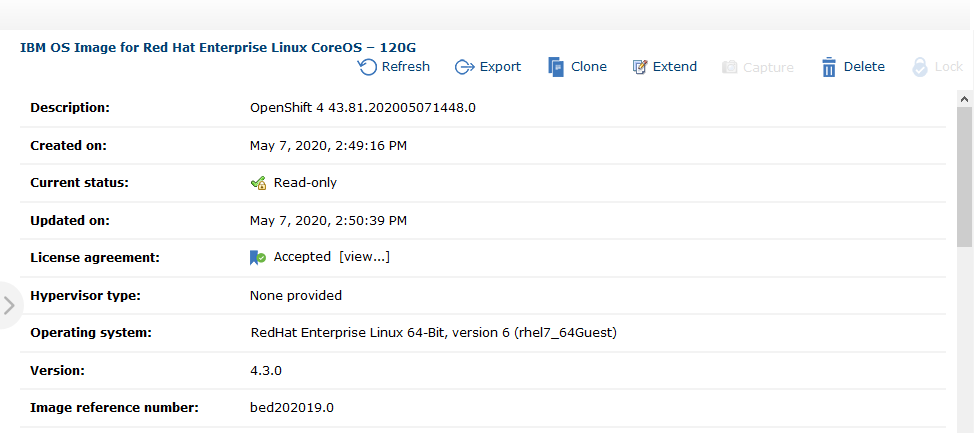
Figure 7: Imported and cloned Core OS Virtual Image is now available in catalog
C. Verifying and importing Pattern Types
By logging onto the IBM Cloud Pak System, you can easily determine whether the Pattern Types you need have been loaded and enabled. Go to Catalog > Pattern Types and filter for the name of the pattern, for example “foundation”. Make sure that the correct version of the Pattern Type is present in the catalog and that the status has been set to “Available” as shown in Figure 8.
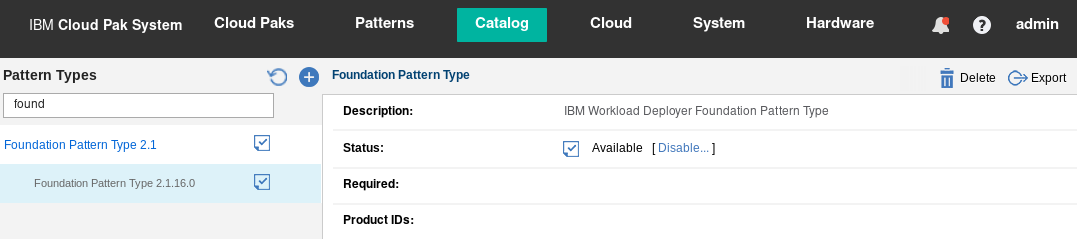
Figure 8: Foundation 2.1.16.0 Pattern Type loaded in the catalog with status available
| Pattern Type |
Version |
Filename |
| Foundation |
2.1.16.0 |
foundation-2.1.16.0.tgz |
| Red Hat OS Update Service |
1.0.14.0 |
rhus-1.0.14.0.tgz |
| Docker |
1.0.12.0 |
docker-1.0.12.0.tgz |
| OpenShift |
4.3.1.0 |
openshift-4.3.1.0.tgz |
Typically, the Foundation V2.1.16.0 Pattern Type gets loaded already as shown in Figure 8. Confirm which of the other Pattern Types are still missing and load them in the order of the above table.
Loading accelerator Types is best done through the IBM Cloud Pak System Command Line Interface (CLI). The commands below demonstrate how to import and enable the OpenShift 4.3.1.0 accelerator.
# ./pure -h -u (system_user) -p (system_password)
>>> deployer.patterntypes.create('/tmp/openshift-4.3.1.0.tgz')
[{
 "build_id": "20200513-0331-097",
 "description": "This accelerator deploys OpenShift Container Platform on IBM Cloud Pak System",
 "license": (nested object),
 "name": " OpenShift Container Platform accelerator ",
 "required": (nested object),
 "shortname": "openshift",
 "status": "accepted",
 "status_text": "Unavailable",
 "version": "4.3.1.0"
}]>>> deployer.patterntypes.get('openshift', '4.3.1.0').enable()
{'status': 'avail'}
After it is loaded, you should see the OpenShift 4.3.1.0 Pattern Type in the catalog with status available as show in Figure 9.
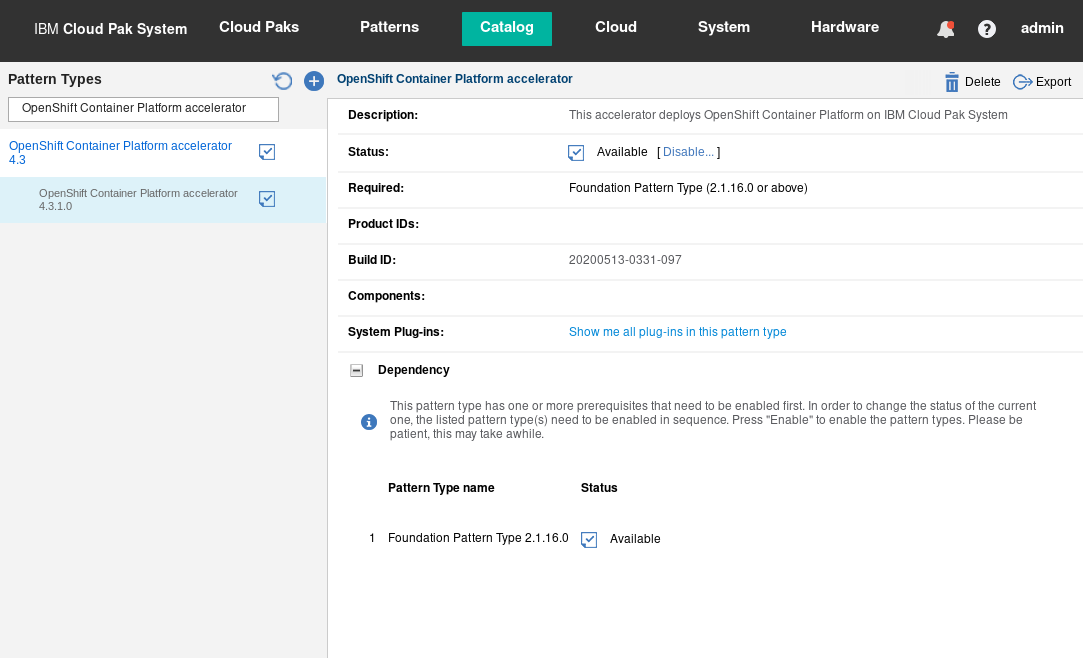
Figure 9: Foundation 2.1.16.0 Pattern Type loaded in the catalog with status available
-
Prepare Red Hat Satellite Server
Most companies choose to integrate their (Intel-based) IBM Cloud Pak System client virtual machines (VMs) with Red Hat Satellite Server (RHSS) 6. When deploying VMs using Red Hat Enterprise Linux (RHEL) 6 or 7, it provides a straightforward process for performing RHEL OS maintenance. (For example, installing security patches on a regular basis.) Of course, it also greatly simplifies the installation of new RPM packages and their dependencies. (For example, you can simply perform a yum install <package-name> from a shell.) You can either deploy RHSS 6 on Cloud Pak System itself, or integrate with an existing RHSS that is already in place. IBM recommends using RHSS 6.4 or higher with IBM Cloud Pak System and IBM Support details how to set it up.
Assuming you have RHSS 6.4 or higher in place, some additional steps are required to deploy RHOCP on Cloud Pak System.
A. Enable required repositories
Make sure that the following Red Hat repositories in Red Hat Satellite Server have been enabled. Each RHOCP 4.2 pattern requires all these Red Hat repositories, most likely you need to only enable “Red Hat Enterprise Linux 7 Server Extra RPMs”.
| Repository name |
Repository identifier |
Already enabled? |
| Red Hat Enterprise Linux 7 Server (RPMs) |
rhel-7-server-rpms |
yes |
| Red Hat Enterprise Linux 7 Server Extra RPMs |
rhel-7-server-extras-rpms |
no |
Go to Content > Red Hat Repositories and search for the repository “Red Hat Enterprise Linux 7 Server Extra RPMs” listed under Available Repositories. When the repository shows up, expand it and enable the repository by clicking the plus sign next to it (Figure 10 shows how to do this). By enabling an additional repository, RHSS will download the RPMs for it.
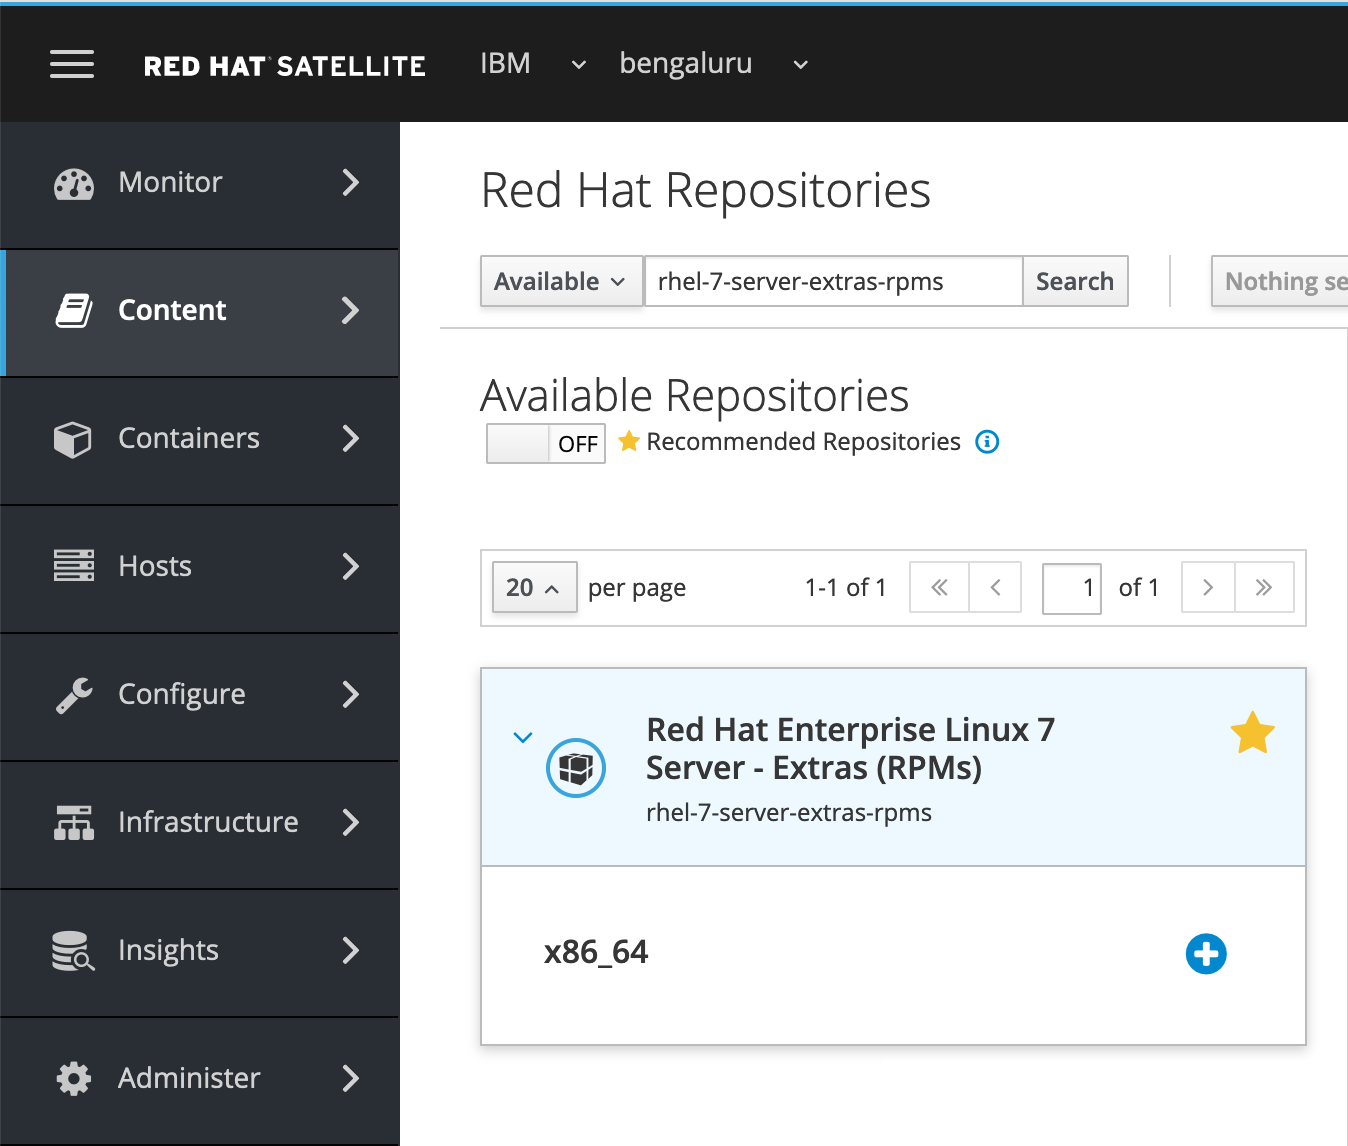
Figure 10: Enabling an additional Red Hat repository in RHSS
After it is enabled, you should see the repository “Red Hat Enterprise Linux 7 Server Extra RPMs” listed under Enabled Repositories as shown in Figure 11.
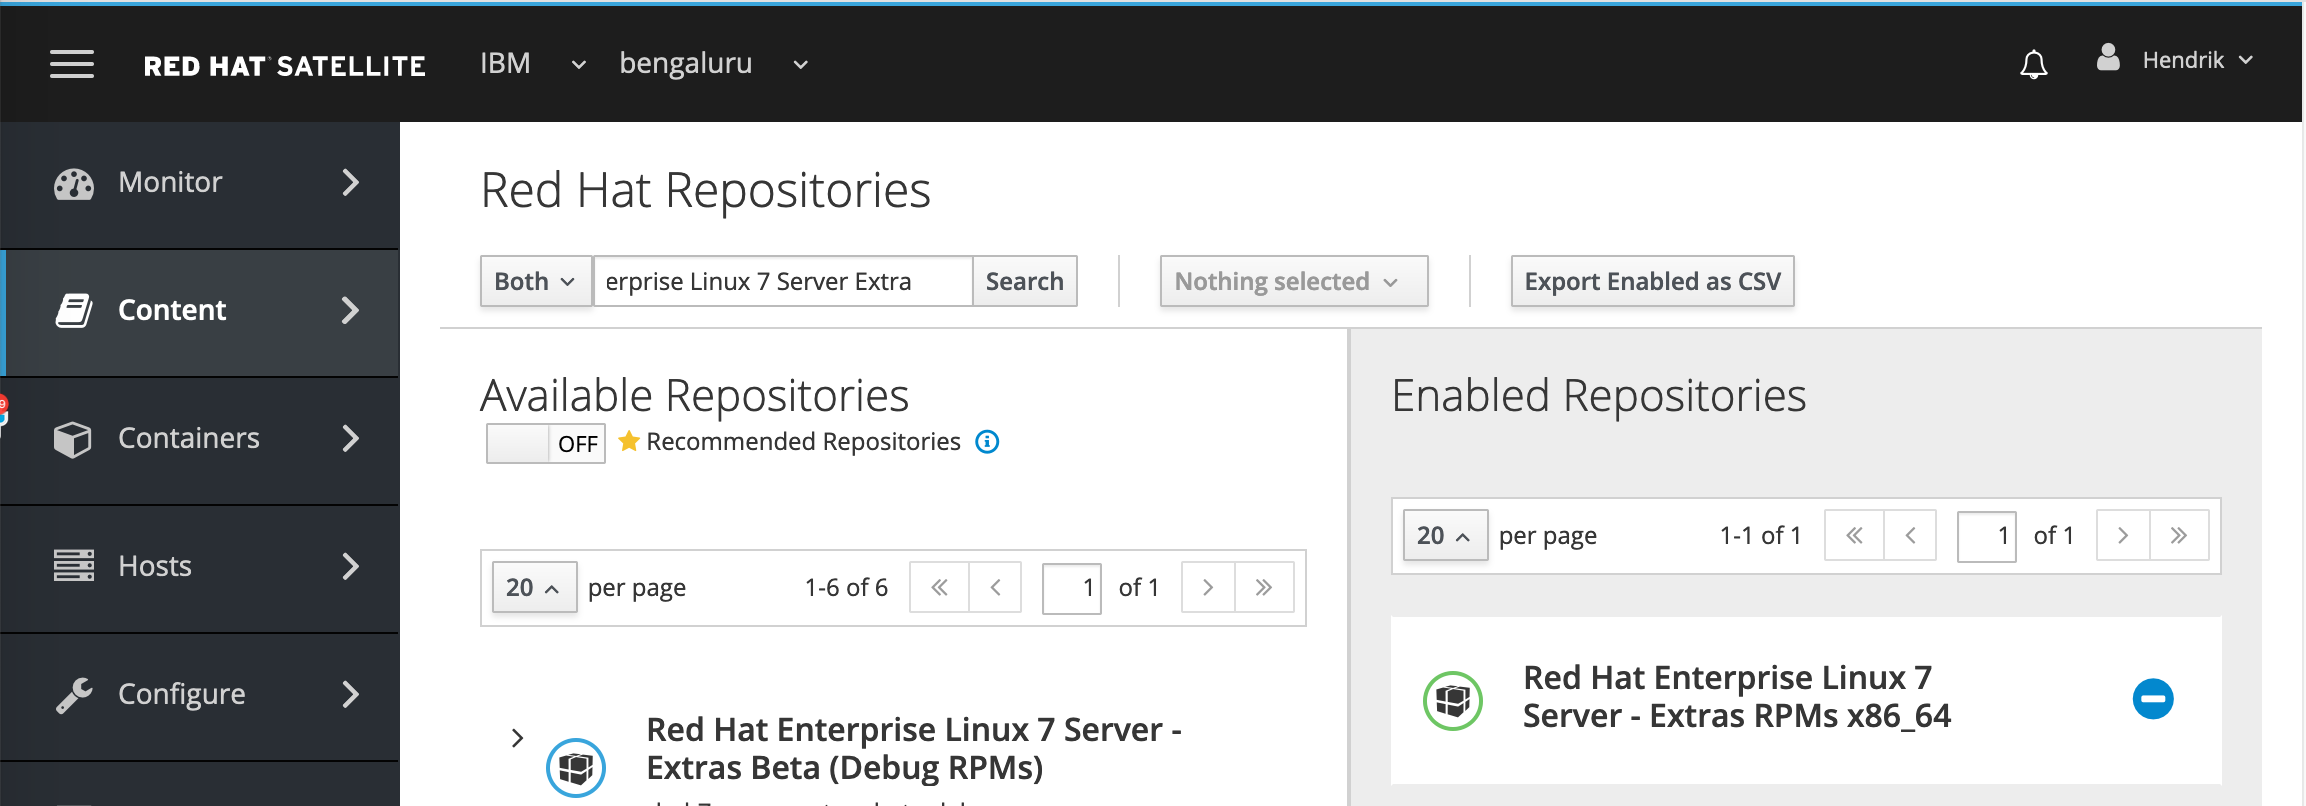
Figure 11: Viewing enabled Red Hat repository in RHSS
B. Synchronize required repositories
Go to Content > Sync Status, as shown in Figure 12, to confirm that the Result column shows a status of Syncing Complete for each repository or that they are downloaded. You may need to trigger the synchronization process or create a schedule to automatically perform the synchronization at regular intervals.
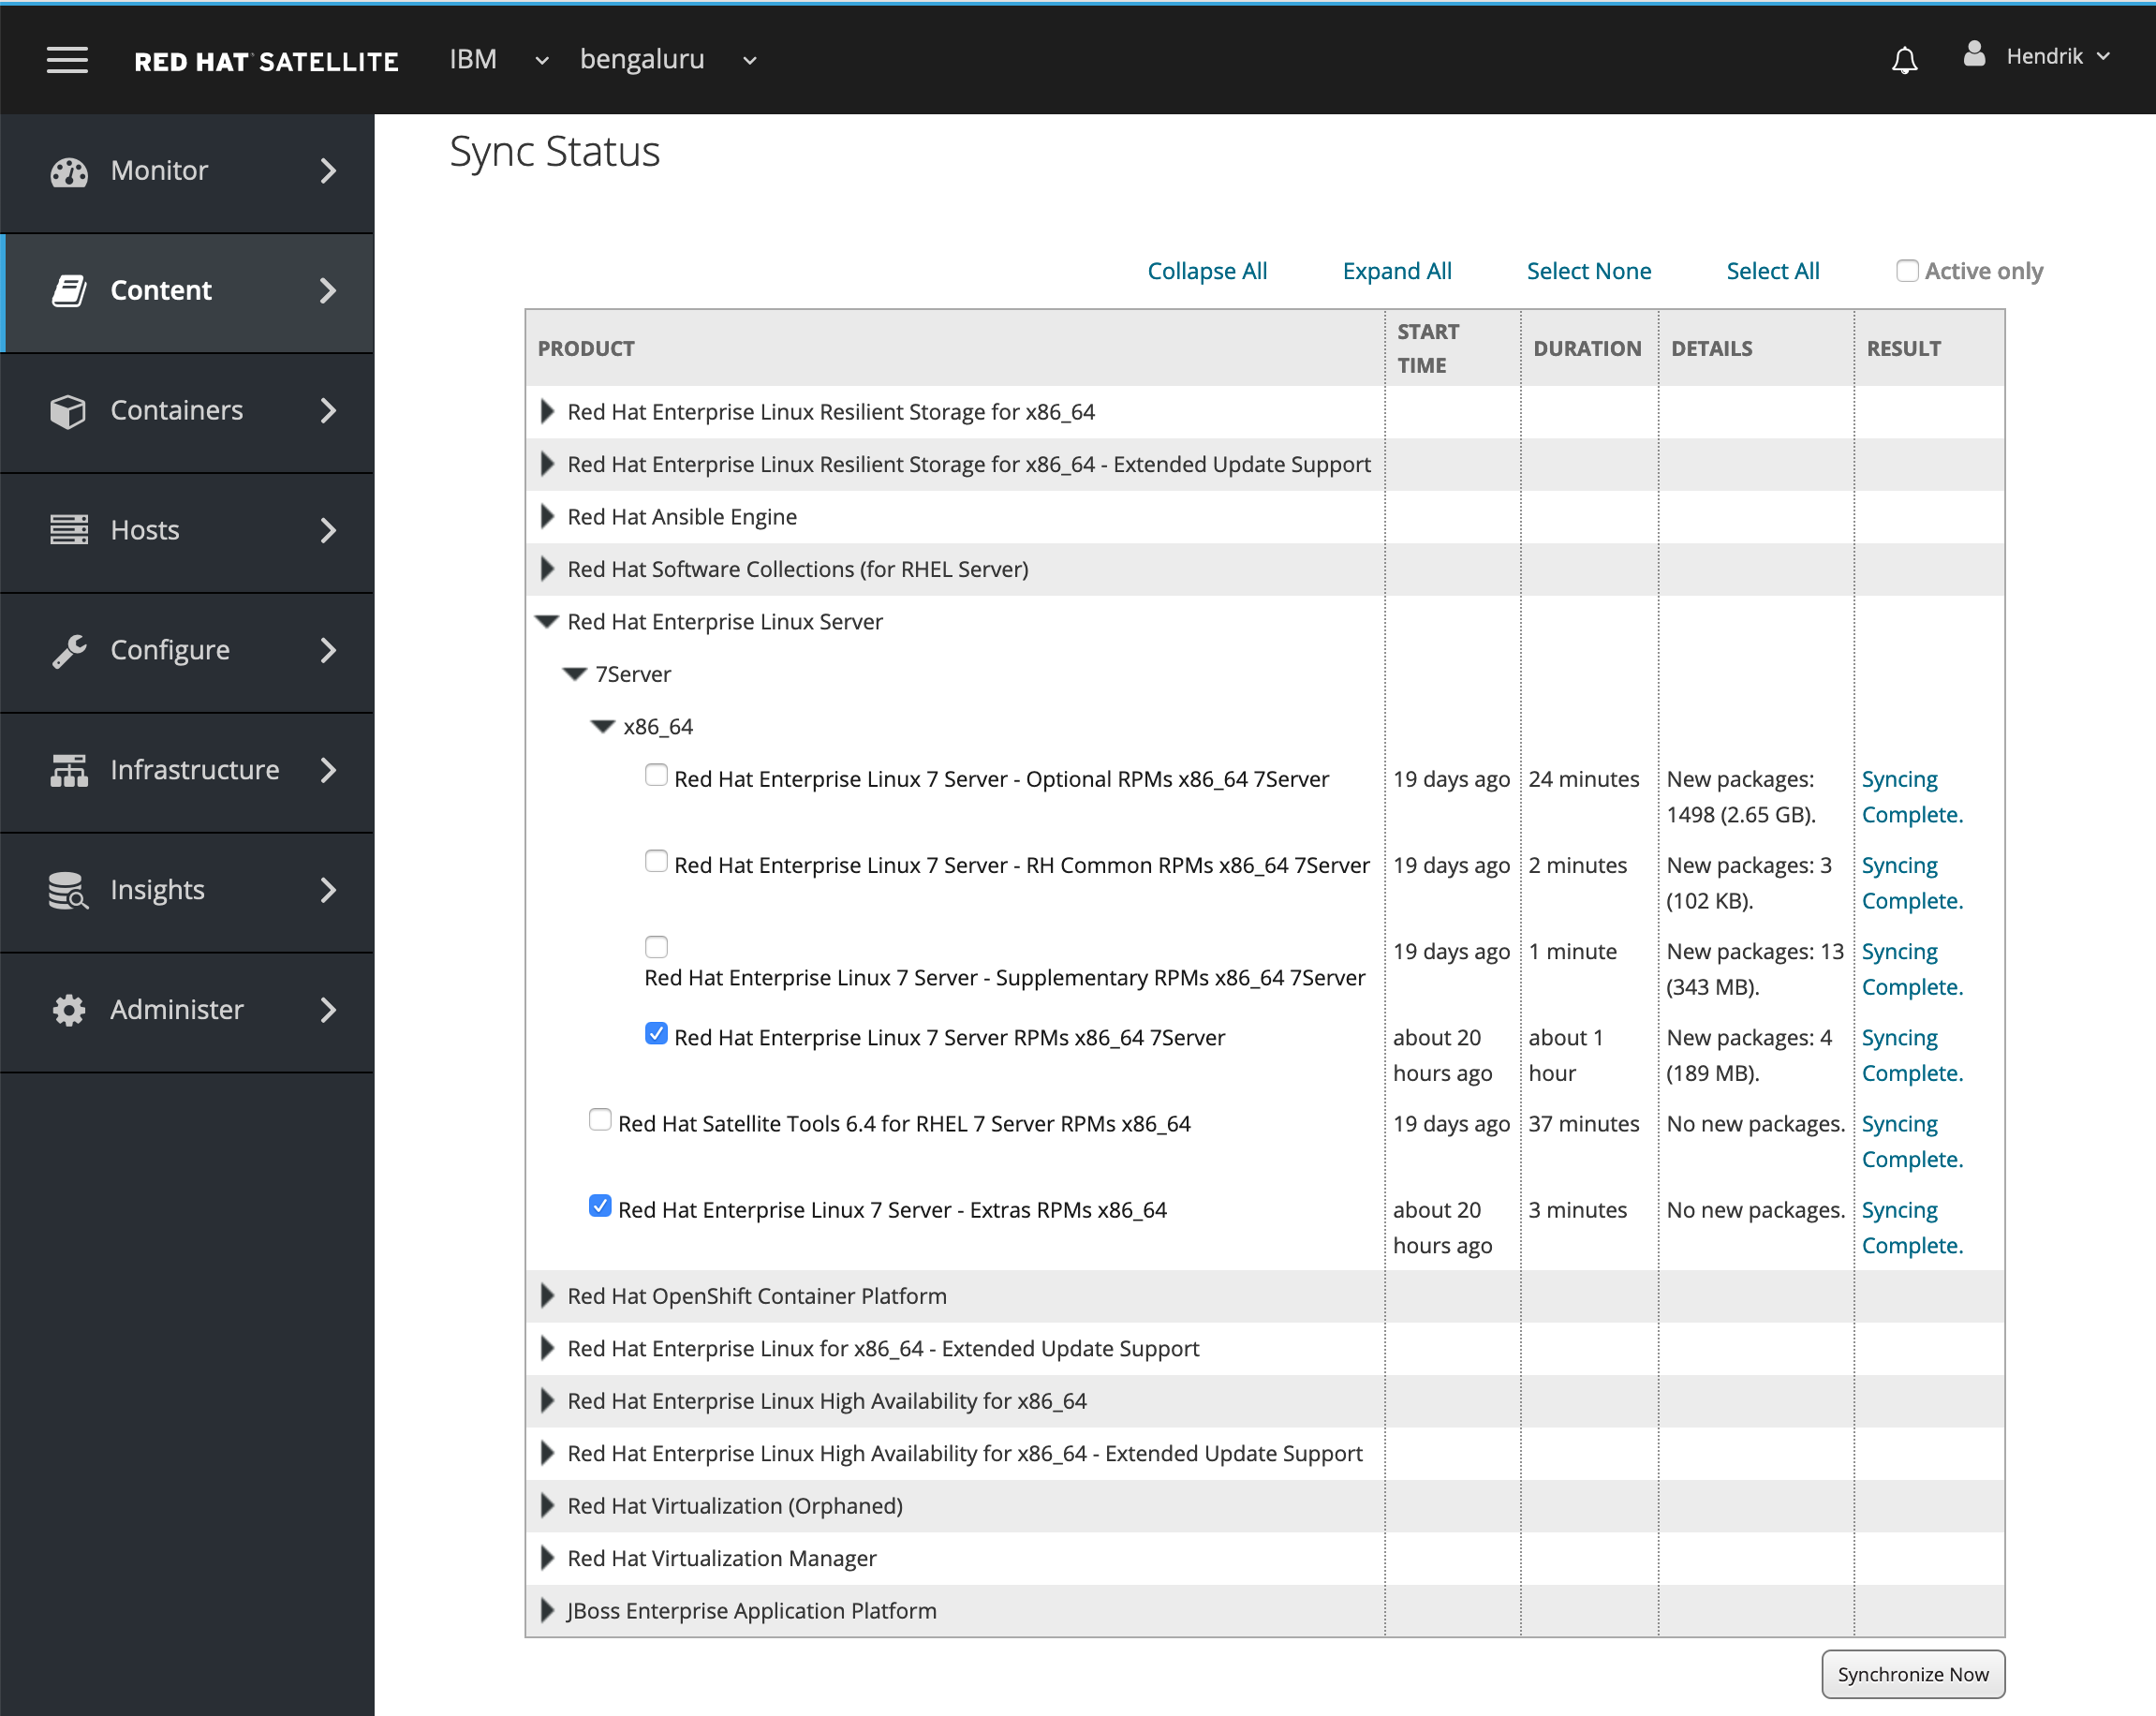
Figure 12: Confirming synchronization status of repositories in RHSS
C. Ensure that the required repositories are associated with the Content View
Go to Content > Content Views and find the Content View default_contentview. A Content View is associated with any VM that gets deployed and registered with RHSS. For example, it determines what RPMs they can “see.” This Content View needs to be updated to include the newly added repository.
Select the Yum Content tab. Under the Repository Selection section, select Add. You should see the Red Hat repository you enabled in Step 2. Select it and click Add Repositories as shown in Figure 13. When done, click Publish New Version.
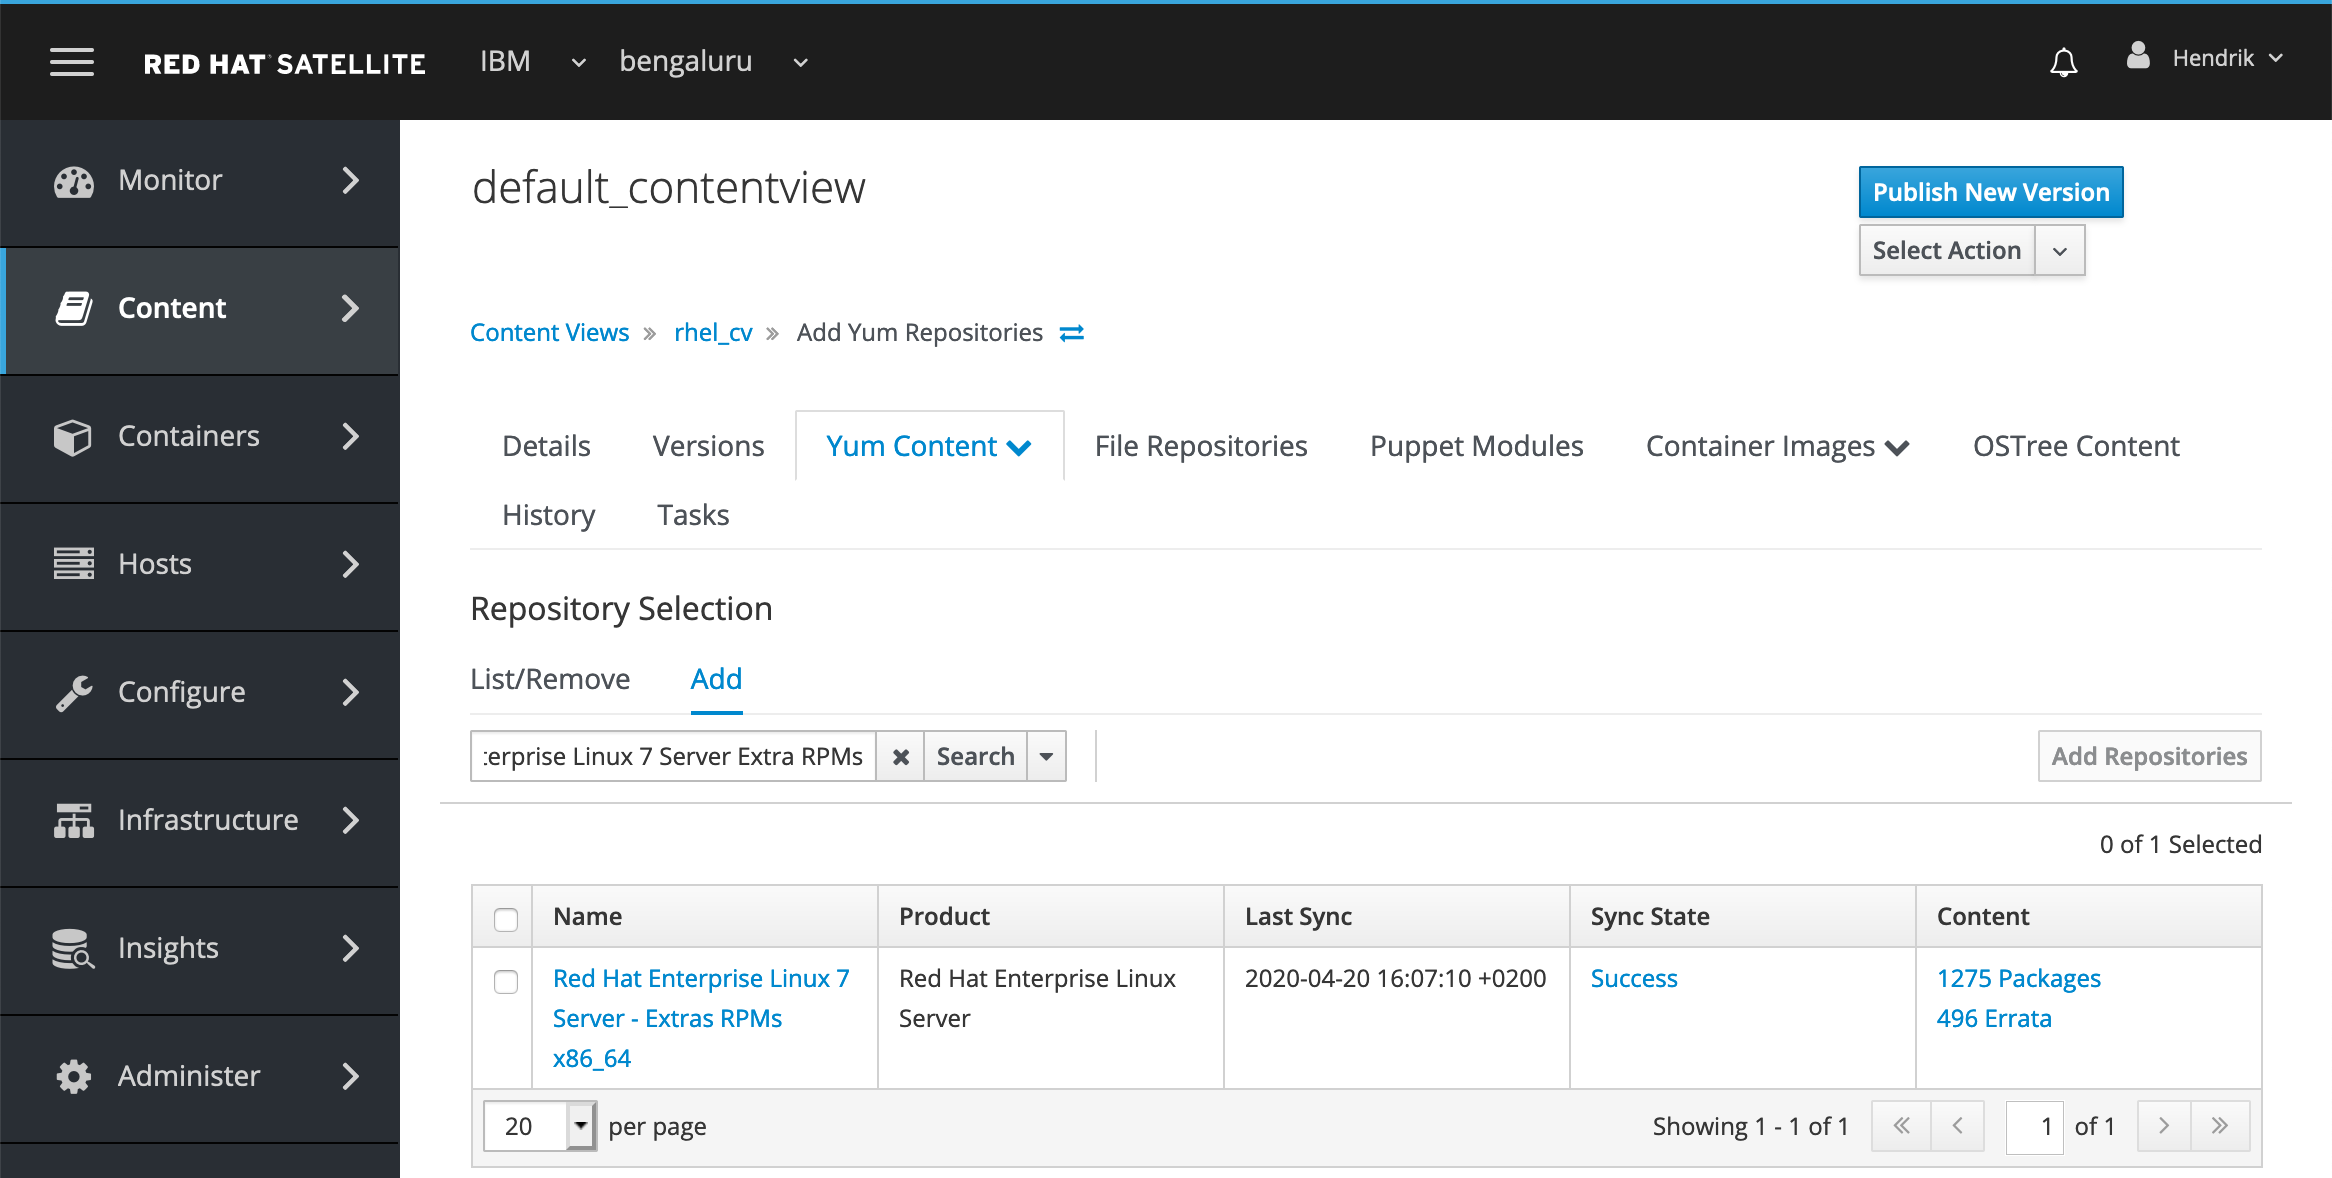
Figure 13: Adding new Red Hat repositories to Content View default_contentview in RHSS
D. Ensure that the Content View is associated with the Actication Key
Step 4. Before you proceed, make sure that the default_contentview page you just updated is associated with the activation key you use on IBM Cloud Pak System.
Confirm the activation key is associated with your content view by navigating to Content > Activation Keys, as shown in Figure 14.
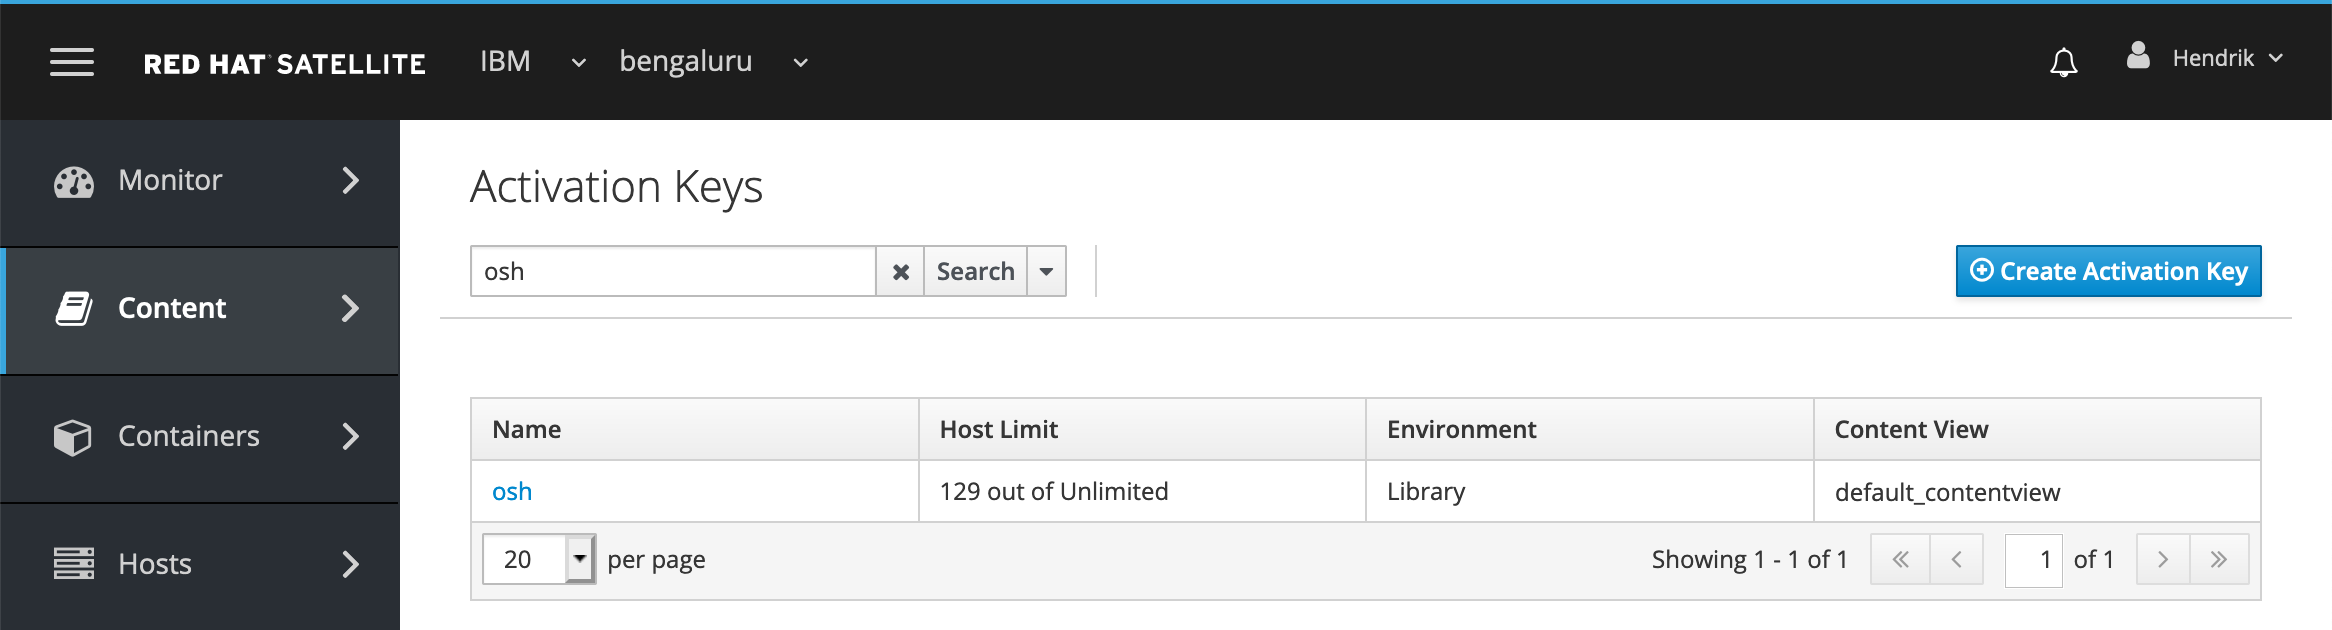
Figure 14: The osh activation key is associated with Content View default_contentview in RHSS
Within the Cloud Pak System, on the Shared Service Instances page, the deployed Red Hat Satellite Six Service instance shows the same activation key as shown in Figure 15.
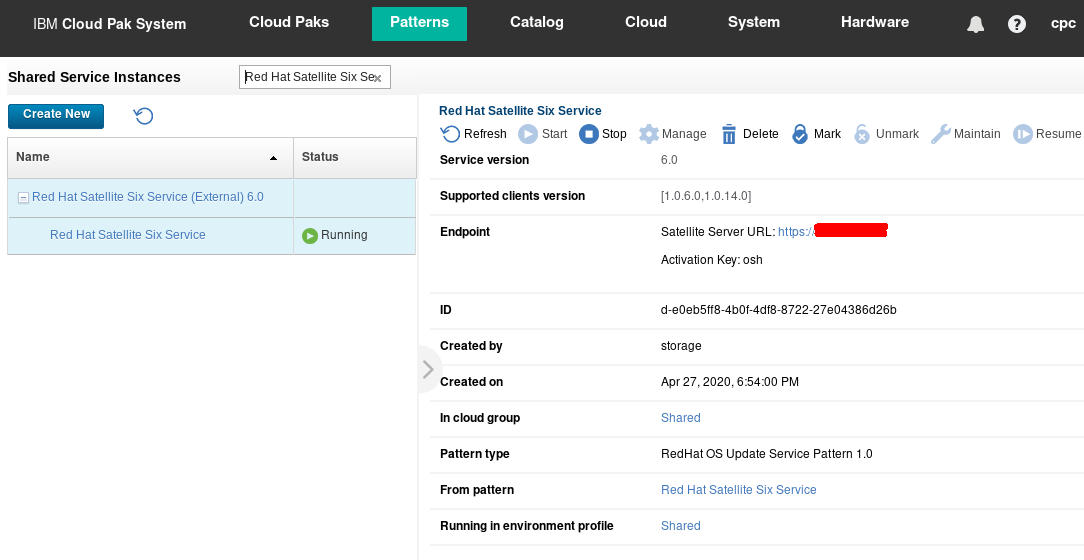
Figure 15: The Red Hat Satellite Six Service instance is associated with the osh activation key
E. Validate that the RPM packages from the requires repositories can be installed
Step 5. From a deployed VM that has registered with RHSS, confirm that you have an RPM package from each of the repositories at your disposal from the yum command line tool. The table below lists the repositories and an RPM for each of those.
| Repository |
RPM |
rhel-7-server-rpms |
syslinux |
rhel-7-server-extras-rpms |
ansible |
By default, only the repositories rhel-7-server-rh-common-rpms and rhel-7-server-rpms are automatically enabled when a VM is deployed on Cloud Pak System. When deploying the RHOCP 4 patterns, the repository rhel-7-server-extras-rpms gets automatically enabled by the Script Package of the Helper VMs in the Virtual System Pattern. However, on the deployed VM that you use for test purposes, manually enable this repository before you confirm that you can install a RPM from each.
-
While logged on as root, run the command below to enable the rhel-7-server-extras-rpms repository:
-bash-4.2# subscription-manager repos --enable rhel-7-server-extras-rpms
Repository 'rhel-7-server-extras-rpms' is enabled for this system.
-
Run the command yum info <RPM> to demonstrate that the RPM is at your disposal as shown below. Repeat the command for each RPM you need:
-bash-4.2# yum info syslinux
Failed to set locale, defaulting to C
Loaded plugins: package_upload, product-id, search-disabled-repos, subscription-manager
Available Packages
Name : syslinux
Arch : x86_64
Version : 4.05
Release : 15.el7
Size : 991 k
Repo : rhel-7-server-rpms/7Server/x86_64
Summary : Simple kernel loader which boots from a FAT filesystem
URL : http://syslinux.zytor.com/wiki/index.php/The_Syslinux_Project
License : GPLv2+
Description : SYSLINUX is a suite of bootloaders, currently supporting DOS FAT
 : filesystems, Linux ext2/ext3 filesystems (EXTLINUX), PXE network boots
 : (PXELINUX), or ISO 9660 CD-ROMs (ISOLINUX).
-
Finally, run the command yum install <RPM> to install the RPM. This will validate whether your RHSS has a local copy of the actual RPM and has any dependencies. Again, repeat the command for each of the RPMs:
-bash-4.2# yum -y install syslinux
Failed to set locale, defaulting to C
Loaded plugins: package_upload, product-id, search-disabled-repos, subscription-
 : manager
rhel-7-server-extras-rpms | 2.0 kB 00:00
rhel-7-server-rh-common-rpms | 2.1 kB 00:00
rhel-7-server-rpms | 2.0 kB 00:00
Resolving Dependencies
--> Running transaction check
---> Package syslinux.x86_64 0:4.05-15.el7 will be installed
--> Processing Dependency: mtools for package: syslinux-4.05-15.el7.x86_64
--> Running transaction check
---> Package mtools.x86_64 0:4.0.18-5.el7 will be installed
--> Finished Dependency Resolution

Dependencies Resolved

================================================================================
 Package Arch Version Repository Size
================================================================================
Installing:
 syslinux x86_64 4.05-15.el7 rhel-7-server-rpms 991 k
Installing for dependencies:
 mtools x86_64 4.0.18-5.el7 rhel-7-server-rpms 203 k

Transaction Summary
================================================================================
Install 1 Package (+1 Dependent package)

Total download size: 1.2 M
Installed size: 2.6 M
Downloading packages:
(1/2): mtools-4.0.18-5.el7.x86_64.rpm | 203 kB 00:00
(2/2): syslinux-4.05-15.el7.x86_64.rpm | 991 kB 00:01
--------------------------------------------------------------------------------
Total 1.0 MB/s | 1.2 MB 00:01
Running transaction check
Running transaction test
Transaction test succeeded
Running transaction
 Installing : mtools-4.0.18-5.el7.x86_64 1/2
 Installing : syslinux-4.05-15.el7.x86_64 2/2
Uploading Package Profile
Loaded plugins: product-id, subscription-manager
Loaded plugins: product-id, subscription-manager
Loaded plugins: product-id, subscription-manager
 Verifying : mtools-4.0.18-5.el7.x86_64 1/2
 Verifying : syslinux-4.05-15.el7.x86_64 2/2

Installed:
 syslinux.x86_64 0:4.05-15.el7

Dependency Installed:
 mtools.x86_64 0:4.0.18-5.el7

Complete!
You have now completed the preparation of RHSS for deployment of OCP.
-
Deploy a Private Docker Registry on IBM Cloud Pak System
The deployment of OCP requires access to a Docker Registry containing the required Docker images. Red Hat provides access to those through registry.redhat.io, however, most IBM Cloud Pak System clients do not allow the deployment of VMs with direct internet access. So, the use of a Private Docker Registry is required instead and populated with the Docker images for the OCP.
IBM Cloud Pak System provides the Cloud Paks Docker Private Registry Virtual System Pattern to simplify the deployment of your own Private Docker Registry.
Note: If you already have a Private Docker Registry in place, you can skip this step and go to Populate the Private Docker Registry with OpenShift Docker images section.
A. Deploy the Cloud Paks Docker Private Registry
While logged on to IBM Cloud Pak System, go to Patterns > Virtual System Patterns and look for the virtual system pattern called “Cloud Paks Docker Private Registry”, as shown in Figure 16. By default, it will deploy a VM with RHEL 7.7 and Docker version 18.06.1-ce. But what is new in IBM Cloud Pak System 2.3.2.0 is that this Virtual System Pattern now also automatically pushes and tags the Docker images for OpenShift 4.3.1 into the Docker Private Registry. Those Docker images were loaded into the Storehouse when we imported the BYOL binaries earlier.
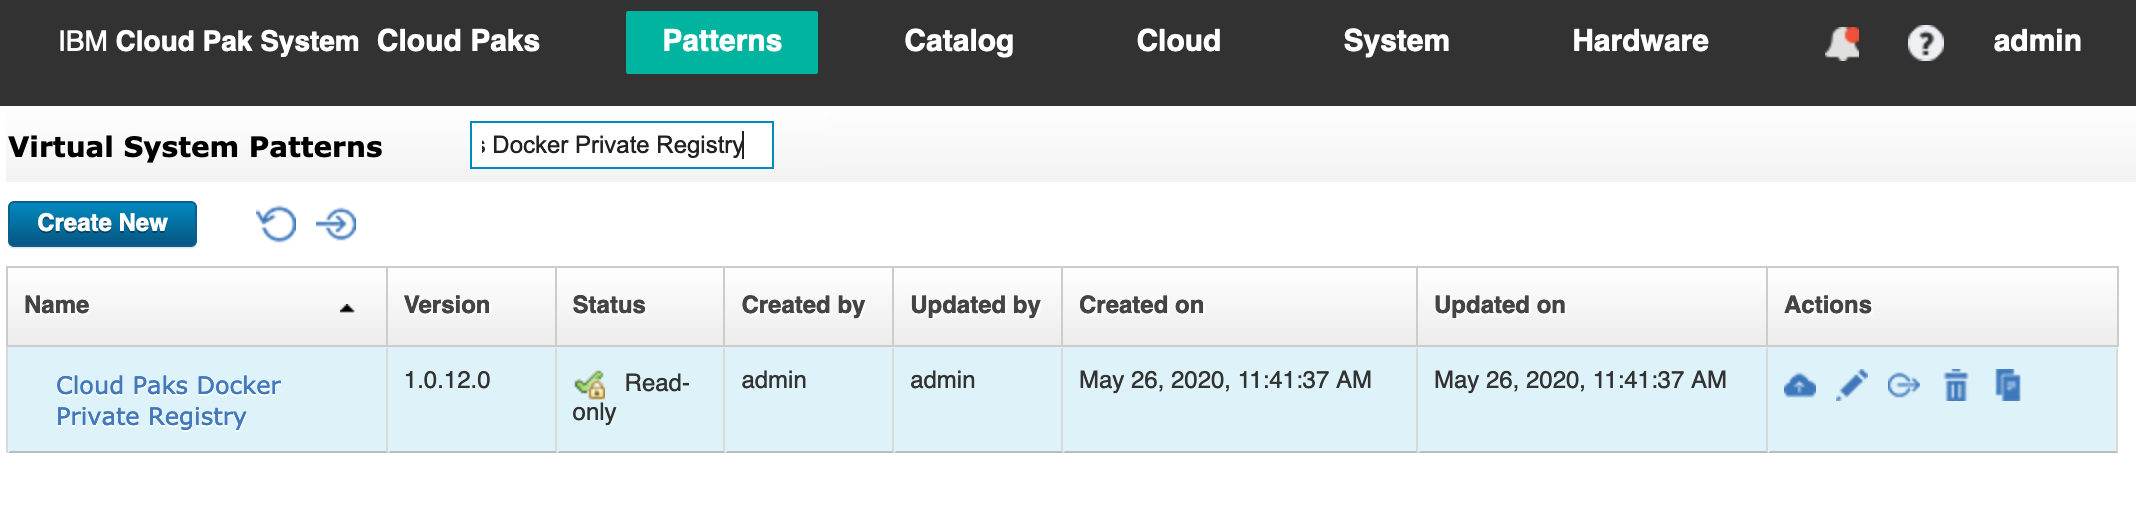
Figure 16: Cloud Paks Docker Private Registry virtual system pattern in IBM Cloud Pak System.
Click deploy icon as shown in Figure 17. Provide a Name for your Cloud Paks Docker Registry and ensure that you are targeting your Environment Profile, Cloud Group, and IP Group. Make sure to enter your own Password for root and virtuser, and finally expand import_ocp_docker_image to make sure it has ocpversion set to 4.3.1. This determines for which version of OpenShift the Docker images are automatically pushed and tagged into the new Docker Private Registry. Now, proceed to deployment by clicking Quick Deploy or Prepare to Deploy.

Figure 17: Deploying Cloud Paks Docker Private Registry virtual system pattern.
B. Validate that the Cloud Paks Docker Registry is ready
After it is deployed, log in to VM to confirm the version of RHEL and Docker.
-bash-4.2# cat /etc/redhat-release
Red Hat Enterprise Linux Server release 7.7 (Maipo)
-bash-4.2# docker --version
Docker version 18.06.1-ce, build e68fc7a
Now, verify that the OpenShift 4.2.18 Docker Images are present in the Docker Private Registry:
-bash-4.2# wget --no-check-certificate -cq -O - https://<private docker registry host>/v2/ocp4/openshift4/tags/list |
\python -mjson.tool
{
 "name": "ocp4/openshift4",
 "tags": [
 "4.3.1-cluster-config-operator",
 "4.3.1-cluster-image-registry-operator",
 "4.3.1-openshift-state-metrics",
 "4.3.1-console",
 ...
 ...
 "4.3.1-console-operator",
 "4.3.1-prometheus-alertmanager",
 "4.3.1-cluster-policy-controller",
 "4.3.1-machine-api-operator",
 ]}
Finally, confirm that you can pull an OpenShift 4.3.1 Docker Image from the Docker Private Registry:
-bash-4.2# docker pull <private docker registry host>/ocp4/openshift4:4.3.1-ovn-kubernetes
Trying to pull repository cps-r81-9-46-123-44.rtp.raleigh.ibm.com/ocp4/openshift4 ...
4.3.1-ovn-kubernetes: Pulling from <private docker registry host>/ocp4/openshift4
964d57e311cc: Pull complete
6d1814359c74: Pull complete
104cc276e39f: Pull complete
92d368863ef4: Pull complete
c710f3690fe9: Pull complete
Digest: sha256:491dd120e4b2746aa919542f7284526094c62fa61b6adc11f8a441cd7ea64234
Status: Downloaded newer image for <private docker registry host>/ocp4/openshift4:4.3.1-ovn-kubernetes
-
Deploy Cloud Pak System Registry Service
Multiple deployments of OCP can pull images from the same Cloud Paks Docker Private Registry configured in the previous step. A Shared Service is used to automatically pass the information about how to access the Cloud Paks Docker Private Registry to each of the OCP deployments. Go to Patterns > Shared Services to deploy the Cloud Pak System Registry Service as shown in Figure 18.
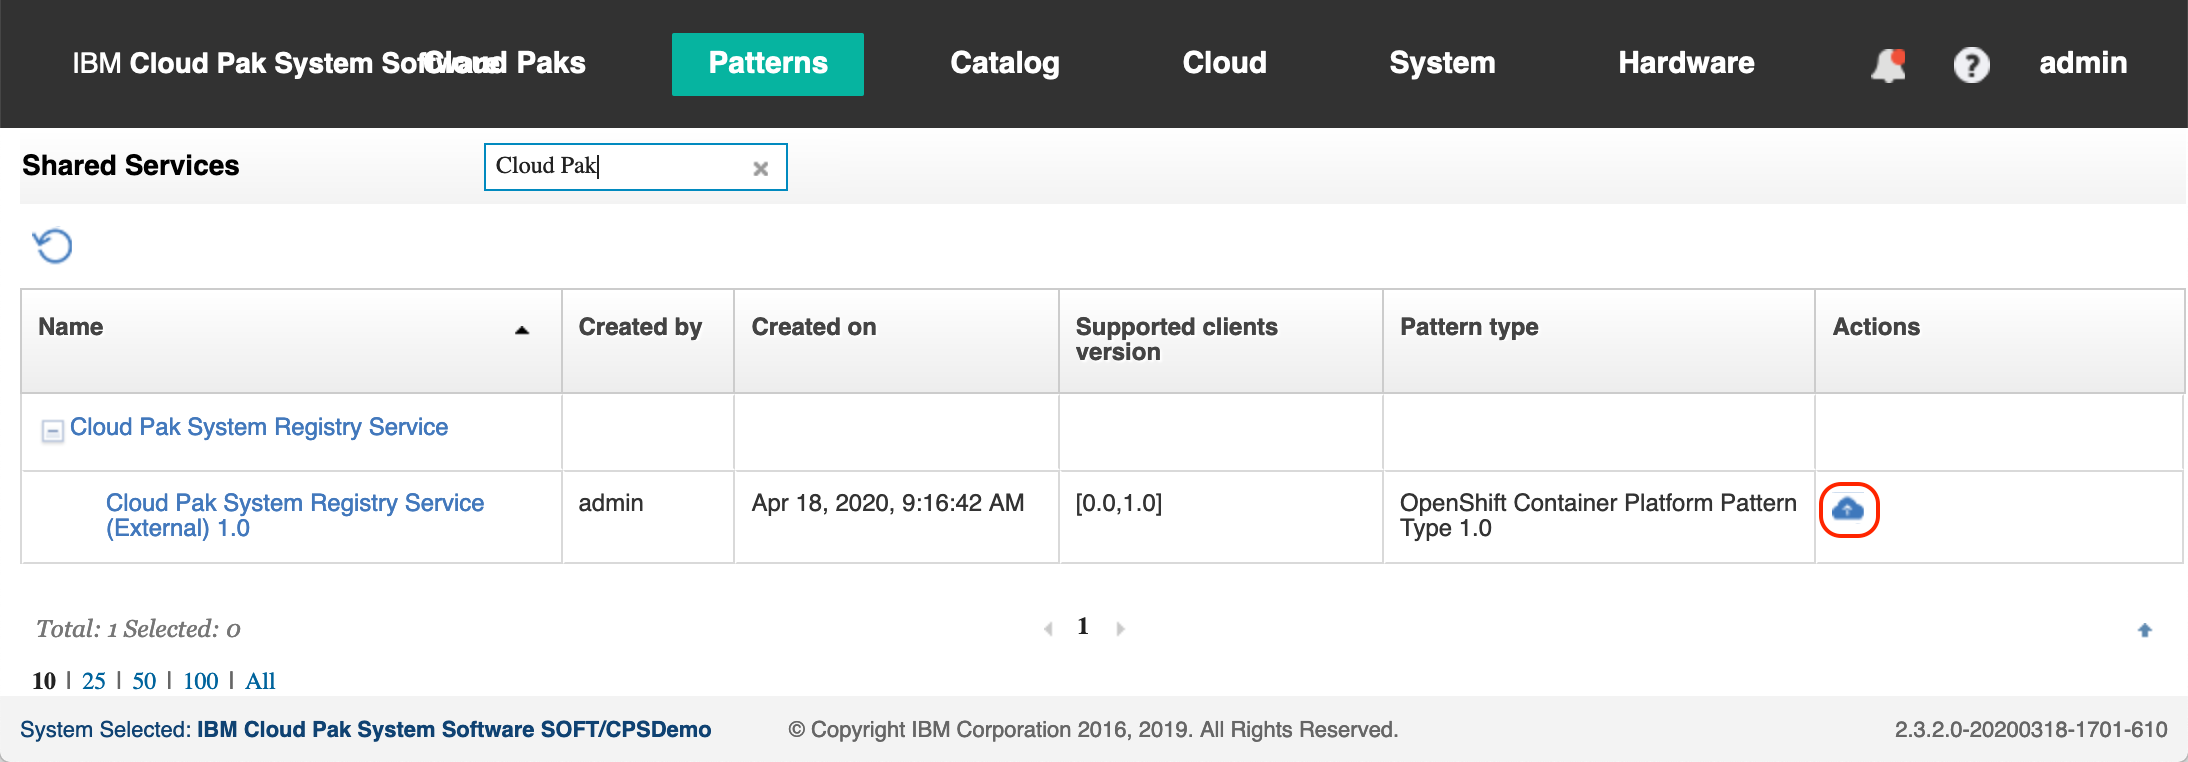
Figure 18: The Cloud Pak System Registry Service shared service.
Ensure that you are targeting your Environment Profile and Cloud Group for the shared service. Enter the following parameters as shown in Figure 19. Finally, click Quick Deploy to deploy the shared service.
- Docker Registry Server (Host name should be FQDN): Enter the FQDN of the VM of the Docker Private Registry you deployed on IBM Cloud Pak System
- Helm Repository Server (Host name should be FQDN): (Leave blank as we are now using Helm here)
- Docker Registry User Name: (Leave blank when using the Cloud Paks Docker Private Registry virtual system pattern as this deploys an Docker Private Registry that does not use authentication)
- Docker Registry User Password: (Leave blank when using the Cloud Paks Docker Private Registry virtual system pattern as this deploys an Docker Private Registry that does not use authentication)
- Helm Repository User Name: (Leave blank as we are now using Helm here)
- Helm Repository User Password: (Leave blank as we are now using Helm here)
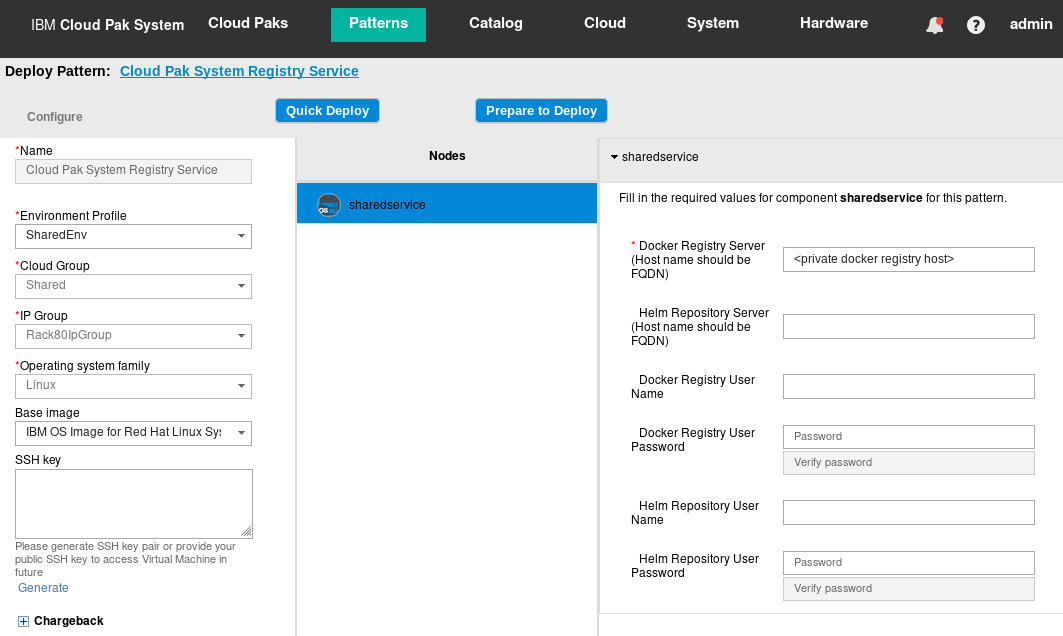
Figure 19: Deploying the Cloud Pak System Registry Service shared service.
Deployment should complete very quickly as there are no VMs associated with this shared service. Go to Patterns > Shared Services Instances. There you should see the “Cloud Pak System Registry Service” alongside the “Red Hat Satellite Six Service” as shown in Figure 20.
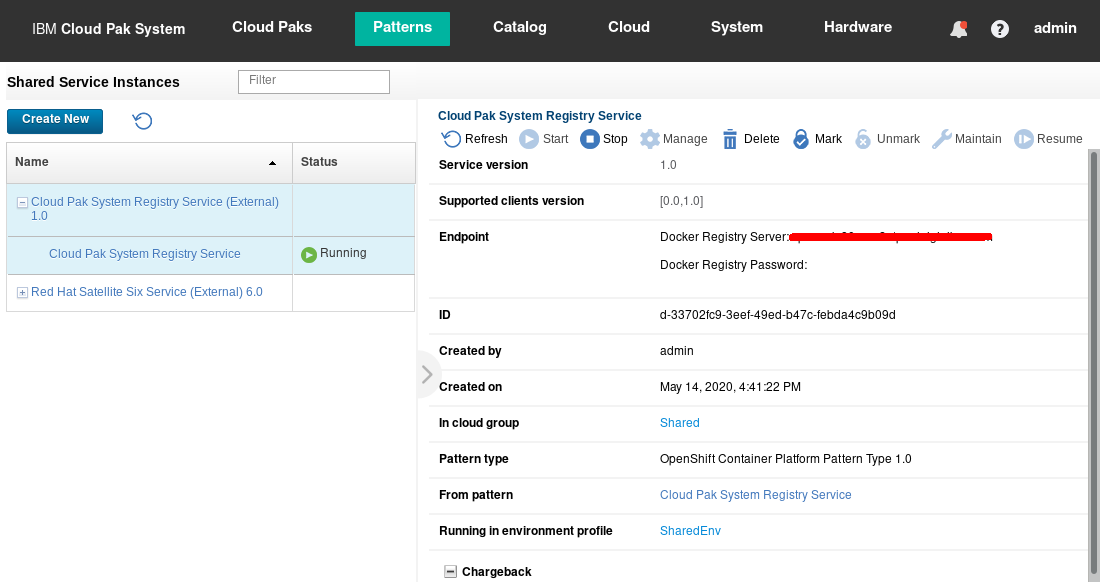
Figure 20: Deployed Cloud Pak System Registry Service shared service instance.
-
Exploring Red Hat OpenShift 4 cluster accelerator
With all the previous steps completed, you are now ready to deploy your first Red Hat OpenShift 4 cluster!
Go to Patterns > Virtual System Patterns and look for the pattern called OpenShift Container Platform 4 - HA version 1.0.0.0 as shown in Figure 21.
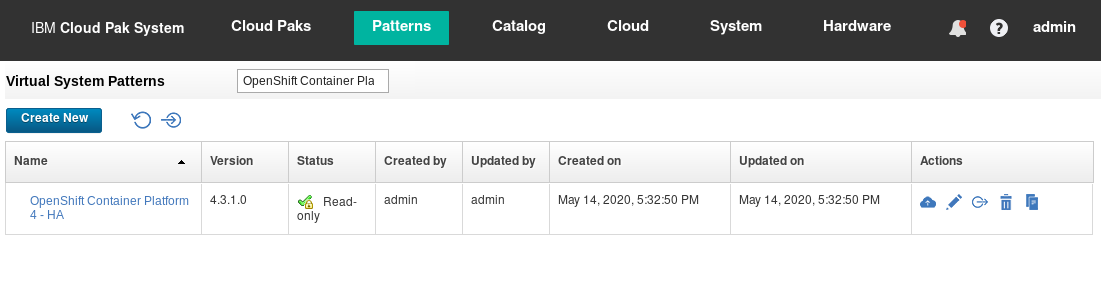
Figure 21: The OpenShift Container Platform 4 – HA Virtual System Pattern.
Open the pattern in the IBM Pattern Builder by clicking the Edit icon. This shows the topology and compoments of the OpenShift cluster VMs as shown in Figure 22:
-
PrimaryHelper and SecondaryHelper
There are two Helper nodes running RHEL 7.7 that support the OpenShift Cluster deployed on VMs having Red Hat Core OS. The Helper node provides services for the OpenShift Cluster as documented here in the OpenShift 4 documentation: Helper Git Repository and Helper Blog. IBM implemented two Helper VMs and uses a floating IP address to provide high availability for these services.
-
Bootstrap
There is one Bootstrap node that is used to install the OCP control plane on the Master nodes. It is only used during installation of OCP.
-
Master
There are three Master nodes deployed on VMs running Red Hat Core OS. OpenShift 4 requires three Master nodes, ensuring high availability and quorum of essential Kubernetes services like etcd.
-
Worker
By default there are two Worker nodes deployed on VMs running Red Hat Core OS. This ensures high availability of containers running on those Worker nodes. Depending on the needs for your OpenShift cluster, you can opt for a higher number of Worker nodes or Worker nodes with more cpu and memory. Note that in IBM Cloud Pak System 2.3.2.0, it is possible to add more cpu and memory to Worker nodes after deployment (vertical scaling), but it is not possible to add additional Worker nodes to your OpenShift cluster after deployment (horizontal scaling). Horizontal scaling of OCP clusters is currently targeted for 2.3.3.0.
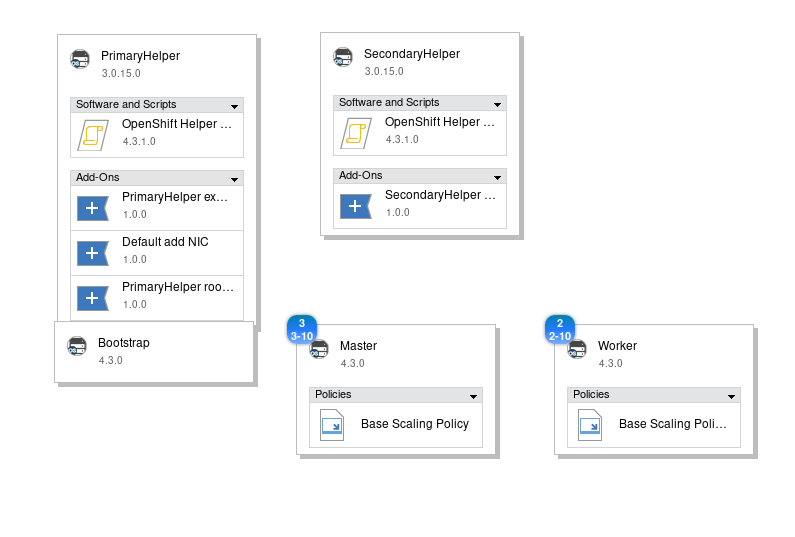
Figure 22: Examining the OpenShift Container Platform 4 – HA pattern in the IBM Pattern Builder.
As you can see from the table below, by default, a single OCP cluster requires 28 virtual CPUs, 112 GB of RAM, and 1874 GB of storage.
Depending on the number and sizing of the worker nodes, the amount of resources required could be higher of course.
| VM |
Number |
OS |
virtual CPUs |
RAM (GB) |
storage (GB) |
| Primary Helper |
1 |
RHEL 7.7 |
4 |
16 |
112 |
| Secondary Helper |
1 |
RHEL 7.7 |
4 |
16 |
12 |
| Bootstrap |
1 |
RH Core OS |
4 |
16 |
250 |
| Master |
3 |
RH Core OS |
4 |
16 |
250 |
| Worker |
2 |
RH Core OS |
4 |
8 |
250 |
| TOTAL |
8 |
– |
28 |
112 |
1624 |
Close the IBM Pattern Builder.
-
Deployment of Red Hat OpenShift 4 cluster
Go to CPS console https://<CPS_system_IP>/cps/catalog and login.
Click Deploy now and you will see OpenShift Container Platform and other cloud paks. Search for OpenShift Container Platform as shown in Figure 23.
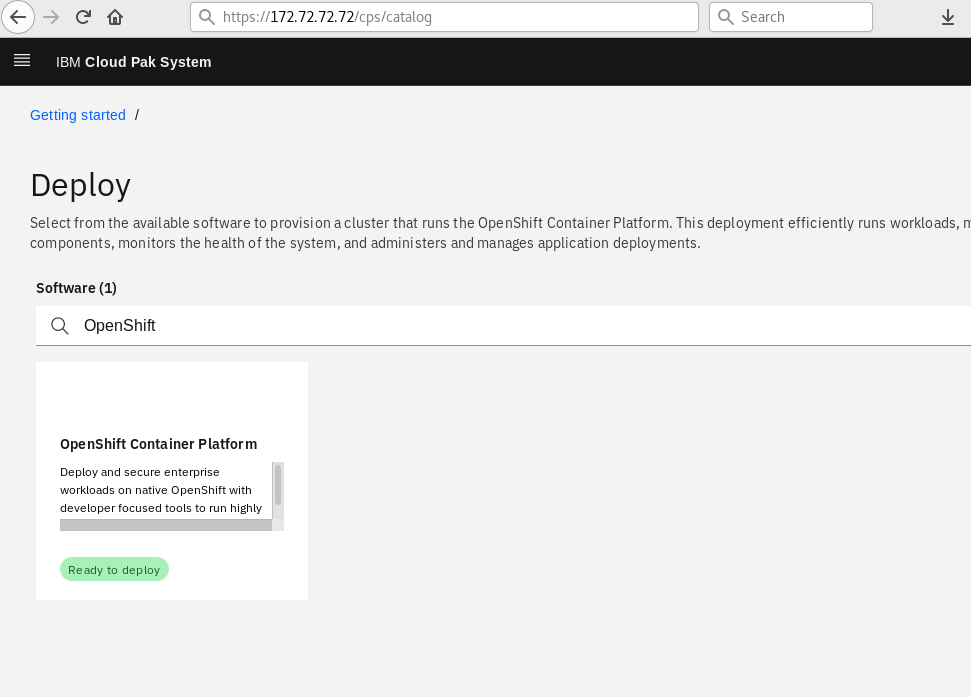
Figure 23: OpenShift Container Platform.
Click Ready to deploy to open the depoyment window. Enter the cluster name as shown in Figure 24 and continue.
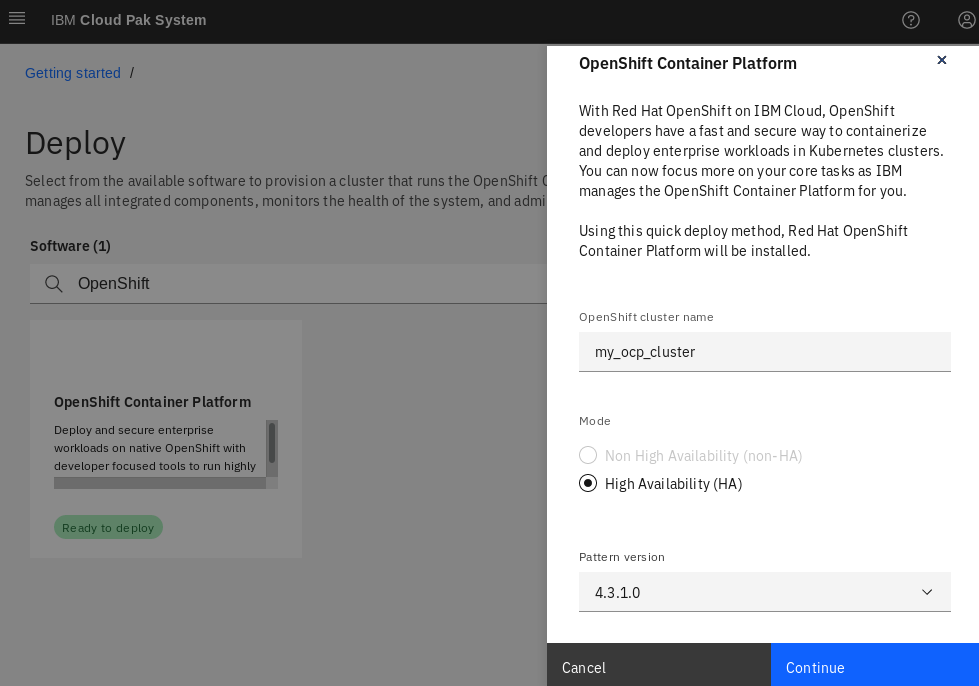
Figure24: OpenShift Container Platform 4 deploy.
Click Helper node credentials tab, and enter the credentials for root and virtuser.
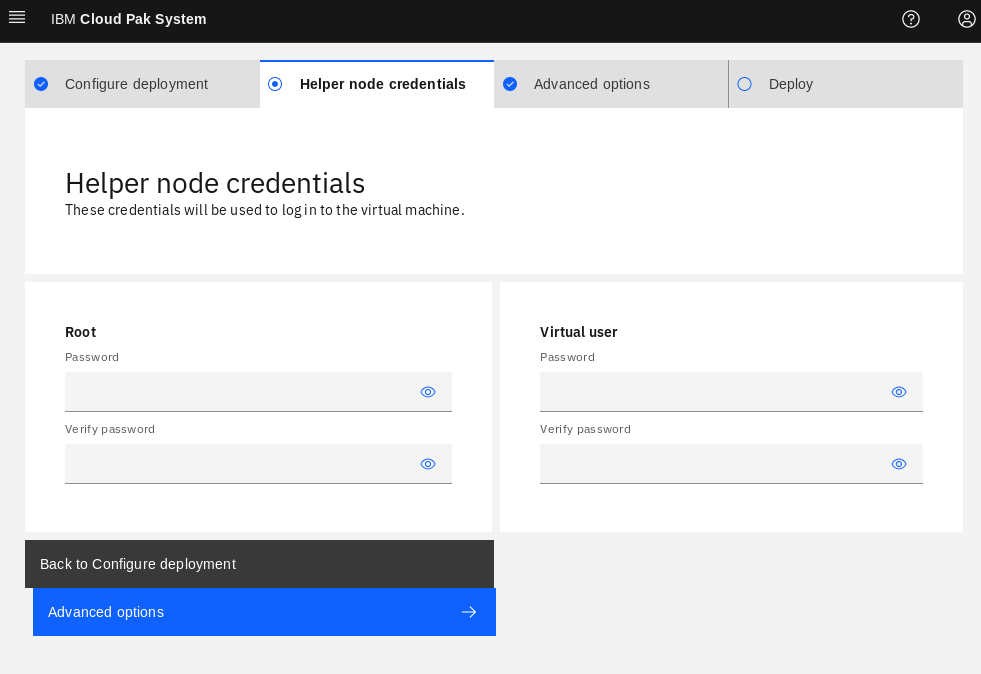
Figure25: Enter root and virtuser password.
root password for root user
virtuser password for virtuser user
Select Deploy tab and click deploy. A pop-up message will display saying “Cluster is now deploying” as shown in Figure 26. Now, you can select Go to clusters to see clusters page.
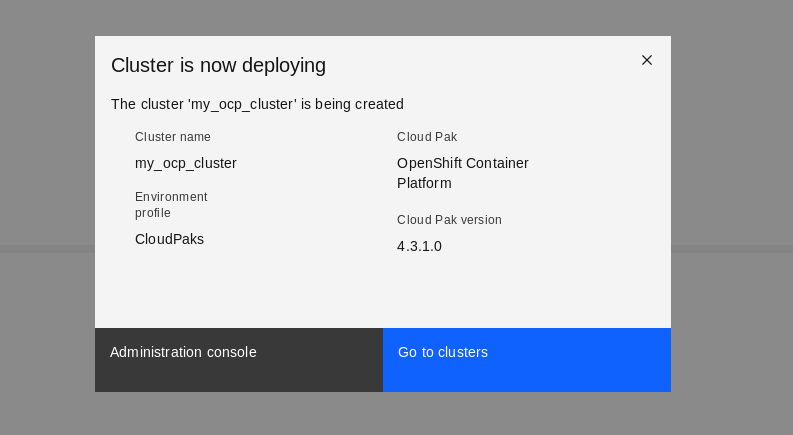
Figure26: Enter root and virtuser password.
Typically, deployment takes about 30-40 minutes. You can check for the status of the deployment in Clusters page as shown in Figure 27.
Note the link to OpenShift web console link on the top right as show in Figure 27. It will be available after the deployment is complete.
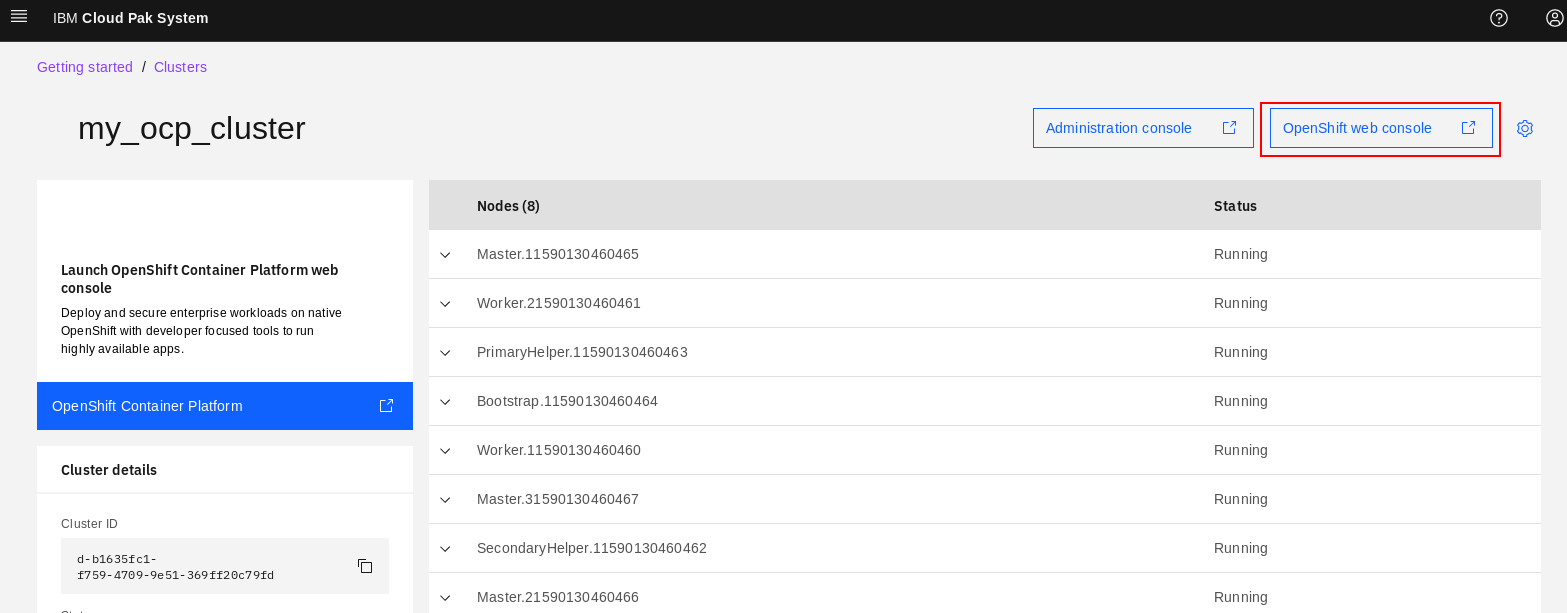
Figure 27: “OpenShift web console link on deployed OCP cluster
-
Post deployment actions
Upon completion, your status will change to running, and you can see it in Figure 28.
Before you can use the OpenShift 4 Cluster, a few more steps are required as documented in step 5 of Getting started with OpenShift Container Platform 4.x pattern. When you see the History section of your OCP cluster as shown in Figure 28, you will note that it tells you what needs to be done here.
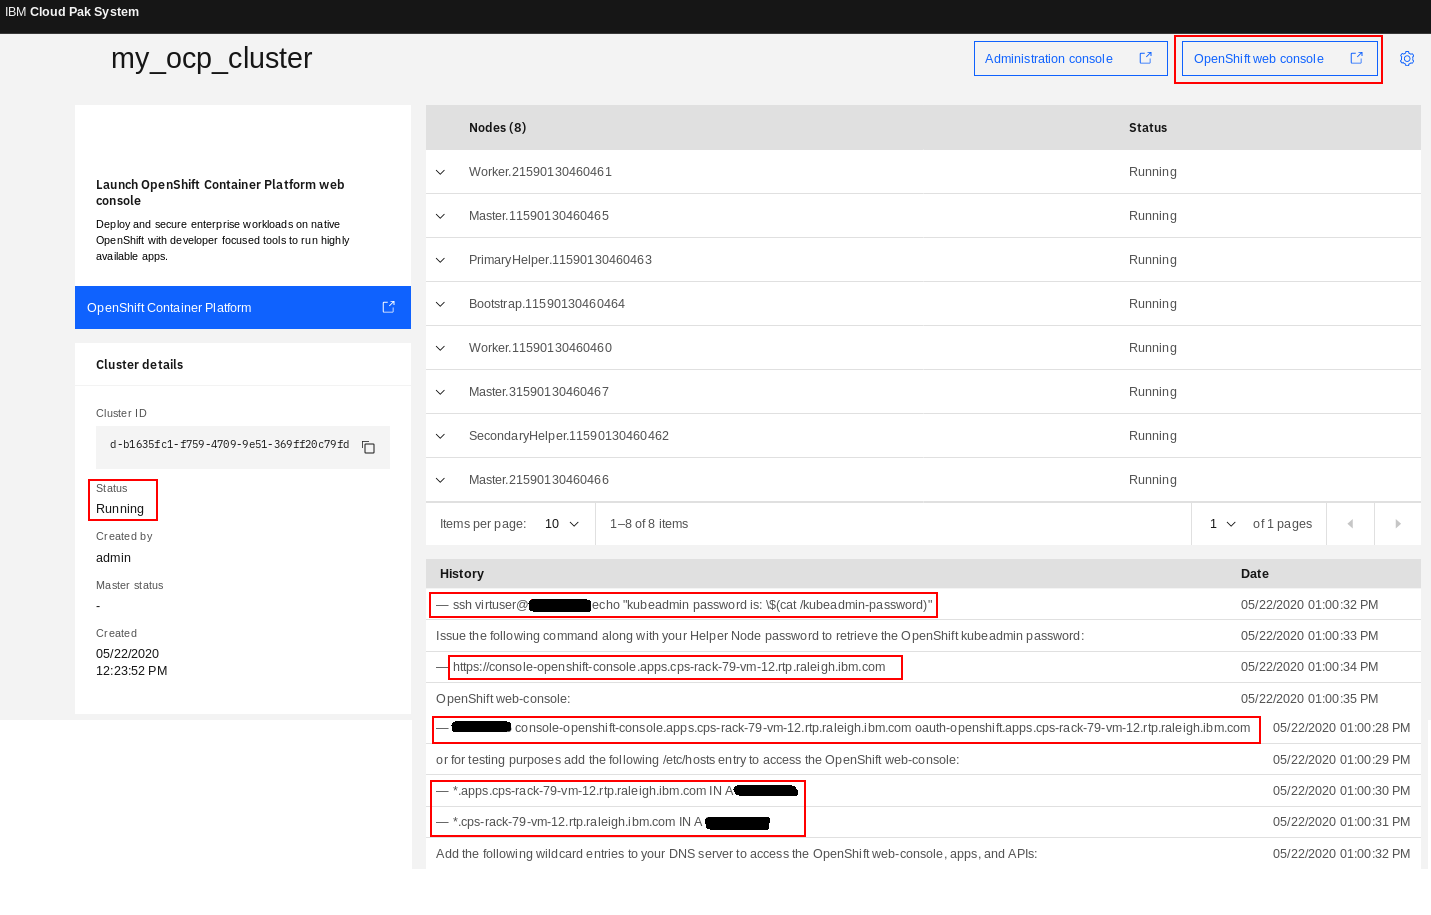
Figure 28: Post deployment steps shown under History of “my_ocp_cluster” cluster
A. Retrieve the password for kubeadmin
The kubeadmin password gets generated during the installation of OpenShift 4, it cannot be set as a parameter up front like that of OpenShift 3.x. Retrieve the kubeadmin password from the command line by using the generated command in the deployment history. Note that the IP address here is the floating IP address that automatically gets assigned to one of the two Helper node VMs. The password used in this command is the Helper node virtuser password that was entered at deploy time.
-bash-4.2# ssh virtuser@ocp_cluster_ip echo "kubeadmin password is: \$(cat /kubeadmin-password)"
virtuser@ocp_cluster_ip's password:
kubeadmin password is: PbSXq-WuzII-ahRS6-jTShp
kubeadmin password is: ***********************
B. Configure your DNS server
Set up the following two DNS wildcard entries for the floating IP address and fully-qualified domain name of your OpenShift 4 Virtual System Instance. This is required to access the OpenShift web-console, applications and APIs.
*.<fqdn> IN A <ip>
*.apps.<fqdn> IN A <ip>
In the case of our OpenShift 4 cluster here, the floating IP address is ocp_cluster_ip with corresponding fully-qualified domain name cps-rack-79-vm-12.rtp.raleigh.ibm.com. So you need the following DNS wildcard entries configured:
*.apps.cps-rack-79-vm-12.rtp.raleigh.ibm.com IN A 9.42.52.15
*.cps-rack-79-vm-12.rtp.raleigh.ibm.com IN A 9.42.52.15
If you are unable to easily make changes to your DNS server, you can add the following entries to your local /etc/hosts file (or equivalent on Windows) for testing purposes. This will allow you to logon to the OpenShift console, but note that you would need additional entries for any applications you would deploy later.
ocp_cluster_ip   console-openshift-console.apps.cps-rack-79-vm-12.rtp.raleigh.ibm.com \
oauth-openshift.apps.cps-rack-79-vm-12.rtp.raleigh.ibm.comigh.ibm.com
You can find more information about OpenShift external DNS requirements here. The DNS records listed as “This record must be resolvable by both clients external to the cluster …” are required. DNS is also provided on the Helper Nodes to cover the resolution inside the cluster.
If you are able to configure DNS records up front, then the cluster console link will be immediately accessible. Configuring DNS ahead of time is the recommended approach for deploying OCP clusters on CPS. You would need to create the following records in your DNS server for each IP in the IP group you are using to deploy (so that any IP that is selected from the IP group to be the floating IP for the cluster will already have wildcard entries associated with it in DNS):
*.sub.domain IN A <ip>
*.mycluster.sub.domain IN A <ip>
-
Access and Register your OpenShift cluster with Red Hat
You can now access your OpenShift 4 cluster using the OpenShift console link shown in Figure 29. Logon with the username kubeadmin and the password you retrieved earlier.
Figure 29: Logging in to OpenShift console of “my_ocp_cluster”
After you log in, go to Compute > Nodes as shown in Figure 30. You will notice that there are 3 Master nodes and 2 Worker nodes. This confirms that the OpenShift 4 cluster topology was deployed as expected.
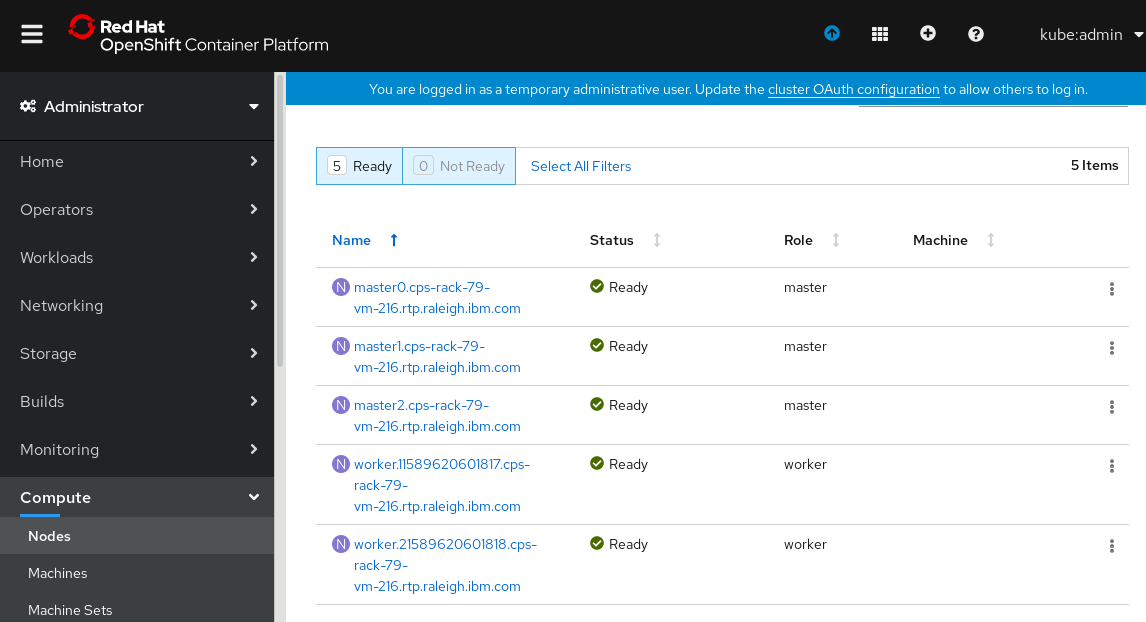
Figure 30: Confirming topology of “my_ocp_cluster” in the OpenShift console
Finally, do not forget to register your OpenShift cluster with Red Hat. This manual step is required if your OpenShift cluster does not have internet access to reach Red Hat. You can follow step 4 here to register your cluster on the “Cluster registration” page.
-
Conclusion
IBM Cloud Pak System 2.3.2.0 enables clients to quickly roll out one or more Red Hat OpenShift 4.3 clusters. The automation greatly simplifies the process, ensures consistency and avoids human error. This is also used as the foundation for the deployment of IBM Cloud Paks on the platform.
Special thanks to Hendrik Van Run, for this tutorial includes content from the recipe written by him.
Also I would like to thank Bhavya Bapna & Rahul Nema for all the help creating this tutorial.
source: https://developer.ibm.com/recipes/tutorials/deploying-redhat-openshift-4-3-on-ibm-cloud-pak-system/