In this article we will walk through the steps for creating database objects on Db2 z/OS or Db2 LUW from existing entities using IBM Data Server provider for Entity Framework Core Code First approach.
Code First support in IBM Data Server provider for Entity Framework Core is introduced from package version 2.0. Package containing this support is available NuGet repository.
Prerequisite:
-
Visual Studio 2017 or Visual Studio 2019 or Visual Studio 2019 Preview
-
.NET 6, .NET 5 or .NET Core 3.1
To start with, we will create Core Console Application:
Step 1: Create Console Application named as "MyCodeFirstApp".
Step 2: Install IBM Data Server provider for Entity Framework Core.
Step 3: Install Microsoft.EntityFrameworkCore.Tools package from Nuget.
Step 4: Now we need to create two classes, one is entity class named as "Student", this class will be used for mapping the Table. Second class we will create named as "SchoolContext", this will represent our database context.
Student.cs:
using System.ComponentModel.DataAnnotations;
using System.ComponentModel.DataAnnotations.Schema;
using System;
namespace MyCodeFirstApp
{
public class Student
{
[Key]
[DatabaseGenerated(DatabaseGeneratedOption.None)]
public int Id { get; set; }
[Column(TypeName ="varchar(100)" )]
public string LastName { get; set; }
[Column(TypeName ="varchar(100)" )]
public string FirstName { get; set; }
public DateTime EnrollmentDate { get; set; }
}
}
SchoolContext.cs:
using IBM.EntityFrameworkCore;
using IBM.EntityFrameworkCore.Storage.Internal;
using Microsoft.EntityFrameworkCore;
namespace MyCodeFirstApp
{
public class SchoolContext : DbContext
{
protected override void OnConfiguring(DbContextOptionsBuilder optionsBuilder)
{
if (!optionsBuilder.IsConfigured)
{
optionsBuilder.UseDb2(@"server=<HostName>:<Port>;uid=<User Name>;pwd=<Password>;database=<Database Name>; ", p=>{ p.SetServerInfo(IBMDBServerType.LUW); p.UseRowNumberForPaging(); });
}
}
public DbSet<Student> Student { get; set; }
protected override void OnModelCreating(ModelBuilder modelBuilder)
{
//Let's ensure the table name is Student
modelBuilder.Entity<Student>().ToTable( "Student" );
}
}
}
Step 5: From Package Manager Console run the following commands to add migration and create object in the database:
a. add-migration addStudent
b. update-database -verbose
Once we run the above commands, it will create a table named Student in the database.
| Note: Step 6 and 7 are optional. It is mentioned here for doing database object validation of the objects created as part of this blog. |
Step 6: Add below code in Program.cs file:
Program.cs:
// This file contains LINQ queries to insert and select a row into table.
using System;
using System.Linq;
namespace MyCodeFirstApp
{
public class Program
{
public static void Main(string[] args)
{
SchoolContext context = new SchoolContext();
//inserting record
insertRecord_Student(context);
//fetch record
fetchRecords_Student(context);
}
public static void insertRecord_Student(SchoolContext context)
{
Student newRecord = new Student
{
Id = 101,
FirstName="Tom",
LastName= " Jonas",
EnrollmentDate= new DateTime(2018,8,7)
};
context.Add(newRecord);
context.SaveChanges();
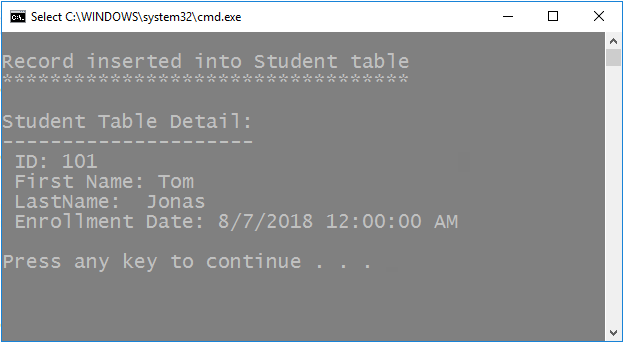
Console.WriteLine("\nRecord inserted into Student table" );
Console.WriteLine("**********************************");
}
public static void fetchRecords_Student(SchoolContext context)
{
Console.WriteLine("\nStudent Table Detail:" );
Console.WriteLine("---------------------" );
var results = context.Student.Where(c => c.Id == 101);
foreach (var record in results )
{
Console.WriteLine(" ID: " + record.Id + "\n First Name: " + record.FirstName
+ "\n LastName: "+ record.LastName +
"\n Enrollment Date: "+ record.EnrollmentDate);
}
if (results.Count() == 0)
Console.WriteLine("Record does not exist\n" );
}
}
}
Step 7: Run the application.
Output:
Running application on Linux:
Below changes are required to execute this application on Linux:
1. Un-install IBM.EntityFrameworkCore package and install IBM.EntityFrameworkCore-lnx package.
2. Set below paths, before executing application:
Setting the path when using Db2 .NET Core 2.0 package :
export DB2_CLI_DRIVER_INSTALL_PATH=$HOME/.nuget/packages/IBM.Data.DB2.Core-*lnx/<version>/build/clidriver/
export LD_LIBRARY_PATH=$HOME/.nuget/packages/IBM.Data.DB2.Core-lnx/<version>/build/clidriver/lib:$HOMEt/.nuget/packages/IBM.Data.DB2.Core-lnx/<version>/build/clidriver/lib/icc
export PATH=$HOME/.nuget/packages/IBM.Data.DB2.Core-lnx/<version>/build/clidriver/bin:$PATH
Setting the path when using Db2 .NET Core 3.1:
export DB2_CLI_DRIVER_INSTALL_PATH=$HOME/.nuget/packages/IBM.Data.DB2.Core-*lnx/<version>/buildTransitive/clidriver/
export LD_LIBRARY_PATH=$HOME/.nuget/packages/IBM.Data.DB2.Core-lnx/<version>/build/clidriver/lib:$HOMEt/.nuget/packages/IBM.Data.DB2.Core-lnx/<version>/buildTransitive/clidriver/lib/icc
export PATH=$HOME/.nuget/packages/IBM.Data.DB2.Core-lnx/<version>/buildTransitive/clidriver/bin:$PATH
Setting the path when using Db2 .NET5 packages:
export DB2_CLI_DRIVER_INSTALL_PATH=$HOME/.nuget/packages/net5.ibm.data.db2-lnx/<version>/buildTransitive/clidriver/
export LD_LIBRARY_PATH=$HOME/.nuget/packages/net5.ibm.data.db2-lnx/<version>/build/clidriver/lib:$HOMEt/.nuget/packages/net5.ibm.data.db2-lnx/<version>/buildTransitive/clidriver/lib/icc
export PATH=$HOME/.nuget/packages/net5.ibm.data.db2-lnx/<version>/buildTransitive/clidriver/bin:$PATH
Also, for connecting to DB2 for z/OS servers, if the license is not activated on the server, the license file should be placed under appropriate license folders as explained in the downloading and configuring of Db2 .NET NuGet packages
Points to remember for using IBM Data Server provider for Entity Framework Core :
For any further questions, please post a question in our discussion forum or contact IBM customer support.
Authored by Archana Soni.
Last updated on 8th September 2022.