Author(s): Divya Kamath, Vijaya Bhaskar R Siddareddi
Overview
IBM Infrastructure Automation is an offering available as a part of Cloud Pak for Watson AIOps (Ref-https://www.ibm.com/docs/en/cloud-paks/cloud-pak-watson-aiops/3.5.0?topic=infrastructure-automation). It brings together Terraform based Managed Services and Infrastructure Management capabilities for Architects and IT Operations teams.
With Managed Services, IT team can build self-services which can be used by various personas – like Developers and Testers – in the organization to provision infrastructure on their own, without the intervention of IT operators. With Infrastructure Management, day-2 operations on infrastructure spread across various environments – cloud / on-prem / hybrid – can be managed through a single pane of glass.
Enterprises typically have the need of positioning solution stacks in hybrid platforms including multiple public clouds and different on-prem data centres for various reasons like cost, proximity to customers, resource availability and security. When the infrastructure and application stack to be provisioned is complex or spread across multiple platforms, provisioning and managing those manually becomes challenging. Different skillsets would be required as the platforms to provision and manage infrastructure are different. Adhering to enterprise security policies and managing compliance across all platforms would become a tedious task.
IBM’s Infrastructure Automation provides a centralized hub using which resources pertaining to all hybrid platforms (like VPC, subnets, virtual machines, and load balancers) can be provisioned, followed by application stack deployment (like application server, database, application packages and containers) and day 2 operations (like start/stop/reset/reconfigure/delete virtual machines, and install security patches ) can be managed for the same.
Infrastructure as Code (IaC) using IBM Infrastructure Automation
IaC is all about provisioning and managing IT using code rather than through manual processes. Terraform is an open-source software tool which provides IaC capability.
IBM Infrastructure Automation has open-source Terraform embedded in it to provide powerful IaC capability along with service composer. Service composer is a simple-to-use graphical interface to build self-services, in which terraform templates can be orchestrated to create workflows along with Ansible playbooks for configuration management. Like terraform templates and Ansible playbooks, service blueprints provide IaC capability and can be stored in source control systems like GitHub and GitLab.
In this article we will explain about how to build a complete solution stack in a target environment using IBM Infrastructure Automation through following steps:
- Pick-up an existing terraform script and convert that into a terraform template in IBM Infrastructure Automation
- Create an Ansible (AWX: open source Ansible Tower) connection
- Create an AWS Cloud Connection
- Compose a Service using the (above) terraform template along with available Ansible playbooks from AWX.
- Publish service to catalog
- Deploy solution stack through self-service
- Verify the solution stack deployed
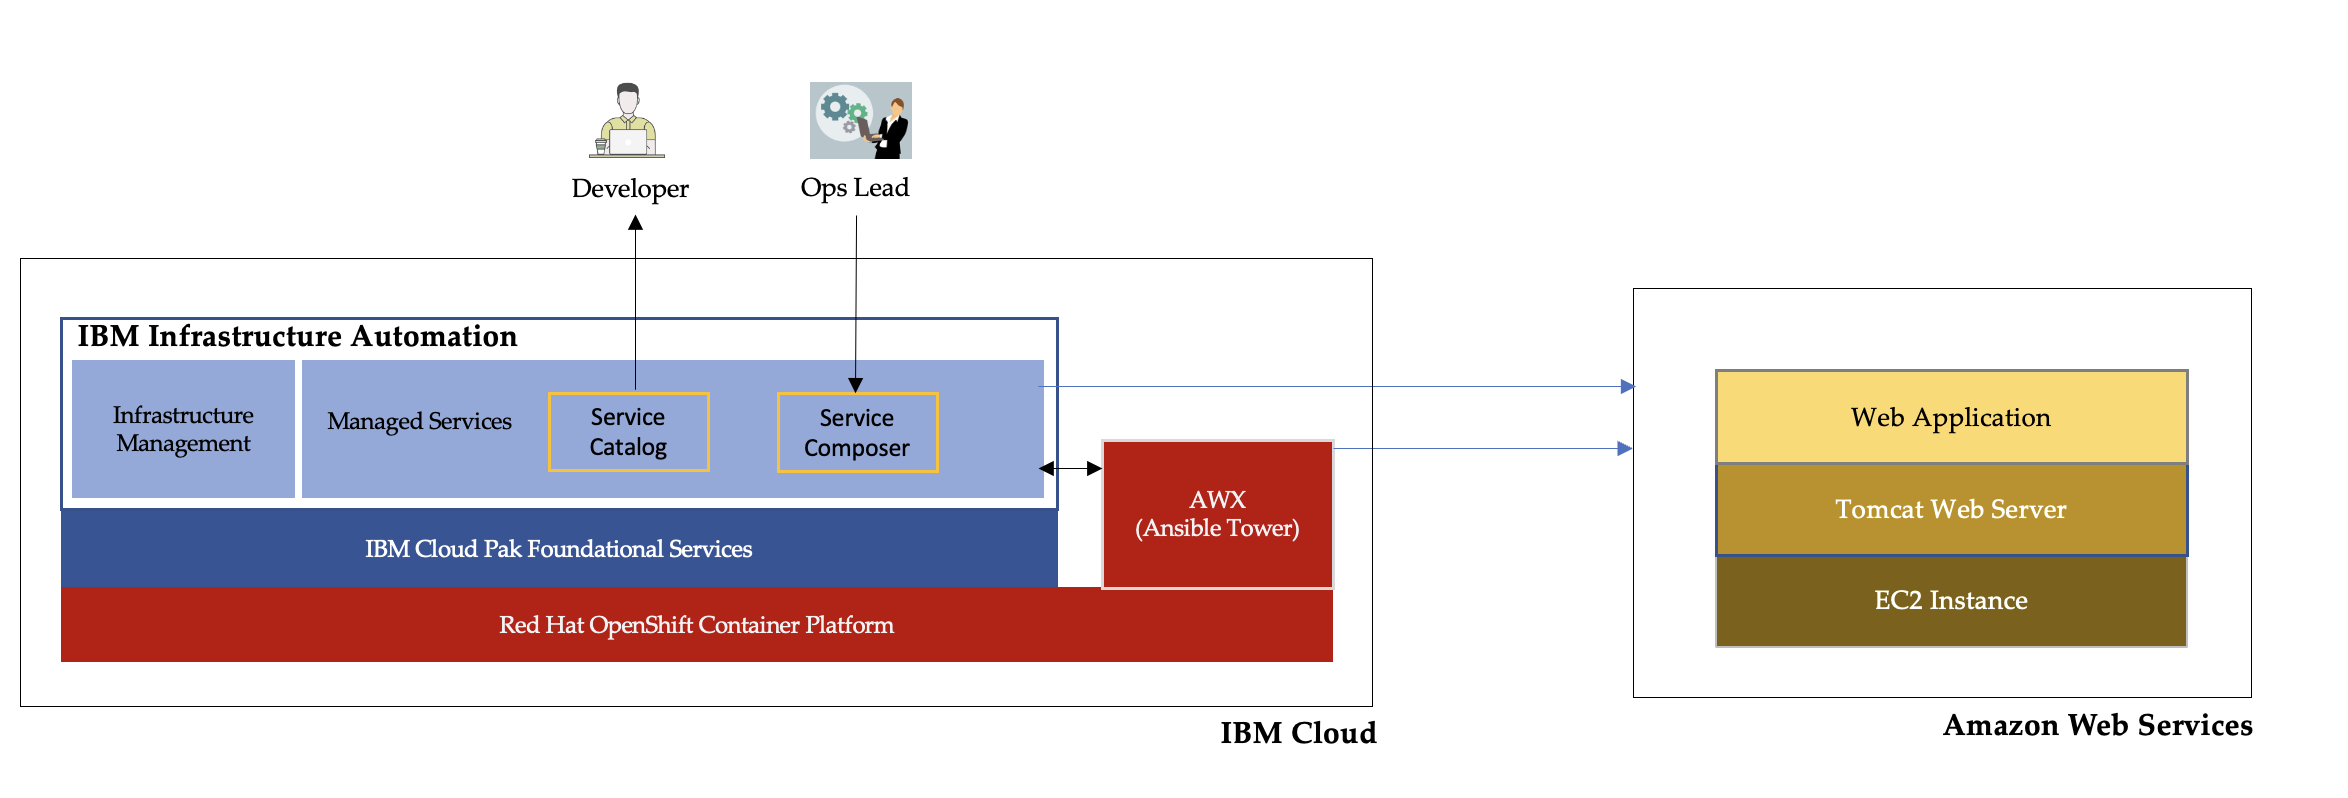
The overall Architecture of IBM Infrastructure Automation setup on IBM Cloud and the Solution Stack provisioned on AWS using that setup are represented in the diagram below:
Step 1: Pick up an existing terraform script and convert that into a terraform template
In this step, terraform script is imported into terraform template as needed by Managed Services. This terraform template would be used in building self-services.
1.1 Here is a terraform script which provisions an AWS EC2 VM:
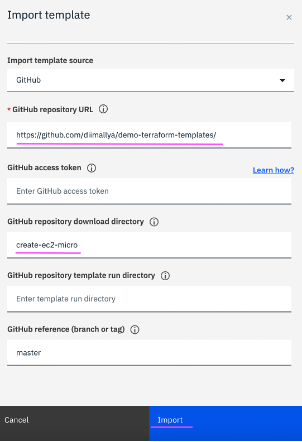
https://github.com/diimallya/demo-terraform-templates/tree/master/create-ec2-micro. This can be imported in Infrastructure Automation by navigating to menu (from IBM Automation Cloud Pak home page)
Automate Infrastructure -> Library -> Terraform templates (tab) -> Import template.

1.2 Fill in the required fields in dialog presented - GitHub repository URL, GitHub repository download directory and then click on
Import.
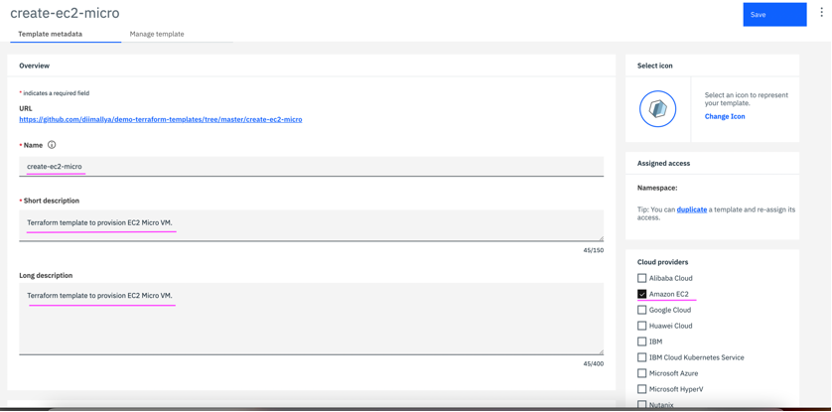
1.3 Provide a name, short description and long description. On the right side pane, under
Cloud providers section select
Amazon EC2 and deselect
Other.
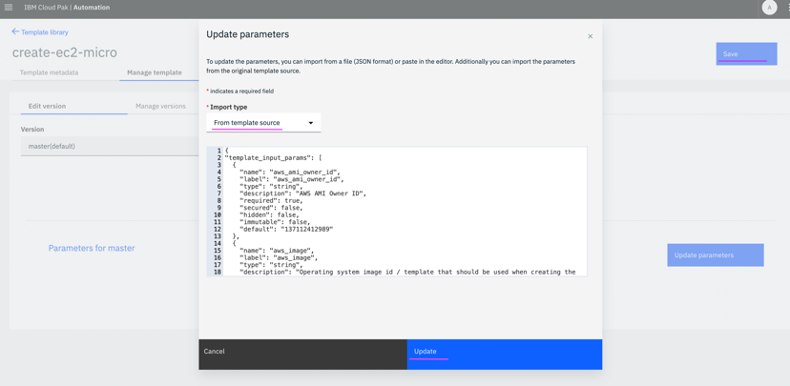
1.4 In
Manage template tab, click on
Update parameters and select
Import type as
From template source. Click on
Update and then
Save.
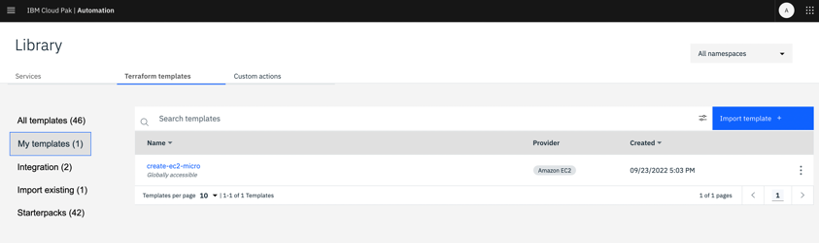
Once saved, the imported template is shown under My templates section.
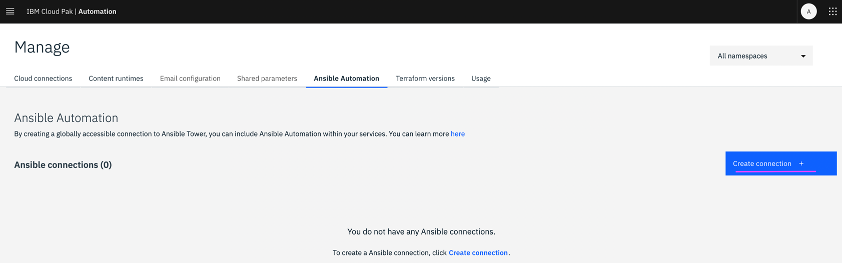
Step 2: Create an Ansible connection
In this step we configure Ansible Tower integration in Managed Services. This is leveraged for executing Ansible playbooks as part of service workflow.
Note: This step assumes AWX is installed on the same OpenShift cluster. Ref:
https://github.com/ansible/awx/blob/devel/INSTALL.md2.1 From the IBM Automation Cloud Pak menu, click on
Automate Infrastructure -> Manage -> Ansible Automation (tab) -> Click on
Create connection
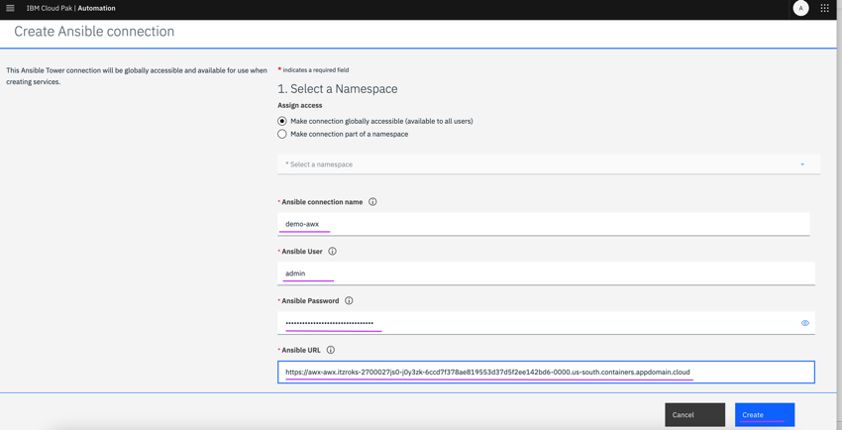
2.2 Enter AWX credentials – Ansible connection name, User, Password and URL and click on
Create.
Step 3: Create an AWS Cloud connection
In this step we configure an AWS account in Managed Services. This is the target environment to provision solution stack.
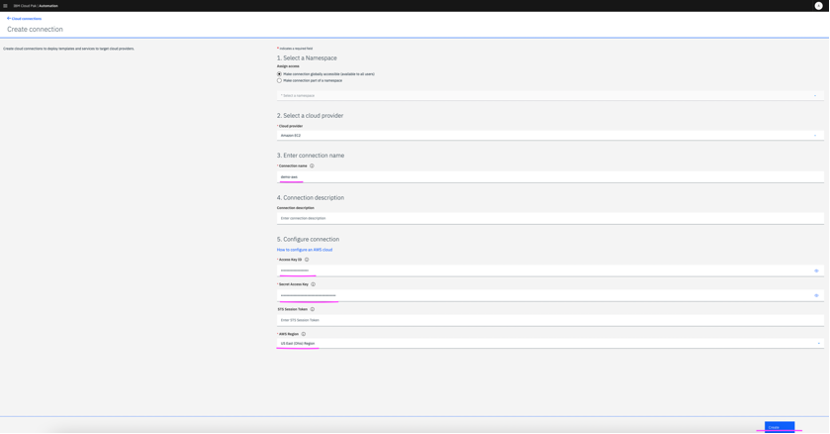
3.1 From the IBM Automation Cloud Pak menu, click on Automate Infrastructure -> Manage -> Cloud connections (tab). Click on Create connection.
3.2 Enter a name for connection and AWS account details like Access Key ID, Secret Access Key and then click on
Create.
Step 4: Compose a Service including terraform and Ansible blocks
This is the major step of building a service using terraform templates and Ansible components. Typically operations team persona in the organization builds this service in service composer to further make it available for the end users to deploy.
Note: Before proceeding with this step, following pre-requisites need to be performed.
Pre-requisites:
- Ansible integration needs to enabled for CP4WAIOps Infrastructure Automation - in the OpenShift console as mentioned in the documentation, if not done already. Ref: https://www.ibm.com/docs/en/cloud-paks/cloud-pak-watson-aiops/3.4.2?topic=integrations-ansible-tower-integration
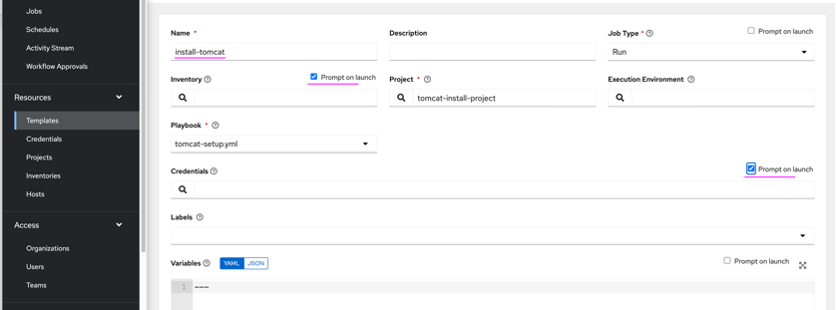
- In Ansible Tower, create install-tomcat job template, with a setting of Inventory and Credentials fields marked as Prompt on launch. Refer the screenshot below. The following GitHub repository may be used to setup install-tomcat job template: https://github.com/divyakamathorg/tomcat-ansible
4.1 From IBM Automation Cloud Pak menu, navigate to
Automation Infrastructure -> Library -> Services (tab) -> Create Service

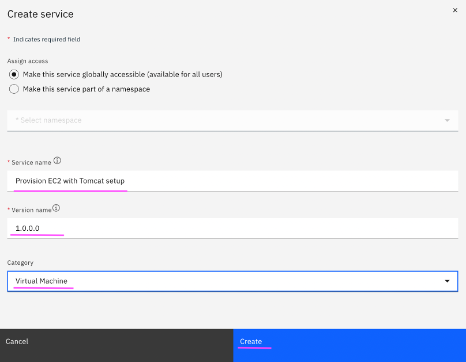
4.2 Give a name to the service, version, category and click on
Create.
4.3 In the first tab, short description, long description, feature list details of the service can be documented. This is an optional step.
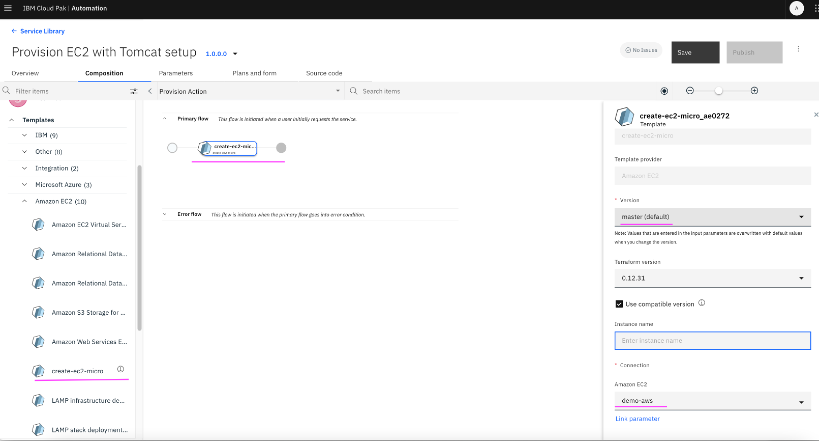
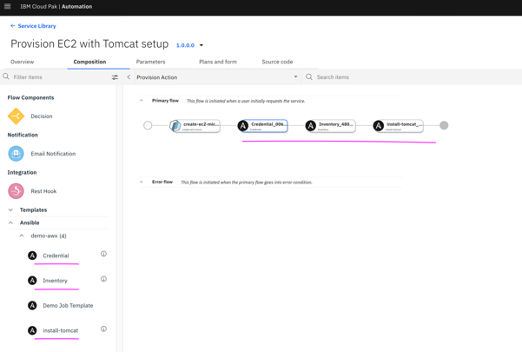
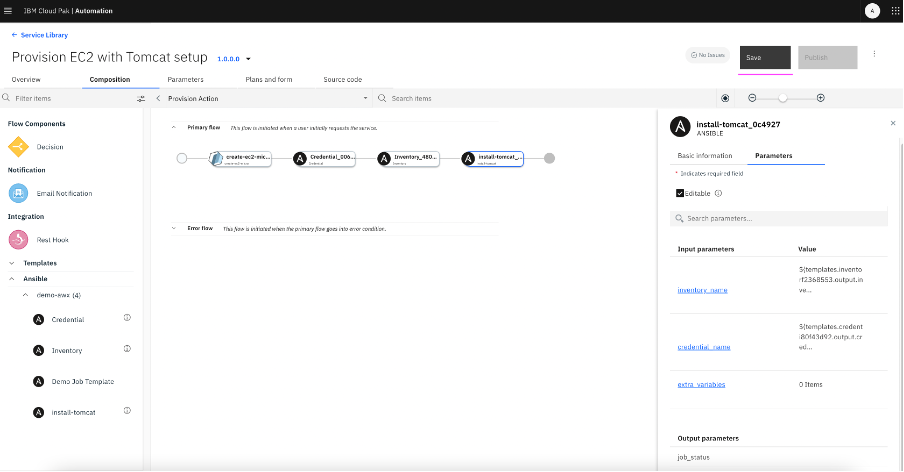
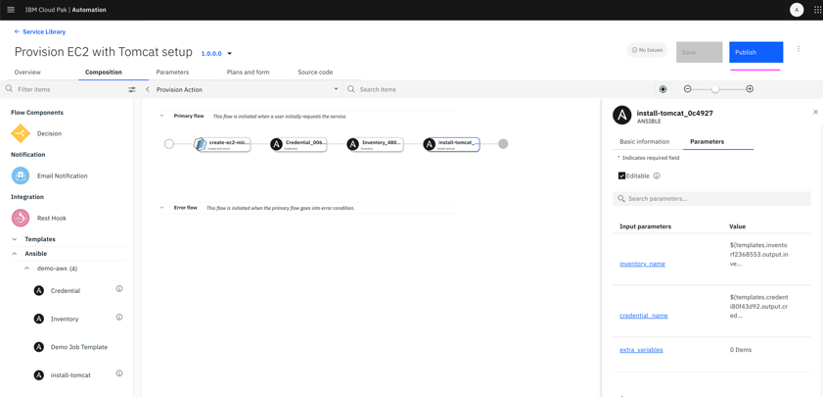
4.4 In the
Composition tab, on the left had side one can find all the terraform templates available along with Rest Hook, Decision etc elements and also Ansible components. Drag and drop
create-ec2-micro from
Templates->Amazon EC2 section and on right side pane, under
Basic information tab, provide version of the template to be used in the service and target AWS connection name where VM needs to be provisioned.
4.5 On right side pane, second tab i.e.
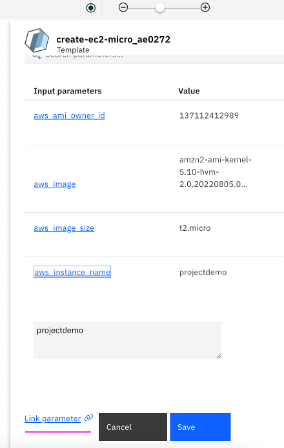
Parameters, various variables with default values initialized in terraform templates are shown. If any of these values need to be taken from users, that can be done by clicking on
Link parameter option below the variable value.
4.6 Click on
Create tab on top right to create a new input parameter which would be linked to that terraform variable during template execution. Datatype for this input parameter, a name and default value which would be populated in user dialog can be chosen. Once all values are provided, click on
Save.
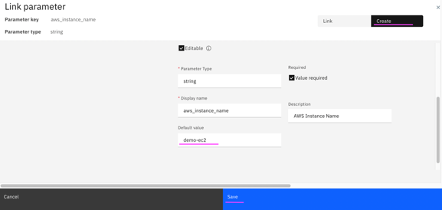
4.7 Below is the screenshot after 2 parameters (aws_instance_name and aws_key_pair_name) are created and assigned to respective template variables.
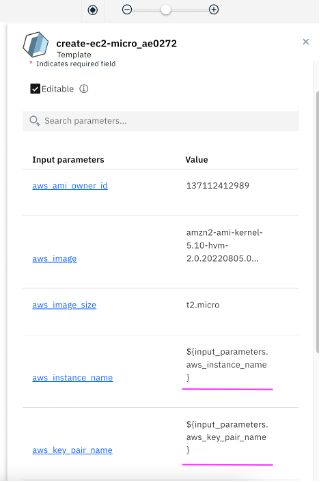
Note: We can see these parameters and modify, if required later in third tab of the service creation UI i.e. Parameters.

4.8 In the Composition tab, we need to further drag and drop Ansible components – Credential, Inventory and install-tomcat job template. This is to create a Credential in AWX for accessing provisioned VM, and to create an Inventory in AWX which contains the IP address / hostname of the newly provisioned VM, followed by execution of install-tomcat Ansible job template by giving these credential and inventory elements created as input.
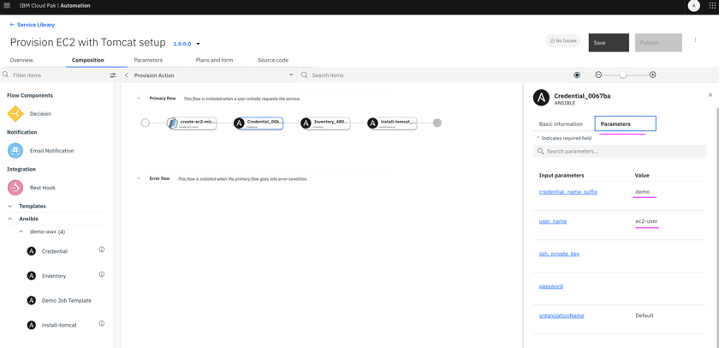
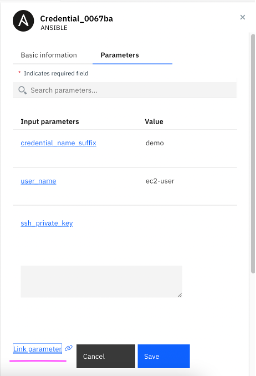
4.9 Now click on Credential element in the middle pane, and click on Parameters tab of Credential element, on right side pane. Provide names for credential_name_suffix and user_name.
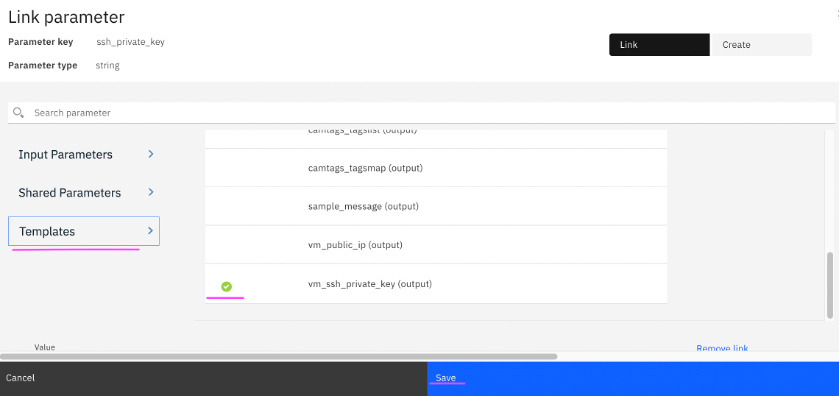
4.10 Next click on ssh_private_key The terraform template (create-ec2-micro) has one of the output variables as vm_ssh_private_key. We need to link this output variable value of the template as input to create credentials in AWX. Click on Link parameter below ssh_private_key.
4.11 In the dialog that appears, click on Templates section in left side pane, select output variable vm_ssh_private_key (output) of the template, and click on Save.
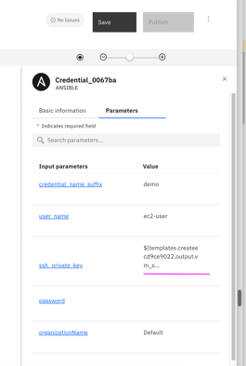
4.12 After creating the link, ssh_private_key variable value would appear as shown in screenshot below.
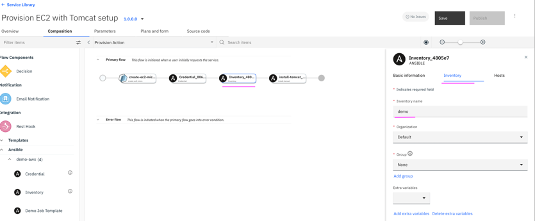
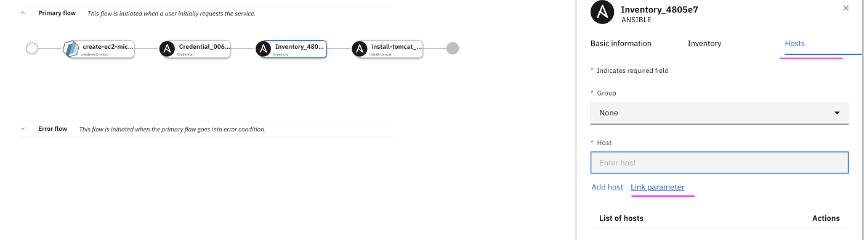
4.13 Similarly,
Inventory element needs to be provided all the required values. Click on
Inventory in middle pane and then in right side pane, provide an
inventory name under
Inventory tab.
4.14 Under
Hosts tab, click on
Link parameter.
4.15 From
Templates section, select output variable of template –
vm_public_ip (output) and click on
Save.
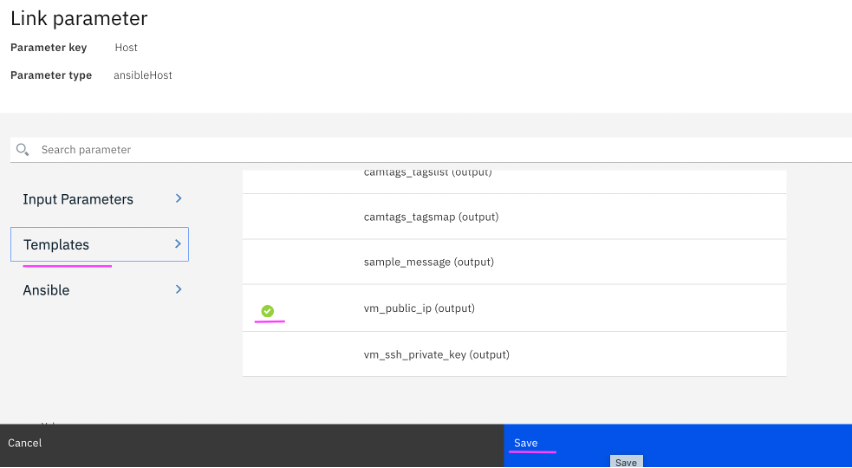
4.16 After creating the link, Host value would appear as shown in screenshot below.

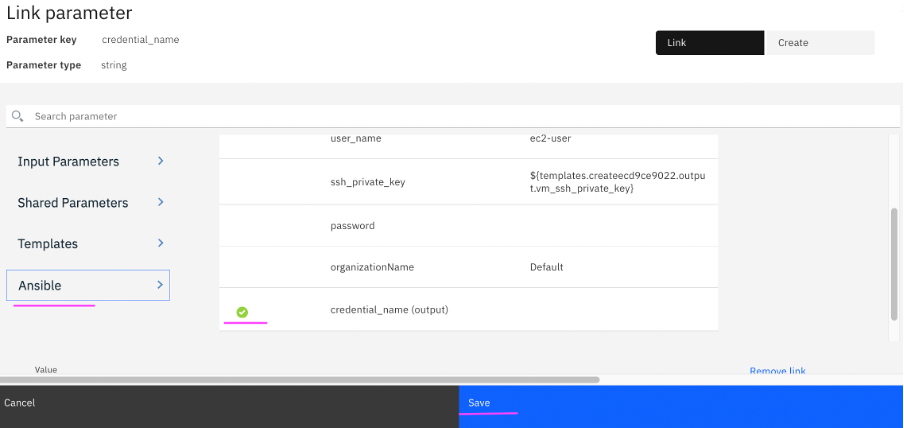
4.17 Next, we need to provide these
Credential and
Inventory elements as input to
install-tomcat Ansible job template. Click on
install-tomcat and select
Parameters tab on right side pane.
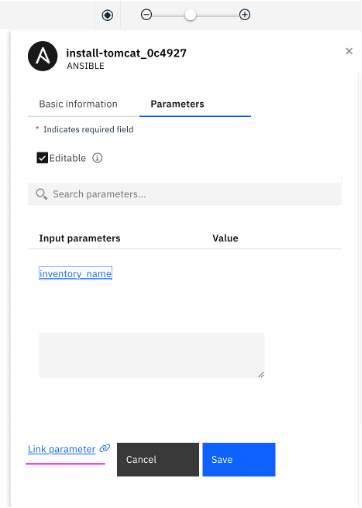
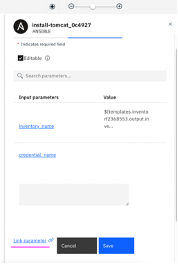
4.18 The field
inventory_name needs to be linked with Ansible inventory element output
inventory_name (output)
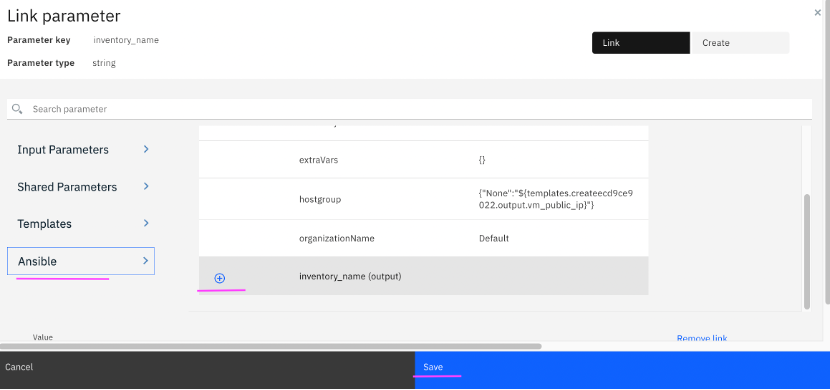
4.19 The
credential_name has to be linked with
credential_name (output).
4.20 This completes the service building phase. Click on
Save button on top right.
Step 5: Publish service to catalog
Once the service is saved, it can be published to the catalog and assigned access to required namespaces. Only published services are available in service catalog for the end users to consume.
5.1 Click on
Publish.
5.2 Click on
Service Library on the top left. Against the service
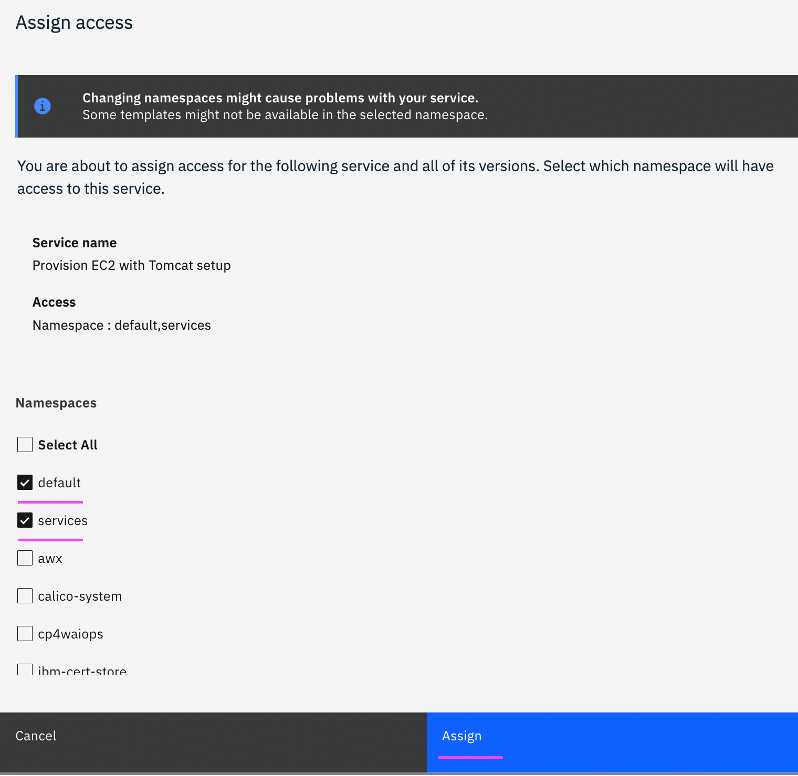
Provision EC2 with Tomcat, click on 3 vertical dots, and select
Assign access. Select required namespaces (Ex: default, services) and click on
Assign.

Step 6: Deploy Solution Stack through Self-Service
This step explains how an end user can provision the solution stack by leveraging the service published by operations team persona earlier.
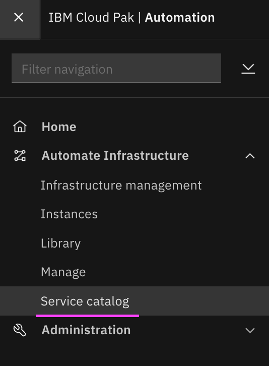
6.1 To deploy a service available in catalog, an end-user persona can click on
Automate Infrastructure -> Service Catalog menu option from IBM Cloud Pak home page.
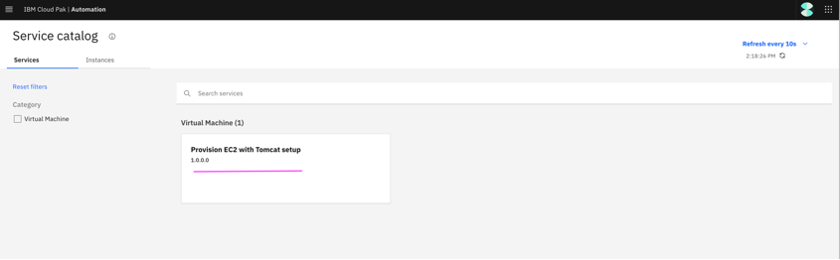
6.2 Click on the tile corresponding to published service –
Provision EC2 with Tomcat setup
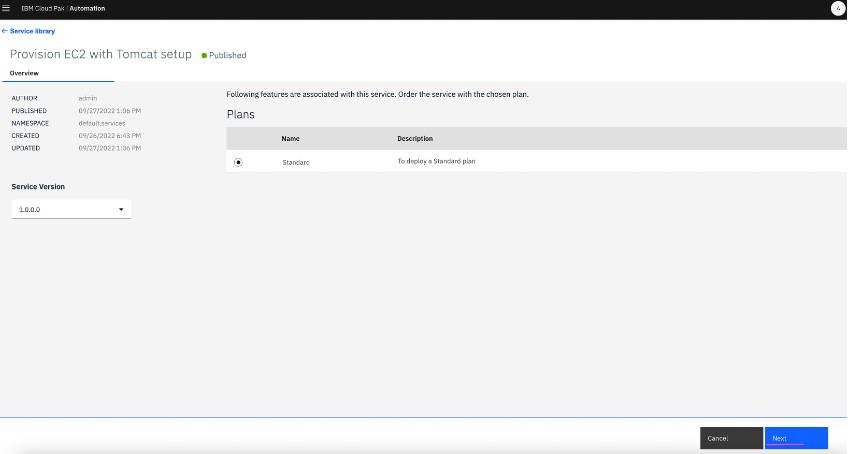
6.3 Select plan and Click
Next.
6.4 Provide inputs for deploying service and click Deploy.
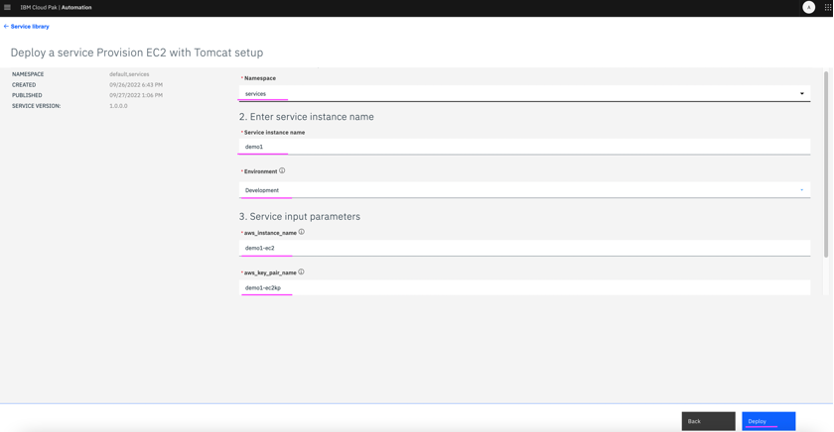
6.5 Service instance deployment starts and the progress of the same can be viewed by clicking on Go to Instances which navigates to Instances page.

Step 7: Verify the solution stack deployed
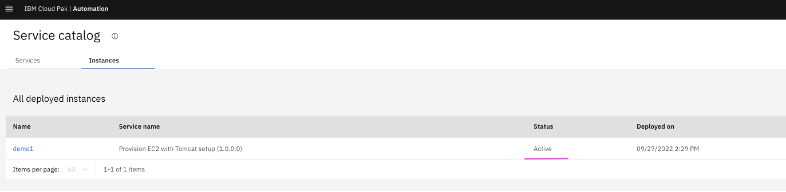
This step details on how to verify provisioned solution stack. When a service is deployed, service instance is created and all provisioned resources are associated with it.
7.1 When the service instance deployment is complete, the state of the instance changes from In progress to Active. Click on instance name demo1 to verify the solution stack deployed.
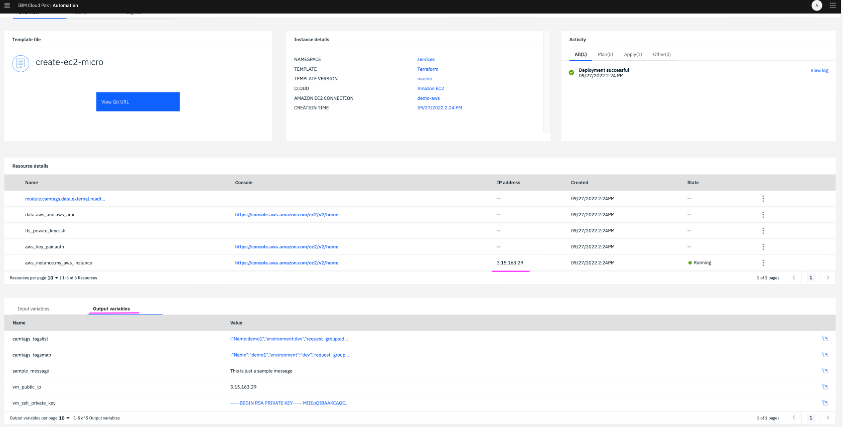
7.2 Each activity in service orchestration workflow has an instance created for the same during service deployment. We can click on those to verify the resources provisioned as part of that activity.

7.3 On clicking the first activity instance i.e. terraform template instance – demo1-00-inst, we can see the input and output parameters of the template execution. Public IP and state of the VM can also be viewed.
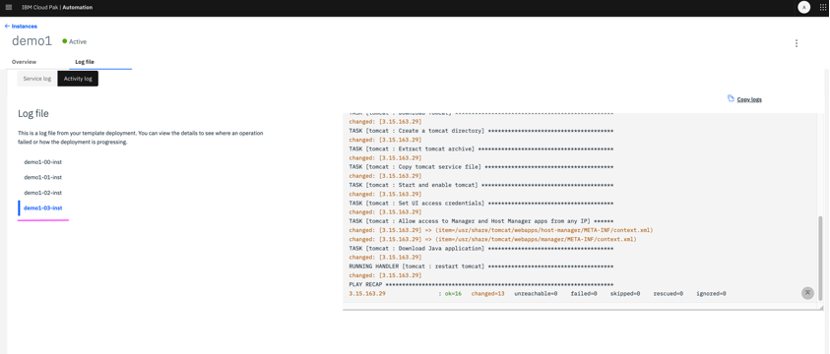
7.4 Click on second tab of service instance demo1, to view the logs of install-tomcat job template execution from AWX.
7.5 On browsing the URL
http://<vm_public_ip>:8080, tomcat installation on the VM can be verified.
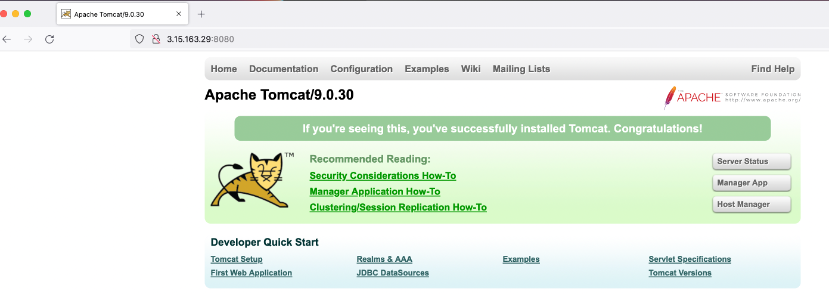
Note: You may have to allow traffic to port 8080 in the security group associated with your AWS EC2 VM if it is not in place already.
Summary
In this article, we have explained how Terraform templates and Ansible playbooks can be orchestrated in a workflow to build an entire solution stack by leveraging IBM Infrastructure Automation.
IT Operations team can easily build such services and publish in a self-service catalog for the service consumer personas like developers and testers in the organization. Whenever a solution stack is required on-prem or on any public clouds, it can be provisioned through these self-services. When they are no longer required, service instances can be terminated to destroy all the resources which are provisioned as a part of that service instance.
In this way IBM Infrastructure Automation can be leveraged to build, deploy and manage self-services in Enterprises.