WebSphere Automation "How To" Series #18 : How to register WebSphere Liberty servers running in containers
Previous blogs in this WebSphere Automation "How To" series :
WebSphere Automation "How To" Series #1 : How to get WebSphere Automation UI URL
WebSphere Automation "How To" Series #2 : How to specify user roles and permissions
WebSphere Automation "How To" Series #3 : How to configure WebSphere Automation with an Enterprise LDAP
WebSphere Automation "How To" Series #4 : How to register WebSphere Application Server traditional servers using configuretWasUsageMetering.py script
WebSphere Automation "How To" Series #5 : How to register WebSphere Liberty servers
WebSphere Automation "How To" Series #6 : How to configure email server and email addresses for notifications
WebSphere Automation "How To" Series #7 : How to setup Instana to send alerts to WebSphere Automation
WebSphere Automation "How To" Series #8 : How to setup secure access to Linux or UNIX servers
WebSphere Automation "How To" Series #9 : How to trigger a memory leak health investigation when used heap is over 80 percent
WebSphere Automation "How To" Series #10 : How to view WebSphere Automation REST APIs using Swagger UI
WebSphere Automation "How To" Series #11 : How to get and delete assets using APIs
WebSphere Automation "How To" Series #12 : How to get security bulletins using APIs
WebSphere Automation "How To" Series #13 : How to retrieve a list of vulnerabilities using APIs
WebSphere Automation "How To" Series #14 : How to get CVE impact summaries using APIs
WebSphere Automation "How To" Series #15 : How to install interim fixes and fix packs using WebSphere Automation UI
WebSphere Automation "How To" Series #16 : How to retrieve and delete installations using APIs
WebSphere Automation "How To" Series #17 : How to retrieve fixes using APIs
This post will focus on how to register Liberty servers running inside containers with WebSphere Automation.
Previous blogs in this series have described how to register existing WebSphere Application Server traditional and WebSphere Liberty servers with WebSphere Automation. However, when the server in question is running inside a container, the process for registering and updating the server is different. This post will focus on how to include the configuration for registering a WebSphere Liberty server in the image that is built and how to update the image in order to resolve vulnerabilities that have been detected by WebSphere Automation.
For this example, we initially have no servers registered. The following is the WebSphere Automation UI screenshot showing no registered servers.

Create the Project Structure
In order to build the WebSphere Liberty server image, we need to create a directory to hold the various files that are required. Perform the following steps to create the directory the relevant files:
- Create a directory to hold the files for this WebSphere Liberty server image:
mkdir wsdemo
cd wsdemo
- Create the
server.xml file that will hold the configuration for the WebSphere Liberty server:
touch server.xml
- Create the file that will hold the usage metering certificate for the target WebSphere Automation instance:
touch wsacert.pem
- Create the
Dockerfile that will be used to build the image:
touch Dockerfile
Copy the WebSphere Automation Configuration
The configuration required to register WebSphere Application Server traditional and WebSphere Liberty servers with WebSphere Automation can be copied from the WebSphere Automation UI. Perform the following steps to copy the configuration to the relevant files in the image project:
- In the Secure view of the WebSphere Automation UI, click the Servers tab.
- Click the Register + button.
- In the Register server fly-out, click the WebSphere Liberty radio button.
- Click the Copy to clipboard button for the server.xml.

- In the image project directory, open the server.xml file that we created and paste in the text copied from the WebSphere Automation UI and save the changes.
- Click the Copy to clipboard button for the Usage metering certificate.
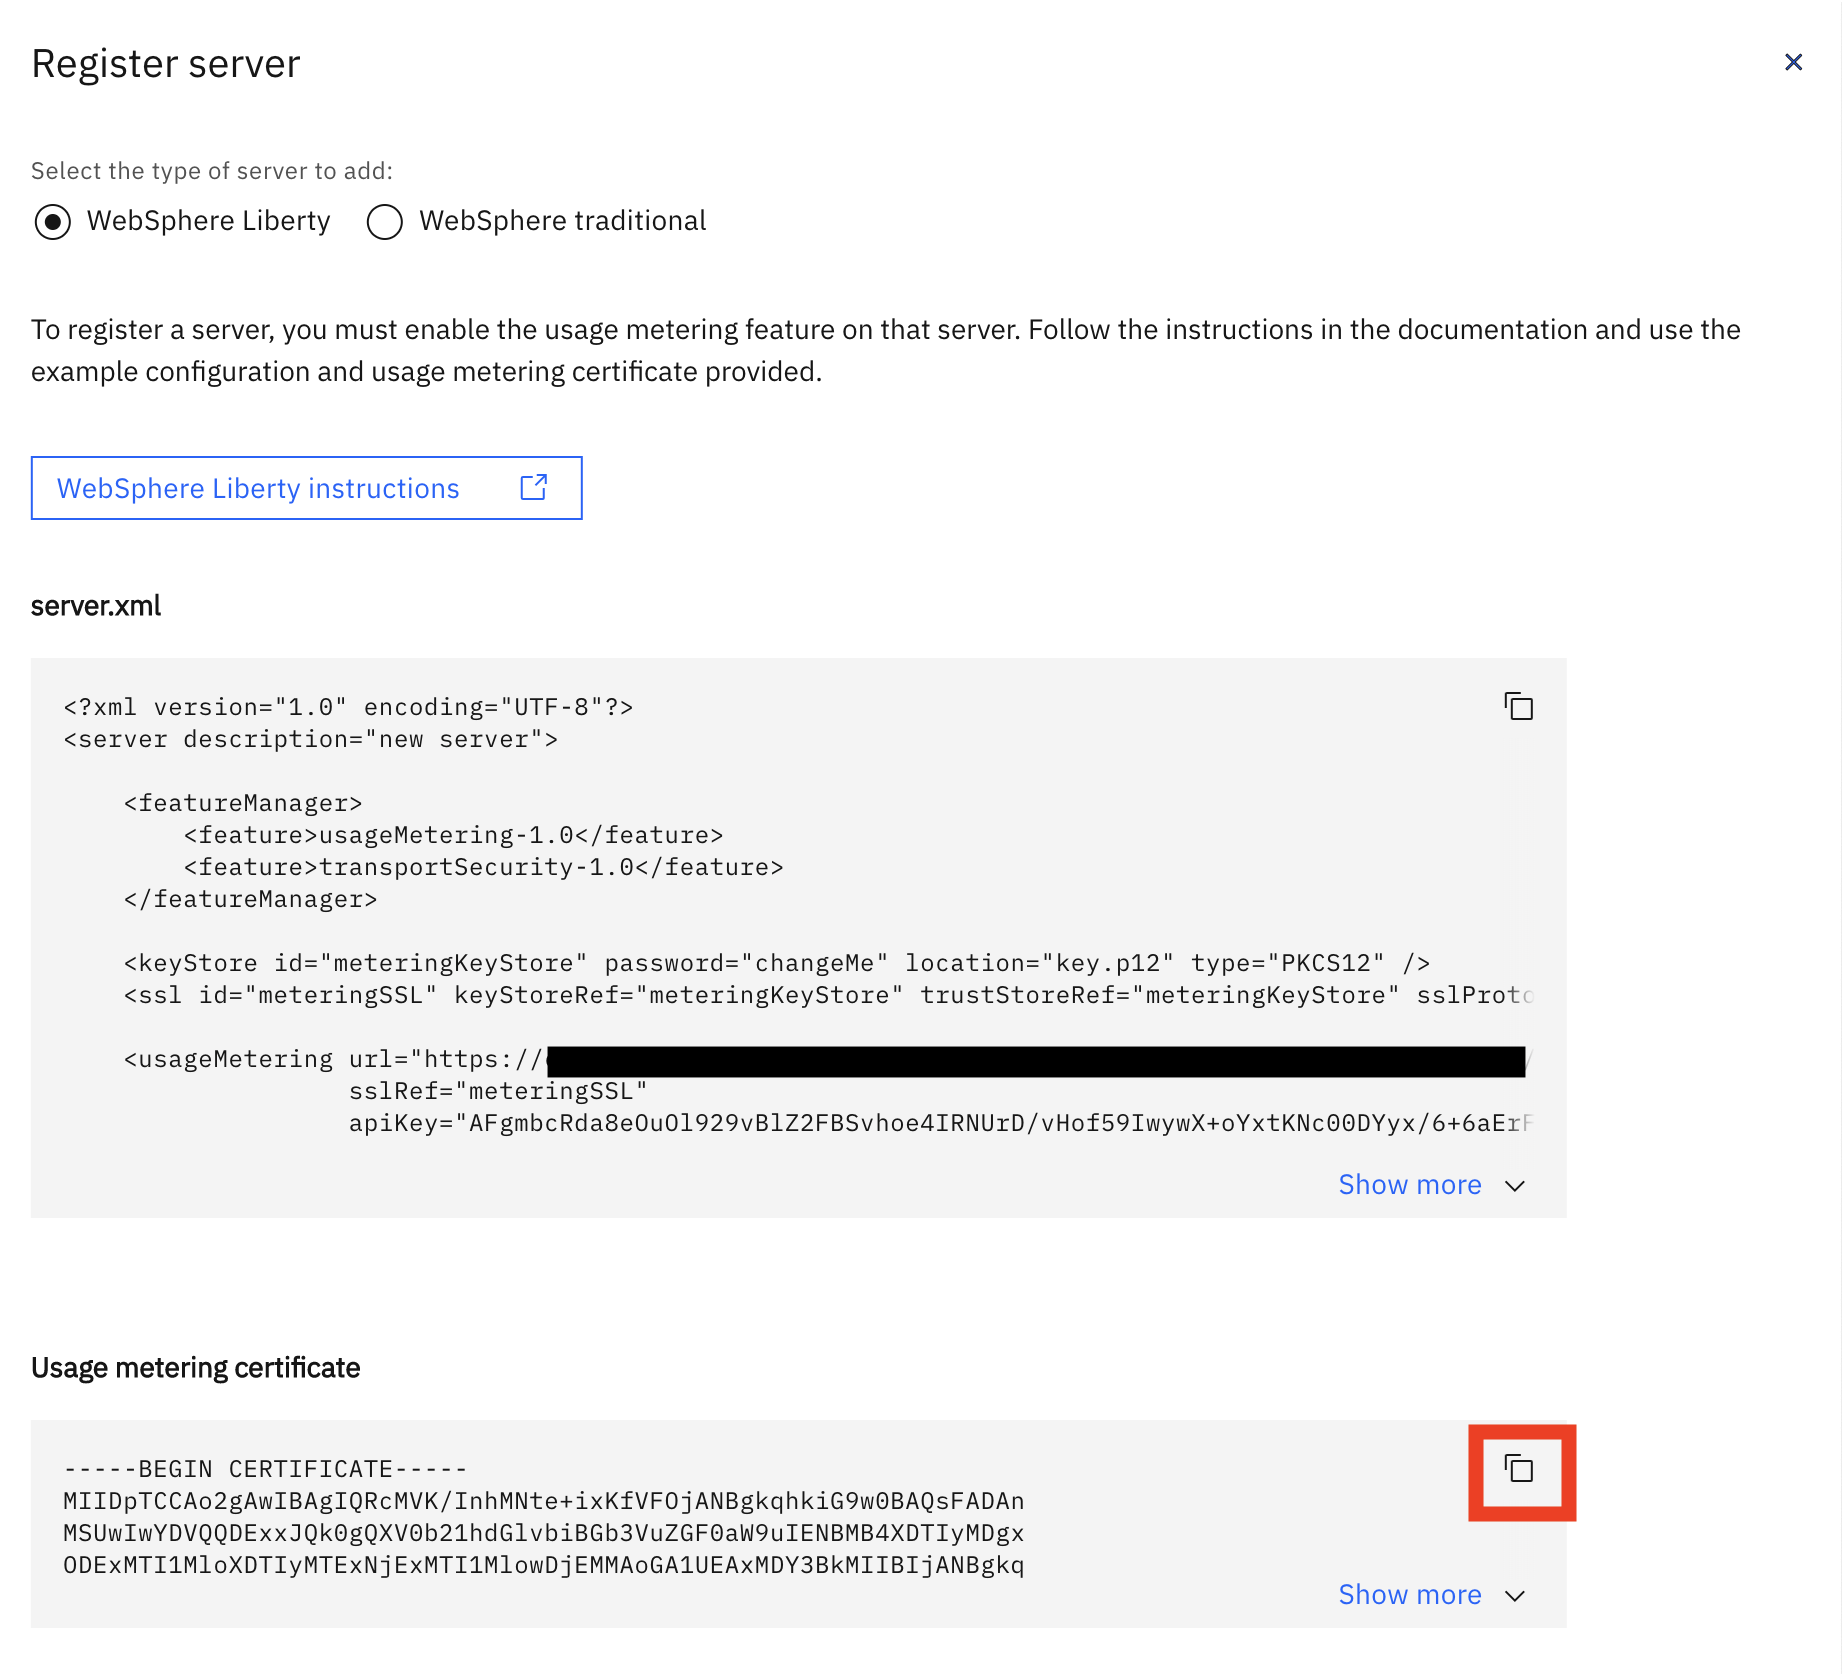
- In the image project directory, open the wsacert.pem file that we created and paste in the text copied from the WebSphere Automation UI and save the changes.
Create the Key Store
The WebSphere Liberty server configuration we copied into the
server.xml file contains a
keyStore element that references a
key.p12 file. We need to create this file and import the certificate that was copied into the
wsacert.pem file. Execute the following command in order to do this:
keytool -alias wsa-usage-metering -import -trustcacerts -file wsacert.pem -keystore key.p12 -storetype PKCS12 -storepass changeMe -noprompt
Note: You should specify a more secure password for the file in the
-storepass argument, remembering to update the password element in the
server.xml to the same value.
Edit the Dockerfile
Now that we have all of the files that we need for the image project, we need to edit the
Dockerfile to define how the WebSphere Liberty server image should be built. To do this, simply copy the following into the
Dockerfile and save the changes.
FROM websphere-liberty:22.0.0.5-kernel-java8-ibmjava

# Add config
COPY --chown=1001:0 server.xml /config/
COPY --chown=1001:0 key.p12 /opt/ibm/wlp/usr/servers/defaultServer/resources/security/

# Default setting for the verbose option
ARG VERBOSE=false

# This script will add the requested XML snippets, grow image to be fit-for-purpose and apply interim fixes
RUN configure.sh
Notice that this
Dockerfile is making use of a slightly older version of WebSphere Liberty server (22.0.0.5) as the base for our image. We are doing this intentionally because it will cause a number of vulnerabilities to be detected on the server when it is registered with WebSphere Automation. Also notice that the
server.xml and
key.p12 files that we have created are copied into the image when it is built.
Build and Push the Image
We now have all of the files that we need to build our image. Perform the following steps to build the image, tag it and push it to a container repository:
- Build and tag the image using the following command:
docker build -t wsademo/liberty-demo-image:22.0.0.5 .
This will generate an image in the local container registry called autodemo/liberty-demo-image with a tag of 22.0.0.5.
- In order to push the image to a private container registry we must tag it with the registry hostname and port (if needed). Use the following command to do this, replacing
<REGISTRY_HOSTNAME> and <REGISTRY_PORT> with the relevant values for the private container registry:
docker tag wsademo/liberty-demo-image:22.0.0.5 <REGISTRY_HOSTNAME>:<REGISTRY_PORT>/wsademo/liberty-demo-image:22.0.0.5
- Push the image to the container registry, replacing
<REGISTRY_HOSTNAME> and <REGISTRY_PORT> with the relevant values for the target container registry:
docker push <REGISTRY_HOSTNAME>:<REGISTRY_PORT>/wsademo/liberty-demo-image:22.0.0.5
Note: For this example, the container registry that the image is pushed to should be accessible from the OCP environment running WebSphere Automation.
Install the Open Liberty Operator
In order to simplify the process of getting the WebSphere Liberty server image running, we are going to use the Open Liberty operator in the OpenShift Container Platform (OCP) environment that is being used to run WebSphere Automation. Perform the following steps to install the Open Liberty operator:
- In the OCP console, expand Operators in the left hand navigation menu and click OperatorHub.
- Type liberty into the filter field and then click on the Open Liberty operator tile:
- In the Open Liberty fly-out, click the Install button.
- On the Install Operator page, accept the defaults and click the Install button.
- The operator will be installed, displaying the message shown below when it is complete:
Deploy the WebSphere Liberty Image
Now we are going to use the Open Liberty operator to deploy in instance of the WebSphere Liberty server image that we have built to the OCP environment. We can deploy the image to any namespace in the OCP environment but, for simplicity, we are going to deploy it to the same namespace as WebSphere Automation. Perform the following steps to deploy WebSphere Liberty server image using the Open Liberty operator:
- In the OCP console, expand Operators in the left hand navigation menu and click Installed Operators.
- Select the namespace that WebSphere Automation is deployed to in the Project down and then select the Open Liberty operator from the list:
- On the Operator details page, click the Create instance link in the OpenLibertyApplication tile:
- On the Create OpenLibertyApplication page, enter wsademo in the name field and the details of the image in the Application Image field. It should be of the form <REGISTRY_HOSTNAME>:<REGISTRY_PORT>/wsademo/liberty-demo-image:22.0.0.5.
- Scroll down until to the Environment Variables section. Expand it and click Add Environment Variable:
- Enter CONTAINER_HOST in the Name field and wsademo in the Value field.
Note: The CONTAINER_HOST environment specifies the hostname that will be reported by the Usage Metering component when it registers the WebSphere Liberty server with WebSphere Automation. If this environment variable were not set, a unique hostname would be generated for each instance of the container that is running, causing them to appear as separate servers in WebSphere Automation.
- Scroll to the bottom of the page and click Create.
- The instance of the OpenLibertyApplication is created and displayed in the OCP console:
- We can confirm that the pod for the application has been started by expanding Workloads in the left hand navigation menu and clicking Pods. The wsademo pod in the list of pods with a Status of Running.
- Finally, we can confirm that the WebSphere Liberty server has been registered with WebSphere Automation by looking in the WebSphere Automation UI:
Update the WebSphere Liberty Image
We can see from the WebSphere Automation UI that the WebSphere Liberty server instance has 2 unresolved CVEs at the time of writing, as follows:
This number may increase as time passes and more vulnerabilities are discovered with Liberty 22.0.0.5.
The process of updating WebSphere Application Server traditional and WebSphere Liberty servers that are running in a container is different than the process used to update instances of these servers running in a VM or a physical server. When the server is running in container, we would typically modify the definition of the image, rebuild the image and deploy the updated image to the runtime environment.
In order resolve the 2 vulnerabilities that have been detected by WebSphere Automation, we need to identify the fixes that need to be applied. CVE-2021-2163 relates to the JDK that is being used to run WebSphere Liberty and the best option to resolve this issue is to move the latest version of WebSphere Liberty that uses a more recent version of the JDK. CVE-2022-34165 can be resolved by applying fixpack 22.0.0.10 or interim fix PH46816. At the time of writing (September 2022), Fixpack 22.0.0.10 has not been released. As a result, we need to download the interim fix and build it into our image. The following steps assume that the interim fix for CVE-2022-34165 (22009-wlp-archive-ifph46816.jar) has been downloaded and placed it into the image directory.
Perform the following steps to update the WebSphere Liberty server image:
- Modify the FROM clause specified in the Dockerfile as follows:
FROM websphere-liberty:22.0.0.9-kernel-java8-ibmjava
- Add an additional COPY clause after the existing COPY clauses to copy the interim fix into the image:
# Add interim fixes
COPY --chown=1001:0 22009-wlp-archive-ifph46816.jar /opt/ibm/fixes/
- Save the changes.
- Build, tag and push the modified image:
docker build -t wsademo/liberty-demo-image:22.0.0.9 .
docker tag wsademo/liberty-demo-image:22.0.0.9 <REGISTRY_HOSTNAME>:<REGISTRY_PORT>/wsademo/liberty-demo-image:22.0.0.9
docker push <REGISTRY_HOSTNAME>:<REGISTRY_PORT>/wsademo/liberty-demo-image:22.0.0.9
- In the OCP console, expand Operators in the left hand navigation menu and click Installed Operators.
- Select the namespace that WebSphere Automation is deployed to in the Project down and then select the Open Liberty operator from the list.
- Click the OpenLibertyApplication tab.
- Click the wsademo.
- In the OpenLibertyApplication details page, click the YAML tab.
- Modify the value of spec.applicationImage to specify the new version of the image. It should be of the form <REGISTRY_HOSTNAME>:<REGISTRY_PORT>/wsademo/liberty-demo-image:22.0.0.9.
- Click Save.
- Expand Workloads in the left hand navigation menu and click Pods. A new instance of the of the wsademo pod should be visible. It is possible that it will be in the process of being created:
Once the new instance of the image is Running, the previous instance will be deleted.
- Finally, we can confirm that the WebSphere Liberty server has been updated in WebSphere Automation and the issues resolved by looking in the WebSphere Automation UI:
Notice that the version of the server is now 22.0.0.9 and that it now has no unresolved vulnerabilities
Conclusion
In this blog post, we have described how the configuration required to register a WebSphere Liberty server with WebSphere Automation can be built into a container image. We also described how the image can be updated in order to resolve any vulnerabilities that are detected by WebSphere Automation.
You can find more IBM Docs related to WebSphere Automation at https://www.ibm.com/docs/en/ws-automation.