Having a Scale filesystem on an internal MMC is no good, MMC storage is notoriously unreliable when stressed and very limited in capacity. So I added two external USB disks, one 256GB SSD, and one 1TB SATA disk. As the Development addition is capped at 12TiB, you can add multiple disks so you can use the filesystem replication feature. However, the limit is set to the total size of the disks, not the size of the files. So for a home system using Linux MD devices may be more interesting.
Let's configure the disks into the filesystem, and get rid of the MMC.
# lsblk
...
sdb            8:16   1 238,5G  0 disk
sdc            8:32   0 931,5G  0 disk
...
We'll have to create a new NSD stanza file to create the NSDs and add them to the filesystem. Note that the sata disk is in a new pool called sata, and that is set to "dataOnly", as only the system pool can contain metadata. The failure group ID is stil set to 1 for both disks, as we do not use replication at this moment.
# cat > usb.nsd << EOF
%nsd:
  device=/dev/sdb
  nsd=ssd1
  servers=`hostname`
  usage=dataAndMetadata
  failureGroup=1
  pool=system

%nsd:
  device=/dev/sdc
  nsd=sata1
  servers=`hostname`
  usage=dataOnly
  failureGroup=1
  pool=sata
EOF
First we create the NSDs:
# mmcrnsd -F usb.nsd
mmcrnsd: Processing disk sdb
mmcrnsd: Processing disk sdc
mmcrnsd: mmsdrfs propagation completed.
# mmlsnsd -m
 Disk name       NSD volume ID      Device          Node name or Class       Remarks
-------------------------------------------------------------------------------------------
 nsd1            C0A8B2C760746935   /dev/mmcblk1p2  scalenode1               server node
 sata1           C0A8B2C760894A8C   /dev/sdc        scalenode1               server node
 ssd1            C0A8B2C760894A8B   /dev/sdb        scalenode1               server node
Next we add the NSDs to the nas1 filesystem
# mmadddisk nas1 -F usb.nsd
The following disks of nas1 will be formatted on node scalenode1:
    ssd1: size 244224 MB
    sata1: size 953869 MB
Extending Allocation Map
Creating Allocation Map for storage pool sata
Flushing Allocation Map for storage pool sata
Disks up to size 7.37 TB can be added to storage pool sata.
Checking Allocation Map for storage pool system
Checking Allocation Map for storage pool sata
Completed adding disks to file system nas1.

# mmlsdisk nas1
disk         driver   sector     failure holds    holds                            storage
name         type       size       group metadata data  status        availability pool
------------ -------- ------ ----------- -------- ----- ------------- ------------ ------------
nsd1         nsd         512           1 yes      yes   ready         up           system
ssd1         nsd         512           1 yes      yes   ready         up           system
sata1        nsd         512           1 no       yes   ready         up           sata
Lastly, we can remove the mmc nsd by just deleting it from the filesystem. All data and metadata will be moved online to the new SSD NSD. (This may take a while)
# mmdeldisk nas1 nsd1
# mmdelnsd nsd1
The Development edition is limited to 12TB of raw storage. All NSDs you define count towards the limit. You can check the limit and the usage as folllows:
 mmlslicense --licensed-usage
 NSD Name                                         NSD Size (Bytes)
------------------------------------------------------------------
 ssd1                                              256.087.425.024
 sata1                                           1.000.204.886.016

 Developer Edition Summary:
 =================================================================
 Total NSD Licensed Limit (12 TB):      12.000.000.000.000 (Bytes)
 Total NSD Size:                         1.256.292.311.040 (Bytes)
Now we have two pools that can have file data in them, but how to determine which files go where? This is done using a placement policy, where the default policy sets the standard location. We can view this policy with the mmlspolicy command, or use the Web GUI to change and update it.
# mmlspolicy nas1 -L
No policy file was installed for file system 'nas1'.
Data will be stored in pool 'sata'.
That is not exactly what we want, the SSD of the system pool should be default, with the sata pool as overflow. We change this as follows:
# cat > placement.pol <<EOF
rule default SET POOL 'system'
EOF

# mmchpolicy nas1 placement.pol
Any new files created are now by definition in the system pool. You can add rules to the placement policy that change that behaviour for specific file types, file locations or filenames. The easiest way to do that is in the GUI. Go to the Files icon on the left hand side, then "Information Lifecycle". You will see your filesystem policy there.

If you do not see the "Add Rule" box you may need to restart the GPFS GUi to initialize it properly:
# systemctl restart gpfsgui
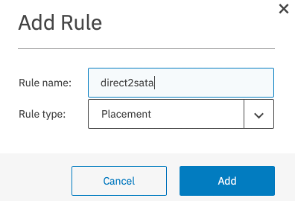
Click "Add Rule" and create a "direct2sata" placement rule:

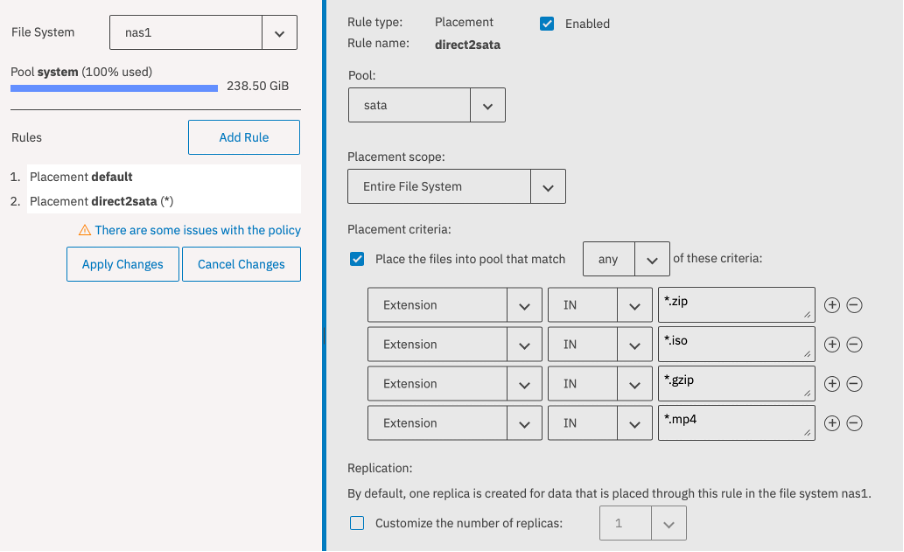
You can now specify pool sata, and create a list of filename extensions that you want placed directly in the sata pool. Note that in the left panel, there is a warning message, the rules are used in order, so drag the direct2sata rule to be above the default rule.
The placement scope can be the Entire filesystem, or you could limit it to a specific fileset. So you could choose to have you Documents fileset to be on SSD always by dragging that specific rule higher than the others.
When done, click apply changes in the left panel.

Back to the command line to verify the policy. Create a file called /nas1/
# echo test > /nas1/test.iso

# mmlsattr -L /nas1/test.iso
file name:            /nas1/test.iso
metadata replication: 1 max 3
data replication:     1 max 3
...
storage pool name:    sata
...
Suppose you did not want this specific iso file to be on SATA, but would really like it to be on SSD. You can change that manually using mmchattr:
# mmchattr -P system /nas1/test.iso

# mmlsattr -L /nas1/test.iso
file name:            /nas1/test.iso
metadata replication: 1 max 3
data replication:     1 max 3
...
storage pool name:    system
...
The placement policy is only used when new files are created. For files that already exist a migration policy is needed. We'll look at that in the next blog: Part 4: Migrating files to the best storage
#Highlights-home#Highlights