Ready: What should I know before I create an app?
Avoid QRadar CE for App Development
If you are a tech partner, avoid developing your DSM or QRadar app on QRadar CE (Community Edition). Instead contact the alliances team and we can provide you a complimentary 12-month partner license. While QRadar CE is good to sandbox QRadar locally on your laptop, it falls short when creating an integration or an app because the DSM Editor and the Application Framework are at older versions.
You Have (a Lot of) Help
There is a vast community of help to guide you. Jose Bravo has numerous and thorough videos on his youtube channel, where he walks you through how to perform just about anything you can do on QRadar. There is also a forum regularly combed by experts: https://ibm.biz/qradarapps. If you are a partner, then you have our alliances team as a resource as well. Feel free to reach out to me (Joel Violette) with any questions and I'll be happy to guide you.
Set: What do I need before I create an app?
(I won't go into detail with these steps, but feel free to message me if you have any issues and I'll be glad to help.)
1. QRadar VM
See intro — avoid QRadar CE. Reach out to the alliances team to acquire your version of QRadar and a complimentary 12 month license.
2. Laptop
You'll install the QRadar SDK on your laptop — it can be Windows, Mac, or Linux — and you'll do your development on this.
3. On your laptop: Python 3.6.8+
Install Python 3.6.8 or later on your laptop. You can use a package manager like brew, yum, dpkg, etc. Or download it from https://www.python.org/
4. ON your laptop: QRadar App SDK
Download the QRadar App SDK here. Install it with these steps.
Go: How do I start?
Let's kick things off by working off an official sample app! You can choose from a wide variety — from a simple dashboard app to a full React app using IBM's Carbon design language components. Once you begin developing, you will find this repository useful as many apps are granular examples to implement a particular functionality, like OAuth or custom memory allocation.
For today we'll follow a long coding tradition and choose the Hello World app.
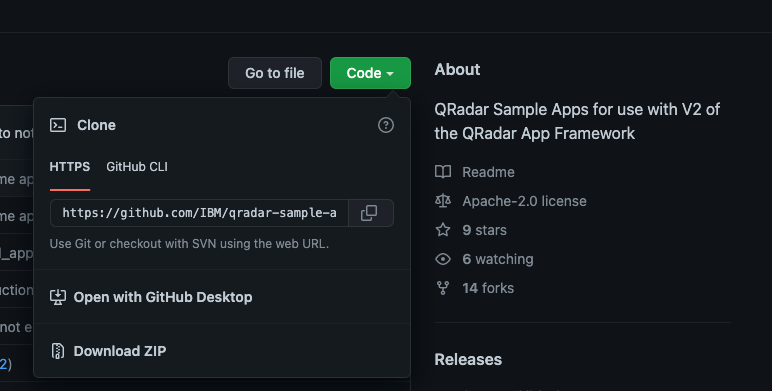
1. Download a zip of the sample app repository (2.1 MB).

Code -> Download ZIP
2. Choose a folder on your laptop (I've chosen /Users/joel/app_sandbox).
3. Extract the zip file.
joel@jvmbp13 app_sandbox % unzip qradar-sample-apps-master.zip
4. Navigate to the Hello World directory.
joel@jvmbp13 cd qradar-sample-apps-master
joel@jvmbp13 qradar-sample-apps-master % cd HelloWorld
(Optional expert mode: If you have docker installed on your computer, at this point you can run the app locally using the command qapp run.)
5. Deploy the app to your QRadar vm. Note: I have used the admin user but feel free to use any GUI username with API privileges.
joel@jvbmp13 qapp deploy -p app.zip -q <QRadar console ip> -u admin
Note: I have used the admin user but feel free to use any GUI username with API privileges.
6. Log into QRadar and click on the new tab. There you have it!

That was exciting! What's next?
Well, now that you've got a HelloWorld, let's dig into the files and see what the app is made of. We will walk through each one and describe what it does and how you can poke it to make it your own.
Contents of HelloWorld App
manifest.json
Describes to QRadar what the sample Hello World app does.
app/views.py
The main entry point into the web application. The file and the manifest.json file are the only files that are required in every app. Contains sample code for the Hello World app.
app/__init__.py
A sample initialization file that creates an instance of the Flask micro-framework which imports views from the views.py script and functions from the qpylib library.
manifest.json
{
    "name":"Hello World App",
    "description":"Simple Hello Word flask app",
    "version":"1.0.0",
    "uuid":"0616bdb3-1c7a-4acf-89a2-4dc726e010bf",
    "image": "QRadar-app-base:2.0.0",
    "areas": [
        {
            "id":"HelloWorldTab",
            "text":"HelloWorld ",
            "description":"Dummy tab that displays text from the flask app",
            "url":"index",
            "required_capabilities":[]
        }
    ]
}
| Name |
Description |
Example Value |
| id |
The ID of the new tab created in UI |
HelloWorldTab |
| text |
The name of the tab that is displayed in the user interface. |
HelloWorld |
| description |
A description of the tab that is displayed. |
Dummy tab that displays text from the flask app |
| url |
Describes the route that is defined in the views.py script that QRadar uses so it can display the "Hello, World!" text in the body of the new tab. |
index |
| required_capabilities |
Allows you to define the user privilege level required to display the Hello World tab. Here there are no restrictions. |
|
app/views.py
from flask import Blueprint
viewsbp = Blueprint('viewsbp', __name__, url_prefix='/')
@viewsbp.route('/')
@viewsbp.route('/index')
def index():
return "Hello World!"
The code creates the default / and /index routes, both of which return a simple string. The index route is declared in the url field of the manifest.json file as we saw above. Here we serve "Hello World!" in plain text.
app/__init__.py
__author__ = 'IBM'
from flask import Flask
from qpylib import qpylib
def create_app():
qflask = Flask(__name__)
qradar_app_id = qpylib.get_app_id()
qflask.config['SESSION_COOKIE_NAME'] = 'session_{0}'.format(qradar_app_id)
@qflask.after_request
def obscure_server_header(resp):
resp.headers['Server'] = 'QRadar App {0}'.format(qradar_app_id)
return resp
qflask.add_template_global(qpylib.q_url_for, 'q_url_for')
qpylib.create_log()
@qflask.route('/debug')
def debug():
return 'Pong!'
from . import views
qflask.register_blueprint(views.viewsbp)
return qflask
When QRadar starts your app, it calls the _init_.py script. The _init_.py file creates an instance of the Flask microframework environment that imports your views module. Your views modules define all the necessary endpoints and routes that serve content back to QRadar.
Conclusion
There you have it! You've got a demo app up on the QRadar box and the tools to edit it and add your own content.
Where to go next?
You can:
Any questions? Drop a line in the comments. Thanks!