OpenID Connect (OIDC) is a simple identity layer on top of the OAuth 2.0 protocol for federated identity and authentication with other applications in your organization that are also configured to use the same OIDC identity provider (IDP). OIDC support is built into our product and available for both on premise and our Cognos Analytics on Cloud customers. OIDC is our direction for web-based authentication providers for customers wishing to federate Cognos Analytics 11 with other applications. OpenID Connect is a modern standard and takes all the best things from SAML, OpenID and Oath2 using lessons learned from these older standards.
Most of the tradition SAML 2.0 IDP’s are already releasing new versions with OIDC support in their product. Check the administrator of your companies IDP or with the IDP sales or support organization.
OpenID Connect in Cognos Analytics 11.07
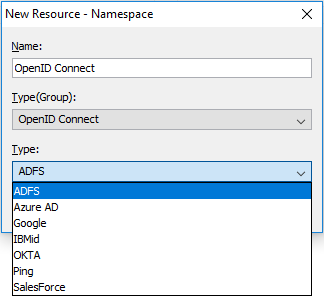
Release 7 introduces support for:
- Active Directory Federation Service
- Azure AD
- Google
- IBMiD
- Okta
- Ping
- SalesForce
We will continue to monitor requests for other OIDC IDP vendors using our Request For Enhancement (RFE) process which can be found at the URL below. Make sure you search for existing RFE’s before logging a new one and if you are logging a new one, log it against Cognos Analytics.
https://www.ibm.com/developerworks/rfe/Configuration of OpenID Connect
Configuration of OIDC is simple and easy to do and requires very little information and configuration.
On the content manager node, select the correct OIDC namespace for your vendor. In the configuration examples below I will be using ADFS but all OIDC IDP’s are very similar in their setup.
Once the OIDC provider you are using has been selected you will need to get information from the IDP to complete the configuration.
Namespace ID is used in the CAMID
Discovery Endpoint, Client Identifier and OpenID Connect client secret can all be obtained from your OpenID Connect administrator
Return URL needs to be updated with your gateway or dispatcher URL
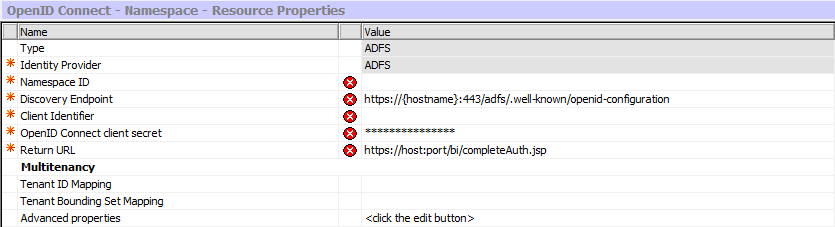
The last step is to import the OIDC root Certificate Authority certificate from the OIDC’s SSL certificate into the Cognos Analytics keystore using the Third Party Certificate Tool. To get information on this see our documentation, there is a link to the OIDC documentation at the end of this blog. Once you have completed all these steps you must do the same configuration on your backup content manager and then restart both content managers.
NOTE: if you use a Load Balancer in your environment, then you will update the Return URL with the DNS entry from the Load Balancer so that all requests are handled correctly. This is regardless of whether the load balancer is in front of many gateway or dispatcher nodes.
Example if you are using a webserver with the Cognos Analytics gateway installed on it:
https://MyLoadbalancerDNS.mycompany.com:443/ibmcognos/bi/completeAuth.jspExample if you are using a set of dispatcher nodes behind the load balancer with no webserver and Cognos Analytics gateway installed:
https://MyLoadbalancerDNS.mycompany.com:9300/bi/completeAuth.jsp Single Signon
If your OIDC IDP support Single Signon and two factor authentication, then Cognos Analytics will take advantage of that as this is enforced at that IDP when Cognos Analytics sends the request for authentication. Cognos Analytics redirects to the OIDC IDP logon page. Once your user has provided the information required they will be redirected back to Cognos with an authorization code that Cognos Analytics redeems for an ID Token which contains the identity of the user. If Single Signon is available from your IDP then that happens when the user makes the request and the ID Token is made available to Cognos Analytics and the users is logged in.
What about SAML?
If your IDP doesn’t support OIDC but does support SAML 2.0 then you do have the option of using IBMiD. IBMiD supports OIDC and allows customers to configure Cognos Analytics to IBMiD using OpenID Connect. Once that configuration is completed then the IBMiD team can help you federate your Cognos Analytics to most SAML 2.0 IDP’s. When your users log on, they are redirected to the IBMiD page and prompted to type in their email address. Once the user does this, IBMiD will recognize them and redirect the user to your companies SAML 2.0 IDP logon page where the user can complete the authentication request by providing the required credentials.

Diagnostic Logging
If you are having issues after you have the configuration correct, you can use diagnostic logging to help narrow them down. In this case, you would want to create a new logging topic. Download the AAA tracing and update it with this:
{
"loggerDefinitions": [
{
"loggerName": "com.ibm.cognos.camaaa.internal.OIDC",
"level": "DEBUG",
"additivity": true
}
],
"topicName": "OIDC"
} |
To get information on diagnostic logging see the blog below which is an overview and has a link to diagnostics logging documentation
#11.0.7#administration#Administration#CognosAnalytics#CognosAnalyticswithWatson#home#LearnCognosAnalytics#Resources#Tips#Tutorials