Tables are the most structured way to represent data. The most common way to create tables is using static headers and rows. This article explains how to add dynamic columns and rows to the table along with custom cells. This is applicable to Automation Application Designer as well as BPM UI toolkit.
- Create/Fetch data for headers and rows.
Assume you have the header details coming from an API call in the below format. Each header column has a name, order and type of column.Sample data for the headers is like this : [{"columnName":"name","columnOrder":"0","columnType":"Text"},{"columnName":"age","columnOrder":"1","columnType":"Integer"},{"columnName":"important","columnOrder":"2","columnType":"Icon"}]
Assume the row data coming from another API call in the below format. Each row contains a list of NameValue pair indicating the column names and it’s value per row.
Sample data for the rowData is like this : [{"row":{"items":[{"name":"name","value":"Thanuja"},{"name":"age","value":"25"},{"name":"important","value":"false"}],"listAllSelectedIndices":[],"te":"Nam"}},{"row":{"items":[{"name":"name","value":"Aarthi"},{"name":"age","value":"21"},{"name":"important","value":"true"}]
- Let’s see how to set the table headers now.
Refer the documentation of setColumns https://www.ibm.com/docs/en/baw/19.x?topic=api-table#setColumns
var columnSpecs = [];
for(var i = 0; i < headers.length; i++){
    columnSpecs[i] = {};
    if(headers[i].columnType == "Icon"){
        columnSpecs[i].renderAs = "C";
        columnSpecs[i].sortable = false;
    }else{
        columnSpecs[i].renderAs = "H";
        columnSpecs[i].sortable = true;
    }
    columnSpecs[i].columnOrder = headers[i].columnOrder;
    columnSpecs[i].type = headers[i].columnType;
    columnSpecs[i].label = headers[i].columnName;
    columnSpecs[i].width = "25%";
    columnSpecs[i].visibility = true;
    columnSpecs[i].dataElementName = headers[i].columnName;
}
me.setColumns(columnSpecs);
me.refresh();
the above code will help you to set the headers to the table. We have made the column with type Icon as it needs some customization. When you render a column as custom it will be call “on custom cell” event per cell load. Remember when you are setting a table you will have the options to render it as Html and Custom. The above code is added in onload event.
To add an icon without any customization you can add the icon class as part of the columnSpecs with this attribute.
columnSpecs[i].css = “fa fa-map-pin”
- The above sets the table headers, now we will set the row data of the table.
Refer the documentation of appendElements : https://www.ibm.com/docs/en/baw/19.x?topic=api-table#appendElements
for(var i = 0; i < rowData.items.length; i++){
elementData[i] = {};
var row = rowData.items[i].row.items;
for(var j = 0; j < row.length; j++){
elementData[i][""+row[j].name+""] = row[j].value;
}
}
me.appendElements(elementData);
the above code will help you to set the row data to the table. When we are inserting multiple rows, it is always useful to appendElements as it will re-render the table only once. The above code is added in onload event.
- So, in step 2 we have a column with data type as Icon and is rendered as custom cell. How do we set the icon with some styling and add some event listeners to it?
if(cell.varName == "important"){
var div = document.createElement("div");
if(cell.row.data[cell.varName] == "true"){
div.innerHTML = "<i class='fa fa-map-pin' style ='color:blue'></i>"
}
else{
div.innerHTML = "<i class='fa fa-map-pin'></i>"
}
div.addEventListener("click", function () {
if(cell.row.data[cell.varName] == "true"){
cell.row.data[cell.varName] = "false";
div.innerHTML = "<i class='fa fa-map-pin' style ='color:black'></i>"
}
else{
cell.row.data[cell.varName] = "true";
div.innerHTML = "<i class='fa fa-map-pin' style ='color:blue'></i>"
}
});
return div;
}
The above code is going to create an element in the cell with the icon class, add some styling to the icon cell and add an event listener to it.
Remember the “On custom cell” event is called every time a custom cell is loaded. You can access the cell properties using “cell”.
* To access the cell variable that called the custom cell event you use : cell.varName
* To access the row data you use cell.row.data, to get the particular cell value you use cell.row.data[cell.varname] or use cell.value
You can console the cell property and use the properties appropriately based on your requirement.
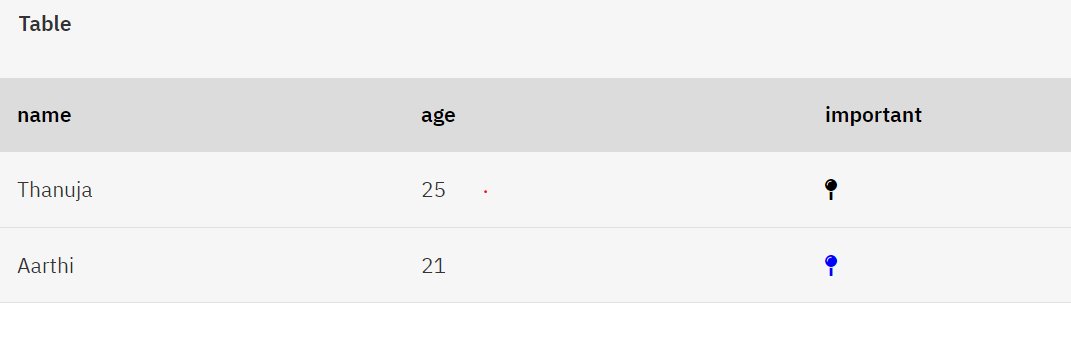
The result of this table will look like this:
Find the sample app designer application for table here: https://ibm.box.com/s/l10synbg4d3sqb8d2mtox061jfszgcl