Article authored by Martin Westphal
This week and next we will be re-blogging some of our most valuable content around APIs in Blueworks Live.
Part 1 of this series presented five general use cases for the best ways to use the Representational State Transfer (REST) application programming interface (API) for IBM® Blueworks Live. You also learned different implementation approaches. The first approach, accessing the API with a local API tester, script or program, is covered in Parts 2, 3, and 4. In this Part 5, you learn how to implement a second approach: accessing the Blueworks Live API through a web application.
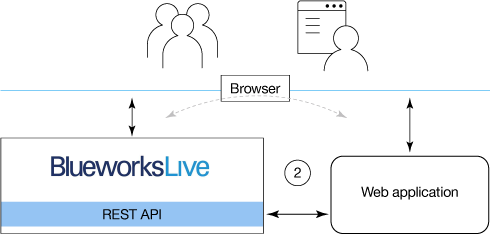
The following illustration shows this kind of web application interacts with the Blueworks Live API, browsers, and users. It allows multiple users to log in from their browsers, interact with the user interface on the web page, and retrieve or send information from Blueworks Live, for example to get a customized report. The web application uses the Blueworks Live REST API to get the needed information, and then it processes the information and renders it as a web page in a specified format.
This approach is more challenging than the implementations in the earlier parts of the series. It requires a central server that is accessible by all the users (users of your Blueworks Live account) through local web browsers. On the server, you also need a web application that is addressed through URLs from these local browsers. Then, the web application must deliver web pages back to the users' browsers.
This tutorial uses Node.js, because it provides a light-weight method to implement a web server with just a few lines of JavaScript code. The JavaScript code is run on the server-side and is combined with HTML (and optionally CSS) and JavaScript, which runs on the client-side, in the browser. As a developer, you can implement everything with JavaScript and use HTML and CSS for the specific rendering of the user interface.
IBM Cloud (previously named IBM BLuemix) is a cloud platform with many services ready to use, including a Node.js boilerplate. With the Node.js service, you can quickly set up a runtime environment for your web application that runs in the same data center as Blueworks Live. Also, with the Node.js service on IBM Cloud, you don't need to be concerned with hardware, IP addresses, security certificates, and that kind of detail. If your application needs more than just a simple web server (for example you need a database, a way to send emails, or monitoring capabilities), you also can find these services on IBM Cloud and combine them easily into your environment.
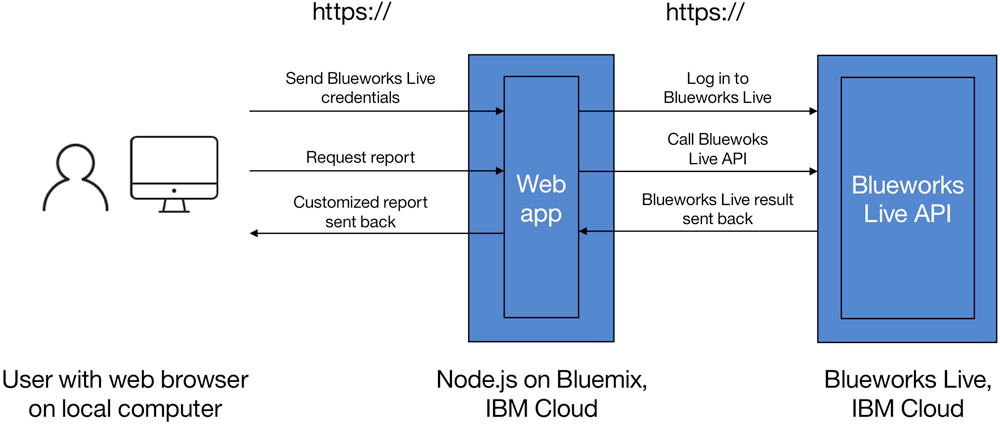
The following illustration gives an overview of the components that this article discusses and how they interact with each other.
This article is structured into two main sections: preparation steps and building a Blueworks Live template app. First, you learn steps to prepare to develop web applications for Blueworks Live. Then you learn steps to build a simple template application that provides users a simple report on a Blueworks Live blueprint. The preparation steps, and testing and understanding the template, are one-time steps. After that, you have enough insight and a running template, which you can modify or extend to fit your needs. You can simply build your own reports or other use case functions on top of the first report. The template and all intermediate steps are available to download from GitHub at https://github.com/BwlTemplateApps.
Preparation steps
Prepare to develop web applications for Blueworks Live by setting up a local development environment with Node.js on your local development machine and setting up an editor or development program. Then you set up and test the runtime environment on IBM Cloud.
- Download, install and run Node.js and npm, the Node.js ecosystem of open source libraries.
You can find free Node.js installation packages, including npm, for various operating systems on nodejs.org.
Follow the instructions to download and install Node.js. After a successful installation you should be able to run node and npm commands in a command-line window. If you just call node, you can interactively enter JavaScript commands that are run directly. The following screen capture shows a short example.

Quit node by entering CTRL-D or CTRL-C twice. Note that your web application is provided as scripts that Node.js runs.
You use npm, a package manager, to install modules for Node.js. To get information about how to use the command, type npm.
- Install an editor or development program.
To create and modify JavaScript, HTML, and other files, you at least need a text editor. It's helpful to use an editor that can format and color your files according to content type. Integrated development environments (IDEs) provide additional functionality such as syntax checking and repository plug-ins.
If you do not already have your standard editing environment, consider the following common choices:
- Create an IBM Cloud account and your Node.js boilerplate.
You can run your application locally and deploy it on an IBM Cloud data center, so that other users can access it at any time. For each service, see the pricing information in the IBM Cloud catalog. Some services are free up to a certain level. Others incur a cost based on the number of transactions or amount of memory use, for example. For more information, see the IBM Cloud registration at console.bluemix.net/registration and the IBM Cloud catalog at console.bluemix.net/catalog.
After you are registered and logged in to IBM Cloud, make sure that you select the right region (the data center) where you want your service. Your account name is displayed in the upper right corner of the browser page. You can click the account name and select the region that you prefer.
Under Apps, your IBM Cloud dashboard shows that you don't have any apps yet. On your IBM Cloud dashboard click Create app or directly follow the link to the catalog. The IBM Cloud catalog shows you all the available services. Either scroll down or type "node" in the search filter until you find SDK for Node.js.
Click SDK for Node.js, and a window opens where you can name your service. It also shows you the pricing plans. Fill in an appropriate App name. This name is also used as the Host name unless you decide to overwrite it.
Click Create. The getting started page of the service that you just created opens. Wait until you see a green icon next to the status that is labeled Running, which means that everything is set up and the starter application is deployed.
The link next to Running is the URL of your service. (You can share this link with others.) If you click the URL, you see your running application. Right now it is a "Hello World!" starter application.
- Understand the starter app.
The getting started page for SDK for Node.js includes the latest information on how to begin using the app in IBM Cloud. For now, just download and unpack the starter app. The starter app is already configured in a way that it runs both locally and on the IBM Cloud server.
Open a command window (for example, cmd on Windows or a shell on Linux) and change to the directory of the unpacked starter app.
You could start the app by giving node the main JavaScript app.js as the argument:
node app.js
However, this approach results in an error because you do not have all required Node.js modules.
Now, the npm package manager comes in handy. If you start it in that directory, it picks up the settings in package.json. Open the file in an editor and see how it tells npm how to start this project and what modules it depends on. The following screen capture shows the package.json file content using Notepad++.

First use npm to install all required modules:
npm install
The following screen capture shows an example output of the command:

If you need more modules, add them to the dependencies list in package.json and repeat the command. After running the command, all required modules are available in the node_modules subdirectory, as shown in the following screen capture:

After you install the modules, you can start the application either by telling node the script name as previously shown, or by typing: npm start.
The following screen capture shows what it looks like to start the app with the node command:

The following screen capture shows what it looks like to start the app with the npm command. The result is the same:

Find the URL, including the correct port number, from the log output and try it in a browser (for example http://localhost:6002). You should get a Hello World! web page. This is the same webpage that you already saw on IBM Cloud, but this time the web server runs on your local machine. You can terminate the service by typing CTRL-C twice in the command window.
To understand how Node.js works both generally - and specifically for this application - look into app.js. A Node.js application can require modules that are also written in JavaScript and provide additional functionality. When using the express module, this application needs only a few lines of code to act as a web server. The web files in the /public subdirectory are shown, if you directly refer to them in the URL. When you don't give a detailed path in the URL, it picks up the index.html file and displays that.
If you add your own mypage.html file in the /public subdirectory, you can display it in the browser also. To try this approach, use the following address, but with the port number, as given in your specific log output: http://localhost:6002/mypage.html
Hint: The Node.js log command might be helpful to show what is going on if you extend the application later. For example, you can add the following JavaScript line in one of your scripts to include message output on the command window where you start the Node.js application:
console.log("my log message: ...");
The other module that was used in the starter app is called cfenv. It helps simplify running the application locally and on IBM Cloud. Notice that the base path of the URL, including the port number, is derived automatically, by using cfenv. In other tutorials about Node.js with the express module only, you might notice that their examples show the port number is set explicitly.
Consider security. An advantage of using IBM Cloud as a runtime environment is that you automatically get a secure connection without being bothered to manually provide certificates and different settings for http or https. IBM Cloud takes care of it. You simply use http for local testing and https after you deploy to IBM Cloud. This approach is important, because you send for example user credentials as post data in a REST request, and these credentials should be encrypted. As long as the deployed web application is accessed through https, everything is secure. However, because users are free to use the starter app either through http or https, consider forcing a redirect of some or all http requests to https. For more information, see Redirecting HTTP to HTTPS with Node.js & Express on IBM Bluemix.
- Deploy on IBM Cloud.
Consider deployment on IBM Cloud. You can work and test locally for as long as you want. If you feel that your reworked application is ready and should be available for multiple users on IBM Cloud, then deploy. See the Getting started page on IBM Cloud to see how deployment works. It might change over time. With the command-line tool, available in 2017, you only need a few simple steps.
Build a Blueworks Live template app
The remaining parts of this tutorial describe how you extend and modify the Node.js starter app to derive a simple Blueworks Live template application. Each step looks into the implementation of specific capabilities that you need.
The Blueworks Live template application provides more than just a static welcome page like the starter app does. You can log in with your Blueworks Live password on the modified welcome page and then retrieve one or more reports in an interactive way. As a simple use case, the Blueworks Live template that you create in this tutorial shows a list of available process blueprints. Users of the application can select one of the processes and get a detailed report for the specific process blueprint.
There are two options to present the process details:
- Option 1: The web page that contains the process list sends a request to your server to retrieve just the data, and renders the data that comes in. The page is kept in the browser and updates using some JavaScript on the client-side (in the browser). This technique is known as Ajax.
- Option 2: To get the process data, link to another page on your server. This page request must also contain information on what process to display. The server retrieves the requested information from Blueworks Live just as it has to do for the first option. In addition, it also renders the page that is based on the process data into HTML (already on the server-side), which the browser then loads. Step 3 of the implementation example uses this method.
In any case, your application must handle various requests from your own web pages and either returns raw data or already renders a web page. The following steps in the upcoming sections show how to build the template application and discuss how to use it:
The important modifications of each step are discussed in the following sections. Solution files are available on GitHub at github.com/BwlTemplateApps. For each step you can find a sample project in the BwlTemplateApp_stepnumber repository. Each project reflects the status after the modifications are done. The project directory does not include required Node.js modules, so you must install the modules first and then call the application. Use the following commands in each directory:
Depending on your preference, you can read through the instructions, look at the sample files for each step, or both. If you want to try it out to have a better understanding of each step, take that approach.
Add a router to handle requests
In this step learn about a router module to handle various paths that are given in the URL when your web application is used. For example, when addressing the http://localhost:6002/welcome URL in a browser, /welcome is the path the router handles as a request.
The port number might be different when you run it on your local machine. Check the console output for the right number.
- Include the router as a required module in the main script (
app.js). The JavaScript file that includes the sample router module is called index.js, and you can find it in the /routes subdirectory. Tell the express application to use it for all paths under the root path /. There is no need to install or declare the module in package.json, because this module is part of your application.
|
1
2
3
4
|
var routes = require('./routes/index');
…
app.use('/', routes);
app.use(express.static(__dirname + '/public'));
|
- Create a
routes subdirectory with an index.js router module.
See the example index.js file for how a module is defined as a JavaScript file. It includes code to write information for each incoming request to the console so that you can see what is happening. If you do not need this, either delete or comment out the following line of code: router.use(loginfo);
The example index.js file of step 1 handles two paths: / and /welcome , shown in the following code sample:
|
1
2
3
4
5
6
7
|
router.get('/', function(req, res, next) {
res.redirect('/welcome');
});
router.get('/welcome', function(req, res, next) {
res.send('Hello');
});
|
The root path is forwarded to /welcome so if you try http://localhost:6002 in your browser, you see in the address field that it eventually calls http://localhost:6002/welcome.
For /welcome, your routing defines a function that is run when a request is received. When the function is called, JavaScript objects are handed over with information about the request (variable req) and response (variable res). As an example, the text "Hello" is sent back. The result is shown in the following screen capture:

Although you do not process any additional URL arguments yet, you can try entering the following text in the address field of the browser:
|
1
|
http://localhost:6002/welcome?name=hans&gender=male&age=20
|
Again "Hello" is returned, because the arguments are ignored. However, the loginfo (if not commented out) in the console tells you the arguments. This information is derived from req.query within the req variable:
|
1
|
INFO(GET) query: {"name":"hans","gender":"male","age":"20"}
|
Create a module to use the Blueworks Live REST API
In this step you add the ability to send REST calls to Blueworks Live.
- Add the
bwlapi.js module script to routes.
The new bwlapi.js module defines a function to execute a BlueworksLive API call:
|
1
2
|
function callAPI(req,res,handleResponse){
…
|
The req and res belong to the request to your own web server. Do not confuse them with the request and response that you use now to interact with Blueworks Live.
Look into the function to see all the required details, including the service host, credentials, and the API resource, which are set in the following way:
|
1
2
3
4
|
var host = 'www.blueworkslive.com';
var username = 'xxxx';
var password = 'yyyy';
var path = '/api/Auth';
|
In this example, the resource is hardcoded to /api/Auth. It checks if the given credentials are registered for Blueworks Live and how many accounts are associated with them.
Important: The credentials are also hard-coded in this example. If you want to run this sample for a real Blueworks Live user, you must use your own credentials and insert them instead of xxxx and yyyy.
The callAPI() function does an https request to Blueworks Live and collects the response. When this action is completed, it invokes the callback function that you passed as handleResponse, shown in the following example:
|
1
2
3
4
5
6
7
|
var bwlRequest = https.request(options, function(bwlResponse) {
…
bwlResponse.on('end', function() {
…
handleResponse(req, res, bwlResData);
});
});
|
You might notice that this Node.js code (and Node.js in general) uses callback functions often. The function calls return immediately and the callbacks are processed at a later time. Always keep this in mind when analyzing or modifying the code.
The returned data in bwlResData contains the status code, response headers, and response data that results from the BlueworksLive request. See the following example:
|
1
2
3
4
|
bwlResData.status = bwlResponse.statusCode;
bwlResData.headers = bwlResponse.headers;
…
bwlResData.data = Buffer.concat(bufferData);
|
For a productive version, you should check the status code. A value of 200 means the request was successful. The headers tell you the data format of the response data. Note that the response data can be text or binary data. For the hard-coded /api/Auth resource in this example, the response data is JSON text data for a successful call (status code=200). You can easily convert this JSON text data into a JavaScript object with the JSON.parse() JavaScript method.
- Include an API call in a page request. To trigger the API call, you must add the new module to your
index.js router script and call it in one of the routes. The following example introduces a /login page in index.js:
|
1
2
3
4
5
6
7
8
9
10
11
|
var bwlapi = require('./bwlapi');
…
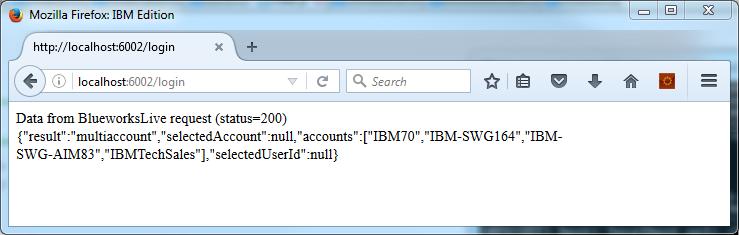
router.get('/login', function(req, res, next) {
bwlapi.callAPI(req, res, function (req, res, resData) {
console.log("BWL response received for auth request");
var dataJson = JSON.parse(resData.data); // buffer to json
var dataText = JSON.stringify(dataJson); // json to text
res.send('Data from BlueworksLive request
(status='+resData.status+')<br>'+dataText);
});
});
|
The following screen capture shows a sample output in a browser:
Although this implementation should work as is (after you apply existing credentials), add the following items to the final template:
- Passing parameters such as method, credentials, or any requested resources to the Blueworks Live API function.
- Checking the status code for errors.
- Checking the response headers to see what kind of data format is returned, and convert the response data into something that you can work with.
Render data as a web page
Note: If you want to run the sample application in Step 3 for real Blueworks Live users, you must enter the Blueworks Live user name and password credentials in bwlapi.js.
So far, you dumped text data to the browser. But what you really need is a renderer that takes the Blueworks Live API response data, which usually is JSON text data, and creates HTML. As previously explained, the text data is easily converted into a JavaScript data object.
One way of rendering data objects as HTML with Node.js is to use the handlebars module. The module takes HTML-like templates with placeholders and replaces them, based on the given data, to render the final HTML page. The work is done automatically on the server side so that HTML can be sent to the client. An alternative way hands over a data object with JavaScript running in the browser to do the rendering on the client side.
- Extend the package description. First you need to provide the module. Add the following dependency in the
package.json file:
|
1
2
3
4
5
|
"dependencies": {
"express": "4.13.x",
"cfenv": "1.0.x",
"express-handlebars": "^3.0.0"
},
|
Now you can download the module files with the following command in the project directory:
- Configure handlebars and add helpers.
In the main app.js script, add the following variables:
var hbs = require('express-handlebars');
var myhelpers = require('./views/myhelpers');
This code loads handlebars as hbs and a self-written helper module that you create.
Then configure express to use handlebars as a renderer as shown in the following example:
|
1
2
3
4
5
6
7
8
9
10
11
12
|
// create a new express server
var app = express();
// view engine setup
app.engine('hbs', hbs({
extname: 'hbs',
defaultLayout: 'layout',
layoutsDir: __dirname + '/views/layouts/',
helpers: myhelpers
}));
app.set('views', path.join(__dirname, 'views'));
app.set('view engine', 'hbs');
|
Consider the following elements of the sample code for handlebars and helpers:
- Layout: The
/views/layouts/ directory contains layouts for your web pages. The samples for this tutorial use only one default layout: layout.hbs. It looks like a complete HTML file but can contain placeholders. There is one important {{{body}}} placeholder that you replace with the specific content of a page. The layout is a wrapper that consists of the parts that are common to all your web pages, such as a header, a logo, or a footer message.
- Views: The specific content of a page is defined as an
.hbs file in the /views directory. It can also contain placeholders. For example the placeholder {{user.name}} is replaced with the value of a user.name variable. Commands are also possible. They can have parameters and can also frame HTML parts. The start of the command is indicated by # and the end by /, as shown in the following example:
|
1
2
3
4
5
|
{{#if user.registered}}
<p>Hello {{user.name}}.</p>
{{else}}
<p>Please register!</p>
{{/if}}
|
- Helpers: You can define your own handlebar commands, also known as helpers. The sample for this step contains a module that holds all helpers in a separate
myhelpers.js file in the /views directory.
- Add a layout and views and use them to render an HTML page.
As an example, replace the send() method in the /login route from Step 2 with the following lines:
|
1
2
3
4
5
|
res.render('accountinfo', {
title: 'BWL Account Information',
status: resData.status,
dat: dataJson
});
|
When you open the /login page in the browser this time, you get an HTML page created with the response data from the BlueworksLive API call with the accountinfo.hbs view file (with status and dat variables). This content is wrapped with the layout given by layout.hbs (with the title variable), as shown in the following screen capture:

All the rendering is completed on the server side. The variables are not seen by the browser. It only gets the HTML text.
If you would like to experiment and modify the sample for Step 3, you do not need to restart the local application if you have changed the .hbs files. Just reload the page in the browser.
In this step you add the ability to react to user input to make the web application more interactive. You need the body-parser module, which helps to process data that you retrieve during a post request from one of your web pages that are based on an HTML form.
You extend the package file and the main app.js script, similar to what you did in the previous step.
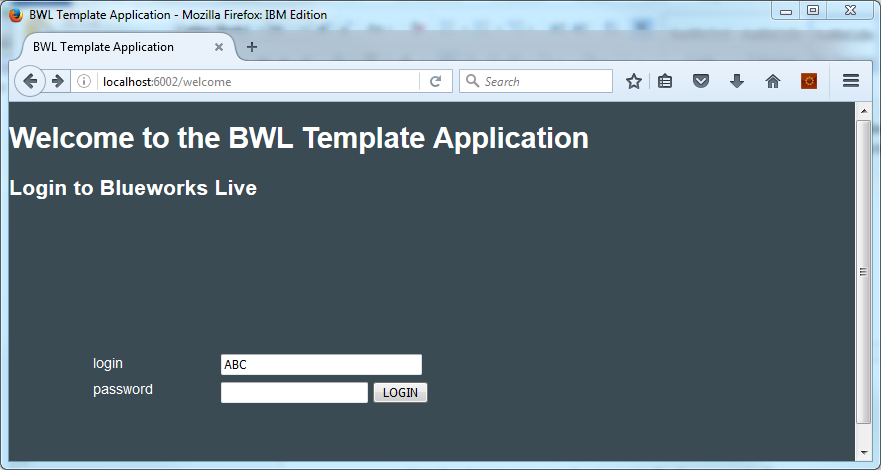
This step introduces a new view for the /welcome web page. On this welcome page you present a login form for the user (see the ./views/welcome.hbs file) that asks for a user name and password. When the button is clicked to log in, a post request is made to the /login path of your server, sending the login information in the body of the request.
Look at the sample in ./routes/index.js for how this post request is handled. The router entry for /login fills a data object with the login information and other information, as shown in the following example:
|
1
2
3
4
5
6
7
8
9
|
router.post('/login', function(req, res, next) {
var reqData = {
'method': 'get',
'host': 'www.blueworkslive.com',
'path': '/api/Auth?version=20091212',
'login': req.body.login,
'password': req.body.password
}
bwlapi.callAPI(req, res, reqData, function (req, res, resData) {
|
Note that the callAPI() function in bwlapi.js is modified to be controlled by this kind of information. There are no longer any hardcoded credentials included or required in this function.
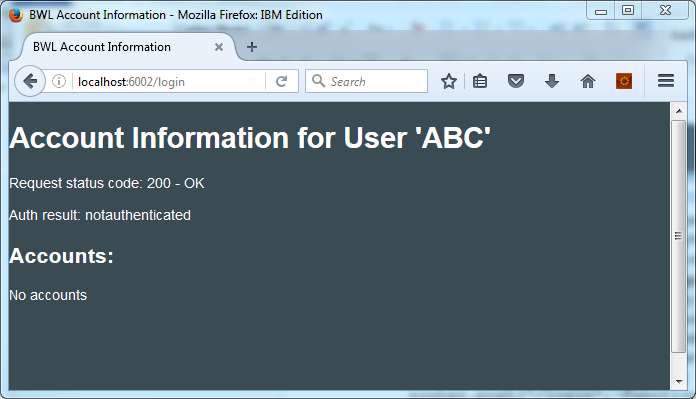
In addition, the response data is analyzed by the handleBWLResponse(resData) function, and the data is converted automatically. If you log in as a user, the request should succeed. The result either tells that this is a valid user name and password combination or indicates that it is not. Although you might fail to log in successfully, the request is technically successful for both cases and returns a status code of 200. See the following two screen captures for examples of input and output:
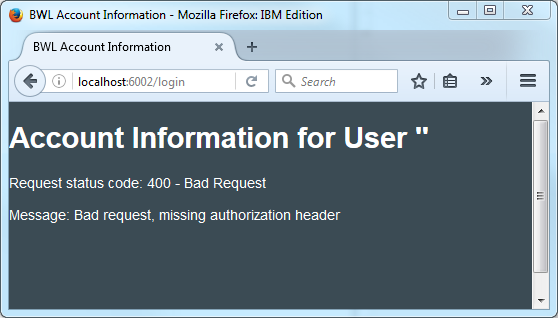
However, if you do not enter a user name and password, the request returns with an error containing a text message. The accountinfo.hbs view that renders /login checks the status code of the response from Blueworks Live. If it is not 200 (= OK), the view displays the returned error text message instead, as shown in the following screen capture.
You can extend the application from what you have so far to let users pick an account, get a list of processes, pick a process, and display details. Each interaction requires a Blueworks Live call to get the requested information and a view to display the result.
However, you need to keep some data as a user moves from one page to the next. At the very least you must keep a user's credentials. The web server application can be used by multiple users, and you need to keep separate data sets for each user (in application terms: each browser client). To identify a specific user, you store a cookie with a unique ID on each user's browser and identify the right set of session data for the user through the cookie.
To keep it simple for this tutorial, the session data for all users is stored in memory on the server side. This might lead to performance issues due to memory shortage if many users connect to the server. Permanent storage (so the session data is available even after the application is restarted) requires a database or other file storage to keep the session data permanently. For details about a productive application, see the module description of express-session at https://www.npmjs.com/package/express-session.
The express-session module must be added to the package file and the main app.js application script. The order is important: the session object must be used by the application before the routes. From now on, you can use the following simple code in any router entry:
|
1
2
3
|
app.get('/', function(req,res,next) {
var sessionData = req.session
…
|
You can use the req.session variable to store and retrieve any kind of information you need for a user's session.
Now it's time to define the page usage concept of the template application. Keep in mind that a user might enter any known URL of your application at any time in a browser. The application uses the following approach of resolving path requests to appropriate views:
GET for any routing path: Users that are not authenticated are redirected to /welcome.GET /welcome: Display the welcome view that allows users to enter credentials and request /login.POST /login and POST /logout: These self-explanatory request paths forward to /process if users are authenticated or /welcome after logging out or after an unsuccessful authentication attempt.GET /: The root path redirects to /process.GET /process or /process?account=… or /process?id=…:
- If no account was selected, it shows the
processlist view, which allows selecting an account (but it does not show any process lists).
- If an account was selected but no ID is provided, then it shows the
processlist view.
- If an account was selected and the ID is provided, then it shows the
processdetails view.
In the simple template application in this tutorial, you have only two views that show content in addition to the welcome view, which is used for logging in. In other situations, you might have more content views, so it is a good idea to provide information about the current user, including the logout function, in the header or footer of these pages. A simple way to provide this information consistently is to include it in the layout file.
Also note:
- The two sample views require more helpers in
myhelpers.js.
- Blueworks Live requests other than
/api/Auth require deriving the specific service endpoint (for example, ams001 = Amsterdam) that depends on the account. So before such requests are sent you call the determineEndpoint() function.
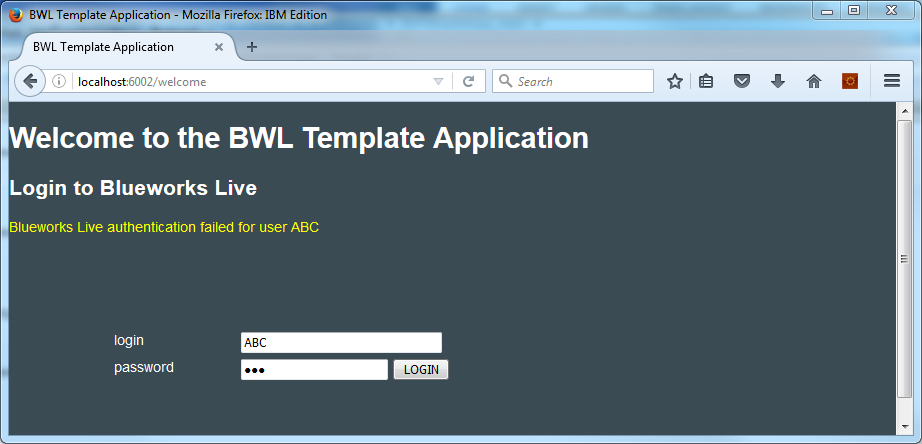
The following screen capture shows an error message after a failed attempt at logging in and the user is redirected to /welcome:
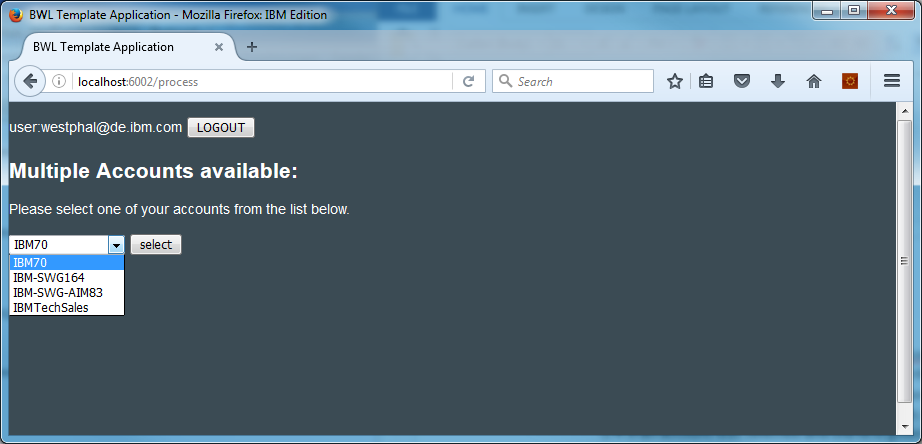
After users successfully log in, they can choose from their available accounts on the process view, as shown in the following screen capture:
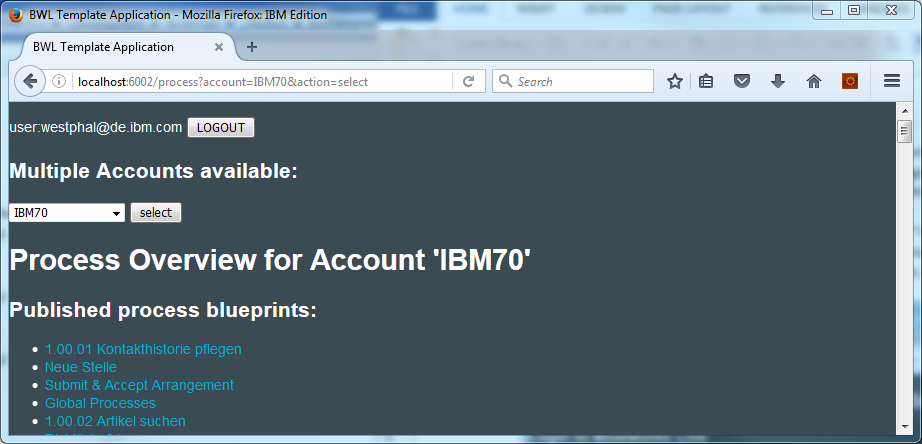
After account selection, the application displays a list of published processes, as shown in the following screen capture. Note that the account name is passed in the URL, so you could also set it there. You can store the link, including the account setting.
When users click a process name, the link leads to a URL that shows the process details, as shown in the following screen capture.
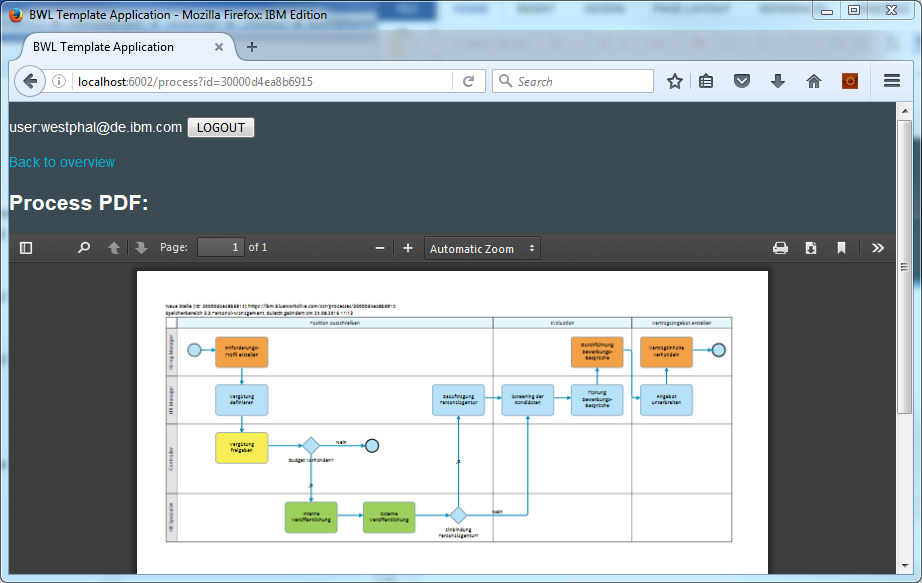
Note that the process ID is passed as an argument. As an example report, the pdf data (provided by the /scr/api/PrintDiagram API resource) is used, displaying the diagram of the process. In your own application, the report can display other information that is required. It might even include multiple API calls to Blueworks Live before a final result page is rendered.
Write your own app
With Step 5, you have a complete template to build your own Blueworks Live application. You might want to modify the process detail page or add new pages. For some ideas, see Part 1 of this series, which discusses various general use cases of applications.
See the following list of other aspects to consider when writing your own app:
- The sample template discussed in this article uses the Blueworks Live credentials directly. There might be cases where no login is required or user permissions are handled separately from Blueworks Live. Then you might use a technical user ID (a service ID) to access the Blueworks Live API.
- Many things can go wrong, and catching all possible errors is tedious work. If you plan to use your application in a productive environment for business users, implementation requires much more effort than a quick, as-is application that only considers the happy path or a simple use case.
- This tutorial generally ignores styles. With cascading style sheets (CSS) you have a powerful tool to style HTML pages exactly the way you want and keep the styles separate from content. You can also add static images to make the user interface more attractive.
- Adding JavaScript to the web pages makes them dynamic (running in the browser on the client-side). As already discussed, you could dynamically load more data and render it within an already displayed page without reloading the page. Therefore, instead of having a page listing processes and another page with process details, you could load the details of one selected process and show it underneath or beside the list. This approach is especially useful if you require multiple calls to Blueworks Live to get an overall result. In those situations, adding JavaScript to the web pages might be preferable, to show the users intermediate results.
- There are a large number of JavaScript libraries available that you can use within the browser, for example, for graphical rendering. You might also want to check out scaled vector graphics (svg), which can allow for dynamic creation of graphics such as pie charts.
- Following this shift toward the client even further, you could also provide a single-page application with angularJS, for example. Then all of your application runs in a single page on the browser. However, the approach discussed in this article allows direct linking to certain report pages and processing (maybe shared processing) on the server. It also allows hiding certain internal data and only passing what is needed to the client.
- Some applications might require a storage facility or other services such as email or analytics. As previously discussed, IBM Cloud offers a wide spectrum of services that are ready to be combined in a cloud environment.
Conclusion
In this tutorial you learned how to implement a multi-user web application that interacts with the Blueworks Live REST API. You used Node.js, an open-source, cross-platform JavaScript runtime environment for running JavaScript code on the server side.
The first section explained how you set up your development environment, introduced a starter app, and showed how to deploy it on IBM Cloud. The second section discussed the implementation details of a Blueworks Live template app, based on a provided sample, and other aspects to consider.
Now try your own application implementation or check with IBM or other service providers for offerings to help you. We might add some more application samples to the Blueworks Live template project on GitHub (github.com/BwlTemplateApps) in the future, so check for updates. If you are interested in further enablement or consulting, feel free to get in touch with your local IBM sales contact or directly with Rolf Riedlinger, rdl@de.ibm.com.
Acknowledgments
The author would like to thank Rolf Riedlinger from IBM Lab Services and Sam Weeks from IBM Technical Sales UK for their review and comments. Also a special thanks to Margaret Thorpe from the Blueworks Live product team for her support and constant willingness to discuss ideas from the field.
Downloadable resources
Related topics