Indeed, the Decision Service zip file size is limited at upload time to 20 MB by default in the CP4BA context for security reason. Therefore, before processing projects coming as zip file, a couple of customization and configuration updates need to be implemented.
3. Procedure
Starting from CP4BA 22.0.1, the end user has the possibility to customize ODM production pattern deployment so that Decision Service zip file larger than 20 MB can be imported directly from DC user interface.
To do so, please follow the procedure described below.
3.1/Check ODM user role:
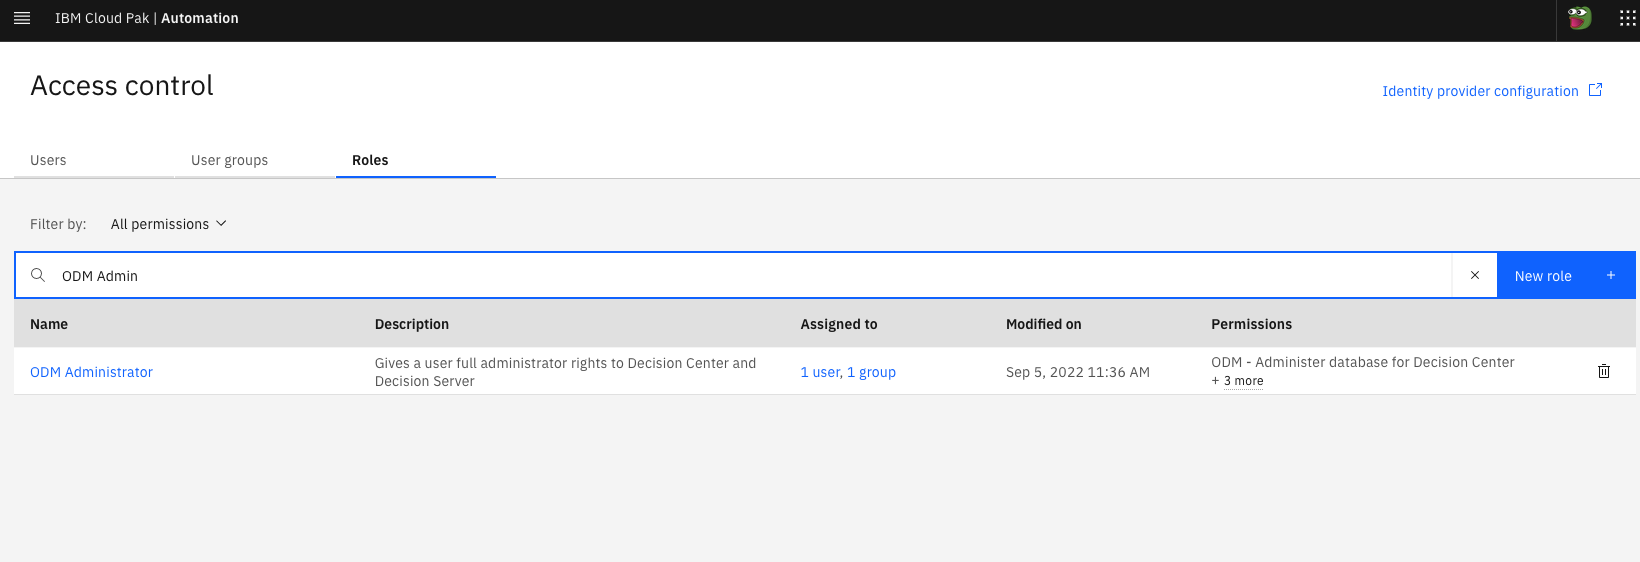
To be able to administrate DC, a user has to have some role setup in ZEN.
Find more information about user configuration in IBM Cloud Pak for Business Automation documentation, configuring user access:
- 22.0.1 link
- 22.0.2 link
- 23.0.1 link
- 23.0.2 link
In the ZEN access control panel, your user should have ODM Administrator role applied, like in the following screenshot:
3.2/Check deployment size:
The import operation from DC consumes CPU. To have better performance, one must adjust his or her ODM deployment T-shirt size. The idea is to have a sufficiently large ODM deployment so that the import operation is efficient.
There are two straightforward ways to validate ODM T-shirt size of an actual deployment. The first one is by checking a Custom Resource (CR) parameter. The second one is to check ODM deployment details.
3.2.1/ Checking size parameter in CR:
Browse the CR YAML file of the deployment which can be found from OpenShift administration console under "Operators > Installed Operators > IBM Cloud Pak for Business Automation (CP4BA) multi-pattern > CP4BA deployment > <CR_NAME>"
In the ODM configuration section, check the value of the parameter called "deployment_profile_size".
- e.g:
- odm_configuration:
- deployment_profile_size: large
- ...
|
In the case where the deployment size is globalized at Cloud Pak level, the parameter will be placed in the shared configuration section and called "sc_deployment_profile_size".
- e.g:
- shared_configuration:
- sc_deployment_profile_size: medium
- ...
|
Please note that the size parameter in ODM configuration section overrides size parameter in shared configuration section. For a production deployment type, the default is small.
3.2.2/ Checking size in terms of pods:
Each size corresponds to a fixed number of pods of each ODM service.
Browse the Decision Center deployment which can be found from OpenShift administration console under "Workloads > Deployments > <CR_NAME>-odm-decisioncenter > Pods”.
For instance, a ODM large deployment will consist of:
|
-
- 2 Decision Center pods:
- <crname>-odm-decisioncenter-xxx
- <crname>-odm-decisioncenter-xxx
|
3.3/ Adapt the import to your project:
Even when ODM deployment size is large enough, some default timeout settings can inhibit data manipulation.
For instance, importing a large Decision Service zip file more than 20 MB could fail since the default max upload size is set at 20 MB and default transaction timeout is 600s.
To be able to import project zip file without encountering timeout, the settings have to be adjusted. Let's see how to update these settings.
3.3.1/ Updating ODM production pattern deployment:
Choose the values which fit your needs (size of your project zip file) and create a configmap.
|
oc create configmap my-odm-dc-web-configmap --from-file web-configuration.properties
configmap/my-odm-dc-web-configmap created
|
|
Once the configmap is created, it looks like:
- oc describe cm my-odm-dc-web-configmap
- Name: my-odm-dc-web-configmap
- Namespace: <my_dba_project>
- Labels: <none>
- Annotations: <none>
- Data
- ====
- web-configuration.properties:
- ----
- ilog.rules.teamserver.transaction.timeout=6000
- maxUploadSize=50000000
- Events: <none>
|
At this stage, the configmap needs to be applied so that the changes can be taken into account.
Update your CR and assign the configmap to decisionCenter.webConfigRef.my-odm-dc-web-configmap parameter.
- odm_configuration:
- deployment_profile_size: large
- decisionCenter:
- webConfigRef: my-odm-dc-web-configmap
|
If updating the CR from OCP administration console, the save button will apply the modification. However, if the CR is a local copy, it must be applied via command line:
|
oc apply -f cp4ba-cr.yaml
|
Once the updated CR applied, wait...
The configuration is taken into account when all of the DC pods restart.
Then in each DC pod log, one can check that the new values are reflected.
Browse the Decision Center pod logs which can be found from OpenShift administration console under "Workloads > Deployments > <CR_NAME>-odm-decisioncenter > Pods > <CR_NAME>-odm-decisioncenter-xxx > Logs > Raw”.
The logs should contain this statement:
|
Setting parameter ilog.rules.teamserver.transaction.timeout to 6000 in the web.xml file
- replace maxUploadSize by 50000000 in /config/apps/decisioncenter.war/WEB-INF/spring/applicationContext.xml
|
3.3.2/ Updating DB configuration:
Updating ODM deployment configuration is not enough to go through an import of a large zip file to DC. Indeed, default values while creating DB tables must be updated to handle logs files properly.
Find out more about external database configuration, Configuring an external database:
- 22.0.1 link
- 22.0.2 link
- 23.0.1 link
- 23.0.2 link
How do I find out my DB log file configuration requires an update?
When uploading zip file in DC, if the DC pod log contains this error:
|
Got exception :The transaction log for the database is full.. SQLCODE=-964
|
How do I update my DB configuration?
NB: the following example deals with a DB2 database
|
Connect to DB "MYODMDB"
|
- db2 connect to MYODMDB
- Database Connection Information
- Database server = DB2/LINUXX8664 11.5.7.0
- SQL authorization ID = USERDB
- Local database alias = MYODMDB
|
|
Check DB log file configuration values
|
db2 GET DB CFG
Database Configuration for Database
...
Log file size (4KB) (LOGFILSIZ) = 1024
Number of primary log files (LOGPRIMARY) = 13
Number of secondary log files (LOGSECOND) = 12
...
|
|
Update DB log file configuration
|
db2 UPDATE DB CFG FOR MYODMDB USING LOGPRIMARY 128 IMMEDIATE;
DB20000I The UPDATE DATABASE CONFIGURATION command completed successfully.
db2 UPDATE DB CFG FOR MYODMDB USING LOGSECOND 64 IMMEDIATE;
DB20000I The UPDATE DATABASE CONFIGURATION command completed successfully.
|
|
Activate DB log file configuration
|
db2 GET DB CFG
Database Configuration for Database
...
Log file size (4KB) (LOGFILSIZ) = 1024
Number of primary log files (LOGPRIMARY) = 128
Number of secondary log files (LOGSECOND) = 64
...
|
|
Make changes effective
|
When updating the DB log file configuration, one can read this message:
"SQL1363W One or more of the parameters submitted for immediate modification were not changed dynamically. For these configuration parameters, the database must be shutdown and reactivated before the configuration parameter changes become effective."
Hence, to activate these new parameter values, run the db2 commands DB2STOP then DB2START
|
4. Example: upload 40 MB zip file from DC user interface
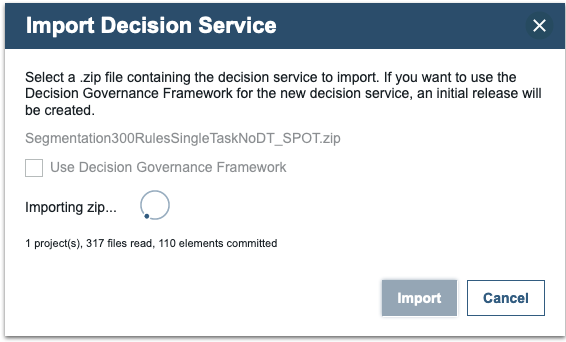
Current example is describing the import of a 40 MB zip file containing a 50k-rule Decision Service.
After login in DC with a user having ODM Administrator role, from the library page click on the "Import Decision Service" button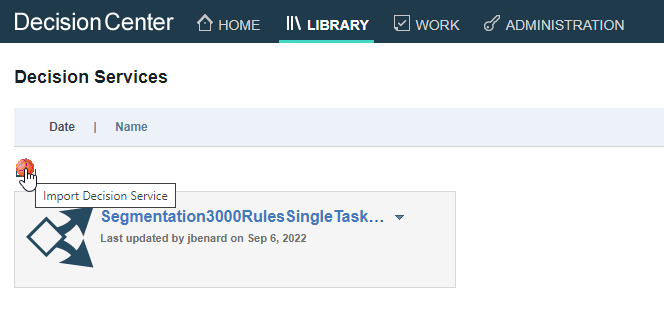
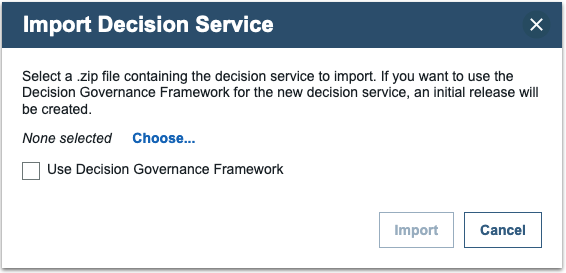
A wizard will popup to help browsing your local zip file.
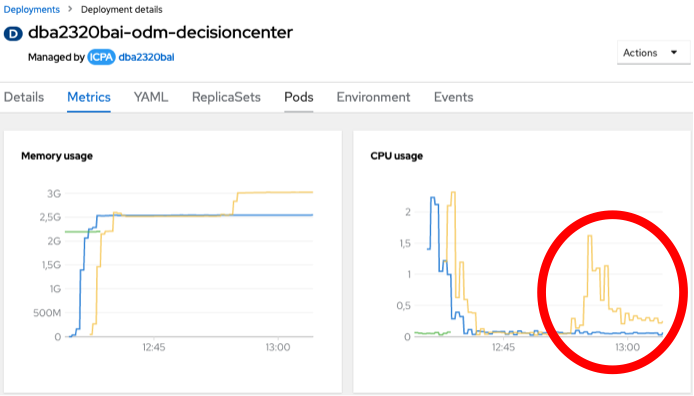
Browse the Decision Center metrics view which can be found from OpenShift administration console under "Workloads > Deployments > <CR_NAME>-odm-decisioncenter > Metrics”.Important: the usage of Decision Governance Framework must be decided while importing, any direct conversion is impossible afterwards. Another row of importation would be required to activate this feature.
When clicking on the "Import button", the upload progress can be followed in the wizard window.
Please note that the user interface may timeout with the following message:
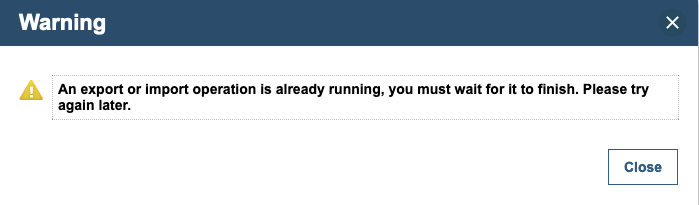
Despite this error, the upload operation goes on as a background activity. No activities surface on the UI nor in DC pod logs. However, the DC pod CPU load shows an ongoing activity. This metric can demonstrate the end of the import operation when the CPU resource usage drops.
Important: once the import wizard has timed out, the library page has to be manually refreshed to see the newly imported file.
5. Conclusion
This article illustrates how to tune the different parts of your ODM production pattern environment. With the proper user role, DC customization and database configuration, one can easily import large projects from the user interface in DC.