◆ Applies to: TBM Studio 12.1 and later
Branching is an advanced feature added to the platform for Apptio TBM Studio v.12.1. Branching is a core feature found in most modern version control systems. Branching allows users to create a copy of a complete project, make changes on the project copy in parallel, and then promote to production those changes with the original project. Branching is an extremely powerful addition to the TBM Studio experience, and it is important to understand its intended uses.
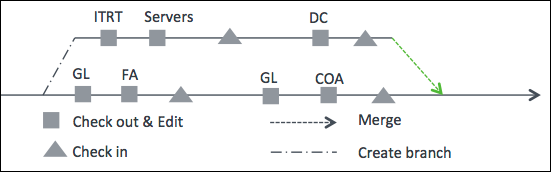
Branches and workspaces
A workspace is a user-specific environment where changes to checked-out documents live until they are checked back in. When you check out a document in a workspace, you have an exclusive lock on that document—no one can check out that document until it is checked in.
A branch is a complete copy of the current project at the time when the branch was created. When you check out a document from a branch, that document goes into a workspace on that branch. Changes made to documents in branch workspaces appear on the branch only after those documents are checked in. To see the changes on the trunk, the branch must be merged back into the mainline project.
Why would you use branching?
Branches are intended to support one of two key use cases:
- Long-running configuration: There is a set of changes to be made that will take a long time before they are ready to be promoted to Production. Meanwhile, changes, such as monthly data loads, need to be made and pushed to Production. You can create a branch and make the changes to the branch while your operational data loads continue on the trunk.
- Hotfix prod: There is a problem with something in Production, but development has taken place that is not ready to promote to Production. You can create a branch, fix the specific issue, and then merge the branch into Production.
- Audit prior state or archived state: There is a business need to look at a past state of a project. For example, a prior fiscal year might be closed and changes are made to the model, but you need to look at numbers from that past state. Using branches, you can look at the exact state of the system at a previous point in time.
Branch concepts:
- Each branch is a complete copy of the trunk project. This has performance implications as discussed in the following Best practices and performance considerations section.
- The number of branches for an environment is limited to five (5).
- To open and close branches, you must be assigned to a role that has the Create and close branches permission.
- Closing a branch removes the branch project along with any build projects, workspaces, and so on. A branch cannot be closed if it has a build used in Production. Once a Staging build from the trunk is promoted to Production, the branch may be closed.
TIP: See also Troubleshoot a branched project that cannot be closed.
- When you merge changes to a branch, you can:
- Select the documents that you want to merge.
- See a list of conflicts, if any exist (a conflict occurs when changes are made to the same document in two different branches).
- You cannot merge a document if it is checked out by another user working in trunk.
- All documents in a branch must be checked in before you can merge the branch.
- Tags exist for all builds, and custom tags can be created to identify specific builds.
- For hotfix branches, when the branch is promoted to production, it overrides the trunk branch.
Best practices and performance considerations
Branches use the same amount of resources (for example, memory, CPU, and so on) as the project from which they are branched. Therefore, when you create a branch, you are adding a load to your Apptio environment equal to the load of any activity you might engage in with your main project.
TIP: When creating a branch, consider the impact on both stage calculations and workspace load. For more information on branch impacts to workspace performance, see Managing performance in your development environment.
Additionally, except for hotfix branches, calculations for branches will be queued with calculations for the project from which they are branched. If you create a branch from a version of the project that took three hours to calculate, then the moment the branch is created, dev and stage calculations will start. If someone checks in a change on the trunk after you have branched, then the resulting dev and stage calculations for the trunk will be queued behind your branch calculation.
The following image shows the AdminDB project view of the calculations for all the projects branch calculations. Note the two sets of branch calculations in yellow and orange, and the trunk calculation for the project on which those branches are based in green:
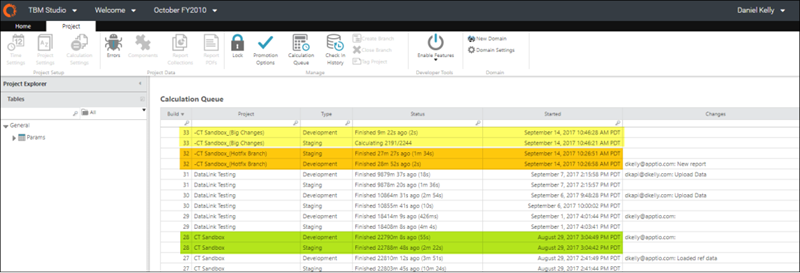
TBMAs wanting to navigate to this view should navigate to Frontdoor, select the TBM Studio tile, and then open the Calculation Queue.
Create a branch based on the most recent completed build
When in the Stage environment, create a branch using the Create branch command on the Project tab, Manage group.
When in the Development environment, you can use the Create branch command only if you have nothing checked out. This restriction is by design. The implication is that you may wish the changes in your workspace to be a part of the branch, but they will not be until all materials are checked in and calculated.
Apply a custom tag to a build
While all builds have default tags, as indicated in the How to create a branch from a past build that did not have a custom tag applied section, after you have locked stage, the Tag Project button becomes available.
Click Tag Project to apply a custom tag to a build, which can help to make finding a build much easier.
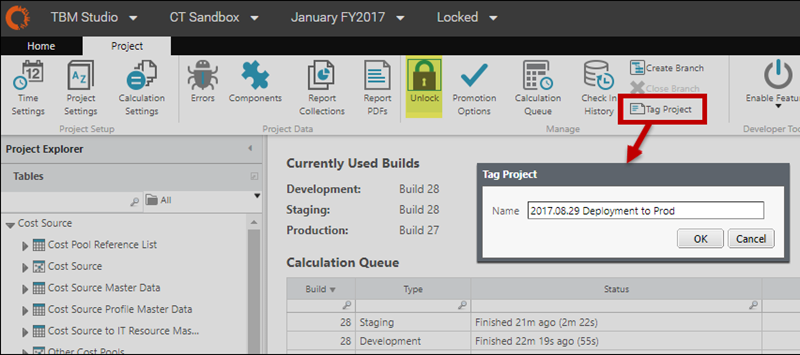
This tag will appear on the Builds page so that you can search for it easily and use it for branching.
NOTE: At the time of this writing, the Tag Project button will not be available after you promote a build.
Create a branch from a tag
To branch from a tag:
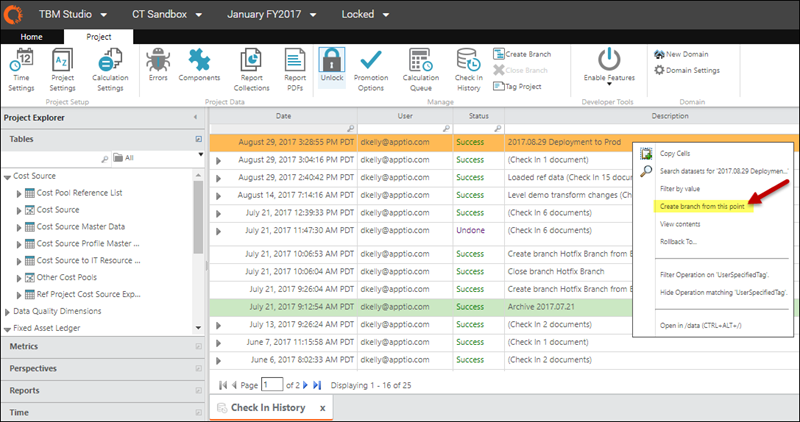
- Find the tag in the Check In History.
- Right-click the tag, and then select Create branch from this point.
Create a branch from a past build that did not have a custom tag applied
Sometimes, it may be useful to create a branch from a prior build that was not tagged (for example, if you discover that something has changed and you need to figure out when that change was introduced).
To create a branch from a prior, untagged build:
- Select the Home tab, then click View to see the drop-down menu.
- In the Check In History, select Verbose View:
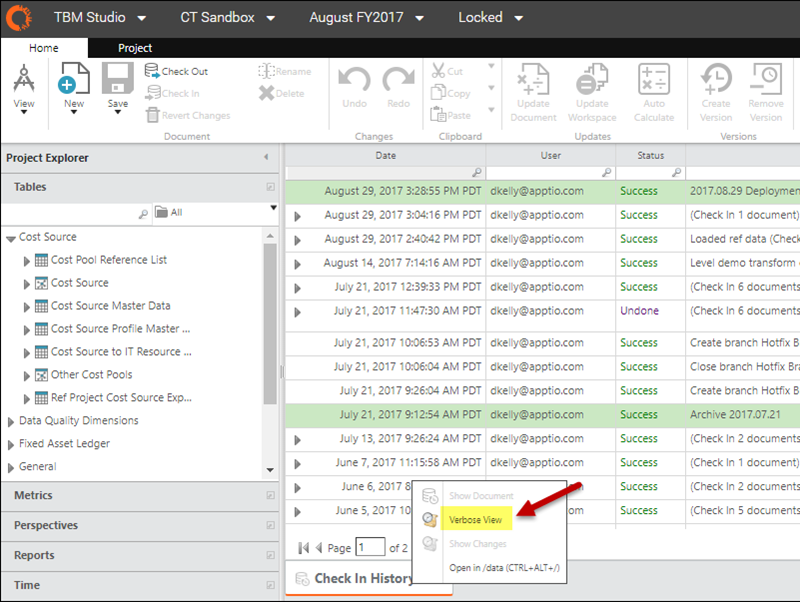
- When you are in Verbose View, you can see all the default build tags:
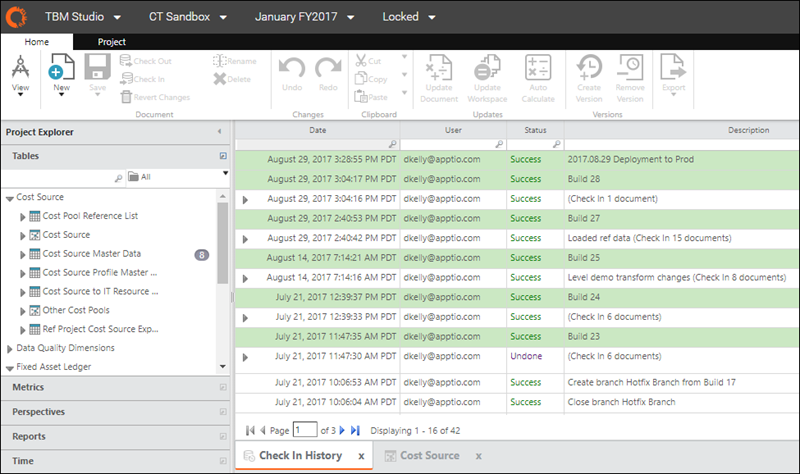
- Right-click on the build tag and select Create branch from this point.
Navigate between branches and the trunk
When a branch for a project exists, you can navigate to the branch, or back to the trunk, using the drop-down menu on the menu bar:

Use a branch
- Limit branch check ins to ~30 documents - When working in a branch, the current recommended best practice is to limit check ins to approximately thirty (30) documents.
Example: You have 100 documents checked out on the branch. Check in approximately thirty documents, then check in another thirty documents, and so forth. This action provides a limit to the individual check in sizes. This practice is recommended to address a limitation when merging the check ins to the trunk.
- Make changes - After a branch has been created, changes are made in the same way they are made to the trunk. Documents can be checked out, modified, and checked back in to the branch.
- Branches and workspaces - Your workspace on the trunk is separate from your workspace on branches. If you check out a document on a branch, and then navigate to the trunk, you will not see the document checked out there because it is a separate workspace.
- Check out considerations - It is possible to have the same document checked out on both the branch and the trunk at the same time. The implication is that one person could be working on the document and commit changes on the trunk that are not in the branch.
Merge a branch back into the trunk
Before you merge, there are some prerequisites:
- None of the documents to be merged can be checked out in the trunk.
- The user executing the merge cannot have any document checked out in the trunk.
- Do not merge from the trunk to branches, or between branches.
While the UI supports merging between branches and from the trunk to branches, there are limitations which make this action outside of best practices currently.
Execute the merge
After changes have been checked in on a branch, the check ins as viewed in the Check In History can be selected to merge into the trunk:
- Select one or more check ins in the Check In History by using Ctrl+click or Shift+click.
- Right-click on the selected records and select Merge changes to branch. At this time, it is recommended to merge branch changes to the trunk.

Resolve conflicts
When you execute a merge, a merge dialog that indicates conflicts might appear:
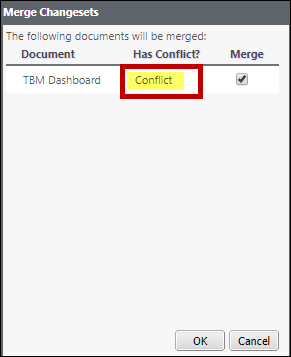
Conflicts occur when the trunk has a document version that has been modified since the time the branch was created. Therefore, if you were to merge the document and check it in, then the branch document would overwrite the trunk document.
To resolve these conflicts, you must either manually integrate the changes present in the copy of the document in the trunk into the copy of the document in the branch, or you must be willing to let the changes be overwritten.
Check in after the merge
After you merge the changes, they will be checked out on the trunk. You must check them in on the trunk before the merge operation is complete. Also, note that there is a document with the name of the branch itself, which must also be checked in.

Close the branch
After you finish merging your changed documents to the trunk, close the branch. Closing the branch conserves resources.

Use a branch to hotfix prod
Occasionally, a change may be needed in prod quickly and changes in stage may not be ready for deployment. In this scenario, a hotfix may be appropriate.
To apply a hotfix to a document in prod, follow these steps:
- Navigate to the document in prod.
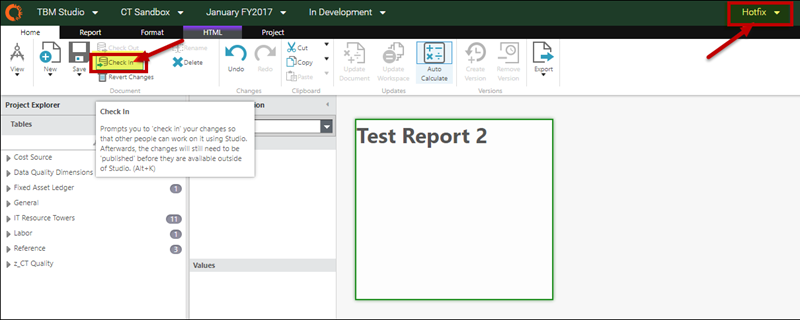
- Check out the document. When the dialog appears, you can select either Development or Hotfix:
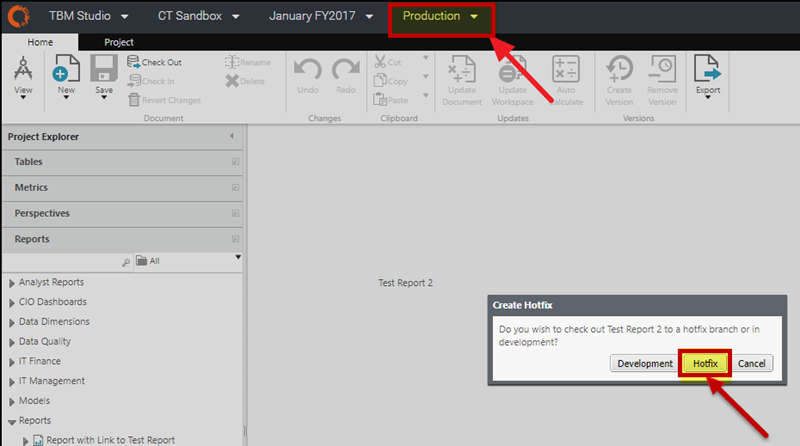
- Select Hotfix.
The system will generate a branch called Hotfix, where you can make your change:
- Wait until the hotfix branch calculates in stage. The system will calculate hotfix branches in parallel with other calculations, so normal build queuing does not apply.
- Click Lock to lock the hotfix branch in stage.
- Click Promote Now to promote the hotfix branch to production:

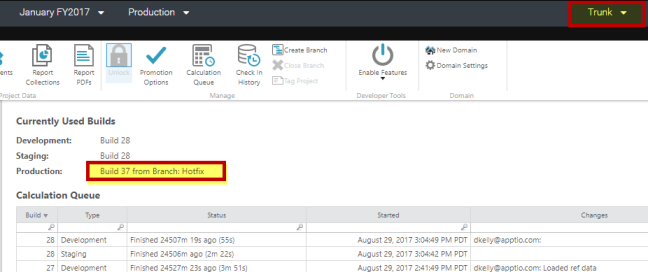
If you were to attempt to close the hotfix branch at this point, you would receive an error:
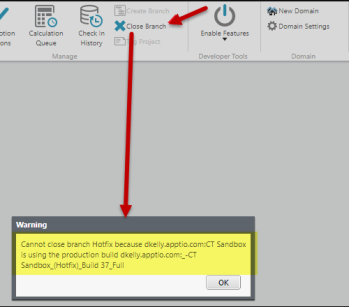
This is because the build in prod isn't based on the hotfix build, and therefore, the system will not allow the hotfix branch to be closed.
To close out the hotfix process:
- Merge the changes into the trunk. See the Merge a branch back into the trunk section above for details.
- Promote the build with the hotfix changes to prod.
- Close the hotfix branch.
TIP: See also Troubleshoot a branched project that cannot be closed.
Archive time periods and access archives
Periodically, it is useful to archive past time periods. For example, when you want to turn off calculation for one or more past fiscal years to reduce calculation time.
To archive time periods:
- Before changing the time settings, apply a custom tag. Use a naming convention for the tag, such as adding a prefix to the tag name with the word "Archive" so that it is easy to find all builds that correspond to archived events.
- Adjust the time settings to make the project start date what you want it to be, and then check it in. This will close the old time periods.
If you want to access the archived time periods, search for the archive tags and generate a branch from the archive tag.
Branching FAQ
Why is Create Branch not available? - If the Create Branch button is not available, or if it doesn't appear in the context menu when you are right-clicking a build tag, you might have exceeded the number of branches allowed for your environment. The branch limit is five branches for the environment (inclusive of all projects).
Why can't I close a branched project? - If you click Close Branch on the Project tab and a warning message appears stating that the branched project cannot be closed, see Troubleshoot a branched project that cannot be closed.