Building API-Driven Pipelines with IBM DevOps Velocity and Jenkins
In modern software development, automation is critical for efficient and reliable CI/CD workflows. IBM DevOps Velocity provides API-driven pipelines, allowing teams to integrate and automate their workflows using REST APIs. When paired with Jenkins, you can dynamically upload builds and manage deployments with minimal manual intervention.
This blog would guide you to:
- Set up an API-driven pipeline in IBM Velocity.
- Use Jenkins to dynamically upload builds via API calls.
Prerequisites:
- Jenkins: Configured with the build job.
- User Access Key: You'll need an access key for making API requests to IBM DevOps Velocity.
Steps to create a User Access Key in IBM DevOps Velocity.
A User Access Key is essential to authenticate your API requests to IBM DevOps Velocity. Follow the below steps to create a new access key in DevOps Velocity:
- Navigate to Settings à My profile.

- Click on Create user access key.
- Provide a name for the access key.
- Click on Create.
For Example, I have created User Access key with the name as API-driven-access-key.

Once you click on Create you will get the details of your User Access key.
NOTE: Copy the Access key value as you won’t be able to see it again.

Step 1: Set Up API-Driven Applications in Velocity
To set up an API Driven Applications in DevOps Velocity:
- Navigate to Value streams.
- Click on Create value stream.

You can refer to the Creating value streams section of the documentation to create a new value stream in IBM DevOps Deploy.
Once you have created a value stream, Navigate to Pipeline.

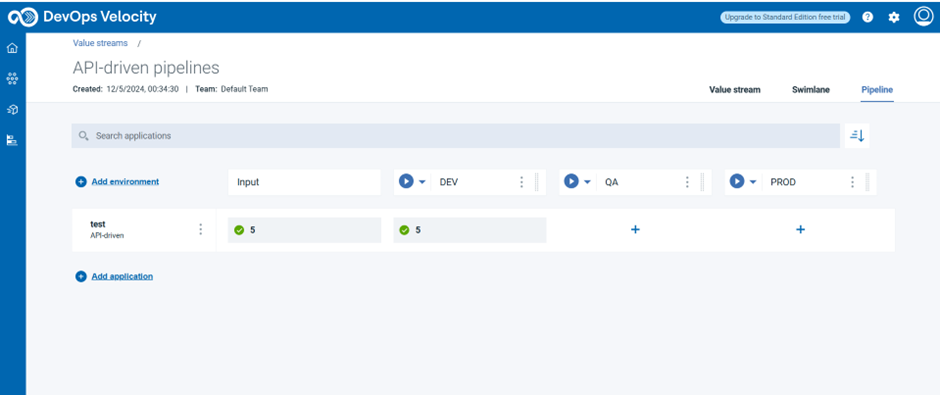
In this blog, I have a Value stream named API-driven pipelines created, where I would be adding the Api-driven applications.
To configure Pipelines, click on Add application and select API-driven in the managed by section.

Once you select Api-driven in the Managed by section. You need to Choose Application Type:
- · Create New Application: Enter a name for the new application and click Save.
- · Use Existing Application: If the application already exists, select it from the drop-down list and click Save.

For this blog, I have created a new application named test.


Step 2: Create a Jenkins Pipeline Job for Build/Version upload
For this blog I have an already created Pipeline job in Jenkins named Api-driven-pipeline.
If you want to create a pipeline job for build upload, you can refer to Setting up the build and deployment jobs in Jenkins section of the documentation for your reference.
Executing the build job through terminal
- Upload a Build to Create a New Version
To create a new version of the application in the pipeline, you’ll need to upload a build:
-
- In the pipeline, under the Input stage, click the + for your application (e.g., Test Api-driven Application).
- After you click on + you would get a curl command popup as below:

-
- Edit the below details for your curl command:
- Replace <User Access Key> with the User Access Key you created earlier.
- Replace <Version Number>, <External ID>, <Build URL>, and <Commit SHA> with appropriate values from your Jenkins build job.
- Copy the curl command and run into terminal or CI/CD automation scripts having network access to the IBM DevOps Velocity server.
For this blog, I am using the Build URL and Revision details from my Jenkins build job.

The curl command for my DevOps Velocity application for the the Input stage would be:
curl -k -X POST "https://localhost:442/api/v1/builds/apiDriven" -H "Authorization: UserAccessKey 8081a084-441b-443f-a24f-c3eda72f2cc6" -H "Content-Type: application/json" -d "{\"version\":\"5\",\"application\":{\"externalId\":\"90944bd6-8851-4933-9106-bc46154064b8\"},\"url\":\"https://github.com/Velocity-learning/api-project\",\"revision\":\"b11a5ee09dd6ca640e7674b8e386036b408469f5\"}"
Output

If the curl command is successful, the build version will be reflected in the Input stage of your application pipeline.

After uploading the build version, you can deploy it to different environments by clicking the + icon under each environment (e.g., DEV, QA, PROD) and providing the necessary details in the curl command.

For example, a deployment to the DEV environment might look like this:
curl -k -X POST "https://localhost:442/api/v1/deployments/apiDriven" -H "Authorization: UserAccessKey 8081a084-441b-443f-a24f-c3eda72f2cc6" -H "Content-Type: application/json" -d "{\"version\":{\"name\":\"5\"},\"application\":{\"externalId\":\"90944bd6-8851-4933-9106-bc46154064b8\"},\"url\":\"https://github.com/Velocity-learning/api-project\",\"environment\":{\"name\":\"DEV\"}}"
Output

Run the curl command for each environment (DEV, QA, PROD) to deploy the build version across multiple stages of the pipeline.
For Example:
On executing the curl commands for all the environments, I could find the build version being deployed for all the environments of the application pipeline.

Automate Deployments status uploads using Jenkins
Instead of executing the API commands manually and uploading the deployment status to DevOps Velocity, you can automate the deployment status upload by using the curl commands in the build step of your Jenkins job.
For Example,
I am using the following curl commands in the Build Step for my Jenkins Build job (Api-Driven-pipeline) to automate deployment status uploads to Velocity pipelines:
curl -k -X POST "https://localhost:442/api/v1/builds/apiDriven" -H "Authorization: UserAccessKey 8081a084-441b-443f-a24f-c3eda72f2cc6" -H "Content-Type: application/json" -d "{\"version\":\"%BUILD_NUMBER%\",\"application\":{\"externalId\":\"90944bd6-8851-4933-9106-bc46154064b8\"},\"url\":\"%BUILD_URL%\",\"revision\":\"%GIT_COMMIT%\"}"
curl -k -X POST "https://localhost:442/api/v1/deployments/apiDriven" -H "Authorization: UserAccessKey 8081a084-441b-443f-a24f-c3eda72f2cc6" -H "Content-Type: application/json" -d "{\"version\":{\"name\":\"%BUILD_NUMBER%\"},\"application\":{\"externalId\":\"90944bd6-8851-4933-9106-bc46154064b8\"},\"url\":\"%BUILD_URL%\",\"environment\":{\"name\":\"DEV\"}}"
curl -k -X POST "https://localhost:442/api/v1/deployments/apiDriven" -H "Authorization: UserAccessKey 8081a084-441b-443f-a24f-c3eda72f2cc6" -H "Content-Type: application/json" -d "{\"version\":{\"name\":\"%BUILD_NUMBER%\"},\"application\":{\"externalId\":\"90944bd6-8851-4933-9106-bc46154064b8\"},\"url\":\"%BUILD_URL%\",\"environment\":{\"name\":\"QA\"}}"
curl -k -X POST "https://localhost:442/api/v1/deployments/apiDriven" -H "Authorization: UserAccessKey 8081a084-441b-443f-a24f-c3eda72f2cc6" -H "Content-Type: application/json" -d "{\"version\":{\"name\":\"%BUILD_NUMBER%\"},\"application\":{\"externalId\":\"90944bd6-8851-4933-9106-bc46154064b8\"},\"url\":\"%BUILD_URL%\",\"environment\":{\"name\":\"PROD\"}}"

How does it works:
- Build URL: Jenkins will dynamically generate the build URL during the job run.
- Version Name: The version is dynamically assigned using Jenkins '%BUILD_NUMBER%.
- API Request: These requests will update your Velocity application pipeline, triggering deployments for the respective environments (DEV, QA, PROD).
By running a single Jenkins build job, you can automatically update the deployment status to IBM DevOps Velocity pipelines.
Sample Output


Conclusion
By combining IBM DevOps Velocity and build tool like Jenkins, you can fully automate API-driven pipelines. This integration reduces manual effort, streamlines workflows, and provides real-time pipeline updates across environments.
#Highlights-home