Overview
This blog gets you started with IBM UrbanCode Release (now IBM DevOps Release). This document focuses only on the IBM UrbanCode Deploy (now IBM DevOps Deploy) integration, a common integration that everyone leverages.
Step 1: Download the IBM UrbanCode Deploy Plugin
To get started, we will setup the IBM UrbanCode Deploy (UCD) integration. This is important as the integration will populate IBM UrbanCode Release (UCR) with Applications, Versions, Statuses, and more that we can leverage in subsequent steps. To get started, please follow these steps:
NOTE: please do not use the out-of-box UCD integration that comes with your UCR base installation. Download the plugin from the above link as it is much more efficient in pulling data from your IBM UrbanCode Deploy (UCD) Server and you can configure it to check for changes on a very frequent basis (e.g. every second).
- In IBM UrbanCode Deploy, create an "Access Token" and save the value temporarily so you can refer to it in subsequent steps
- In IBM UrbanCode Release, configure the UCD integration by navigating to Home > Integrations and then clicking "Add New".
- Be sure to select "IBM UrbanCode Deploy Plugin" for your Integration Type and provide your "Authentication Token" value as shown below:
- Click the "Check Authentication" button and verify that you have a successful connection
- Click Save
- Run the integration and view the log results
The integration should pull into UCR your IBM UrbanCode Deploy Applications, Components, Environments, and much more.
Step 2: Create a Lifecycle
Follow these steps to create your first Lifecycle that can be leveraged for your releases.
- Navigate to Home > Release Process and click on the Lifecycles tab
- Add a new Lifecycle
- Click Add New
- Add your phases by clicking “Add Phase”
- Add statuses that indicate what is required for an artifacts/code before it can enter a new phase. You can switch to the “Quality Status” tab and add new ones.
- Create gates using these statuses by clicking "Add Gate"
NOTE: some statuses may be present from the integration with UCD.
Some of our clients use “status” and “gates” to help prove to an auditor that their processes are being followed to ensure quality code progresses through the pipeline.
Finally, if you have a common checklist that a Release Manager uses for each release, you can create a “Process Checklist Template” that can be associated with your Lifecycle. An example could be:
The Date Offset is automatically applied as you create your release and set a “Target Date” to calculate the day on the calendar for each item in the checklist. These items will also be visible in the Calendar view of IBM UrbanCode Release.
Step 3: Configure Team-Based Security
Before you create your new Release, please follow these steps to configure Team-based Security in IBM UrbanCode Release:
- Navigate to Home > Manage Security
- Click on the Teams sub-tab
- Click the “Add New” button to add a new team to be used for your Releases
- Click on the Roles sub-tab
- Add any roles that your organization requires
- Add users to particular Roles for your Team
Now that this in place, the last thing that is important to do is to associate your Applications discovered by the IBM UrbanCode Deploy integration to your new Team. To perform this action, follow these steps:
- In the Manage Security view, click on the “Applications” sub-tab
- Select the Applications used by your Team in the right-hand pane and drag and drop them to your new Team in the left-hand pane as shown below:
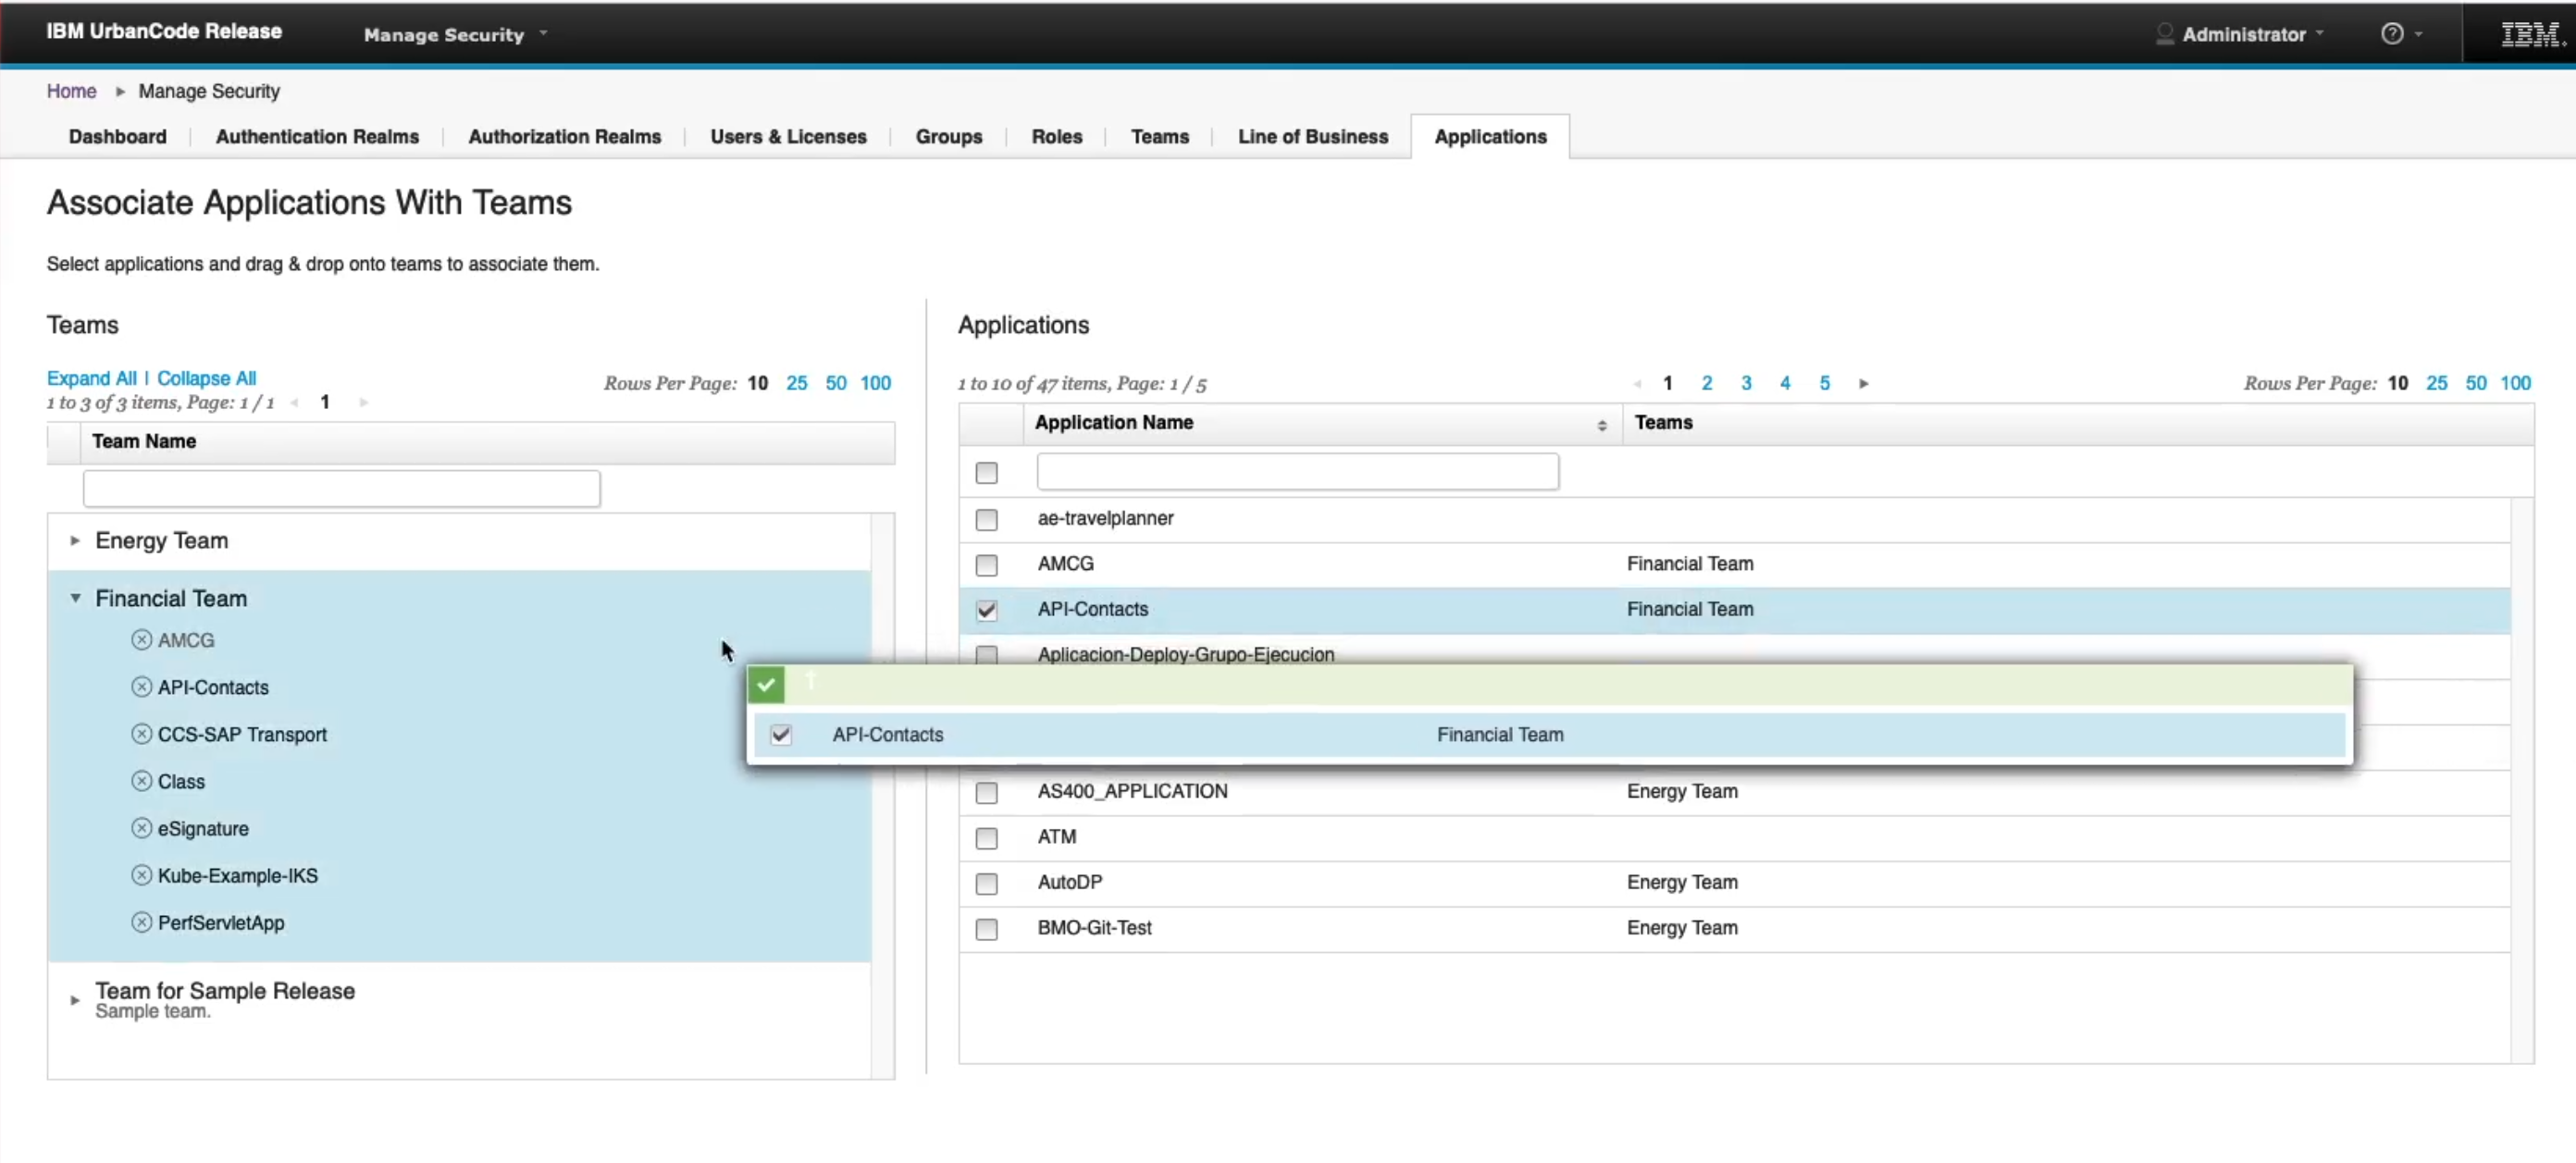
This is a necessary step as you will not be able to add your participating applications to your new Release without this in place. You are ready to move to the next step.
Step 4: Add any “Manual” applications (those not automated with UCD)
In your organization, when you release your software, you may have some applications that are manually deployed. For example, you may have an SAP-based application that is updated manually along with a corresponding database that it leverages. Your release team would like to track these updates and incorporate steps into a deployment plan for your release weekends. To add manual applications, follow these steps:
- Navigate to Home > Applications
- Click the “Add New” button as shown below:
- Provide a name for your application, associate the Team properly, and select the Release Environments appropriate as shown below:
- Click Save
- Click on your new manual Application
- Click the “Add New” button to add some “Versions” that you can use to track what is being deployed during a release as shown in the example below:
Great job! We are making excellent progress! In the next section, we will configure our Release Environments.
Step 5: Add Release Environments
In this step, we will be adding any Release Environments we leverage that are not present with the out-of-box installation. After this is complete, we will map our IBM UrbanCode Deploy application environments discovered by the UCD integration to these Release Environments in UCR.
- Navigate to Home > Environments
- Click on the “Release Environments” sub-tab
- Click “Add Release Environment” as shown below to add any Release Environments in the left-hand pane that you require:
For example, you may have multiple QA environments (e.g. QA-1, QA-2, QA-3) or multiple CERT environments (e.g. CERT-1, CERT-2). Add any environments you need as shown above in the left-hand pane.
- For the applications you will be leveraging in your release, drag and drop the Application and environment found in the right-hand pane to the corresponding Release Environment found in the left-hand pane as shown below:
For example, the Application Sum-App with Environment DEV would be mapped to DEV-1. Similarly, the Sum-App with Environment QA would be mapped to QA-1. Repeat this for all of your target environments.
You are now ready to create your first Deployment Plan.
Step 6: Create a Release
In this section, we will create our example Release and add our participating applications. Follow these steps:
- Navigate to Home > Releases & Deployments
- Click the “Add New” button on the Releases sub-tab
- Enter a name, select your Lifecycle, select your Team, and provide a target date as shown below:
- Click Save
- Click on your new Release to edit it as shown below:
- Click the “Add New” button to add your participating applications as shown above.
- When complete, you should see the applications as shown in the example below:
- For each phase in your release pipeline, click the “Environment Reservation” button and make your environment reservations for each environment as shown below:
NOTE: your environment reservations will show up in the Calendar view for all to see which is great for collaboration. Further, without this reservation, the pipeline view will not display anything for a given environment.
- Click on the “Pipeline View” sub-tab for your release
- You should see your participating applications and what snapshots have been deployed to each target environment.
Our next and final step for this blog is to create our deployment plan to be used as we release our applications into each of the target environments.
Step 7: Create your Deployment Plans
Your release managers likely have a set of steps they follow during the release event. These steps are often tracked in a spreadsheet, a Confluence page, or by using some other means. The issue with them is that the larger team will not have visibility into this which is why everyone typically finds themselves in a conference call listening in and waiting for their turn to perform their tasks.
Using IBM UrbanCode Release, we can digitize this experience and provide everyone with visibility into this activity. To get started, you will create a “Deployment Plan” and often you can leverage the spreadsheet from a release manager as your guide to create segments, manual and automated tasks, and more. Please follow the steps below to get started:
- Navigate to Home > Releases & Deployments
- Click on the “Deployment Plans” sub-tab as shown below:
- Click “Create/Import Plan” as highlighted above
- Provide a name for your deployment plan and select your new Release as shown below:
- You will now create Segments and then Tasks (manual and automated) for each segment.
- Keep in mind that you can have steps in a Segment that run in sequential order or can be run in parallel.
- Keep in mind that each segment can specify a dependency on other segments before they can be started.
- Consider steps that can only be run in certain environments or once per environment.
- Consider segments that could be run in parallel
- Consider adding a “tag” for different types of steps. This is helpful when you execute the release to see progress on a dashboard.
NOTE: you can specify the typical "Duration" for a task as shown above. Further, you can specify an "Executor Role" and if the step is dependent on a particular application being deployed. Notice that I added a "Task Tag" as shown above which is helpful for collaboration in a deployment dashboard.
- Here is an example of what a deployment plan could look like:
NOTE: some of the segments above are setup such that they can run in parallel (e.g. "Deploy iSeries Updates" and "Deploy Mainframe Changes" can be run in parallel by two different teams). You can also see a task dependency graph by clicking an icon in the plan. Here is an example:
- When you are complete, be sure to associate this deployment plan with your lifecycle for the release you created as shown below. Some of our clients create a “Production” plan and a “Non-Production” plan which could have different segments and tasks. Others have a single “Production” plan that is used for each phase of the lifecycle and they use settings for the tasks to delineate what should be run in each environment phase.
Our first Release is now configured and ready to test. I hope you found this guide helpful as you get started with IBM UrbanCode Release.
Here is a link to a video showing many of the tips covered in this blog post along with a short demo of IBM UrbanCode Release.
In my next blog, I will walk through an example of how to schedule and execute a deployment plan against a target release environment.
#UrbanCodeRelease