How to Integrate a GitLab CI/CD Pipeline with IBM UrbanCode Deploy
Author: Randy Langehennig
Date: June 9, 2021
Overview
The GitLab solution is a very popular option for many of our clients for source code management, issue tracking, CI/CD capabilities, and much more all in a single solution and data store. It has some really great collaboration capabilities and advanced features for "shifting left" your security testing at time of code-commit which our customers love. Further, many of these clients have also made a significant investment in IBM UrbanCode Deploy (now DevOps Deploy) and want to be able to enjoy all the benefits of GitLab in conjunction with the great capabilities that UrbanCode Deploy (UCD) brings to the table. The purpose of this document is to provide an example of how you can configure the integration using a “build once, deploy many” DevOps approach.
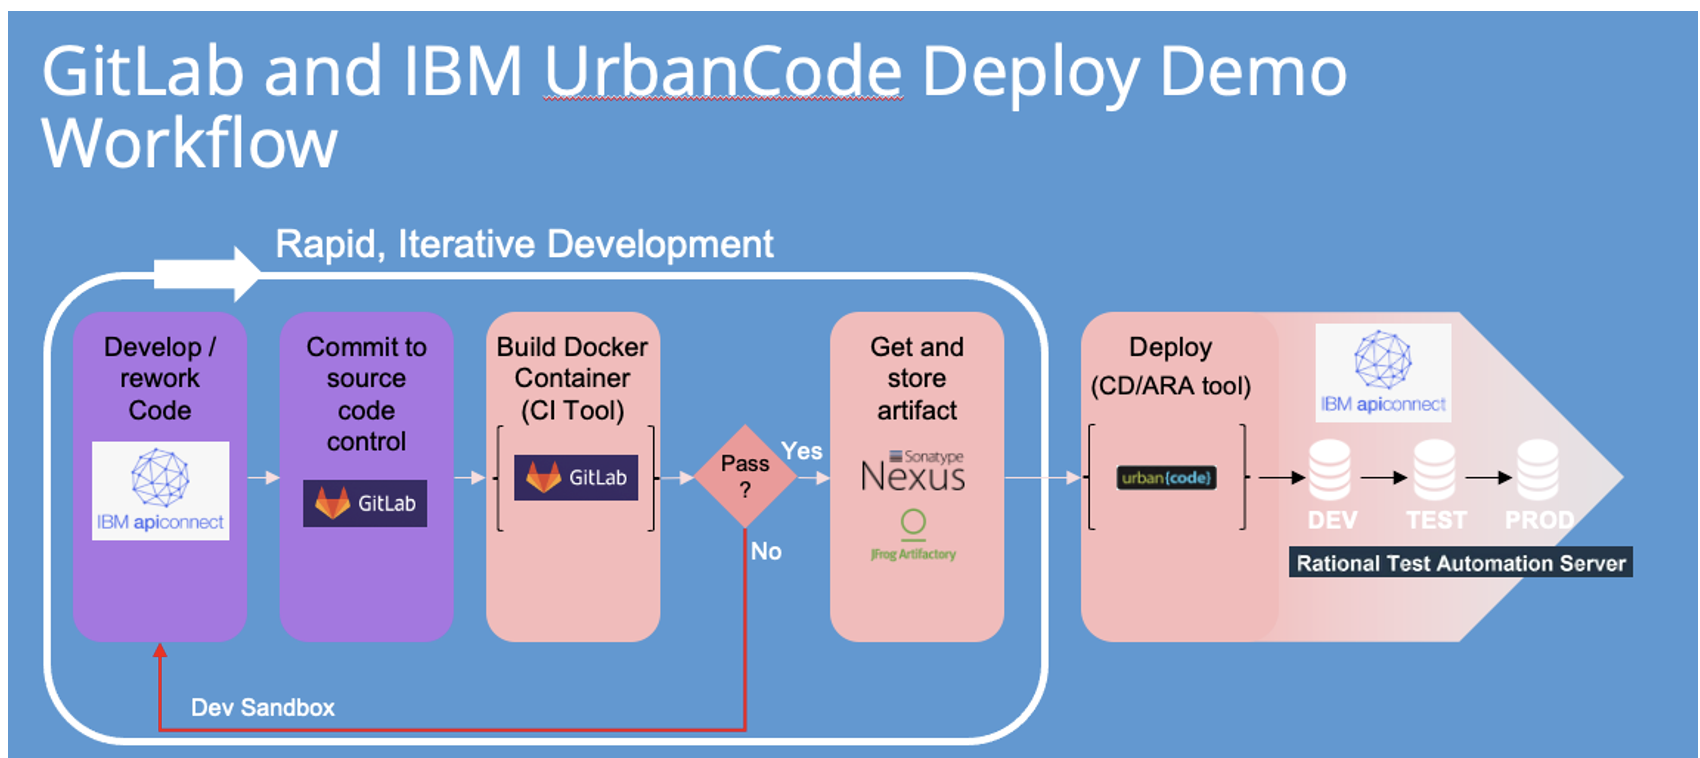
With GitLab, you can leverage existing investments like Artifactory or Nexus from an definitive asset repository perspective as well as IBM UrbanCode Deploy for your deployment automation as shown above.
In this document, we will work on an example application in GitLab and show how you can integrate the solution with IBM urbanCode Deploy.
Review of a Simple CI/CD GitLab Pipeline
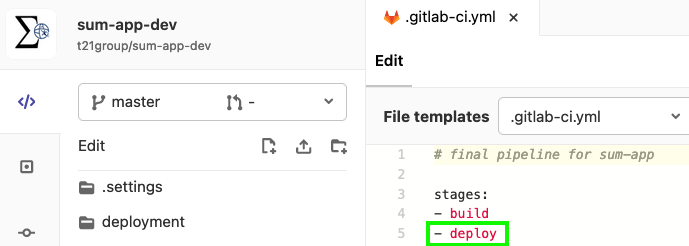
Let’s take a look at an example CI/CD pipeline (.gitlab-ci.yml) for a project called “sum-app-dev”. We currently have our “build” stage configured to build our Liberty-based application using maven as well as run some unit tests. Our pipeline currently looks like this:
stages:
- build
build_maven:
stage: build
image: maven:latest
artifacts:
paths:
- target/sumapp.war
script:
- mvn install
unit_test:
stage: build
image: maven:latest
script:
- mvn test
As review, GitLab leverages a GitLab Runner for each step and is configured to use a docker image which you can specify. You can see that for the build process, we are using a container labelled as “maven:latest” to build our SumApp application code. The artifact of the build will be placed in GitLab’s package repository in “target/sumapp.war” as shown below in the right-hand pane labelled "Job artifacts":
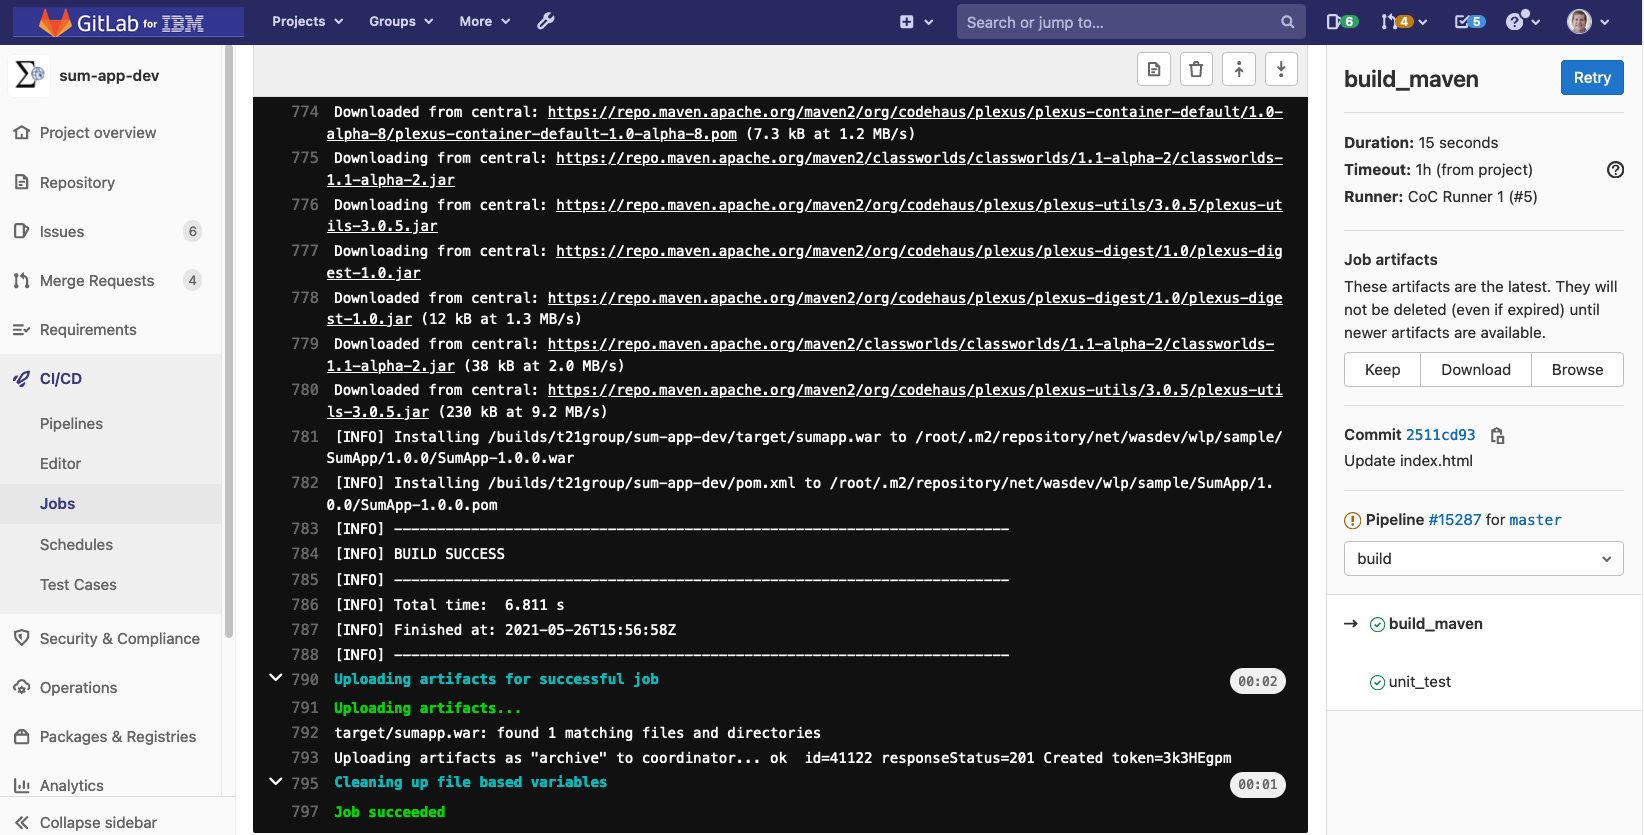
You can click on “Browse” in the right-hand pane for this “build_maven” step and see the artifact of the build as shown below:

We will add a new "deploy" phase to the CI/CD Pipeline to make IBM UrbanCode Deploy aware of the new component version and trigger a deployment. Before we can do that, we have a couple of administrative steps that we need to complete.
Generating IBM UrbanCode Deploy Authorization Tokens for GitLab
Before we update our CI/CD pipeline in GitLab, we will need to generate an authorization token or tokens in IBM UrbanCode Deploy which we can use as part of the integration. This will allow GitLab to authenticate with the system to initiate the deployments. You can setup a single token or a couple of tokens based on your preference. Here are some examples:
|
Description
|
User
|
Expiration Date
|
Expiration Time
|
|
GitLab Version Importer
|
System Version Import
|
<pick date>
|
<pick time>
|
|
GitLab Deployer
|
gitlab-admin (an example)
|
<pick date>
|
<pick time>
|
|
GitLab Single Token
|
gitlab-admin (an example)
|
<pick date>
|
<pick time>
|
For this example, I am going to leverage two tokens. One to handle the version import and the other to be used for triggering the deployment. This is helpful if you need separation of duties.
To create a token, follow these steps:
- Click on “Settings” in the IBM UrbanCode Deploy web console
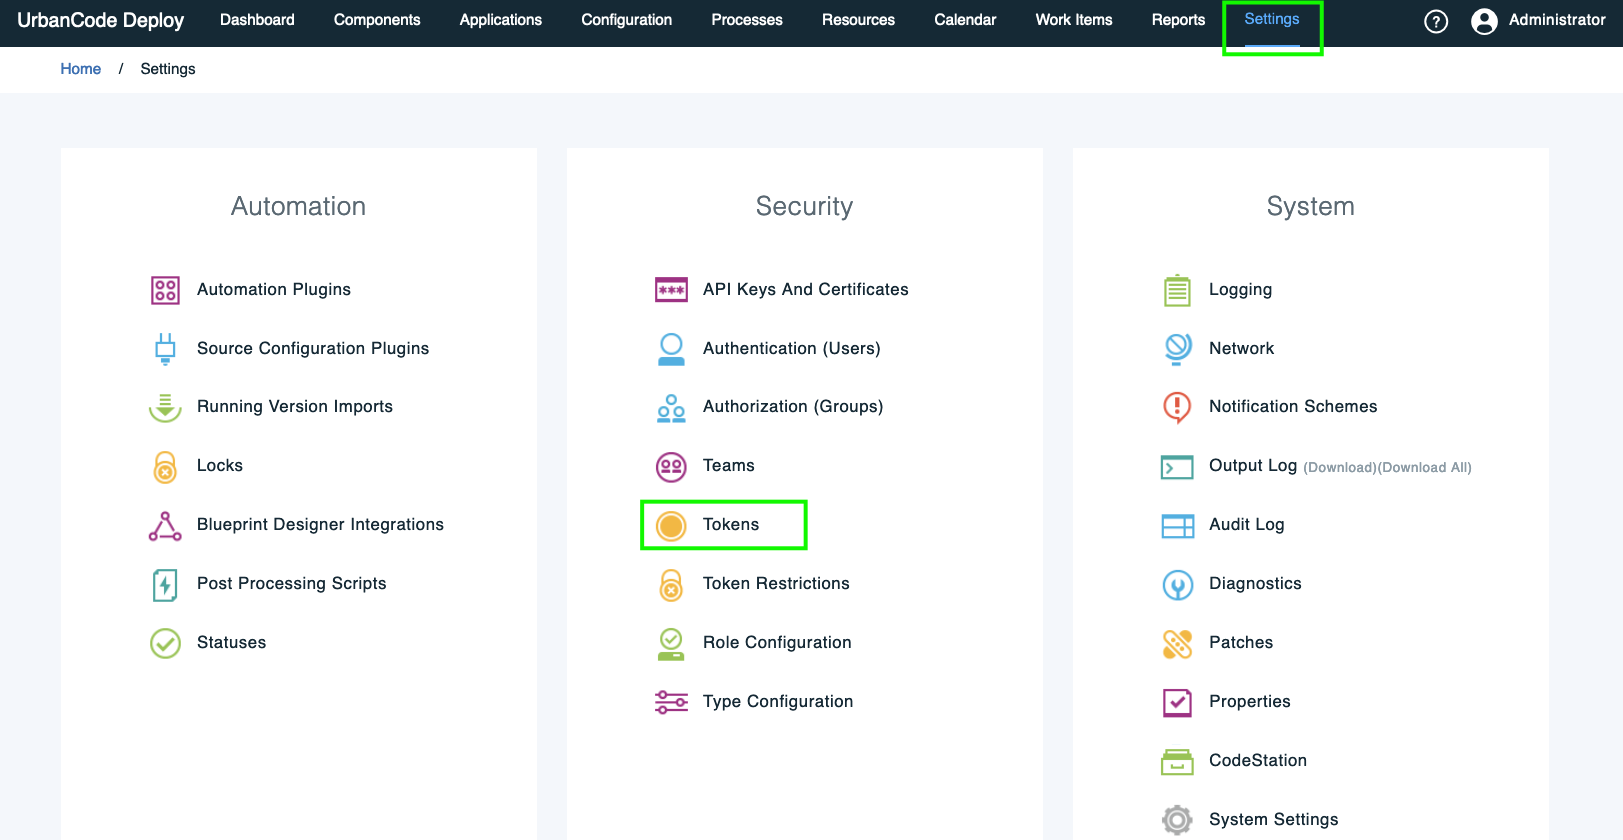
- Click on “Tokens” as shown above
- Click on “Create Token” as shown below:

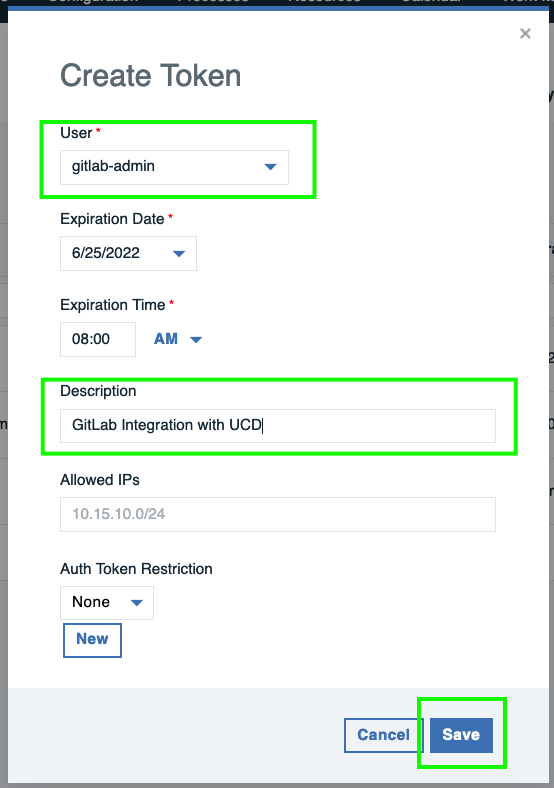
- Create a token to be used to create new component versions using the out-of-box "System Version Import" user in UCD. Specify a user, expiration date and time, and include a description for future reference as shown below:
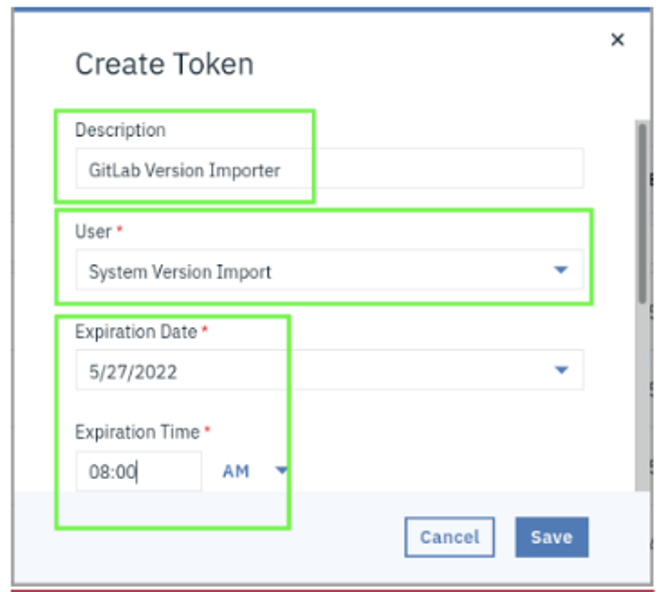
- Click Save
- Copy the authorization token value to a temporary location like a notepad window for your reference later.
- Repeat the steps above and create another token which will be used for deployment as shown below:
- With these two tokens saved in your notepad window for later reference, let’s continue to the next section.
Creating Properties in GitLab
We will now create properties in GitLab for our project that we can leverage to “mask” the authentication token values. This ensures that the value for the authentication token is hidden in job logs. Follow these steps to get this configured:
- In your browser, return to your GitLab tab
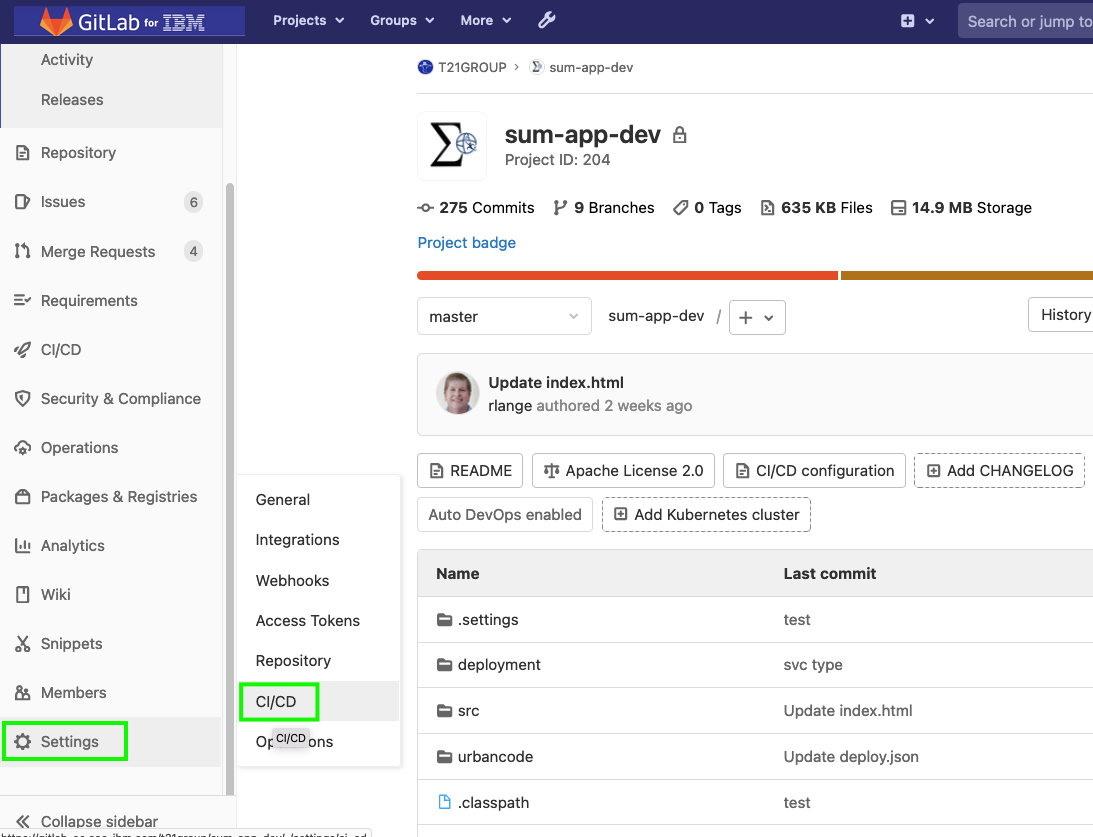
- While in your project, sum-app-dev in my example, from the left navigation menu, scroll down and click on “Settings” and then click on “CI/CD” as shown below:
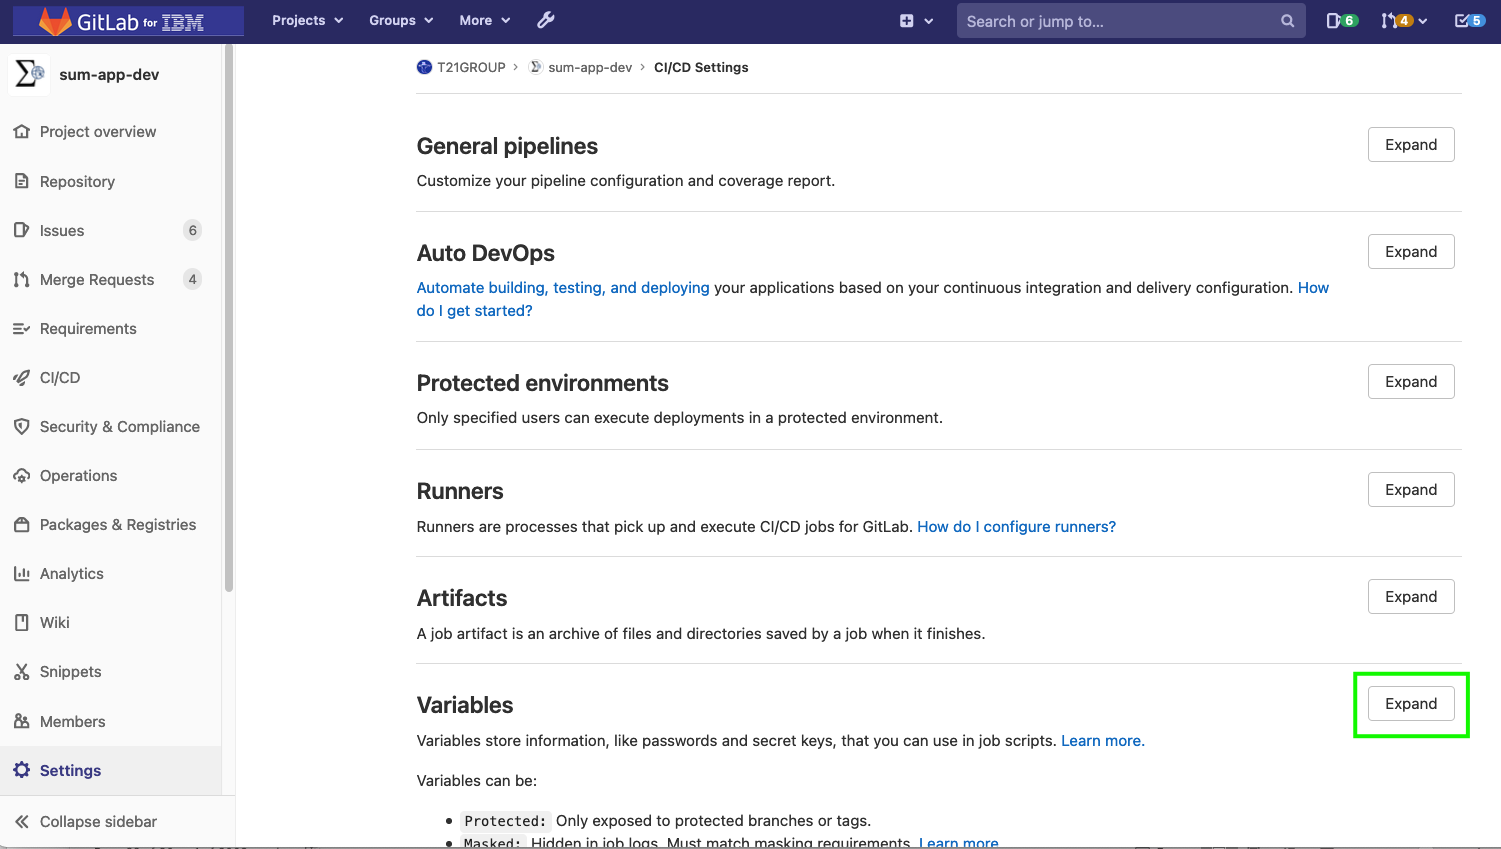
- Scroll down to the Variables section and click the “Expand” button as shown below:
- Click the “Add Variable” button and we will add three variables:
Variable: UCD_WEB_URL
Key: UCD_WEB_URL
Value: <Insert-Your-UCD-URL-Here>
Type: Variable
Environment Scope: All (default)
Protect Variable: False
Mask Variable: False
Variable: UCD_AUTH_TOKEN
Key: UCD_AUTH_TOKEN
Value: <insert-auth-token-hash-value>
Type: Variable
Environment Scope: All (default)
Protect Variable: False
Mask Variable: True
Variable: UCD_DEPLOY_TOKEN
Key: UCD_DEPLOY_TOKEN
Value: <insert-auth-token-hash-value>
Type: Variable
Environment Scope: All (default)
Protect Variable: False
Mask Variable: True
- You should see your variables added as shown below:

We can now leverage these variables in our CI/CD pipeline. We are ready to update our ".gitlab-ci.yml" to add a new phase to perform a deployment using IBM UrbanCode Deploy.
Adding the Deploy Phase to our CI/CD Pipeline to integrate with IBM UrbanCode Deploy
Follow these steps to add your new phase for deployment:
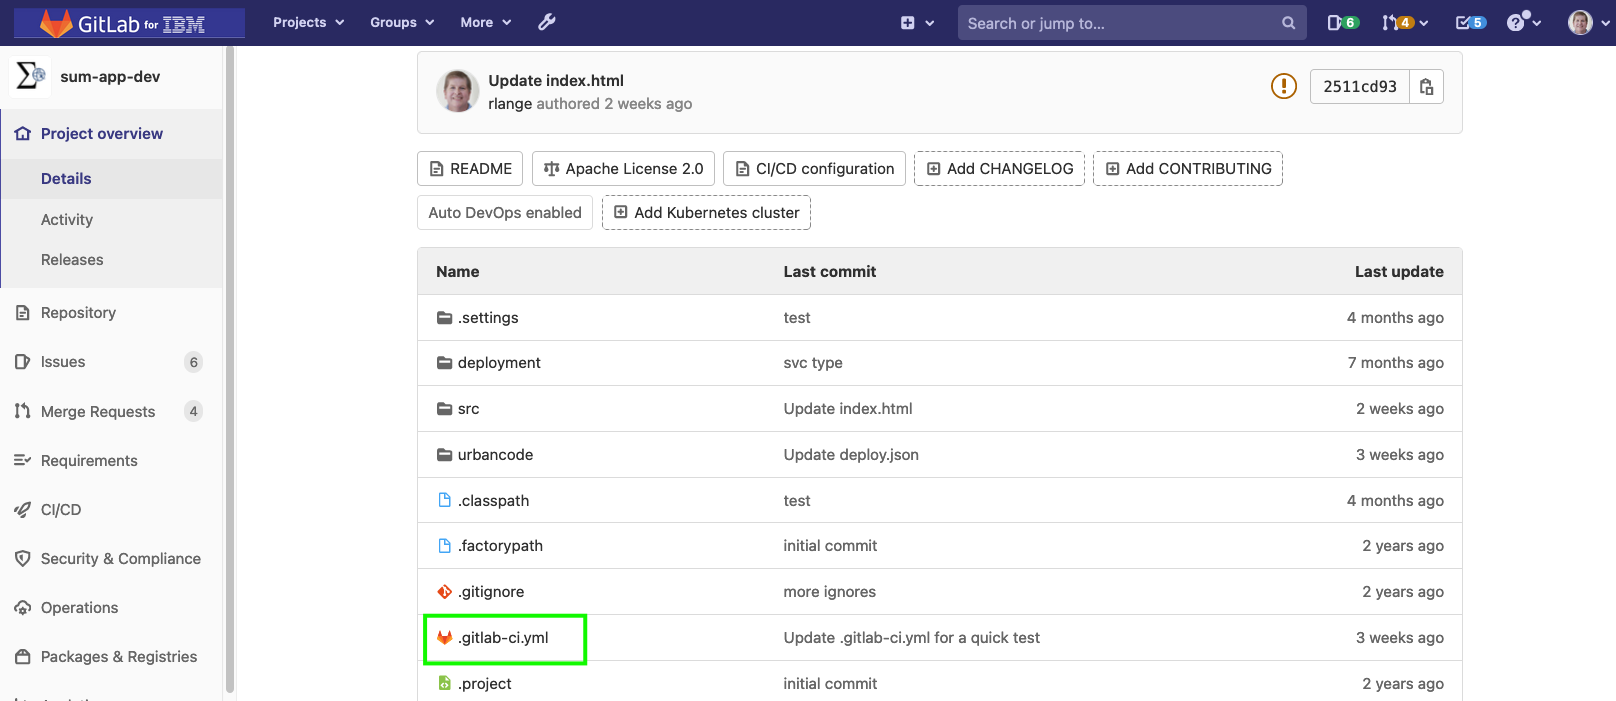
- In your GitLab project, click on the “.gitlab-ci.yml” file as shown below:
- Click on the “Web IDE” button

- Add a new stage called “deploy” as shown below:
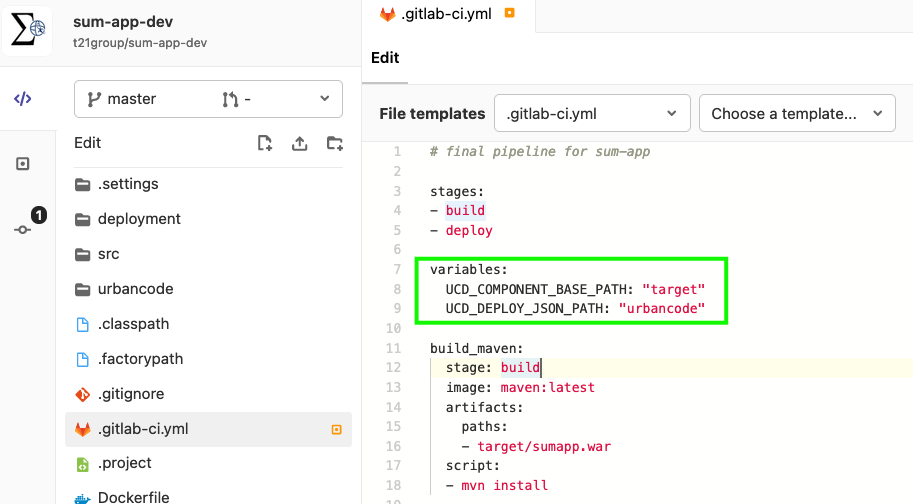
- Add a “variables” section underneath the stages with some additional unmasked variables we will use in our deploy phase as shown below:
- Scroll down and add a new stanza called “deploy_using_ucd” below the “unit_test” stanza:
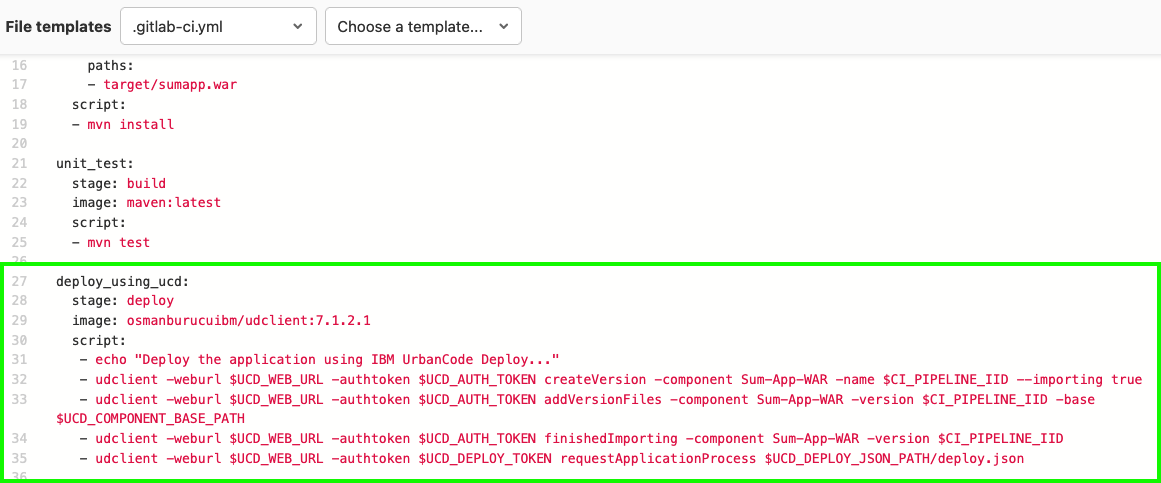
NOTE: we are using a Linux-based docker image that includes the IBM UrbanCode Deploy command line client which you can leverage to make REST API calls to the UCD Server. This client is called “udclient” and has been setup on a docker image we reference using the “image:” declaration as shown above.
- Notice that our “deploy” stage is creating a new component version in IBM UrbanCode Deploy using the $CI_PIPELINE_IID built-in GitLab variable as a reference back to the build. It is also pushing the WAR file artifact to this UCD component version.
NOTE: IBM UrbanCode Deploy can integrate with Artifactory, Nexus, or other definitive asset repositories if you like.
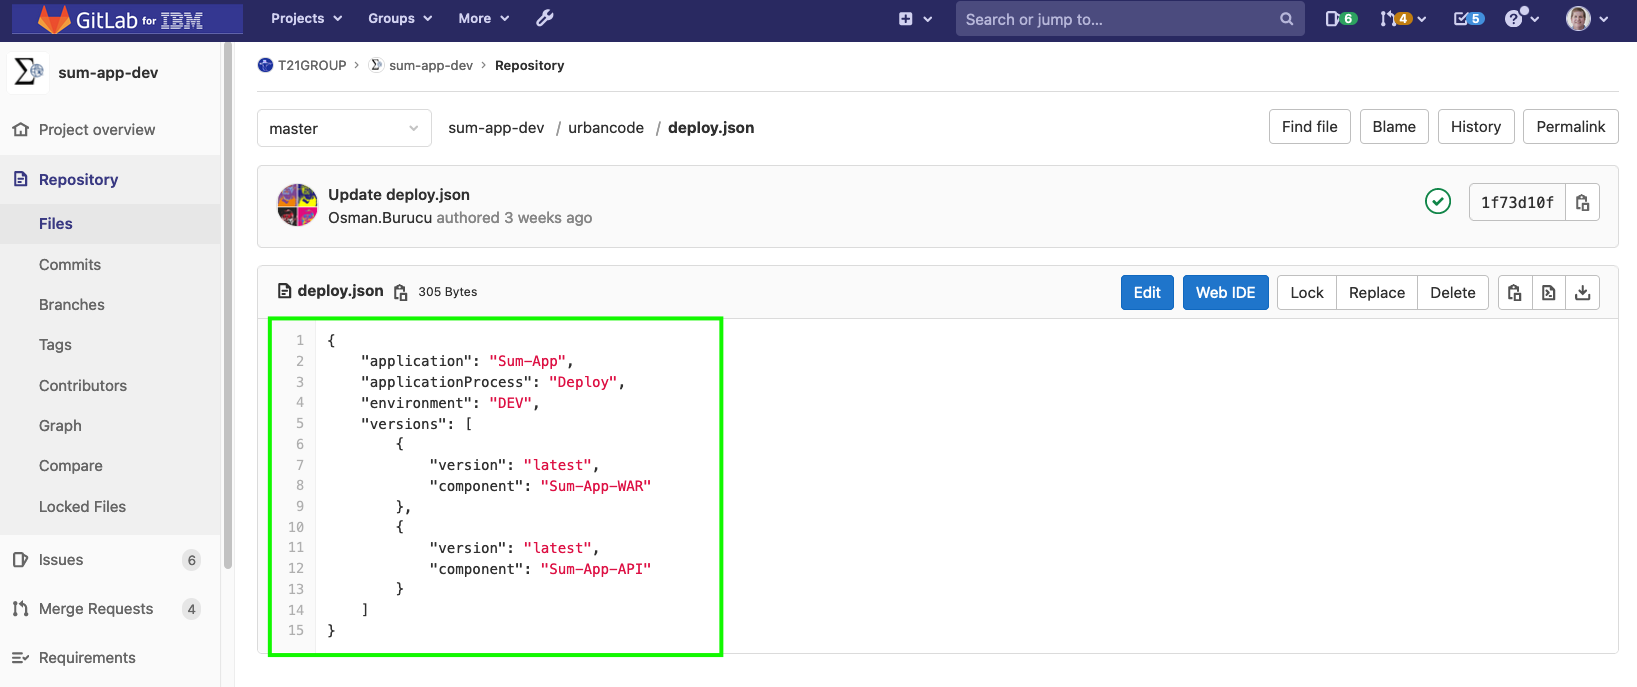
- Finally, notice that a deployment is triggered as the last step using the “requestApplicationProcess” udclient command. This will leverage a “json” that describes the application, the application process, the target environment, and more. Here is my urbancode/deploy.json for this example:
- Commit your changes to your “.gitlab-ci.yml” file to the master branch.
- Your CI/CD pipeline will begin to run.
In our final section, we will review the results of the GitLab pipeline execution.
GitLab CI/CD Pipeline Execution using IBM UrbanCode Deploy
When you commit your changes to the “.gitlab-ci.yml” on the master branch, your CI/CD pipeline should begin to run. Follow these steps to review the results:
- Go to your Project home page.
- You should see that your pipeline is running as shown below:
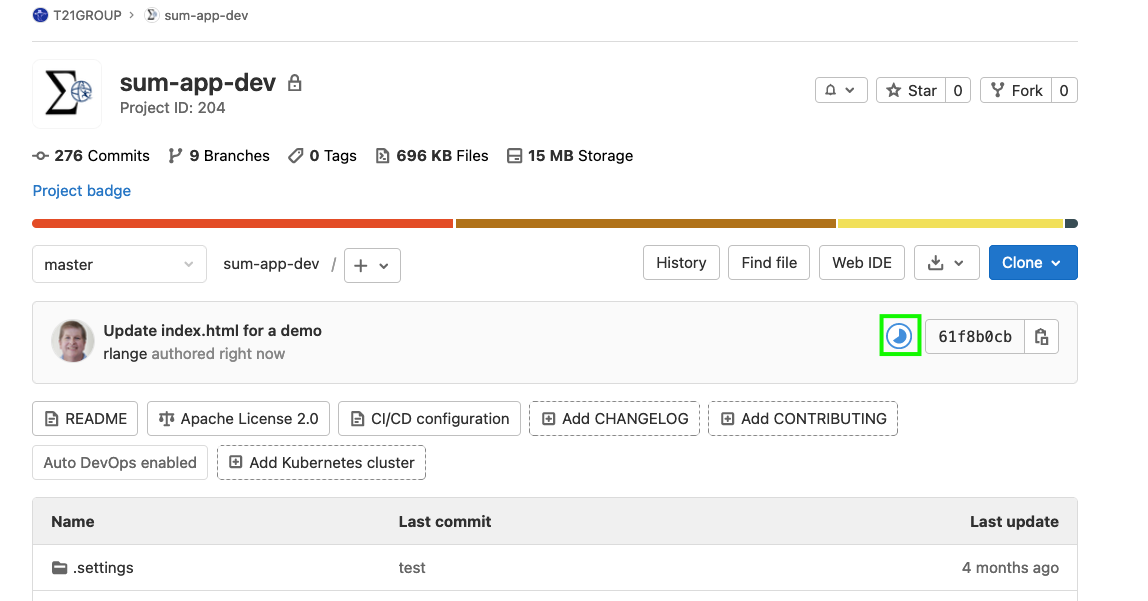
- Click on the “progress” icon as shown above.
- Monitor the execution of the pipeline and it should ultimately complete as shown below:
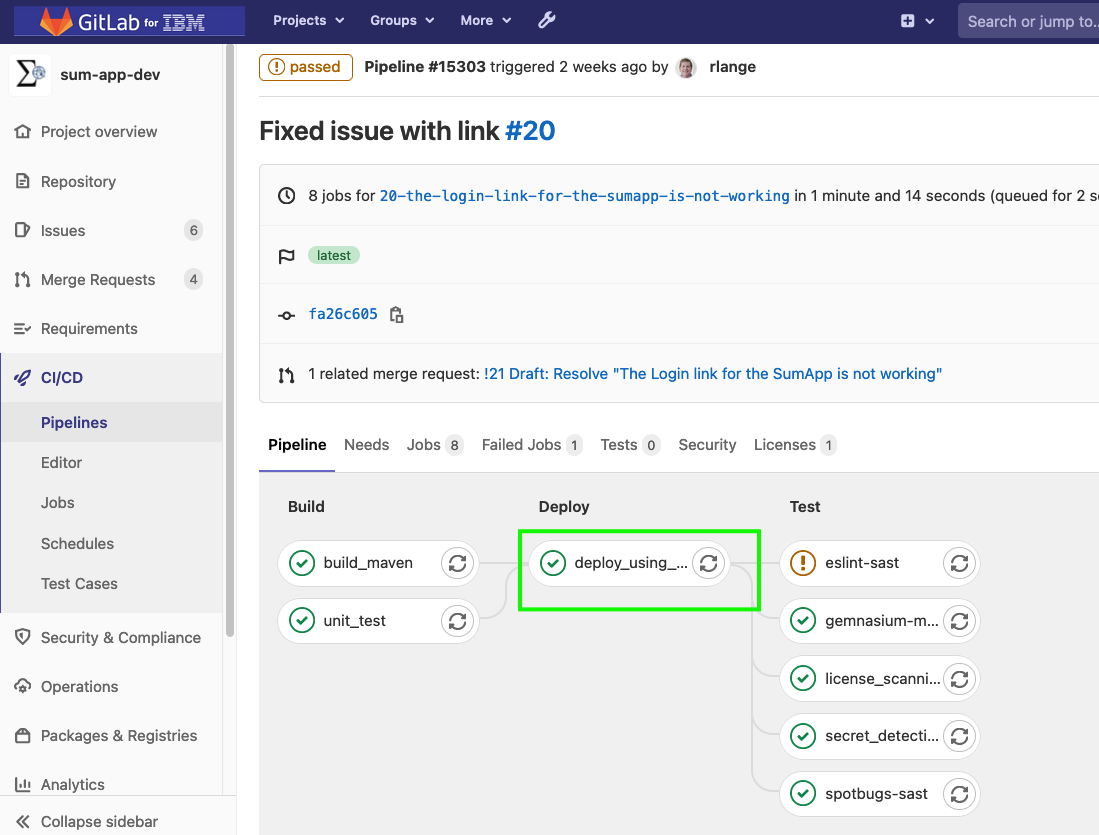
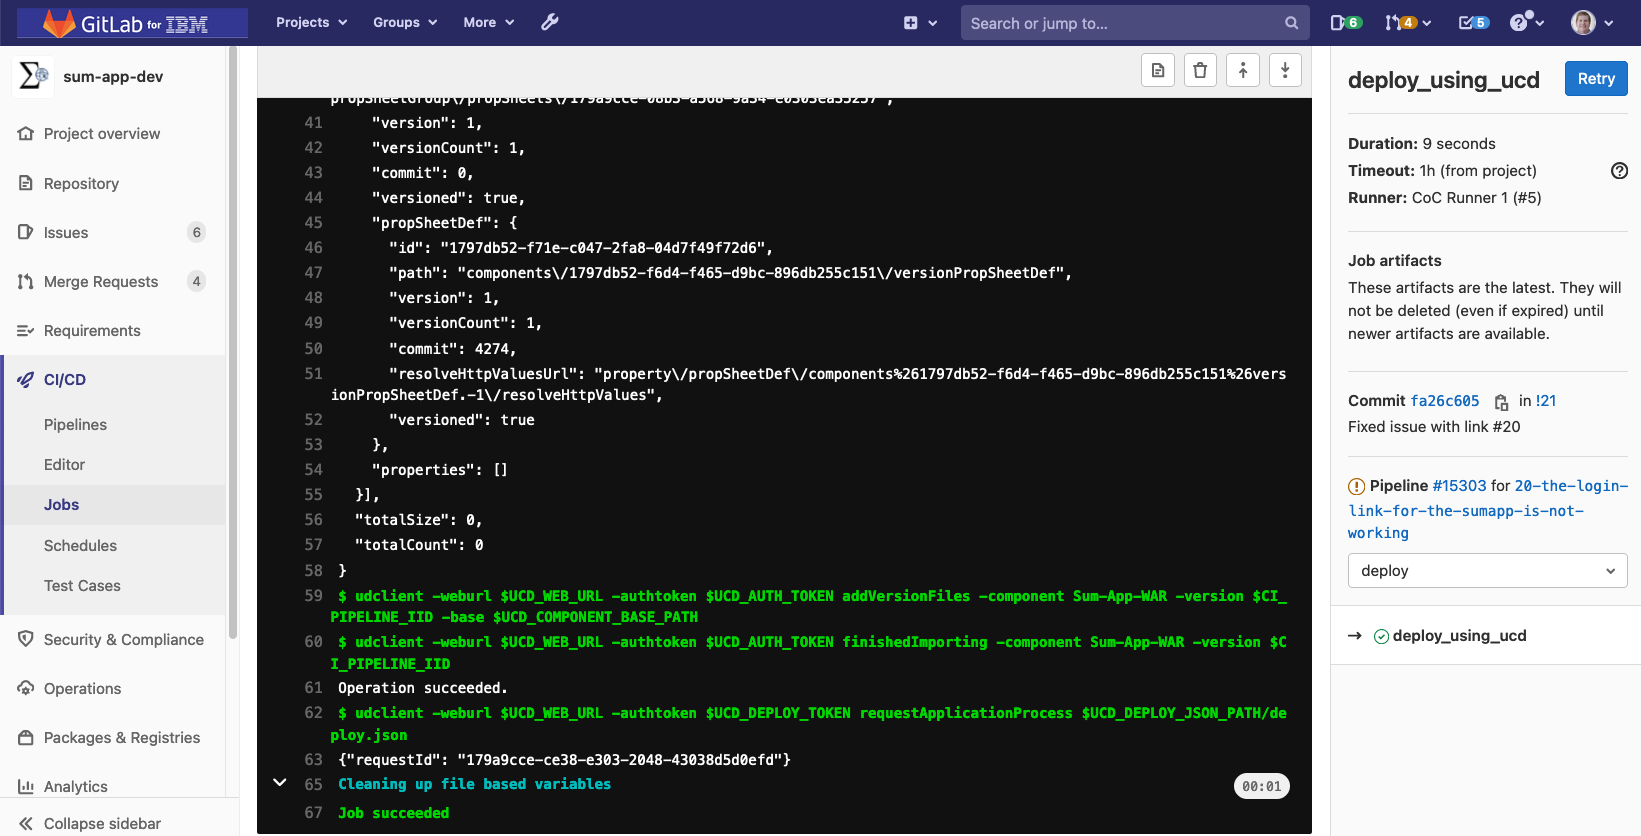
- Click on the “deploy_using_ucd” step of the process to view the output log:
- In your web browser, switch to your UrbanCode Deploy tab.
- If the deployment is in progress, you can click on the “Dashboard” tab at the top of the screen to see all the running deployments. Click “View Request” to see the details of the running deployment.
- You should see the application process deployment details as shown below:
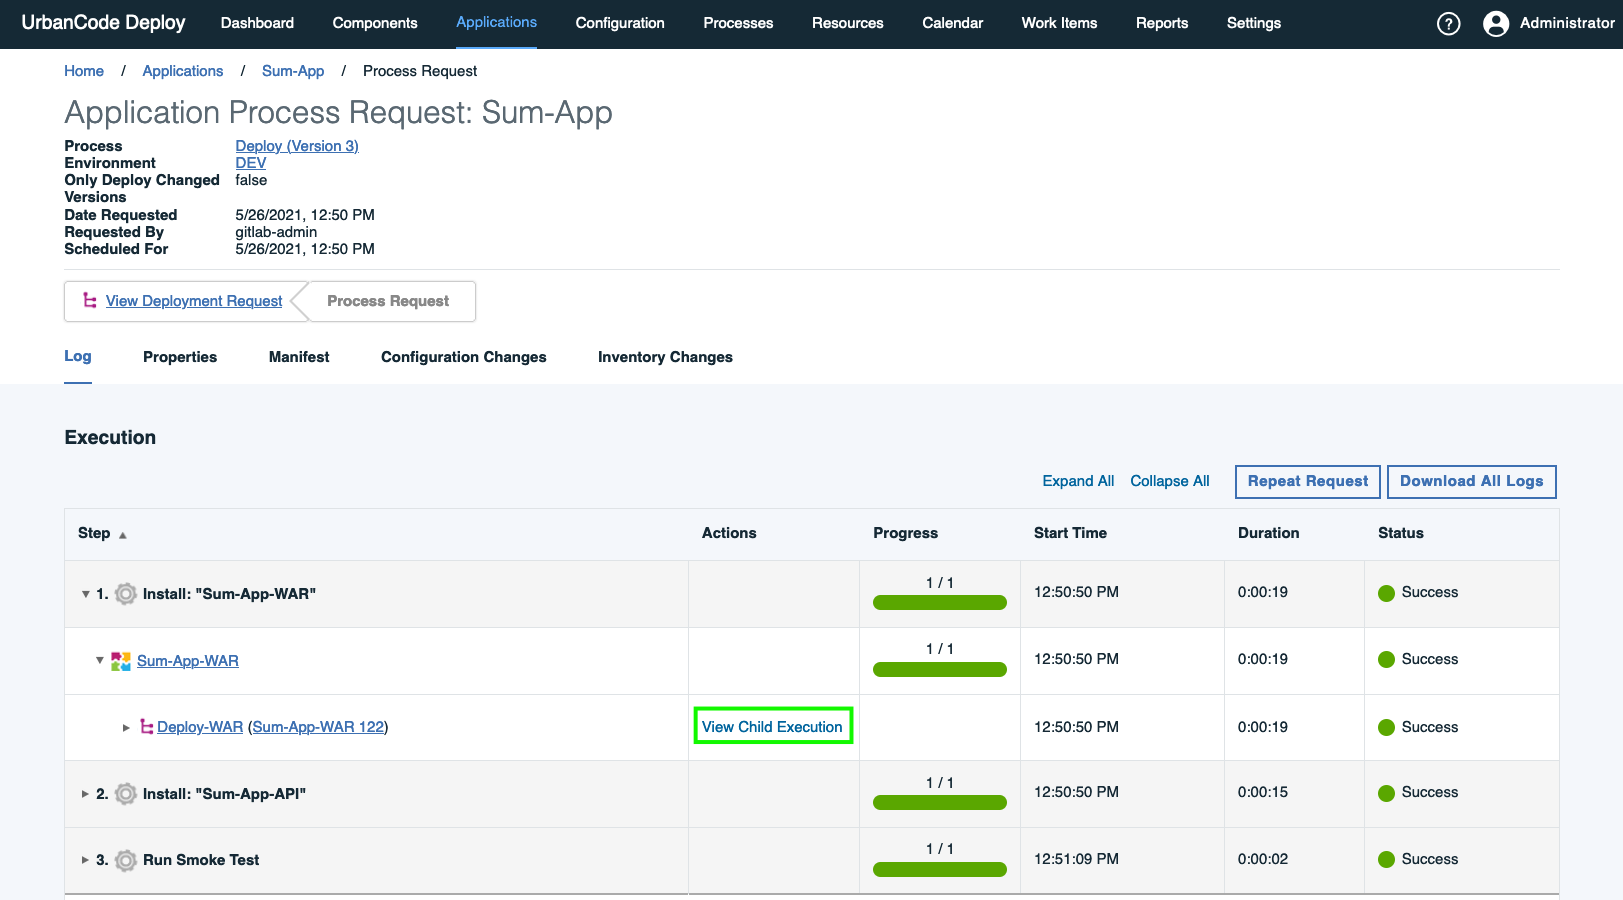
- Expand “Sum-App-WAR” and click on “View Child Execution” as shown above.
- Notice the component version that was deployed is “122” which was populated using the $CI_PIPELINE_IID built-in variable from GitLab as highlighted below:
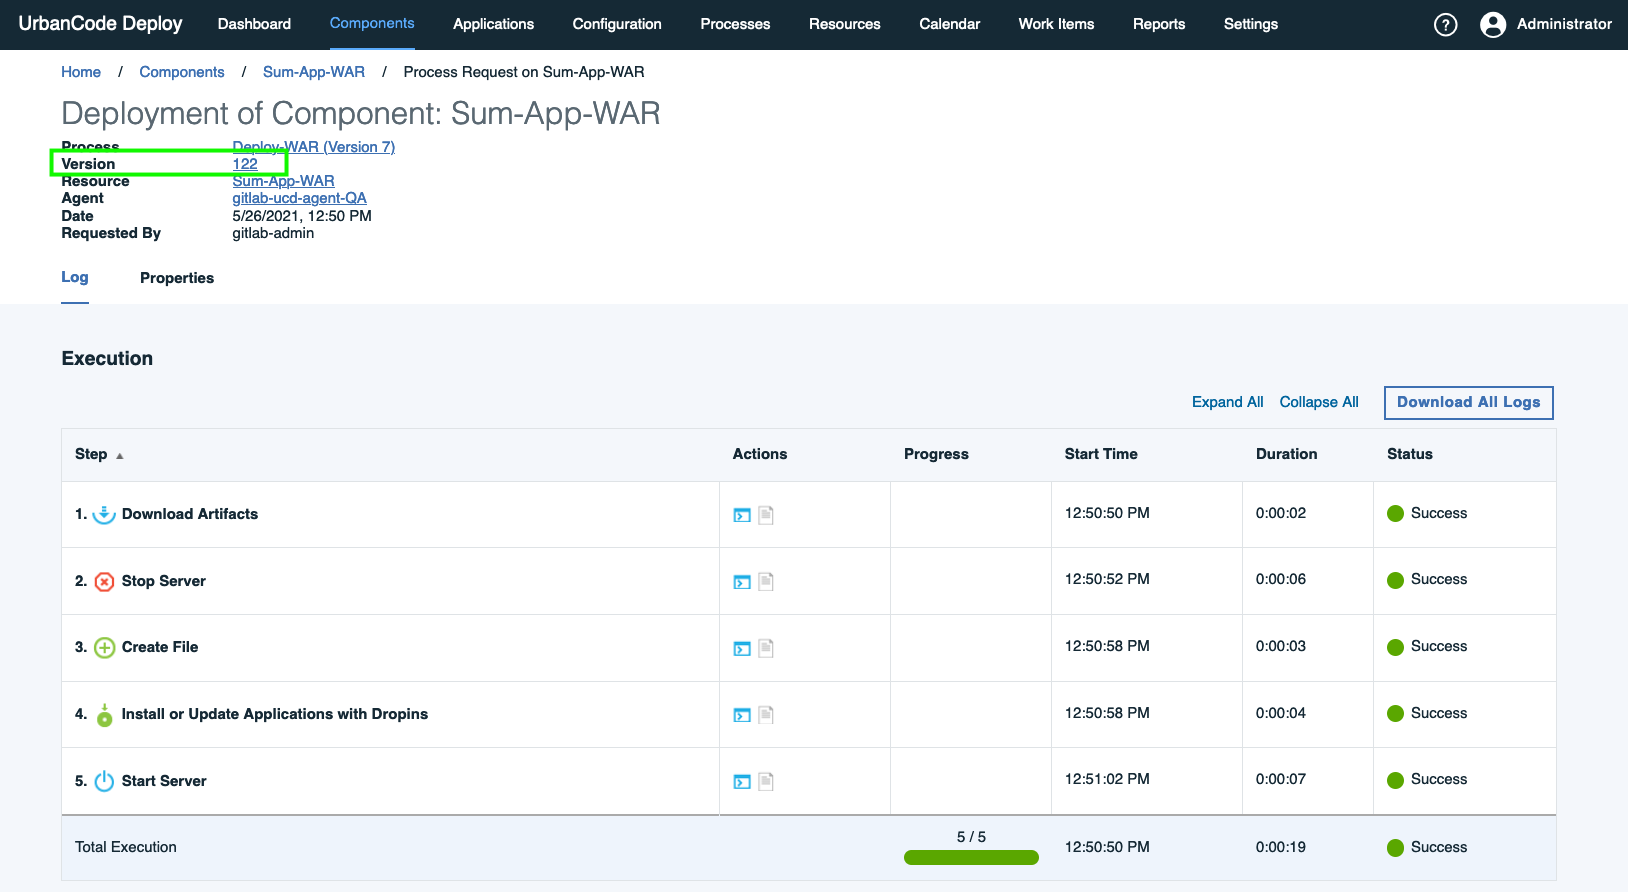
- If you like, you could add a link back to the GitLab job execution in IBM UrbanCode Deploy as well for full traceability.
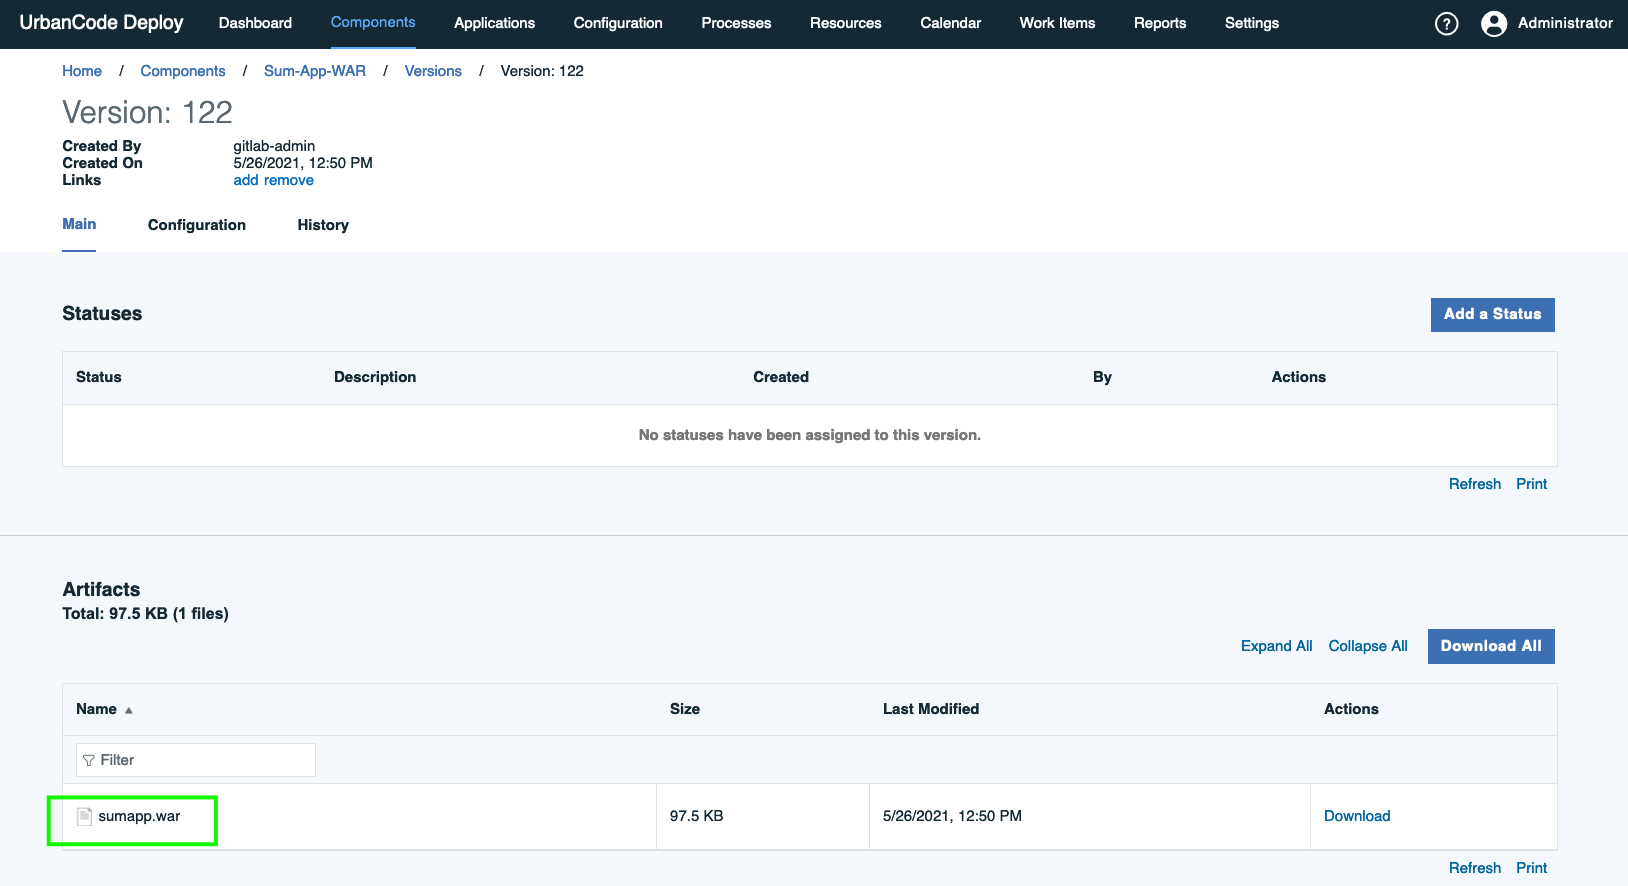
- If you click on the version link, you can see contents which includes the “sumapp.war” that was built during the GitLab CI/CD pipeline execution as shown below:
- You have successfully integrated a GitLab CI/CD pipeline with IBM UrbanCode Deploy!
Summary
As you have seen in this step-by-step tutorial, it is easy to setup a GitLab CI/CD pipeline to integrate with IBM UrbanCode Deploy. I hope you found this blog informative and helpful for your use. Look for future articles highlighting GitLab as well as IBM UrbanCode Deploy capabilities.