This article was originally published in 2017.05.18
IBM Integration Bus uses Enterprise Service Bus technology to allow for communication between various business applications. IBM UrbanCode Deploy (now DevOps Deploy) provides an automation integration that works with both versions 9 and 10 of IIB. See Installing Plug-ins In UrbanCode for help installing plug-ins in IBM UrbanCode Deploy. This post will address two main topics regarding IIB and UCD. First and foremost we will go over some concepts related to IIB, namely the hierarchy of resources that exist in IBM Integration Bus. After we have a better understanding of the concepts behind IIB some common use cases and plugin steps which originated the need for an integration with UrbanCode Deploy will be demonstrated.
IBM Integration Bus Concepts
Queue Managers
Queue managers handle queues that store messages until an application is ready to process them. IIB version 9 requires that an Integration Node is always associated with a Queue Manager, while IIB version 10 does not. The reason for this is that WebSphere MQ is no longer a prerequisite to run IBM Integration Bus beginning with version 10. This allows you to develop and deploy applications without WebSphere MQ, and instead directly in IIB. This distinction is evident in the plugin, where when connecting to a version 9 integration node you must first specify a queue manager, while with version 10 you may connect directly to the integration node. A distinction must be made here relating to MQ Nodes. Multiple types of MQ Nodes exist, including MQInput and MQOutput nodes. An MQInput node can be used to receive messages stored on a queue of an MQ Queue Manager, while MQOutput nodes are used to send messages to a queue. So, when deploying message queues that are defined using MQ Nodes a Queue Manager is required.
Integration Nodes (Brokers)
Message flows define a series of steps to be run when an integration node receives a message. Integration nodes host message flows and route messages as defined in the message flow.
Integration Servers (Execution Groups)
Integration servers are groups of message flows managed by an integration node. The integration node makes sure that the message flows operate in separate address spaces when they are on separate integration servers.
Broker Archive Files
As the focus of this post pertains to integrating IIB with UrbanCode Deploy, the details behind BAR file creation will not be covered. However, the knowledge center fully explains this concept in the Creating a BAR File page in the IBM Knowledge Center. Note that the terms 'integration node' and 'broker' are used interchangeably, just as the terms 'integration server' and 'execution group' are interchangeable.
Integrating IIB with UrbanCode Deploy
Provisioning Your Environment
Sometimes, the most difficult part of automating a deployment is determining the structure of your resource tree within UCD. Determining an efficient scheme for what to treat as a resource or a component can save time and complexity. A good recommendation is to follow the structure outlined within IIB. Note that if you aren't using WebSphere MQ, it is not necessary to treat a Queue Manager as a resource. However, if you are, the "IBM WebSphere MQ Explorer" may be a good guide as to what resources need to be created. As an alternative, you may employ the 'mqsilist' command line script located in your IIB's installation directory to outline your resource tree. Running the mqsilist command by itself will list all integration nodes and the queue manager that they are associated with. You may list execution groups managed by a given broker by supplying the broker name as a command line argument to the script (i.e. 'mqsilist brokerName'). It may be necessary to run the 'mqsiprofile' script first, which will export some necessary environment variables. Please see the mqsilist Command page in the IBM Knowledge Center for more information on this command.
The Navigator pane of the IBM WebSphere MQ Explorer.
Generally an IIB resource tree will involve the queue manager at the top level (if one is being used), the integration nodes associated with that queue manager, the execution groups belonging to each broker, and then the BAR files that are to be deployed to each corresponding integration server. As a disclaimer, however you decide to provision your resource tree I strongly recommend having integration servers (execution groups) as their own components. As an example, consider the following use case. A user has three execution groups in their IIB environment (EG1, EG2, and EG3). Each execution group belongs to the integration node (broker) named BRK1. They also have ten BAR files to deploy amongst these execution groups (BAR1 to EG1, BAR2 to EG2, BAR3 to EG3, BAR4 to EG1, BAR5 to EG2, BAR6 to EG3, etc...) However, before each deployment the user must make some configuration changes to the execution group that is going to be deployed to and then restart that execution group. With each execution group as their own separate component we will have three components within UCD. Each of the execution group components will have their own component process to set the properties on the execution group and then restart that execution group. We will also have ten components for each of our BAR files. These components will exist under the execution group component that they are to be deployed to within the resource tree, so that they may access it's properties. The BAR files components will each have a component process to handle the deployment logic.
Now, within our UCD application we can create an application process to run all of the execution groups component processes to set properties and restart. This logic may run in parallel using the "Install Multiple Components" step. After the execution groups are properly restarted we can have a second application process to run all of the deployments in parallel. Imagine if this user didn't have components for their execution groups, and instead used properties on their BAR file components to determine which execution group that BAR file would be deployed to. There would be no way to execute any logic that is specific to the execution group itself. The user could add a component process to restart the execution group referenced by the property on their BAR file component and run all of those in parallel. However, this would mean that ten different components would be run at the same time to restart potentially overlapping execution groups. The BAR1 component would begin execution to restart EG1, while at the same time the BAR4 component would begin restarting the very same execution group. Whichever process finishes first would succeed, and the subsequent process would fail during the middle of execution. These race conditions can be avoided easily by justifiably allocating a component for each execution group within your environment.
A resource tree provisioned with queue managers, integration nodes, integration servers, and BAR files.
The idea behind provisioning your resources in such a way is so that properties from each of the resources can propagate downwards. So, when running a deployment using one of your BAR file components it has access to properties on the parent execution group, broker, and queue manager. To save time you may choose to create some general components to represent each type of resource (queue manager, broker, and execution group) and configure each with properties that correspond to that resource in IIB. We will specify the following resource properties on our resources (Note that you may specify any property names that you want. These are just the default values for the fields in the IIB plugin. These properties will be referenced directly in the plugin step fields of your component processes).
- iib.queueManager
- iib.brokerName
- iib.executionGroup
For demonstration purposes I have created the three components: MQ Queue Manager, IIB Broker, and IIB Execution Group. This way we can define the iib.queueManager property on the MQ Queue Manager component, the iib.brokerName property on the IIB Broker component, and the iib.executionGroup property on the IIB Execution Group component.
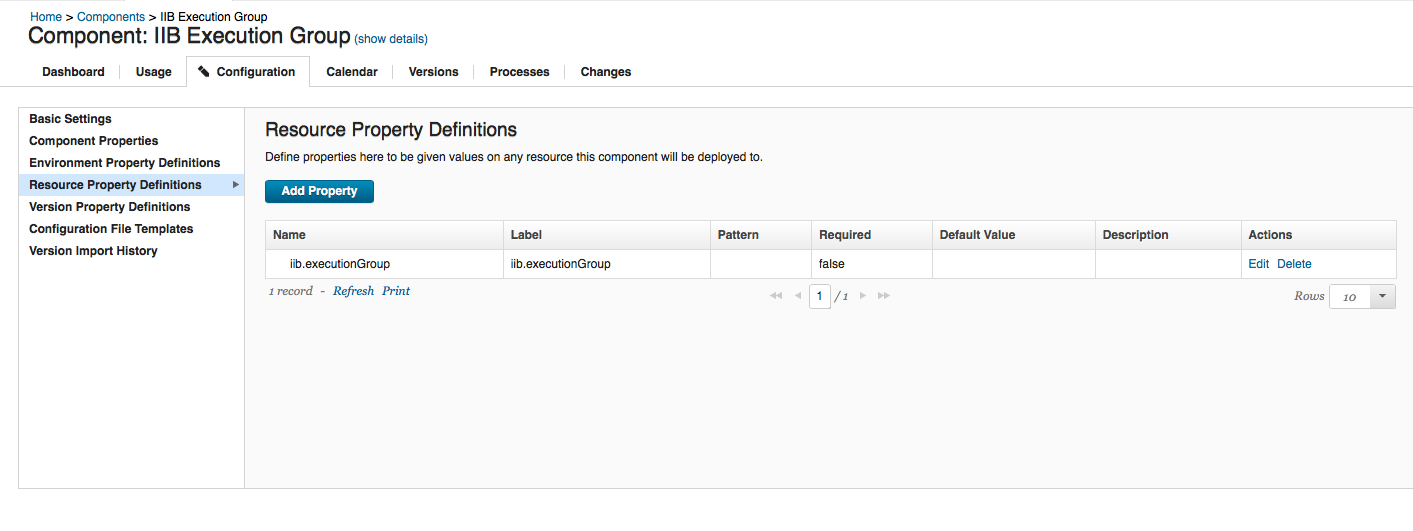
Resource property definition on the IIB Execution Group component.
Now that we have our IIB Execution Group component in place, if you want to add a new execution group named "NewEG" to your resource tree you may navigate to your "Resources" tab in UCD and add a new execution group component. The name that you specify to the newly added resource should be used as your iib.executionGroup resource property definition to keep all of your resources nicely organized by name.
Adding a new execution group to the resource tree.
Specify the name of your execution group as your 'iib.executionGroup' property.
The same procedure may be used to create your queue manager and integration node resources, with careful consideration for the resource tree hierarchy. The BAR files that we want to deploy will require a different strategy to model within UCD. The strategy that was used to add our queue manager, execution group, and broker resources to the resource tree won't be sufficient. Each BAR file needs it's own separate component in UCD since each deployable BAR file will require it's own set of component versions to be deployed. The easiest way to go about creating BAR file components would be to employ a component template. This tutorial employs a simple component template using the 'File System' source configuration type, directly supplying the path to the individual BAR file on the agent system.
A simple component template for creating BAR file components.[/caption] This template can now be used to model all BAR files that will be used for deployment. Adding a component property to the template to refer to the name of the BAR file will allow us to dynamically resolve this name during runtime. Please see the section devoted to executing BAR file deployments entitled
Override BAR Properties and Deploy for configuring these component properties.
Creating a new BAR file component using the component template.
After all BAR files have been accounted for, the components may be added to the resource tree under the desired execution group resources (follow the guidelines for the resource tree that we determined earlier.)
Completed resource tree with BAR files added to parent execution groups.
Three additional resource properties that you will want to set are iib.mqsiprofile, iib.version, and iib.jarPath. Mentioned earlier in this post is the mqsiprofile executable script that exists in your IIB installation directory. This script is used to set some necessary environment variables to run the IIB command executables. The mqsiprofile script must also be run before using the IBM Integration API. For this reason you will notice a field on all IIB plugin steps that use the IBM Integration API called 'MQSIPROFILE Executable'. You can provide the path to your mqsiprofile in this field so that your command environment is properly configured, which is located by default in your IIB installation directory. Setting this location as a resource property will make it so that you don't have to continually specify it on each step. For this example I've set the 'iib.mqsiprofile' property on the agent resource, which can be referenced in plugin step fields as ${p:resource/iib.mqsiprofile}. The iib.version property is also necessary to determine the version of the IBM Integration API to use when running plugin steps. This property may also be defined at the agent resource level. For this example I will also set the JAR path property at the agent resource level. Another possible place for this property would be on the environment since it references a path specific to your IIB environment, as does the iib.mqsiprofile property. For specific details as to what JAR files must be specified for your version of IIB please see the section labeled
IBM Integration API JAR Files.
Setting the 'iib.jarPath' property at the agent resource level.
Running Plugin Steps
Now that we have a proper resource tree, we can begin configuring steps to run using our resources. This tutorial will focus on some of the most common steps in the IIB plugin. See a complete list of all supported steps of the IIB plugin here. The commonly used steps that we are going to cover include Create Integration Node, Create Execution Group, Set Execution Group Properties, Override Bar Properties, and Deploy. Before we begin, we will want to determine the scope of each step. In order to do this we have to determine the properties required during each step. We will do this for each step as we continue with this post. The plugin itself contains two different classifications of steps that can be run. There are those plugin steps that act as command line wrappers for the IBM Integration Bus Commands. These steps execute the command scripts that exist within your IIB installation location under the bin directory. When running steps that rely on the IBM Integration Bus commands you must specify your IIB installation directory. The field in the plugin step is labeled "IIB Installation Directory. These steps include:
- Create Integration Node
- Delete Integration Node
- Start Integration Node
- Stop Integration Node
IBM Integration API JAR Files
The other classification of plugin steps rely on the Java IBM Integration API and do not require the installation directory to function. However, some other additional properties are required for each of these steps. With these plugin steps you will need to specify the location of the IBM Integration API JAR files from your IIB server. The default location for these files differ based on the version of IIB. With IIB version 9 the default location of these files is within the java/lib directory in your WebSphere MQ installation directory. With version 10 of IIB the default location of these files will be in the classes directory of your IIB server installation directory. The JAR files required also differ based on the version of IIB. Here are the required JAR files that must be specified based on version:
| IIB Version 9 |
IIB Version 10 |
| ConfigManagerProxy.jar |
IntegrationAPI.jar |
| com.ibm.mq.jar |
| ibmjsseprovider2.jar |
Steps that require access to these JAR files to utilize the IBM Integration API include:
- Set Broker Properties
- Create Execution Group
- Restart Execution Groups
- Set Execution Group Properties
- Set Message Flow Properties
- Create Or Update Configurable Service
- Delete Configurable Service
- Deploy
- Start Message Flows
- Stop Message Flows
- Override Bar Properties
Create Integration Node
Note that this step makes use of the MQSI script files located in your IIB installation directory. For this case we should create another resource property to specify the location of this directory. The location of this property is subject to your specific use case. The most likely location would be as a resource property on the agent resource, since we are specifying a directory on the agent itself within our IIB environment. There are a few other steps in the plugin that use the MQSI scripts and rely on this property as well. These steps include Delete Integration Node, Start Integration Node, and Stop Integration Node as noted earlier in this post.
Adding the iib.installDir property to the agent resource.
If you are running IIB version 9, you must also specify the Service User ID and Service Password of the user that the new broker will run under. Earlier in this post we've dramatically simplified things by creating a general component to represent our integration node. If you missed it, see the section Provisioning Your Environment. First what we will want to do is add a new operational component process to our general integration node component created earlier. The logic for this new process will handle the creation of the integration node.
Add the component process step to create the integration node.
After this component process is added to the generic IIB Broker component, the component can now be used to create all future integration nodes in your resource tree. Note that in the future you may add new component processes to the generic component that will automatically be added to the broker components that you have created.
Add the new component to your resource tree under the Queue Manager that it belongs to if applicable.
Choose the generic "IIB Broker" component and specify the name of your new broker to create.[/caption] The remaining setup is simplified by the fact that we've setup all of the required properties to run the step on our resources. The final steps are to add your components to the application, create an application process, and add your resources to the environment within that application. For this you will want to create an application and add the 'IIB Broker' component to it.
Adding your IIB Broker and IIB Execution Group components to an application.
Next, you will need an application process to execute the 'Create Integration Node' component process. Since we've created the component process as an operational process, it does not require a version to be specified on the component when executing. Operational processes are located in the process designer under the folder pertaining to it's component. Note that when this application process is executed it will run the step for each 'IIB Broker' component that has been added to your environment. If you only want to run specific execution groups in this environment you can tag those added components and specify the tag in the 'Limit to Resource Tag' field. Another option is to only add the desired IIB Execution Group components to your environment.
Application process created to execute the 'Create Integration Node' component process.
Finally, you will want to create an environment within that application and add your resources to it. In this instance I've added my agent and all resources under are also added to the environment.
Create Execution Group
The setup for the Create Execution Group step will be very similar to the above step. The big difference is that you will have to specify the path of your IBM Integration API JARs. For this example I will set the JAR path at the top level of my resource tree, which in this case is my agent. Another good place for this property would be on the environment since it is going to reference a path specific to your IIB environment.
Setting the 'iib.jarPath' property at the agent resource level.
After the jarPath property is configured, you can create a new operational component process on your 'IIB Execution Group' component to run the Create Execution Group step.
Configure the Create Execution Group step on your IIB Execution Group component.
The remainder of setup for this step involves adding the IIB Execution Group component to your application and environment, and creating an application process to run the operational process. This part of the tutorial was covered in the 'Create Integration Node' subsection of the Running Plugin Steps section of this post. Note that you will need to add a new 'IIB Execution Group' component to your specific 'IIB Broker' component.
Add a new IIB Execution Group component resource to the broker component resource that you want to create the execution group under.
Set Execution Group Properties
We won't go into depth on the setup for this step since it is essentially the same as the 'Create Execution Group' step explained above. Instead, we will focus on how to determine which properties can be set on the execution group. The Integration Server HTTP Listener Properties page in the knowledge center provides you with some insight and examples of what properties you may change on the execution group. However, your IIB installation provides a helpful executable that you can run in your IIB installation directory called mqsireportproperties that you can use to explore all properties on the execution group. You will have to specify the broker the execution group exists under and the execution group name itself. Please see the mqsireportproperties Command" page in the IBM Knowledge Center for usage.
List all objects of the execution group that you can configure properties for.
You can use the same executable to list all properties of a given object for that execution group.
Run the mqsireportproperties executable to list all execution group properties.
In this case I am listing all general properties for the execution group. You may choose any of the objects to report the properties of, such as the HTTPConnector object. When you have discovered a property that you wish to change you may set it's value in the 'Properties' field of the step using the syntax 'ObjectName/PropertyName=Value'. For instance, if I wanted to change the maximum number of HTTP connections for my execution group at a given time to 128, I would specify 'HTTPConnector/maxThreads=128'. Note that not all properties are configurable, and the request to change a non-configurable property will result in a rejected response from the broker. The knowledge center section on Changes to properties that are associated with integration servers provides some examples as to what properties may be configured but doesn't cover all of them.
Broker rejecting a request to change a property that is not configurable.
Override Bar Properties and Deploy
The Override Bar Properties step is executed before a deployment in order to change configurable properties on a broker archive file. If you are looking to create a new BAR file for deployment, please see the mqsicreatebar Command page in the knowledge center. Customizable BAR file properties exist in the deployment descriptor of the BAR file in it's META_INF/broker.xml configuration file. For a list of properties on your BAR file you may use the mqsireadbar executable script located in your IIB installation directory. For details about using this command executable please see mqsireadbar Command. The following is an example of reading the pager.bar sample BAR file provided with a successful IIB version 9 installation.
Executing the mqsireadbar command using the pager.bar file.
In this example, if I were to change the queueName of the TEXTMESSENGER queue to MYMESSENGER, I would specify 'TextMessenger#TEXTMESSENGER.queueName=MYMESSENGER'. The Override BAR Properties step allows you to either specify individual property names and values (name=value) or to specify a properties file. The properties file must consist of a series of individual property overrides.
Example properties file to override properties on the 'pager.bar' file.
For the creation of the BAR file component we will use the IIB BAR File template that we created in the Provisioning Your Environment section of this post. If you plan to override BAR file properties with each deployment it may make sense to add a property to your template that will allow you to easily specify overrides during component creation. To do this add a new component property definition to your IIB BAR File component template.
Add a component property to specify BAR file overrides during component creation.
Now, using the component template to create the BAR file component will allow us to provide BAR property overrides if they are necessary. As stated earlier, you can either specify individual property overrides or you may choose to specify a file. A properties file will be the best option if your property overrides will change from version to version. For this example I have setup a directory on my IIB server's file system to hold any BAR files and properties files used for BAR overrides. If you wish to use a different type of source configuration to specify the location of your BAR files and properties files you can change the Source Configuration Type field on your IIB BAR File template. Doing so will allow you to use any of IBM UrbanCode's source configuration plugins to import your files. You may find the proper plugin to suite your source configuration needs from the Source Config Plugins section of the UrbanCode Plugin page.
Creating a new BAR file component using the IIB BAR File component template.
Once we have our BAR component created we can add it to our resource tree under the desired execution group that it will be deployed to from the 'Resources' tab of our UrbanCode Deploy web console. For this example I will add the 'pager.bar' to our newly created 'NewEG' execution group.
Adding the BAR file component to your resource tree.
The placement of the component in the resource tree gives the pager.bar component access to the resource properties on the execution group, broker, and queue manager, as well as the component properties defined on the pager.bar component itself. These resource properties were defined in the Provisioning Your Environment section of this post. Now we will need to create the component process for the deployment. Note, that this should be created as a 'Deployment' type process and not an 'Operational' process since a component version must be specified when it is executed. We can create this new component process on our IIB BAR File component template so that we only have to define it once for each BAR file component. In this sample deployment I contain the steps for both overriding the BAR file properties and deploying the BAR file in the same component process. The logic for our deployment component process will be as follows:
- Copy the pager.bar and pager_overrides.txt file from our component version to the agent's working directory. This is handled by the "Download Artifacts" step of the built in IBM UrbanCode Deploy Versioned File Storage plugin. Please see the Documentation Page for this plugin if you have any issues.
Note that the properties in the 'Includes' field are specific to that BAR file component, and will include the BAR file and properties file.
- Override the properties of our BAR file specified in our properties file. This will use the 'Deploy' step of the IIB Plugin for UCD. Since the BAR file and the override properties file have both been copied to the agent's working directory, they may now be referenced directly in the plugin step fields.
Override BAR file properties.
- The final step is to deploy our BAR file to the execution group.
The 'Deploy' step of the IIB Plugin.
After the BAR file component is created and properly configured we must add it to the application and create a new application process to execute the deployment component process. Assuming we will have multiple BAR files to deploy to multiple execution groups it makes sense to use the "Install Multiple Components" application process step. For usage information on this step please see the Install Multiple Components page in the IBM Knowledge Center. To utilize the Install Multiple Components step we will have to tag each BAR file component that we've created. Luckily, we created these components using our IIB BAR File component template. If we tag the component template, all components created using that template will be tagged as well. In this example I will create a new tag to for my BAR file components called "BARFILE".
Added a new tag to the component template
All BAR file components now have the 'BARFILE' tag.[/caption] As the last setup for running our deployment we will create a new application process on our application, which I am going to call 'Run Deployment'. This new process will only consist of one application process step 'Install Multiple Components'. To run all deployments on each of our BAR file components we will specify our newly created component tag and the name of the component process to run.
Application process step to run all BAR file deployments.
Before running the process, we must make sure that we have a component version imported into our BAR file component. To do this navigate to the 'Versions' tab of your BAR file component and click 'Import New Versions'. This will use your configured source configuration to import artifacts into a new component version that may be used to run our new application process.
#UrbanCodeDeploy
#IBMIntegrationBus(IIB)