UrbanCode Build is a continuous integration and builds management server optimized for the enterprise. It is designed to make it easy to scale the configuration and management of your build infrastructure and seamlessly plug into development, testing and release tooling.
Running UrbanCode Build, as containers, make installation of the server and connecting it with agents much easier. Updating the software version can also be performed compared to regular installation.
Set up UrbanCode Build container
First, let’s set up the docker container for the UrbanCode Build server.
Download the ZIP file for the server container and extract it. The files contain a tar.gz file for the server, a folder named examples and Readme.txt. Load the docker image using the command:
docker load -i ibm-ucbs-container-linux-x86_64-version_number.tar.gz
Create the installed.properties file and ensure it is in the appropriate location. An example of this installed.properties.example is provided in the examples folder. To connect to your database, make sure you update the database configuration.
I will create four folders to maintain the persistence of the server container. So that even if the server had to be brought down, the data won’t be lost.
The folders can be in the following format for example:
- /root/opt/ucb/ucb-server-conf
- /root/opt/ucb/ucb-server-var
- /root/opt/ucb/ucb-server-plugin
- /root/opt/ucb/ucb-server-lib-ext
I will create another folder named server inside the ucb-server-conf folder.
Put the installed.properties.example file into the newly created ucb-server-conf/server folder. Rename it to installed.properties so that whenever the container gets started it will pick these values and connect to the database accordingly.
Put the JDBC JAR file of the database inside ucb-server-lib-ext, so that on starting the container it will access the file.
Now, create the networks that will connect the server container with database container as well as agent container.

The database container is running in my host machine, so I will just connect it with this ucb-db-net.

Let’s create a server container now. I will name the container as ucb-server, publish the ports 8443 and 8080 of the container to my host machine, connect it with the database container using the bridge network ucb-db-net and mount those four folders to the container.
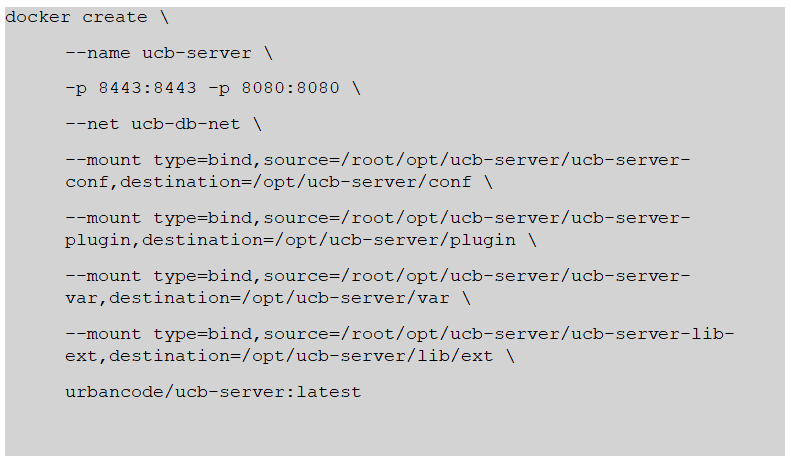
The mounting of these folders is necessary for persisting the state of the server across different UrbanCode Build versions when upgrading the server or recovering from a container or infrastructure issue.
The installed.properties file contains the information needed to initialize the database or re-use an existing database. If the database schema is older than the schema in the current container, it is upgraded automatically to the current schema
Now start the container using:

Until now, the container was not connected to the agents’ network because while creating the container, it can be connected to only one network. But a running container can be connected to other networks as needed.

Note: To check the logs of the container use:

Since the port 8443 of the container is mapped to my localhost:8443. I just have to use my browser and open https://localhost:8443 for the UI of the UrbanCode Build server_._
Update the UrbanCode Build Server version
Now, let’s update the UrbanCode Build Server version:
First, stop the container (if running):

Remove the container:

Load the newer image by using:

Create the new container as you would have done for a new setup, but mount those exact same folders for persisting the state of the server. The installed.properties contain the database information which will be reused. The database schema will also be upgraded automatically (if needed).

Start the new container and connect it with the agents’ network.

#UrbanCode
#UrbanCodeBuild