Introduction
This Post, I would like to deploy another patient UI Node.js application in OpenShift split from a monolithic Java EE application and integrate it with the business logic Java EE application that we created last time around. ( Part 1 )
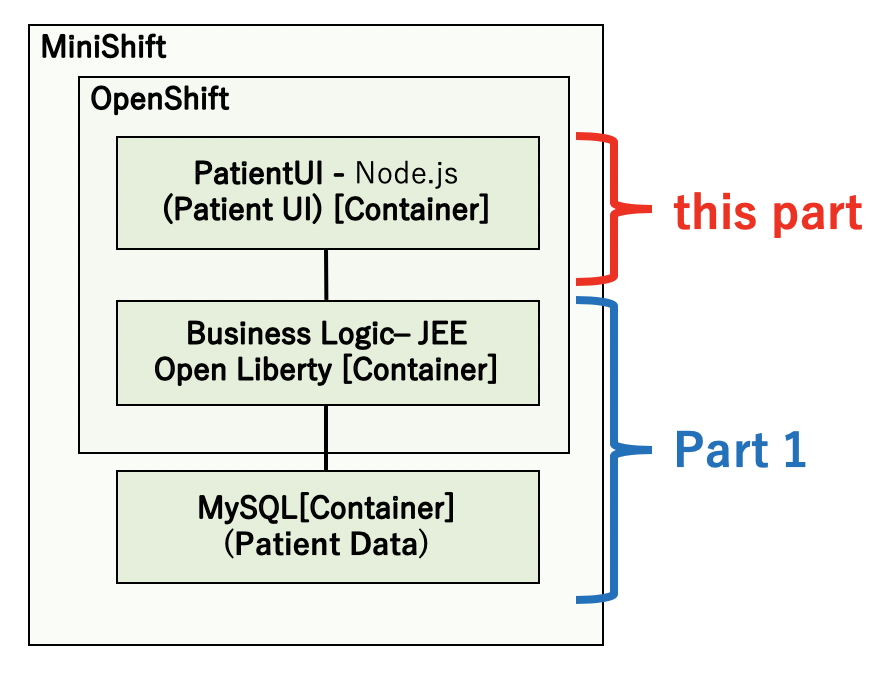
Modernization of the Patient UI (User Interface)
The modernization of the Patient UI (User Interface) uses code patterns [ Application modernization with Node.js, the Source-to-Image toolkit, and OpenShift ]. The UI is programmed using the JavaScript open standard and the latest universal CSS and HTML5 Canvas for the layout.
Let’s start making the Patient UI right away! The code pattern procedure uses a GUI operation. However, since we are solution architects, let’s reproduce the same procedure as the GUI using CLI operations!
Procedure
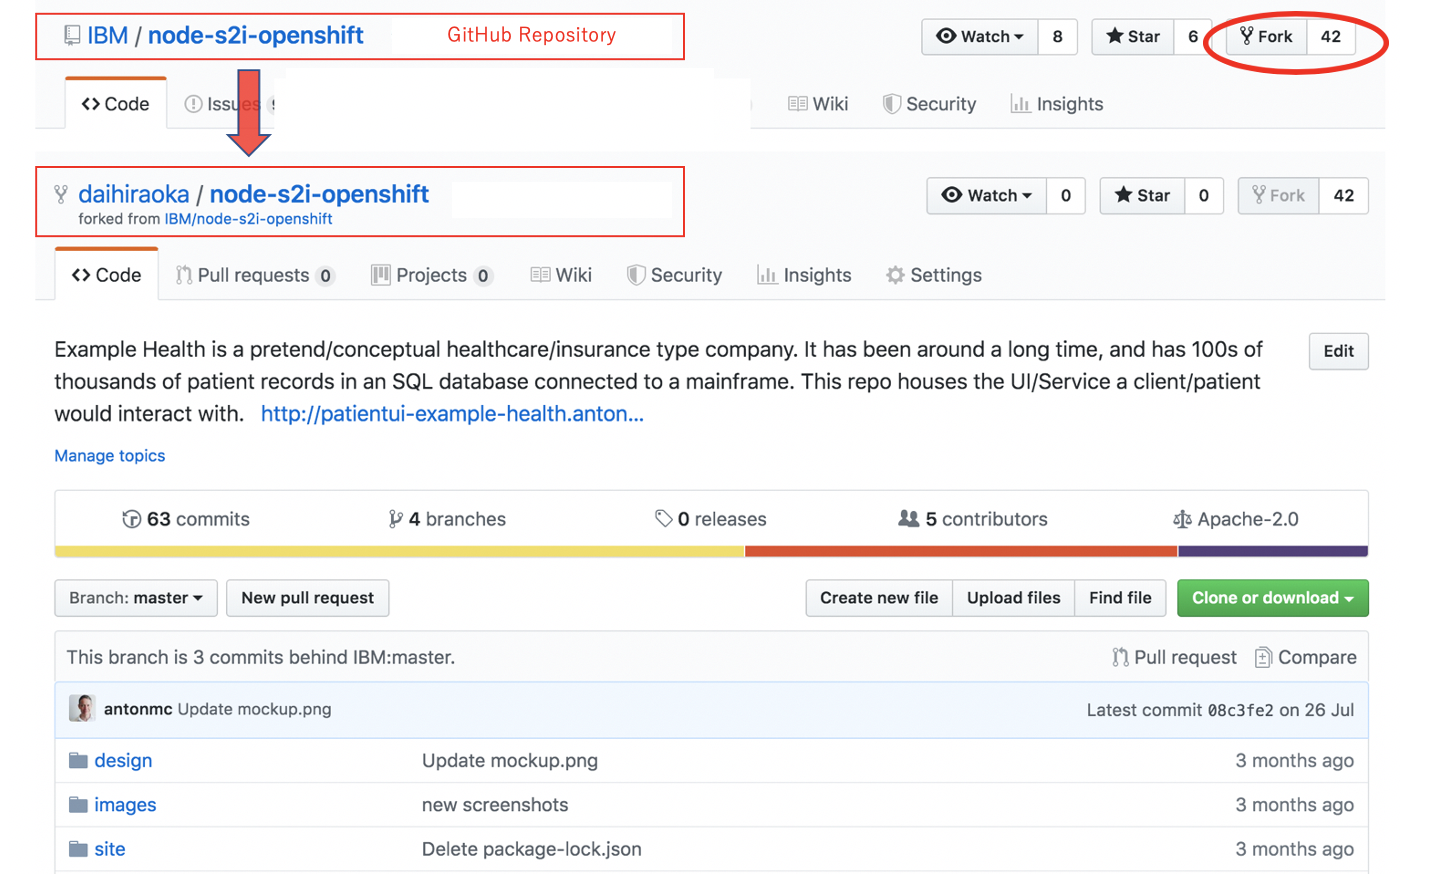
1. First, press the “Fork” button in GitHub’s “IBM/node-s2i-openshift” repository in order to fork your own GitHub repository.
2. Import the Red Hat UBI Node.js 10 container image into the OpenShift project. For uses cases when the container image is shared between projects, import the container images into the OpenShift project.
Administrator privileges are needed in order to import OpenShift projects, so import after logging in using system:admin. After the import is complete, switch to developer user.
# oc login -u system:admin
# oc import-image ubi7/nodejs-10 --from=registry.access.redhat.com/ubi7/nodejs-10 -n openshift --confirm
# oc login -u developer
3. Code patterns create a new project, but here, we will use the Example Health Project created in the previous procedure here. We will move to the health project.
# oc project health
4. Review the import results. Output the ImageStream(is) list for the OpenShift project.
# oc get is -n openshift
NAME         DOCKER REPO                            TAGS                           UPDATED
dotnet       172.30.1.1:5000/openshift/dotnet       2.0,latest                     31 hours ago
httpd        172.30.1.1:5000/openshift/httpd        2.4,latest                     31 hours ago
jenkins      172.30.1.1:5000/openshift/jenkins      1,2,latest                     31 hours ago
mariadb      172.30.1.1:5000/openshift/mariadb      10.1,10.2,latest               31 hours ago
mongodb      172.30.1.1:5000/openshift/mongodb      latest,2.4,2.6 + 3 more...     31 hours ago
mysql        172.30.1.1:5000/openshift/mysql        5.5,5.6,5.7 + 1 more...        31 hours ago
nginx        172.30.1.1:5000/openshift/nginx        1.10,1.12,1.8 + 1 more...      31 hours ago
nodejs       172.30.1.1:5000/openshift/nodejs       0.10,10,4 + 4 more...          31 hours ago
nodejs-10    172.30.1.1:5000/openshift/nodejs-10    latest                         5 hours ago
perl         172.30.1.1:5000/openshift/perl         5.24,5.26,latest + 2 more...   31 hours ago
php          172.30.1.1:5000/openshift/php          5.5,5.6,7.0 + 2 more...        31 hours ago
postgresql   172.30.1.1:5000/openshift/postgresql   9.6,latest,10 + 3 more...      31 hours ago
python       172.30.1.1:5000/openshift/python       3.6,latest,2.7 + 3 more...     31 hours ago
redis        172.30.1.1:5000/openshift/redis        latest,3.2                     31 hours ago
ruby         172.30.1.1:5000/openshift/ruby         2.5,latest,2.0 + 3 more...     31 hours ago
wildfly      172.30.1.1:5000/openshift/wildfly      10.0,10.1,11.0 + 5 more...     31 hours ago
nodejs-10 is the container image that will be imported this time. nodejs and dotnet displayed in the list are the same as the catalog in the Web console shown in the picture below.
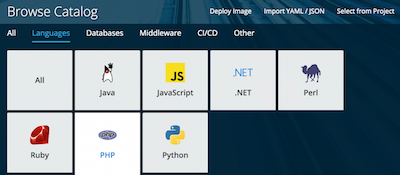
OpenShift provides a mechanism to easily deploy applications with CLI!
5. Build and deploy the Patient UI application using S2I in OpenShift.
# oc new-app openshift/nodejs-10~https://github.com/daihiraoka/node-s2i-openshift.git \
--name='patientui' --context-dir='/site'
* openshift/nodejs-10 is the ImageStream name (nodejs-10 for the openshift project) for the container image which will be the base
* The right side after the ~(tilde) is the source code repository
* --name=the name of the repository to be generated
* --context-dir specifies the subdirectory for the source code repository
S2I (Source to Image) is Red Hat’s original build method that generates a new container image using the base container image and source code.
Note:
If the Red Hat UBI could not be imported, change openshift/nodejs-10 to openshift/nodejs:10 and use nodejs in CentOS7.
The execution results are output as below.
--> Found image fca7ff7 (3 weeks old) in image stream "openshift/nodejs-10" under tag "latest" for "openshift/nodejs-10"

    * A source build using source code from https://github.com/daihiraoka/node-s2i-openshift.git will be created
      * The resulting image will be pushed to image stream tag "patientui:latest"
      * Use 'start-build' to trigger a new build
    * This image will be deployed in deployment config "patientui"
    * Port 8080/tcp will be load balanced by service "patientui"
      * Other containers can access this service through the hostname "patientui"

--> Creating resources ...
    imagestream.image.openshift.io "patientui" created
    buildconfig.build.openshift.io "patientui" created
    deploymentconfig.apps.openshift.io "patientui" created
    service "patientui" created
--> Success
    Build scheduled, use 'oc logs -f bc/patientui' to track its progress.
    Application is not exposed. You can expose services to the outside world by executing one or more of the commands below:
     'oc expose svc/patientui'
    Run 'oc status' to view your app.
After a while, the STATUS for patientui-a-<alphanumeric> will change to Running.
# oc get pod
NAME                READY     STATUS      RESTARTS   AGE
patientui-1-build   0/1       Completed   0          2m
patientui-1-lpql7   1/1       Running     0          5m
6. Create Route in order to publish the Patient UI application to the internet.
# oc expose svc/patientui
route.route.openshift.io/patientui exposed

# oc get route
NAME       HOST/PORT                              PATH  SERVICES  PORT TERMINATION WILDCARD
patientui  patientui-health.192.168.42.218.nip.io       patientui 8080-tcp         None
7. Access the host name in your browser.
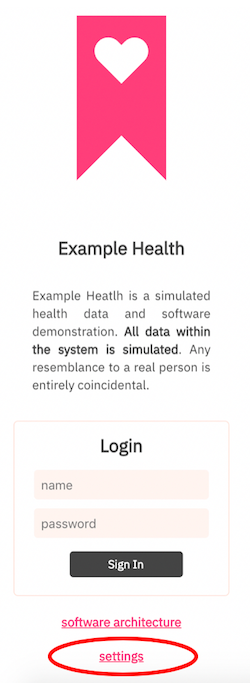
This operates in mock mode by default.
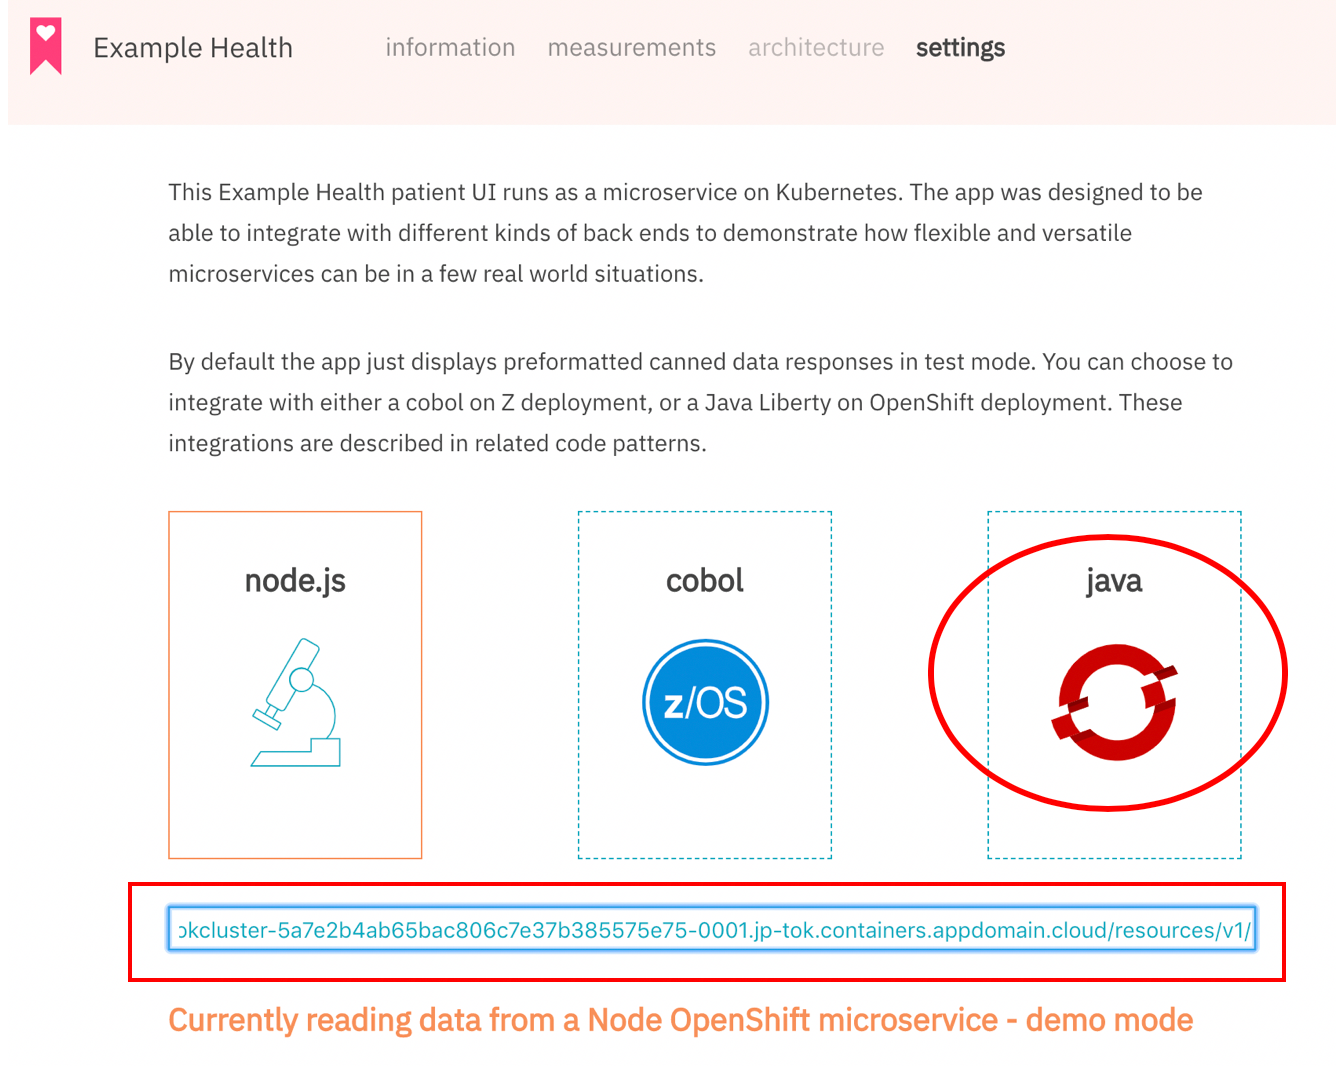
By entering “test” for both name and password, you will be able to log in. Here you can connect the Patient UI and the business logic by clicking “settings” and moving to the next screen.
8. Enter the URL for the Java EE application API for the business logic in the red box and click “java”.
URL: http://example-health-api-health.192.168.42.218.nip.io/resources/v1/
9. Retrieve the user id and password from the Patients table in the health database in order to confirm the log in information.
• First, obtain the mysql Pod name.
# oc get pod
NAME            READY     STATUS      RESTARTS   AGE
mysql-1-build   0/1       Completed   0          3m
mysql-1-hktv2   1/1       Running     0          2m
• Use the Pod name to rsh the mysql Pod and run the mysql command.
# oc rsh mysql-1-hktv2
sh-4.2$ mysql -u admin -ppassword health -e "select first_name,last_name,birthdate,user_id,password from Patients;"
+------------+-----------+------------+------------+------------+
| first_name | last_name | birthdate  | user_id    | password   |
+------------+-----------+------------+------------+------------+
| Clyde      | Ferry     | 1949-03-19 | clydef     | clydef     |
| Lawerence  | Pollich   | 2003-10-18 | lawerencep | lawerencep |
| Opal       | Larkin    | 1999-04-21 | opall      | opall      |
| Tresa      | Green     | 1980-08-30 | tresag     | tresag     |
| Stanley    | Kris      | 1987-11-06 | stanleyk   | stanleyk   |
| Karri      | McDermott | 2011-05-01 | karrim     | karrim     |
| Janise     | Metz      | 1963-09-16 | janisem    | janisem    |
| Alphonse   | Hand      | 2009-04-15 | alphonseh  | alphonseh  |
| Pedro      | Perea     | 1993-09-13 | pedrop     | pedrop     |
| Octavio    | Mante     | 1951-02-28 | octaviom   | octaviom   |
+------------+-----------+------------+------------+------------+
10. Enter “clydef” as the name and password and click “Sign In” in order to log in to see Clyde’s patient information.
 11. After logging in, Clyde’s personal information, appointment history and prescription record will be displayed.

You have now combined the Node.js application for the Patient UI with the Java EE application for the business logic!
This is the end of the Java EE application modernization journey.
The modernization journey for Java EE application modernization will soon be over.
On this journey, we have experienced modernizing using 2 code patterns
• How to split a monolithic Java EE application and run it as a microservice in OpenShift
• How to deploy using OpenShift’s Source to Image (S2I)
Next, it is time for everyone to start their own journey, instead of that of a fictional company!
What to do next! ( Part 3)
Example Health that successfully migrated to OpenShift is facing the problem of a slow-down in the application release cycle as the number of services increase. Why does this issue occur? The theme of Part 3 is about how to solve this issue.
I would like to try DevOps and CI / CD (Continuous Integration / Continuous Delivery) using only the basic features of OpenShift.
#CloudpakforApplications#openshift4.4#Openshift#RedHat#ApplicationModernization#Java#JavaEE