How to configure Cluster Level traffic to stay local within IBM Blockchain Platform
Authors: Varad Ramamoorthy, Jorge D Rodriguez
Overview
IBM Blockchain Platform (IBP) provides an easy way to deploy and manage Hyperledger Fabric components using an easy-to-use interface. IBP supports deployment on various cloud providers through OpenShift Container Platform (OCP). OCP allows logical separation of components under different namespaces, aka projects. For example, you could run development components under one namespace and staging components in another.
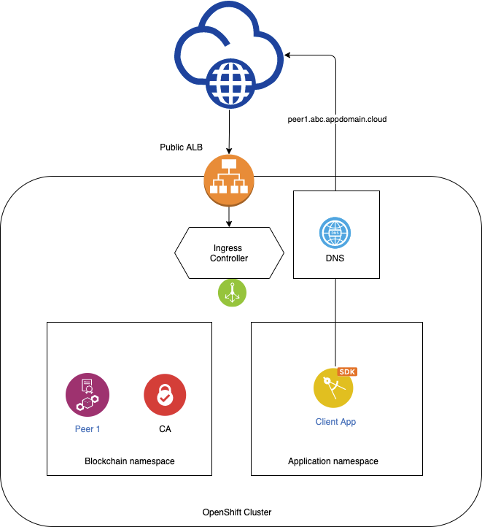
One of the possible deployments with OCP is where the Fabric components run under one namespace, and your application may be running under a different namespace. By default, all grpcs and https endpoints created by IBP are configured for external access. These endpoints are used on channel configuration blocks and other Fabric constructs to facilitate the communication between components of the same organization and other organizations in the blockchain network, which most likely be outside of the Kubernetes cluster where IBP is deployed. While we cannot change the default behavior used by IBP to create these endpoints, we can use a split DNS technique to ensure that network traffic between components deployed by the IBM Blockchain Platform on a specific Kubernetes cluster stays within the boundaries of the cluster's network. The central concept in this approach is to use the cluster's DNS configuration to map public routes assigned by IBP to internal addresses within the cluster by leveraging the internal router. Hence, instead of relying on the public resolution of these routes, we will have a cluster-level DNS server to do the resolution that we need. This is illustrated in the following picture.
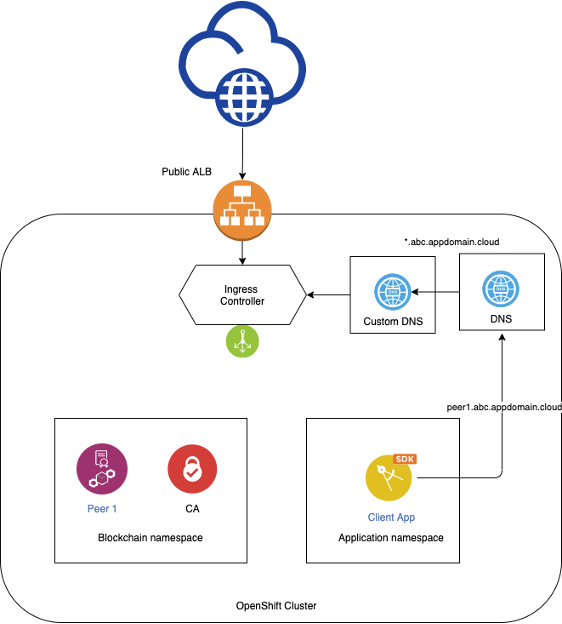
This article will focus on configuring your OCP cluster so that traffic between components within the cluster across different namespaces are kept local to the cluster and not leave the cluster. The end goal of the setup should look like the following.
Prerequisites
To take full advantage of the content in this article, the reader should be familiar with the following technologies:
- Kubernetes
- Hyperledger Fabric
- CoreDNS
- Ingress
The reader should also have the following setup already in place:
On IBM Cloud:
On Workstation:
Steps
Deploy CoreDNS
There are several options to install a custom CoreDNS on OCP. We choose the option using helm since it handles some of the lower-level configurations.
- Login into your oc cluster
- Change to the kubernetes namespace where you would like to deploy CoreDNS using the oc command.
- Install Helm in your system
https://helm.sh/docs/intro/install/
- Add the coredns helm repo to your list of available helm repositories.
helm repo add coredns https://coredns.github.io/helm
For details on the repo you can go here:
https://github.com/coredns/helm/tree/master/stable/coredns
- Create a directory called coredns on your local system and
cd to it.
- Using the helm command retrieve the configurable parameters for the coredns helm chart and use it as template for your values.yaml. This should create a yaml formatted file with properties in it.
helm show values coredns/coredns > values.yaml
- Open the values.yaml file and change the following values:
-
- Set isClusterService to false.
- Set replicaCount to 3. This will make sure you deploy 3 instances of the CoreDNS pods.
- Set port (found under the servers stanza) to 65353. Notice that changing that port means that this DNS server will take requests on port 65353 instead of the standard 53. That is how we want this to work because to run on port 53 we would have to allow containers to run as root user under that namespace.
- Uncomment the clusterIP entry (under the service stanza) and set the value to the ClusterIP you got from the CoreDNS service. (for example 172.21.10.59). Specifying an IP will guarantee that the service will always be deployed with the same IP hence we can use the IP later on when we have to redirect other DNSes to this one.
- Add the following lines under the entry ttl 30. The -name entry need to align with the other -name entries in the that section. Also, the parameters entry needs to align right under name.
# Custom configurartion for IBP

- name: rewrite

  parameters: name regex (.*).<public_ingress_subdomain_of_your_openshift_cluster> router-internal-default.openshift-ingress.svc.cluster.local
Where <public_ingress_subdomain_of_your_openshift_cluster> is the ingress subdomain of your OCP cluster. You can use the following command to get the ingress subdomain
oc describe --namespace=openshift-ingress-operator ingresscontroller/default | grep "Domain"
The following snippet shows and EXAMPLE of how that section looks like. Notice that indentation is very important.
servers:

- zones:

  - zone: .

  port: 65353

  plugins:

  - name: errors

  # Serves a /health endpoint on :8080, required for livenessProbe

  - name: health

    configBlock: |-

      lameduck 5s

  # Serves a /ready endpoint on :8181, required for readinessProbe

  - name: ready

  # Custom configuration for IBP

  - name: rewrite

    parameters: name regex (.*).mylocalinstallroks-b3c-18fbcb2a7646ee6f1ffd2a6c141df6c2-0000.us-south.containers.appdomain.cloud router-internal-default.openshift-ingress.svc.cluster.local

  # Serves a /metrics endpoint on :9153, required for serviceMonitor

  - name: prometheus

    parameters: 0.0.0.0:9153

  - name: forward

    parameters: . /etc/resolv.conf

  - name: cache

    parameters: 30

  - name: loop

  - name: reload

  - name: loadbalance
This step assumes that there is a service called router-internal-default under the openshift-ingress project. Please validate that the service. If the service does not exist you need to use a different service name and modify the router-internal-default.openshift-ingress.svc.cluster.local value used here.
Notice that what you are doing in step is updating the rules that will determine how to resolve the ingress subdomain of the cluster to the internal router of the cluster. This is what will do the magic.
- Using the helm command install the new instance (I think in the helm world is called a release) of the CoreDNS service
helm install -f values.yaml --namespace=<NAMESPACE_FOR_COREDNS> coredns/coredns # notice the use of values.yaml
Verify CoreDNS
You should see 3 new PODs running under the namespace after the command is completed. Explore those PODs and the config map created under this namespace. The data section of the config map should look similar to this (this is an EXAMPLE):
data:

  Corefile: |-

    .:65353 {

        errors

        health {

            lameduck 5s

        }

        ready

        rewrite name regex (.*).mylocalinstallroks-b3c-18fbcb2a7646ee6f1ffd2a6c141df6c2-0000.us-south.containers.appdomain.cloud router-internal-default.openshift-ingress.svc.cluster.local

        prometheus 0.0.0.0:9153

        forward . /etc/resolv.conf

        cache 30

        loop

        reload

        loadbalance

    }
Also explore the service that was created under this namespace which is how you can access the DNS. The ClusterIP assigned to the service should be the one specified in the values.yaml file.
Update OCP’s DNS to point to your CoreDNS instance
- Log into OCP cluster
- Modify the OCP DNS server to forward requests with the cluster's Ingress subdomain to an upstream server that would know how to map the Fabric component's routes to a local cluster service. This can be done using the following command:
oc edit dns.operator/default
Add the following content under the spec stanza:
  servers:
  - forwardPlugin:

      upstreams:

      - <CLUSTER_IP_OF_COREDNS_SERVICE>:<PORT_SECIFIED_IN_VALUES_FILE >

    name: my-server

    zones:

    - <CLUSTER-INGRESS-SUBDOMAIN>
Where CLUSTER_IP_OF_COREDNS_SERVICE is the IP assigned to the CoreDNS service that we just installed on previous steps.
Test CoreDNS configuration
Verify that our changes are working properly
- Deploy a dnstools pod on the namespace where CoreDNS is running and open a terminal on the dnstools pod:
kubectl run -it --rm --restart=Never --image=infoblox/dnstools:latest dnstools --namespace=<NAMESPACE _FOR_COREDNS>
- On the dnstools terminal run the command below. Note the IP address that came back.
nslookup router-internal-default.openshift-ingress.svc.cluster.local
- Go to the IBP console deployed on that cluster. Click on one of the peers and look for the operations URL.
- On the dnstools terminal run the following command:
curl -vvvk <operations_url_for_peer>/version
If the DNS is working properly, the IP address shown next to the `curl` output should be the same IP as the IP returned by the `ping `command on step 2.
#SupplyChain#IBMBlockchainTransparentSupplyandIBMFoodTrust#Highlights#Highlights-home