Overview
The IBM Cloud Pak System has introduced workload mobility as a new feature in the 2.3.3.3 Interim Fix 1 release.
This feature allows the client to migrate the running workloads from one IBM Cloud Pak System to another IBM Cloud Pak System.
Who should read this article?
The article should be helpful to developers or architects who use IBM Cloud Pak System 2.3.3.3 Interim Fix 1 on intel Generation 3 or higher to manage their cloud computing environment. This feature enables the customers to do live migration of their workloads across racks without shutting down their virtual machines. There are various use cases on how workload mobility plays an important role in workload management on Cloud Pak System.
What is the feature?
Knowledge required of Cloud Pak System: Intermediate Level
Using the workload mobility feature, customers can migrate their running workloads across IBM Cloud Pak System with minimal changes and minimal downtime.
A customer can migrate a virtual system instance(VSI) that runs on a IBM Cloud Pak System (let’s call source system) to another IBM Cloud Pak System (let’s call target system), running on Intel Generation 3 IBM Cloud Pak Systems or higher. If a virtual system instance includes multiple virtual machines as a part of a pattern, then all the associated virtual machines get migrated to target during migration process. If the virtual machine is associated with any addon disks or addon NICs, then those get migrated to the target as well.
Who can use it?
Let’s understand the prerequisites. Both the source and the target IBM Cloud Pak System should be at a minimum level of 2.3.3.3 Interim Fix 1. The feature only supports the migration of virtual system Instance of type
“Workload” as of now.
During virtual machines migration, their IPV4 addresses are retained as is, though the IPV6 addresses may change. Further, as IPv6 is not usually exposed, it should have minimal impact.
Both source and target Cloud Pak System must have at least one common VLAN associated with IP group, Cloud group and instance. Refer to the
Additional information and references of this article for documentation links.
How it works?
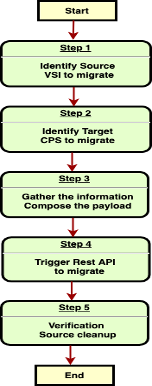
Here is basic workflow of the administrator tasks
Let’s take few customer use cases here:
Use case 1: Suppose, a virtual system instance is running on the source IBM Cloud Pak System and needs to move to another IBM Cloud Pak System on another Rack. We assume that all prerequisites are already met.
Let’s assume source instance:
VS1 and deployment Id of
VS1 is
d-1234.VS1 has 2 IPv4 addresses with two NICs mapped to IP groups, namely
IPG1 and
IPG2 on the source Cloud Pak System respectively.
The IP Group page includes IP group details along with all IPs. Identify the IP groups and IPs that must be moved or associated with the source instance.
Make a note of VLAN that is associated with the IP. In this case, lets note down VLAN of IP groups
IPG1 and
IPG2. Let’s say, it is
VLAN11 for both IP Groups.
Now let’s go to the target Cloud Pak system and identify a environment profile and a cloud group where the migrated instance would reside.
Let’s say environment profile is
Ep2 and Cloud Group
is Cg2 on the target system .
Also, identify
IPG3 and
IPG4 as target IP group names and they must reference to
VLAN11.
Those 2 IPv4 addresses get added to
IPG3 and
IPG4 IP groups after migration, so those IP addresses get retained on the target system as is.
Use case 2: A workload is running on a Cloud Pak System that is on datacenter (d1). The customer wants to move all the running workloads to another datacenter (d2) in the same (or another) location.
In the migration planning, the Cloud Pak System (of d2) is set as target and workload migration is initiated from d1 to d2 after setting up the prerequisites.
Use case 3: If there is a planned maintenance to happen on a Rack of a Cloud Pak System, the business-critical workloads need to continue. One can plan the workload movement before maintenance while keeping it live and even can bring it back to the original system after maintenance.
Here are the steps:
Step 1 : Gather source data.
To migrate a virtual system instance, first we need to gather the following information on the source Cloud Pak System.
- Virtual system instance on the source Cloud Pak System that needs to be migrated. Note down the deployment id.
- Virtual images, patterns, and dependencies and their version associated with the source Instance.
- There must be network connectivity between source and target systems and must be reachable using IPv4.
- Check VLAN associated with the IP Group of the source instance.
- IPv4 address of source Cloud Pak System(will be required for payload).
- User with admin rights on the source system.
- Credentials of each VM to be migrated.
Step 2 : Gather target data.
Let’s gather the following information on the target Cloud Pak System.
- Ensure that the same pattern and virtual image with the same version are available as on source.
- The Environment profile where the instance should be migrated.
- The Cloud group where the instance should be migrated.
- IP groups where the IP of each VM should be moved on the target System.
- All desired IP group should be selected on the environment profile page under the desired cloud group as shown in picture 2.
- Ensure that the target IP groups has a matching VLAN with IP group of source instance’s IP addresses. (as explained in Use case 1)
- User with admin rights on the target Cloud Pak system to trigger the API.
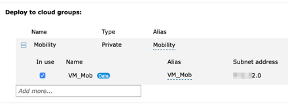 Picture 2:
Note: Though most of the above points get validated in the premigration validation stage, but the administrator must plan for them advance.
Step 3: Compose the payload.
We can create a simple payload JSON after we have all the required information.
Here is example of payload
https://<Target Cloud Pak System IP>/admin/resources/migrate_deployment
{
    "source_deployment_id": "d-1234",
    "target_environment_profile_name": "Ep2",
    "target_cloud_group_name": "cg2",
    "source_rack_ipaddress": "x.x.x.x",
    "source_admin_user": "admin",
    "source_admin_password": "xxxxx",
    "migration_timeout_min":  "120",
    "state": "start",
    "target_ip_group": "['OS_Node':['eth1':'IPG3','eth2':'IPG4']",
    "vm_user_credentials": "['OS_Node':['user':'root','password':'xxxxx']]"
}
Note: The ‘ethX’ is just a naming convention to map IP groups to IPs where X starting with 1. Remember to provide required headers and basic authentication credentials.
First NIC IP (Network Interface 1 - NIC) gets added in IPG3.
Second NIC IP (Network Interface 2 - NIC) gets added in IPG4 and so on.
Similarly, if there are more than one virtual machines in an source instance, their respective prefix must be mentioned as follows:
[' OS_Node':['eth1':'rack1CPSIPgroup'],' OS_Node_1':['eth1':'rack1CPSIPgroup']]",
Here, we are using OS_Node (just a name in this example picture 3) because the same name appears as prefix in the Source Instance Page (OS_Node.XXXX).
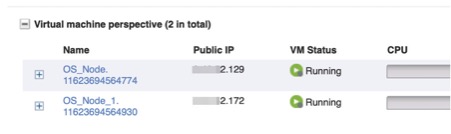 Picture 3:
Step 4: Trigger the migration.
Administrator must execute the Post REST API call with the composed payload. This API call must be run against the target system URL, which is the destination for the Workload migration. After triggering post call, response of payload of REST would return success with status 201 and do a run GET immediately.
In case of invalid data or any inconsistency, It returns 400 with error details after validation and do not trigger the migration.
Note: There is a way to just validate migration payload without triggering the migration using
premigration_validate attribute in payload. Just pass
"premigration_validate": "VALIDATE_ONLY" as additional parameter in payload.
As of now, there is no user interface for this feature and is well controlled by administrator only through a REST call. Simple curl or a utility can be used to trigger the call. There is a list of optional parameters captured in the IBM Documentation for further customisation.

Picture 4
Step 5: Monitoring and Verification
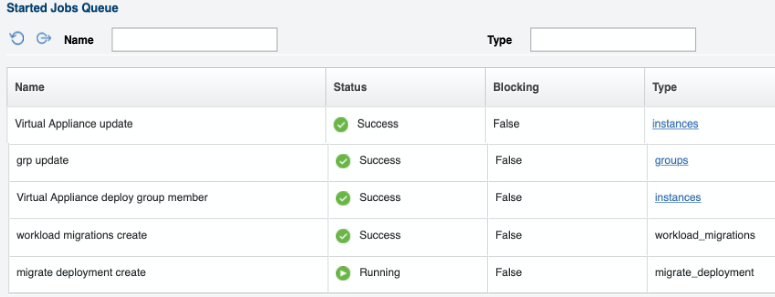
After triggering the call, migration is driven by multiple job in the Cloud Pak System as shown in picture 5. Administrator can track the jobs statuses in job queues. Ideally, if all associated jobs are successful, then VSI migration is also successful.
The target system can also be monitored. A new Instance pops up in launching state.
When all jobs are done, target instance status changes to Running state. Finally, the source instance gets deleted from the Source Cloud Pak System only if everything is good. There is a message in History section after successful completion as shown in picture 4.
Picture 5
Conclusion
Plan the migration of virtual system instance in advance. Check the prerequisites. Workload mobility feature can help developers to automate the free movement of workloads and manage them efficiently and at the same time exploit the existing capabilities in IBM Cloud Pak System.
Additional information and references
Reference link to KC
https://www.ibm.com/docs/en/cloud-pak-system-w3500/2.3.3?topic=system-migrating-instances
Acknowledgement
Sincere thanks to Hugh Hocket and Shyamala Rajagopalan for running through the steps and helping review the article.