By: Pam Andrejko & Sundari Voruganti
For customers who prefer a managed OpenShift cluster on Microsoft Azure, Azure Red Hat OpenShift or “ARO” is the answer. But the only storage option available in this managed cluster is “Azure Disk” storage which is ReadWriteOnce (RWO) storage meaning the volume can be mounted as read-write by a single node. Many applications require ReadWriteMany (RWX) storage which means that the storage volume can be mounted as read-write by multiple nodes. This blog explains how to provision and use the Azure File CSI Driver as a RWX storage option for an application.
Disclaimer: This configuration is currently not supported by Microsoft, so use at your own risk.
Process Overview:
- Create an ARO cluster.
- Create an Azure storage account.
- Create an NFS file share and mount point using the Azure portal.
- Install the CSI driver.
- Create the “azurefile-csi“ storage class.
- Deploy an application using the storage class.
Detailed steps:
- Create an ARO cluster. Important: Record the name of the Resource group you used here as you will need it in the next step.
- Create a storage account in the same resource group as the ARO cluster. We will run these steps using the Azure CLI, so be sure to log in with the CLI before attempting these commands.
Provide a name for your storage account, and specify the resource group you used when you created the cluster in the previous step.
export AZURE_STORAGE_ACCOUNT_NAME=<your storage account>
export RESOURCEGROUP=<your resource group>
az storage account create --name $AZURE_STORAGE_ACCOUNT_NAME --resource-group $RESOURCEGROUP --kind StorageV2 --sku Standard_LRS
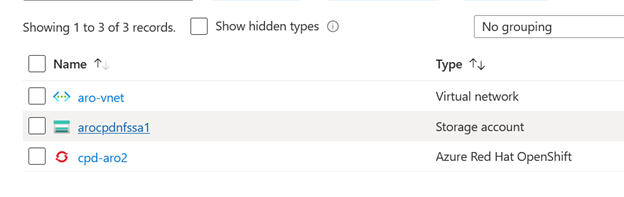
When the command is successful, you can see the storage account in the resource group in your Azure portal.
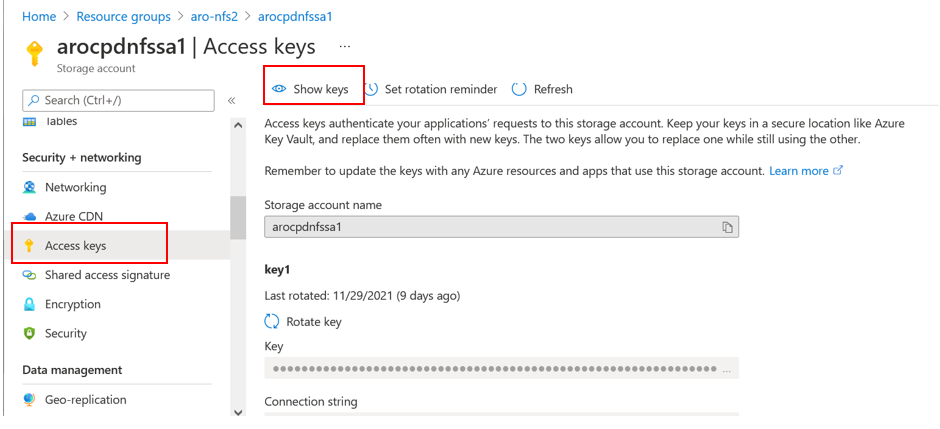
Open the Storage account and click Access keys, then Show keys to copy the first storage key. You will use this key when you create the azure-secret and storage class in the following steps.
- Log in to your ARO cluster from the command line (“oc login …”)
- Create the azure secret by specifying your storage account and key from above:
kubectl create secret generic azure-secret --from-literal azurestorageaccountname=<your storageaccount here> --from-literal azurestorageaccountkey="<your key here>" --type=Opaque
- Create an NFS file share in the storage account.
- Log in to your Azure portal.
- Navigate to your resource group.
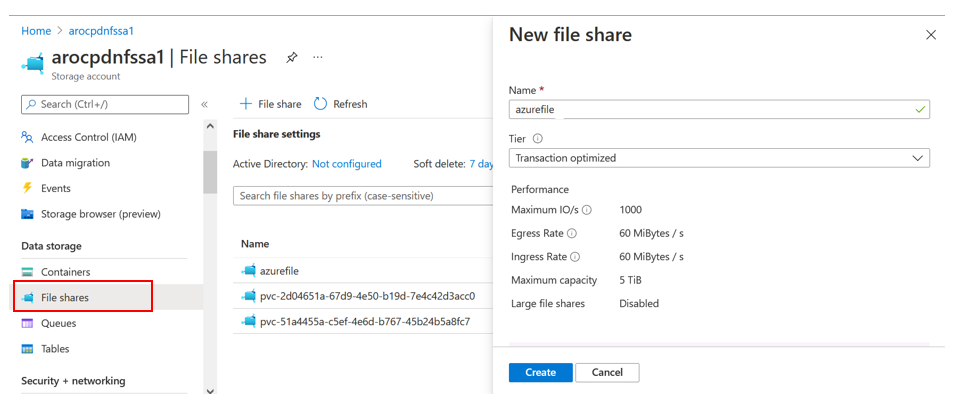
- Click on your storage account.
- In the left navigation, click File shares which is under Data Storage.
- Click + File share to create a new file share.
- The name that you specify will be used later in your application as the mount point. For example, our sample application uses azurefile.
- Click Create to create your file share
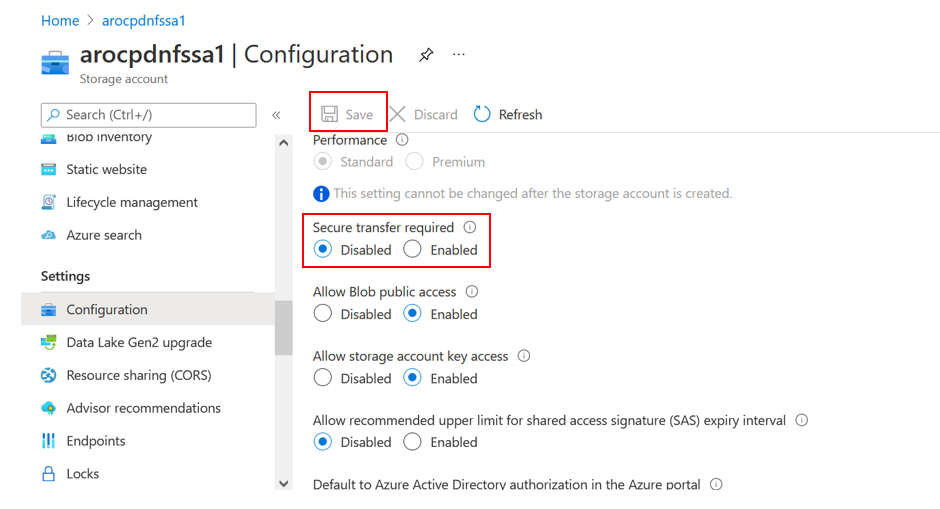
- Disable secure transfer
- Select Configuration.
- Select Disabled for Secure transfer required.
- Click Save
3. Azure File CSI Driver pre-reqs
Run the following set of commands to build a YAML file that contains your Azure credentials that will be added to the OpenShift cluster as a Configmap.
Before attempting these commands, ensure you have logged into the Azure CLI. You will need to provide your ARO cluster name and your resource group.
mkdir deploy
export cluster_name=<your ARO cluster name above>
export rg_name=<your resource group name above>
azure_cnf_secret=$(oc get secret azure-cloud-provider -n kube-system -o jsonpath="{.data.cloud-config}" | base64 --decode)
azure_cnf_secret_length=$(echo -n $azure_cnf_secret | wc -c)
aadClientId="${azure_cnf_secret:13:36}"
aadClientSecret="${azure_cnf_secret:67:$azure_cnf_secret_length}"
subId=$(az account show --query id)
tenantId=$(az account show --query tenantId -o tsv)
managed_rg=$(az aro show -n $cluster_name -g $rg_name --query 'clusterProfile.resourceGroupId' -o tsv)
managed_rg_name=`echo -e $managed_rg | cut -d "/" -f5`
echo $tenantId
echo "subscription ID :" $subId
echo "ARO RG Name" $managed_rg_name
echo "aadClientId " $aadClientId
echo "aadClientSecret" $aadClientSecret
IMPORTANT: Note that the “ARO RG name” is the ARO Cluster managed resource group and not your resource group.
Copy and paste the following text into a file named azure-cloud-provider.yaml. Replace the variables with the values from the echo commands above, then apply the YAML to your cluster.
-----------
kind: ConfigMap
apiVersion: v1
metadata:
name: azure-cred-file
namespace: kube-system
data:
tenantId: <$tenantId>
subscriptionId: <$subId>
resourceGroup: <$managed_rg_name>
useManagedIdentityExtension: ‘false’ #Note: Use single quotes around false
aadClientId: <$aadClientId>
aadClientSecret: <$aadClientSecret>
--------------
oc apply -f deploy/azure-cloud-provider.yaml
- Add-scc-to-user privileged account
oc adm policy add-scc-to-user privileged system:serviceaccount:kube-system:csi-azurefile-node-sa
oc describe scc privileged
4. Install CSI driver.
Now we are ready to install the CSI driver with dynamic provisioning.
- Install driver using the provided cURL command.
driver_version=master #vv0.10.0
echo "Driver version " $driver_version
curl -skSL https://raw.githubusercontent.com/kubernetes-sigs/azurefile-csi-driver/$driver_version/deploy/install-driver.sh | bash -s $driver_version --
- Verify the CSI driver installed successfully. From the OpenShift web console, you can examine the pods in the kube-system namespace to verify they are all running or you can run the following set of commands to check the pods for errors:
oc get events -n kube-system | grep -i "Error"
for pod in $(oc get pods -l app=csi-azurefile-controller -n kube-system -o custom-columns=:metadata.name)
do
oc describe pod $pod -n kube-system | grep -i "Error"
oc logs $pod -c csi-provisioner -n kube-system | grep -i "Error"
oc logs $pod -c csi-attacher -n kube-system | grep -i "Error"
oc logs $pod -c csi-snapshotter -n kube-system | grep -i "Error"
oc logs $pod -c csi-resizer -n kube-system | grep -i "Error"
oc logs $pod -c liveness-probe -n kube-system | grep -i "Error"
oc logs $pod -c azurefile -n kube-system | grep -i "Error"
done
5. Use kubectl to create the storage class using the azure secret created above.
kubectl create -f https://raw.githubusercontent.com/kubernetes-sigs/azurefile-csi-driver/master/deploy/example/storageclass-azurefile-secret.yaml
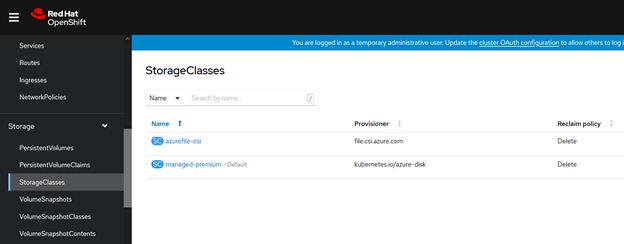
When the command is successful, you can see the storage class in the OpenShift web console.
6. Now we are ready to create a test application, a statefulset in our case, using the storage class and the mount point that we created. Examine the
test application where you can see the mountPath:
/mnt/azurefile is specified and the storage class
volume.beta.kubernetes.io/storage-class: azurefile-csi is provided. Run the following command to create the stateful set:
kubectl create -f https://raw.githubusercontent.com/kubernetes-sigs/azurefile-csi-driver/master/deploy/example/statefulset.yaml
7. Verify that the test application works. The pods in the statefulset should be in running state. Also verify that the persistent volume is created and bound.

References:
These instructions were based on the information in the following git repos:
https://docs.microsoft.com/en-us/azure/openshift/tutorial-create-cluster
https://github.com/kubernetes-sigs/azurefile-csi-driver/blob/2f1b8073411e2a104e23db40b73211cfd626b9b2/deploy/example/e2e_usage.md#azure-file-dynamic-provisioning
https://github.com/ezYakaEagle442/aro-pub-storage/blob/master/setup-store-CSI-driver-azure-file.md
#StorageFusion#StorageforContainers#Storage