The IBM Spectrum Fusion HCI appliance is factory-made with a base configuration. Customers can upsize their storage/compute nodes to increase the storage capacity and compute power.
The following is the factory-made base configuration available for the IBM Spectrum Fusion HCI appliance:
- 42U rack
- 2x Ethernet high-speed switches
- 2x Ethernet management switches
- 6x Storage/Compute servers with 2 NVMe drives/server
- The server in RU7 is the provisioner node, connected to the KVM
- Servers in RU2, RU3, and RU4 become the OpenShift control plane
The customers of the appliance can upsize their storage/compute nodes to a maximum of 20 (minus any GPU servers). The storage can be increased by adding pairs of drives to storage/compute servers. The addition of a disk increases the storage capacity, while the computer-only node increases the compute capacity. The compute-only servers are also available in pairs. Apart from storage/compute, the following node types are available for upsizing:
- A pair of 2U GPU servers, each with 3x NVIDIA A100 GPUs
- 68TB NVMe PCIe Gen4 drives/server to a max of 10 drives/server
- AFM (Active File Manager) delivered as a pair of servers
The different stages of upsizing are as follows:
- Add the node to the physical appliance. It is done by IBM Service Support Representative.
- From the IBM Spectrum Fusion user interface, add the node to the OpenShift Container Platform cluster
- From the IBM Spectrum Fusion user interface, add the node to the storage cluster.
The procedures in this article describe the node addition and disk upsize steps. It also explains the various user interface screens and other operations associated with the procedures.
Ensure that the following prerequisites are met before you upsize nodes or disks:
- The IBM Spectrum Fusion appliance must be running
- The OpenShift must be running, and existing nodes must be in a healthy state.
Note: This prerequisite is not applicable if you are performing a node replacement scenario. (except for node replacement scenario)
- The Spectrum Scale must be running and healthy.
- The received new nodes have a specific number of NVMe drives, that is, the new node must have the same number of disks as the ones that are already there.
- The received nodes must have a known username/password account pre-enabled as per ORD.
- The new nodes must have a link-local IP address sticker.
Procedure to upsize or add nodes:
- After the node is received, the IBM Service Support Representative will unbox the node, determine the correct unit for the new node, do a physical installation of the node, and insert the necessary cables. The following sample image shows how the appliance looks after the physical node installation is complete:
- Log in to the IBM Spectrum Fusion user interface as an administrator user.
- Go to Manage > Compute. The Compute page is displayed.
- Click Add node. A new Add Node page is displayed.
- Enter the Link local address and Serial number.
- Select the Rack location and click Add nodes. A message appears informing you about the successful submission of the request.
-
If you want to add more nodes, then click Add another node and enter the details.
For each added node, a corresponding ComputeConfiguration Custom Resource gets created.
After the nodes are added to your compute cluster, the State changes to Ready for OpenShift.
If entered values are incorrect, then the following message appears in the Status column of the node row:
If the error is due to incorrect data input, delete the previous Compute Configuration CR and recreate the CR with correct data.
8. To add the node to the OpenShift cluster, do these steps.
-
- After a node is added successfully, wait for the State of the node to change to Ready for OpenShift.
- Click a node that has State as Ready for OpenShift. A window is displayed that requests you to select the nodes to move to the OpenShift cluster. This list includes all the nodes that are ready for the OpenShift cluster.
Note: Make sure to add nodes to the OpenShift cluster one by one. 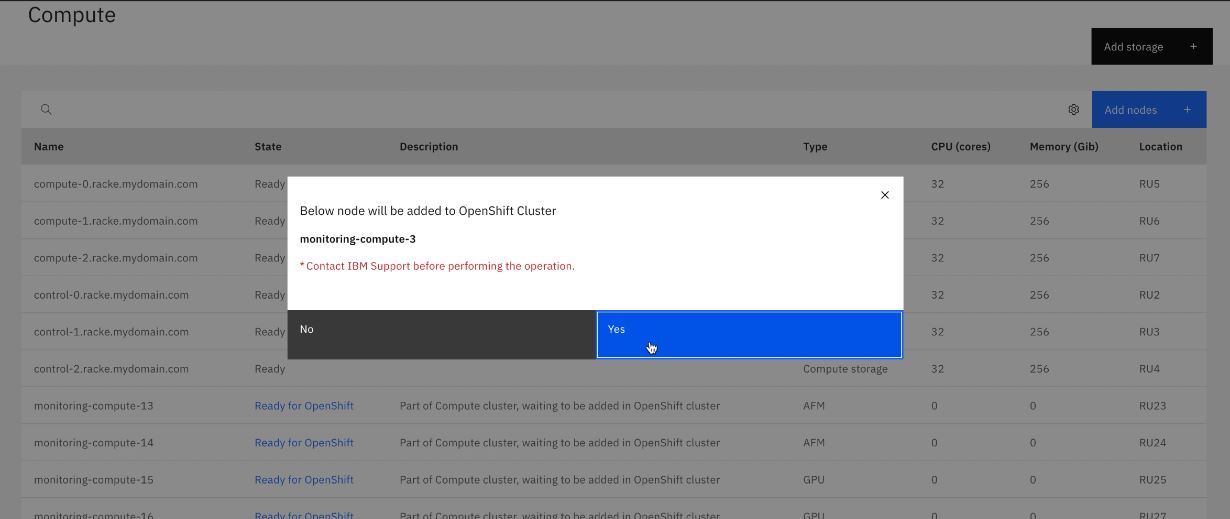
3. Select a single node and click Yes.
4. Repeat the earlier procedure to add the remaining nodes one by one into the OpenShift cluster.
5. Verify whether the OpenShift cluster is healthy after node addition and the added nodes are in a Ready state.
9. To add the node to the storage cluster, do the following steps:
-
- Click a node that is ready for storage.
3. Click Yes to add the node to the storage cluster.
4. Wait for the node status to change to Ready state.
Note: After the node is added to the storage cluster successfully, the node status changes to Ready state. It might take a few minutes for the status to change to Ready.
Procedure to upsize storage disks
- After the drive is received, the IBM Service Support Representative ascertains whether slots are available and inserts drive into drive bay. A sample image shows six storage nodes after the inclusion of two additional drives to each node by the IBM Service Support Representative.
The following picture shows node with blanks removed. The second picture shows two additional drives.
Here is a picture of the 6 storage nodes after 2 additional drives have been added to each node.
2. Log in to the IBM Spectrum Fusion user interface as an administrator user.
3. Go to Manage > Compute. The Compute page is displayed.
4. Click Add storage. A new Add storage page is displayed. If there no additional disks are found, then the following image is displayed.
If you are not able to see additional disks even after 1 hour, contact IBM Support.
5. Review the newly installed disk details and click Add. The following message is displayed:
Request accepted successfully.
Note: All new disks on all nodes will be added automatically and no selection of disks are there. It is highly recommended that you add a bunch of storage nodes at a time and not one by one.
6. For verification, do the following steps:
-
- Go to the node details page.
- In the Inventory tab, go to the Disks tab.
- Check the new size. Also, check whether the disk information reflects the newly added drive.
Summary
This article covers the procedure to quickly upsize nodes and storage disks from the IBM Spectrum Fusion user interface. It also showcases the appliance after the insertion of the physical nodes by the IBM Service Support Representative.
For troubleshooting the user interface-related issues in Compute node page, see IBM Documentation at Troubleshooting issues.