IBM Cloud Satellite is an extension of the IBM Public Cloud that can run inside the customer’s datacentre. IBM Cloud satellite helps the user to create a hybrid environment that brings the scalability and on-demand flexibility of public cloud services in a user secure private cloud. It expects users to set up Virtual machines in a specific way and connects them to the cloud to bring all IBM Cloud Satellite services inside the datacentre.
IBM Spectrum Fusion provides an automated way to deploy the hosts on OpenShift Virtualization. The VMs get deployed and registered on IBM Cloud Satellite. After the Virtual Hosts are registered in IBM Cloud Satellite Location, any IBM Cloud Service can be deployed and managed on the deployed hosts. IBM Spectrum fusion installs a custom IBM Cloud Satellite operator that is responsible for IBM Cloud Satellite instance deployment on Openshift Virtualization and registration of the instance that is deployed on IBM Cloud Satellite. Users can perform various day 2 operations on the deployed instance via Openshift Virtualization UI. As a part of the IBM Spectrum Fusion 2.1 release, support is added for Remote Scale Cluster mount, which can help the user to create and manage the application volumes from the Native Scale cluster. Workloads that can be deployed on IBM Cloud Satellite OCP can use storage from the IBM Spectrum Fusion scale.
1. Pre-requisites
1.1 Install Openshift Virtualization
For detailed steps to install OpenShift Virtualization, see https://docs.openshift.com/container-platform/4.7/virt/install/preparing-cluster-for-virt.html.
1.2 Setting up Network from IBM Spectrum Fusion User Interface
- Log in to IBM Spectrum Fusion appliance by using the IBM Spectrum Fusion user interface.
- Navigate to Mange -> Network -> VLANs.
- Click ADD VLAN.
- Enter Name and VLAN ID.
- Select Cloud Satellite VLAN from type the drop-down list.
- Click Save. Verify whether the Cloud Satellite VLAN is added successfully. Refer to the following screenshot for more details:

- Adding Cloud Satellite VLAN to the Default Native Link:
- Navigate to Links
Click Edit for the exiting link. Refer to the following screenshot for more details:
In the VLANs section, select the newly added Satellite VLAN and ensure that the Native Vlan is “Default Native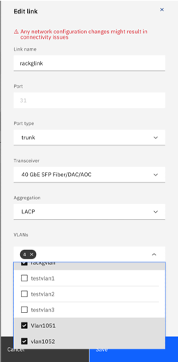
Click Save to add the Satellite VLAN to the link. Verify whether the Cloud Satellite VLAN is listed in the VLANs section of the Default Native Vlan. Refer to the following screenshot for more details:
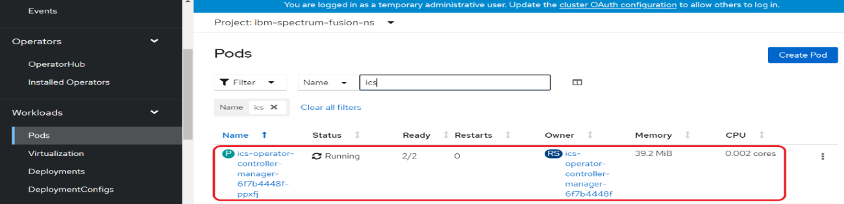
1.3 Verify IBM Cloud Satellite operator Installation
Perform following steps to verify whether the IBM Cloud Satellite is installed and the corresponding POD is in “Running” state in ibm-spectrum-fusion-ns project:
- Log in to IBM Spectrum Fusion appliance by using the IBM Spectrum Fusion user interface.
- Navigate to the Menu and launch “Red Hat Openshift Console”.
- Navigate to the Pods and in the Red Hat Openshift menu, go to Workload -> Pods.
Verify whether the ics-operator-controller-XXXX pod is in “Running” state. Refer to the following screenshot for more details:
1.4 Creating and Updating Secrets and Config Maps
The following secrets should be available in “ibm-spectrum-fusion-ns” namespace before deploying IBM Cloud Satellite host from IBM Spectrum Fusion appliance UI.
1. Create a Secret “isf-ics-rhsubscription” to download the required packages from the Red Hat VM for registering VM on IBM Cloud satellite locationUser needs to have access to all the Red Hat repositories. This secret stores Red Hat subscription details.
Command:
oc create secret generic isf-ics-rhsubscription --from-literal=rhsuser=<Redhat Subscription Username> --from-literal=rhspassword=<Redhat Subscription Password> -n ibm-spectrum-fusion-ns
2. Update Configmap isf-ui-operator-ics-config with proper Docker registry URL to download qcow2 image
Modify the value for “isfregistryurl” as per the following format:
format : “docker:// /hub.docker.com/repository/docker/satelliteimage/qcow2-image:latest"
Note: Follow Steps mentioned in 1.5 for Registry image creation.
3. Create a Secret for Docker registry to pull required images from the Docker hub
Create a Secret with name “isf-ics-pull-secret” in “ibm-spectrum-fusion-ns” project. This secret should contain credentials to download the required images from Docker registry.
Command:
oc create secret docker-registry isf-ics-pull-secret --docker-server=<docker-server> --docker-username=<username> --docker-password=<password> --docker-email=<email ID> -n ibm-spectrum-fusion-ns
1.5 Steps to Create Image and Push image to docker registry
IBM Cloud Satellite operator assumes the availability of a registry where the VM image can be stored.Red Hat Enterprise Linux (RHEL) 7.X images are available in qcow2 format.qcow2 images need to be uploaded and available to the registry.Use following sample Docker file to create an image:
FROM scratch
ADD rhel-server-7.9-x86_64-kvm.qcow2 /disk/
Use the following sample script to create and push image to docker registry:
#!/bin/sh
docker build -t qcow2-image:latest .
docker image tag qcow2-image:latest <docker-repo>/qcow2-image:latest
docker image push hub.docker.com/repository/docker/satelliteimage/ qcow2-image:latest
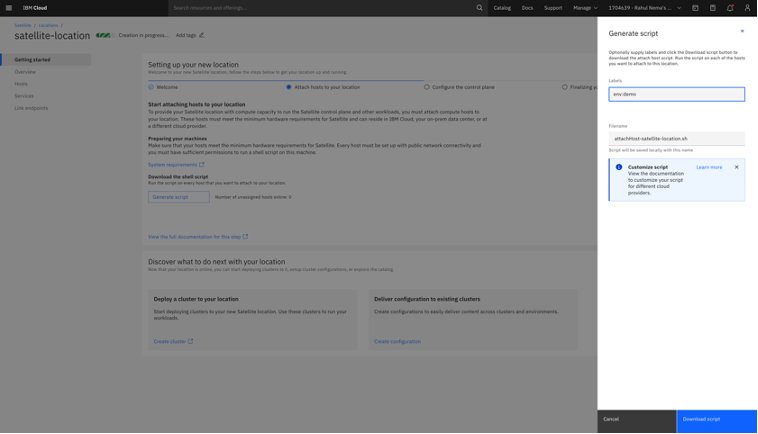
2. Create Satellite location at IBM Cloud Satellite
- Log in to IBM Cloud.
- Manually go to this URL https://cloud.ibm.com/satellite/locations
- Click Create Location.
- Download the registration script for the location. For complete steps, see https://cloud.ibm.com/docs/satellite?topic=satellite-locations.
3. Deploy IBM Cloud Satellite Location from IBM Spectrum Fusion – Satellite User Interface
- Launch IBM Spectrum Fusion appliance user interface.
- Navigate to Cloud Satellite Page.
From the menu, select
Manage ->
Cloud Satellite.

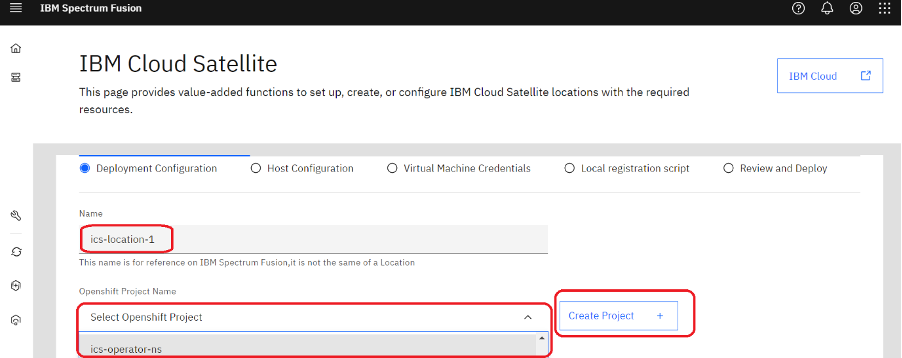
3.1 Deployment Configuration Steps to Deploy IBM Cloud Satellite Hosts
- In the IBM Cloud Satellite UI , click Deploy hosts.
- Specify Name for Cloud Satellite host.
- Number of hosts to deploy (Minimum 6 hosts are required)
vCPUYou can create a new project using “Create Project” option.
3.2 Host Configuration Details Page
User need to choose the appropriate values for host hardware (VM configuration):Memory
Enter username and password, which will be configured on the VM and can be used to login to the VM.Storage
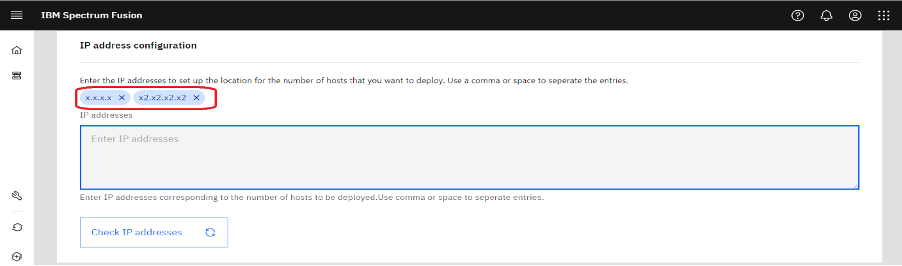
3.3 IP Address configuration details:
Users need to enter comma separated IP addresses. Number of IP addresses must be same as the number of configured hosts (at least 6).
3.4 Network configuration details:
User need to provide Gateway, Netmask, DNS and VLAN values.

3.5 Virtual Machine Configuration details Page
Enter username and password, which will be configured on the VM and can be used to login to the VM.
Note: This username and password are same for all the virtual machines.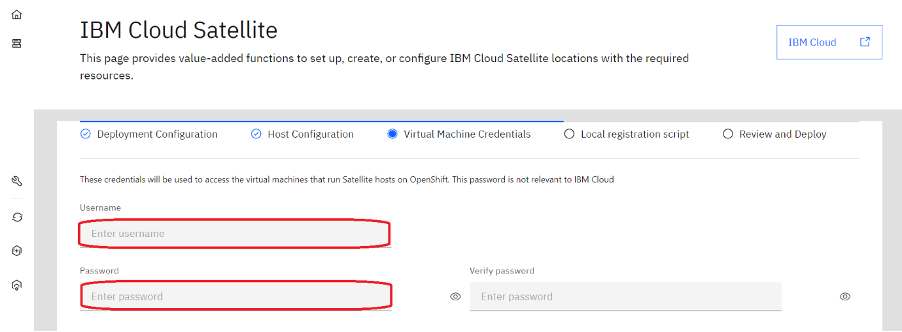
3.6 IBM Cloud Satellite Location Registration Script
Upload the IBM Cloud Satellite location script downloaded in Step 3 in the Upload Location selection box.
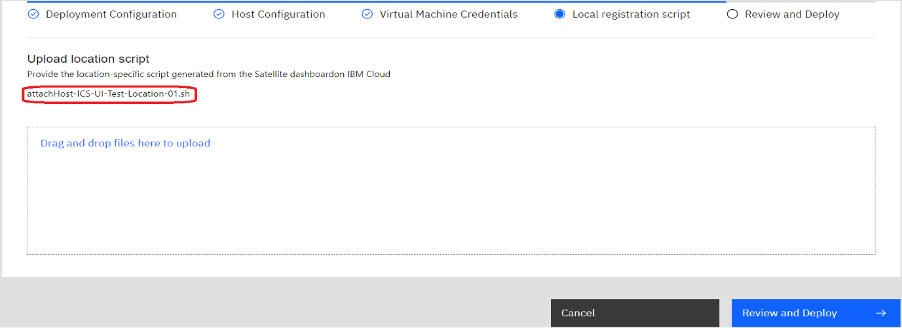
Note: Registration script will be executed on all the created virtual machines.. This script attaches all the virtual machines to IBM Cloud Satellite Location.
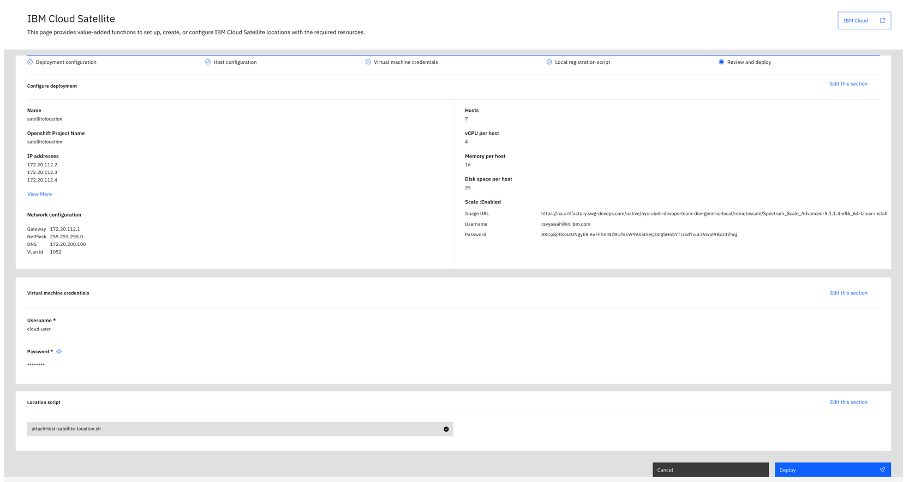
3.7 Verification on Review and Deploy
Verify all the details in the Review and Deploy page.
Click Deploy to deploy IBM Cloud Satellite hosts. Refer to the following screenshot:
3.8 Verification step
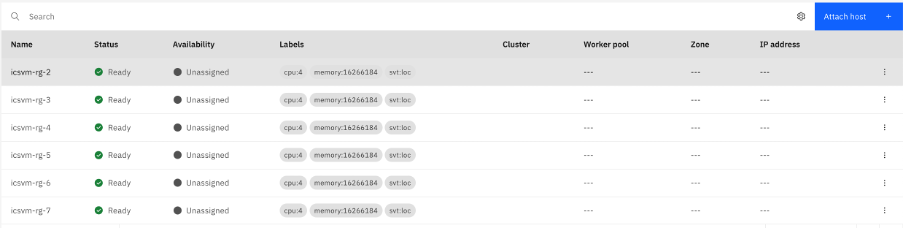
3.8.1 Verify Status of Deployed Hosts on IBM Spectrum Fusion
Verify whether the status of the deployed host should be in running state on IBM Spectrum Fusion appliance UI. Refer to the following screenshot:

3.8.2 Verification of VMs from RedHat Openshift Virtualization
-
Open IBM Spectrum Fusion console appliance UI.
-
Click Openshift Console.
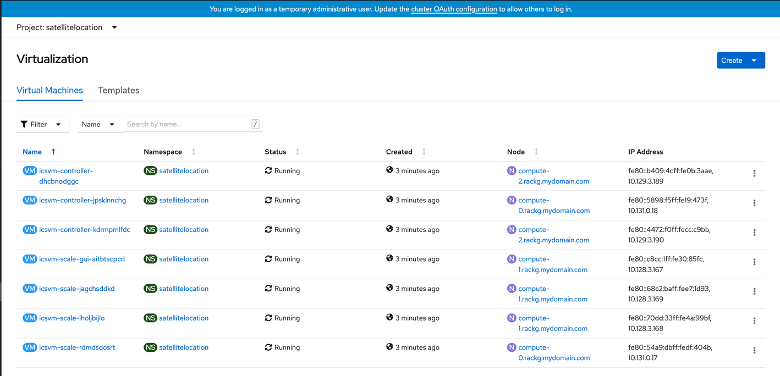
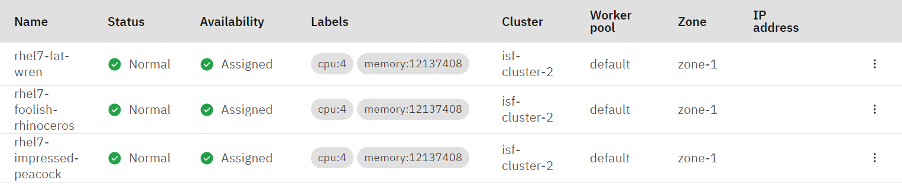
In OpenShift Container Platform web management console, go to Workloads > Virtualization.
- In the Virtual Machines tab, verify the following:
- Verify that the virtual machines of specified size (default 6) are created.
- Verify that the virtual machines have correct vCPU, Memory and Storage specifications.
- Verify that all the specified virtual machines are in “Running” state.
- Verify that all the specified virtual machines have IP address allocated.
Refer to the following screenshot for more details:
3.8.3 Verification of Deployed host on IBM Cloud Satellite
- Log in to cloud.ibm.com/satellite/locations.
- Select the location created.
- Click Hosts. It displays a list of all the hosts attached to the location.
- Verify that all the virtual machines are appearing in this list.
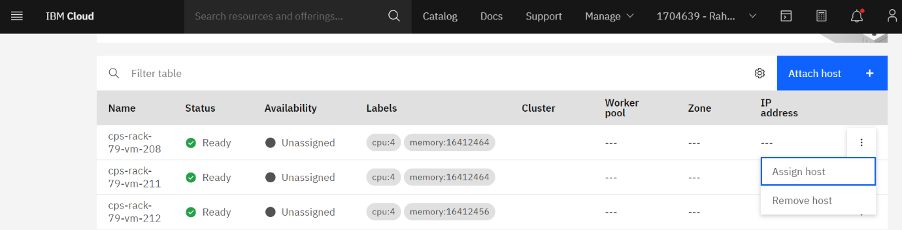
4. Assign Hosts to control plane at IBM Cloud Satellite
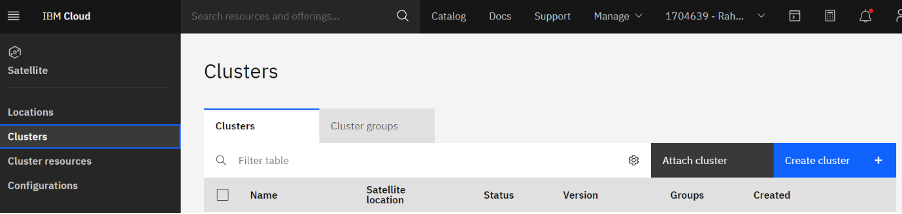
5. Create IBM Cloud Satellite – Cluster
- Go to URL https://cloud.ibm.com/satellite.
- Choose clusters option.
- Choose “Create Cluster +”.
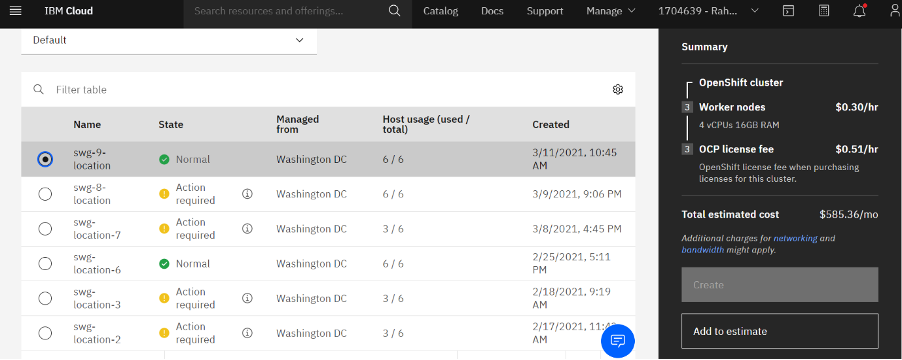
While creating the cluster, choose the location where hosts are assigned. Ensure that the location is in “Normal” state before creating the cluster.
Note that the location must be in “Normal” state before creating the cluster.
6. Assign Hosts to IBM Cloud Satellite Cluster
7. Validate successful deployment of IBM Cloud Satellite
View the created cluster and ensure that the cluster is in “Active” state. Launch the cluster to in turn launch Open Shift Container Platform.
This link will be available from https://cloud.ibm.com
Dashboard -> Kubernetes – Clusters
Choose the cluster name.