Acknowledgements: Khanh Ngo, Guy Margalit Authors: Pratibha Srikanth Joshi ,Gayatri Kudalkar, Nils Haustein, Sasikanth Eda
Data is at the center of every business. Organizations are using AI tools to unlock the full potential of their data. For the AI models to produce high quality outputs, predictions, relationships they require all data to come together. But traditionally organizations have been using monolithic repositories with multiple data warehouses and data lakes that are spread across various heterogeneous on-premises and cloud sites, these data silos inhibit the AI capabilities. The problem only gets worse with data growth.
Data lake architecture fixes these issues. Open data lake house platforms (such as watsonx.data) combines the performance of data warehouses with the flexibility of data lakes, to address the challenges of today’s complex data landscape and scale AI.
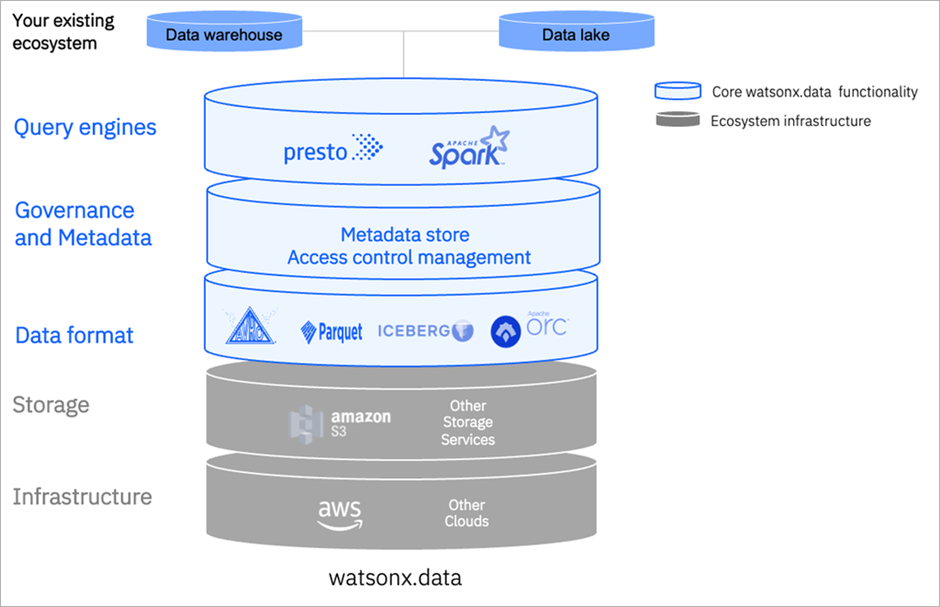
Data Lakehouse architecture [1]
Data lakehouse[2] can accelerate the data processing as the organizations no longer need to straddle two disparate data systems to complete and scale more advanced analytics. Object storage plays an important role in this architecture which acts as a backend to store a broader range of data types—that is, structured data, unstructured data and semi-structured data.
IBM Storage Scale[3] is a clustered file system that provides concurrent access to a single file system or set of file systems from multiple nodes. It enables high-performance access to this common set of data to support a scale-out solution or to provide a high availability platform. It has many features, beyond common data access, including data replication, policy-based storage management, and multisite operations. With its extreme scalability and vast feature set, it makes a perfect solution for DataLake workloads.
On the other hand, NooBaa[4] is a highly customizable and dynamic data gateway for objects, providing data services such as caching, tiering, mirroring, deduplication, encryption, compression, over any storage resource including S3, GCS, Azure Blob, Filesystems, etc.
NSFS (Namespace-Filesystem) is a capability of NooBaa to use a shared filesystem storage of S3 buckets, while keeping a 1-1 mapping between Object and File.
Combination of IBM Storage Scale and NooBaa (NSFS) gives the benefits of a high performance datalake with a dynamic s3/object storage data gateway.
Here are few high-level steps that can be used to install and configure object protocol standalone with IBM Storage Scale (these steps assume RedHat-8.x).
Note: RedHat -7.x version not supported.
- Build Noobaa rpm - with prerequisite docker/podman utilities installed.
# git clone https://github.com/noobaa/noobaa-core.git
# cd noobaa-core
# make rpm
The rpm will be generated in “noobaa-core/build/rpm”.
- Install the built rpm on protocol node (or a Storage Scale client node) which has filesystem mounted.
# yum install -y noobaa-core-5.15.0-1.el8.x86_64.rpm
- After installing the rpm, below service file will be created on the node.
# cat /etc/systemd/system/nsfs.service

[Unit]
Description=The NooBaa nsfs service.
[Service]
Restart=always
RestartSec=2
User=root
Group=root
Environment=
ExecStart=/usr/local/node/bin/node /usr/local/noobaa-core/src/cmd/nsfs.js /tmp/test/
ExecStop=/bin/kill QUIT $MAINPID
WorkingDirectory=/usr/local/noobaa-core/
LimitNOFILE=65536

[Install]
The directory /tmp/test is the path where buckets and objects are stored. This path can be replaced with a path in the IBM Storage Scale file system.
- One can use this service by modifying the ExecStart options as described above and handling the service using -
# systemctl enable nsfs
# systemctl start nsfs
# systemctl stop nsfs
# systemctl restart  nsfs
# systemctl status nsfs
The logs can be viewed as `/var/log/messages` or by using ' journalctl -u nsfs' .
- NSFS can be run in single user context and multiuser context. Based on it the ExecStart options should be modified.
a. Single user mode
In single user mode, one S3 user can use the NooBaa based S3 object storage. In this mode the credentials of the S3 user are provided as arguments when NooBaa is started.
To start NooBaa in single user mode, use the following command:
# /usr/local/node/bin/node  /usr/local/noobaa-core/src/cmd/nsfs.js  /gpfs/fs1/object_fset/ --access_key access_x123 --secret_key secret_x456

where, `/gpfs/fs1/object_fset/` is the gpfs fileset mount path
b. Multi-user mode
In multi-user mode multiple S3 users can use the NooBaa based S3 object storage. In this mode the S3 user credentials and bucket and object path are provided in separate files (one file per S3 user)
For each S3 user create an "<account>.json" file in a IBM Storage Scale file system. If Cluster Export services are enabled, then create the account files in the cesSharedRoot file system. The cesSharedRoot file system can be determined with the following command:
# mmlsconfig cesSharedRoot
Note, if Cluster Export Services are not configured, the configuration parameter cesSharedRoot is empty.
In the example below the account files are stored in directory "/gpfs/fs1/ces-shared-root/". First create the directory structure for the account and bucket files:
# mkdir -p /gpfs/fs1/ces-shared-root/noobaa/config/accounts
# mkdir -p /gpfs/fs1/ces-shared-root/noobaa/config/buckets
Create an account file an S3 user in the accounts sub directory (e.g., /gpfs/fs1/ces-shared-root/noobaa/config/accounts). The account file includes the access_key, secret_key and the new_bucket_path which is the directory where the buckets and objects created by this S3 user are stored. The account file name must include the access_key of the user "[access_key].json".
cat /gpfs/fs1/ces-shared-root/noobaa/config/accounts/a-abcdefghijklmn123456.json
{
	"name": "user1",
	"email": "user1@noobaa.io",
	"has_login": "false",
	"has_s3_access": "true",
    "allow_bucket_creation": "true",
	"access_keys": [{
		"access_key": "a-abcdefghijklmn123456",
		"secret_key": "s-abcdefghijklmn123456"
	}],
	"nsfs_account_config": {
		"uid": 0,
		"gid": 0,
		"new_buckets_path": "/gpfs/fs1/object_fset/",
		"nsfs_only": "true"
	}
}
In this example, the path where buckets and objects are stored is /gpfs/fs1/object_fset/.
Now NooBaa can be started in multi-user mode. The config_root parameter must point to the directory above accounts. NooBaa will fetch the available accounts, keys and bucket paths from the account files. To start NooBaa in multi-user mode, perform the following command:
# /usr/local/node/bin/node /usr/local/noobaa-core/src/cmd/nsfs.js --config_root /gpfs/fs1/ces-shared-root/noobaa/config/ --backend GPFS
In this example the account files are located in /gpfs/fs1/ces-shared-root/noobaa/config/. When running in multi-user mode, then replace the command behind ExecStart= in the systemd unit file with this command.
When additional S3 users are required then create a corresponding account file in the account sub directory (e.g., /gpfs/fs1/ces-shared-root/noobaa/config/accounts) for each S3 user. Each user can store their buckets in the same or different directories of the IBM Storage Scale file system. To activate a new S3 user the NooBaa service must be restarted.
Validation of Object access via awscli
Below are a few object CURD commands using awscli :
Configuration -
# aws configure
AWS Access Key ID [None]: access_x123
AWS Secret Access Key [None]: secret_x456
Default region name [None]:
Default output format [None]:

Creation of test bucket -
# aws --endpoint-url=http://localhost:6001 s3 mb s3://test-bucket
make_bucket: test-bucket

Listing the buckets -
# ls -lrth /gpfs/fs1/object_fset/test-bucket/
total 0


Note, as a result of the successful bucket creation NooBaa automatically generates a configuration file for the bucket in /gpfs/fs1/ces-shared-root/noobaa/config/buckets/test-bucket.

# aws --endpoint-url=http://localhost:6001 s3 ls
2023-08-15 07:34:35 test-bucket

Upload of objects into buckets -
# aws --endpoint-url=http://localhost:6001 s3 cp /root/test-object s3://test-bucket/
upload: ./test-object to s3://test-bucket/test-object

Listing the objects -
# aws --endpoint-url=http://localhost:6001 s3 ls s3://test-bucket/
2023-08-15 07:42:19         29 test-object

Deletion of bucket -
# aws --endpoint-url=http://localhost:6001 s3api delete-object --bucket test-bucket --key test-object
# aws --endpoint-url=http://localhost:6001 s3 ls s3://test-bucket/
Note: The above described method is subject to change.
Working with object metadata
Objects stored in a NooBaa based S3 object storage can be enriched with metadata using the S3 API. Metadata can be used to further describe the object or to trigger subsequent actions on the objects such as migration to tape.
Metadata can be added to the object when the object is uploaded using the s3api set of awscli commands. The example below uploads a file /root/test-object2 to the bucket test-bucket with the metadata tag project=project-x.
# aws --endpoint-url=http://localhost:6001 s3api put-object --bucket test-bucket --body /root/test-object2 --key test-object2 --metadata project=project-x
The object metadata can be viewed with the head-object command of the s3api:
aws --endpoint http://localhost:6001 s3api head-object --bucket test-bucket --key test-object2
Output:
{
    "AcceptRanges": "bytes",
    "LastModified": "Wed, 27 Sep 2023 05:27:36 GMT",
    "ContentLength": 578560,
    "ETag": "\"mtime-cvtg97pcdpts-ino-xl7\"",
    "ContentType": "application/pdf",
    "Metadata": {
        "project": "project-x"
    }
}
When the buckets and objects are stored in a IBM Storage Scale file system, then the object metadata is propagated to the file metadata. To view the file metadata of the object that was uploaded in this example the following IBM Storage Scale command can be used:
# mmlsattr -L -d /gpfs/fs1/object_fset/test-bucket/test-object2
file name:            /gpfs/fs1/object_fset/test-bucket/test-object2
metadata replication: 1 max 2
data replication:     1 max 2
immutable:            no
appendOnly:           no
flags:
storage pool name:    system
fileset name:         buckets
snapshot name:
creation time:        Wed Sep 27 07:27:36 2023
Misc attributes:      ARCHIVE
Encrypted:            no
security.selinux:     "system_u:object_r:unlabeled_t:s0?"
user.content_type:    "application/pdf"
user.project:         "project-x"
As shown above the storage location of the object test-object2 is in /gpfs/fs1/object_fset/test-bucket/test-object2. The command mmlsattr shows the attributes of the file. The metadata tag that was put with the object is encoded in file attribute: user.project=project-x.
IBM Storage Scale ILM policy[5] can be used to identify files that have certain file attributes set. For example, to identify all files that have the file attribute user.project set to any value the following rule can be used:
RULE '1' EXTERNAL LIST 'project' EXEC ''
RULE '2' LIST 'project'  WHERE XATTR('user.project') like '%'
The second rule identifies all files where the file attribute user.project is set to any value. To execute this policy the two rules must be written into a file (for example,list-user.project and the policy engine can be invoked like this:
# mmapplypolicy /gpfs/fs1/object_fset -P list-user.project -f /tmp/files-with-project -I defer
This command creates an output file named /tmp/files-with-project.list.project, and this file includes the names of the file matching the second rule of the policy:
More resources:
[1] https://aws.amazon.com/blogs/apn/making-data-driven-decisions-with-ibm-watsonx-data-an-open-data-lakehouse-on-aws/
[2]. Data lake house architecture https://www.ibm.com/topics/data-lakehouse
[3]. IBM Storage Scale documentation https://www.ibm.com/docs/en/storage-scale
[4]. https://www.noobaa.io/noobaa-core-standalone.html
[5] IBM Storage Scale policy engine https://www.ibm.com/support/pages/node/6260749