As you have already learnt and understood earlier from the article about how to add a VLAN (see the Adding a VLAN article), let us now learn and understand about how to edit or delete VLANs, which this tutorial focuses on with by using the IBM Spectrum Fusion user interface.
Before you start with this tutorial, you can keep the IBM Documentation for IBM Spectrum Fusion handy, which also provides a good starting point for reference and learning.
As you know, VLANs can be assigned or removed according to the IBM Spectrum Fusion appliance requirements.
After you have successfully added a VLAN to your IBM Spectrum Fusion appliance, at a later stage you decide that you want to edit or delete the VLAN that you added earlier as part of your network configuration. So, in such a context, edit or delete that VLAN record or other VLANs. Carry out these steps accordingly.
- Log in to the IBM Spectrum Fusion appliance by using the IBM Spectrum Fusion user interface. See the following figure for reference about the welcome page:
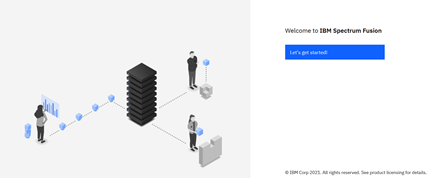
Figure 1: IBM Spectrum Fusion welcome page
- Click Let’s get started.
- On the login page, log in to your account with your user credentials by specifying the username and password.
You are welcomed by the Dashboard page on the IBM Spectrum Fusion user interface.
- On the Network section of the Dashboard page, click the arrow mark in the Network section on the Dashboard page to go to the Network See the following figure for reference for reference.
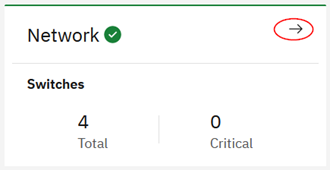 Figure 2: Network section on Dashboard
- Optional: Alternatively, click the IBM Spectrum Fusion Dashboard menu in the top-left corner of the user interface and click Manage > Network. See the following figure for reference.
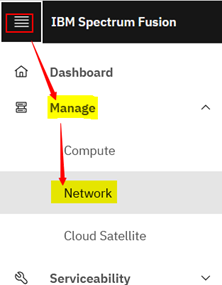 Figure 3: Menu to access Network page
The Network page is displayed, which provides you with all the information about the Network configuration on your IBM Spectrum Fusion appliance. See the following figure for reference.
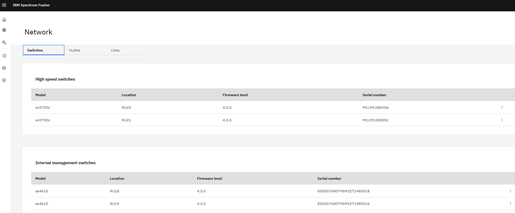 Figure 4: Network page
- Click the VLANs The VLANs section is displayed. See the following figure for reference.
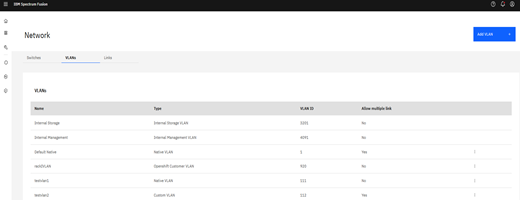 Figure 5: Network page (VLANs tab)
This page provides all the VLAN information in a tabular form.
The columns of the VLANs table are as follows:
- Name: Indicates the name of the VLAN that you specified when adding a VLAN.
- Type: Indicates the type of VLAN that you selected.
- VLAN ID: Indicates the ID of VLAN that you specified (range 1 - 4096).
- Allow multiple link: Indicates whether you associated the ‘multiple link’ option or not with the selected VLAN. The states are ‘Yes’ or ‘No’.
- To edit a VLAN, follow these steps:
- On the Network page, go to the VLAN record that you want to edit. See the following figure for reference.
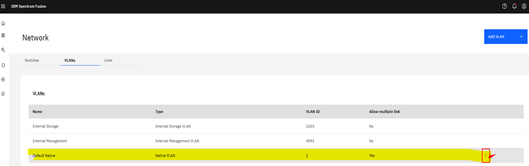 Figure 6: VLAN record you want to edit
At the end of the record, click the ellipses icon to view more actions. See the following figure for reference.
 Figure 7: Ellipsis icon to view more actions
- Click Edit. See the following figure for reference.
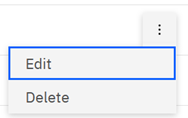 Figure 8: Edit VLAN record
The Edit VLAN pane is displayed. See the following figure for reference.
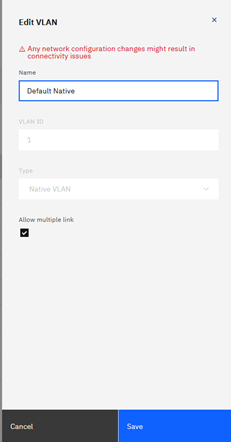 Figure 9: Edit VLAN pane
Note that any network configuration changes that you go on to do with editing a VLAN record might result in connectivity issues.
- Edit the VLAN details. Note that the VLAN ID and VLAN Type values are read-only and cannot be edited.
- Edit Name to update the existing VLAN name.
- Select or clear the Allow multiple link checkbox according to your requirement. If you select this option, the VLAN can be used for more than one link.
- Click Save to apply your changes.
Once you have saved and applied your changes, you will see the edited or updated record is available in the VLANs table of the Network page. See the following figure for reference.
 Figure 10: VLANs table
With this procedure, you have successfully edited a VLAN in the Network page of the IBM Spectrum Fusion user interface to meet your business requirement.
As part of modifying a VLAN record in your appliance, you can also delete or remove it from your network. Do these steps:
- Go to the end of the record, click the ellipses icon, and select Delete. See the following figure for reference.
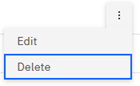 Figure 11: Ellipsis icon to delete VLAN record
The Delete VLAN confirmation window prompts up on the Network page to ask whether you want to delete the VLAN record. See the following figure for reference.
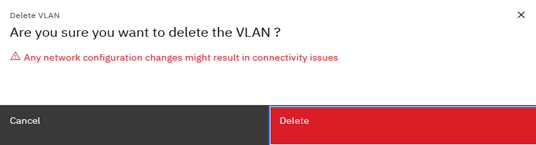 Figure 12: Delete VLAN record
- Click Delete to confirmation deletion of the VLAN record.
The VLAN record is removed from the VLANs table in the Network page and from your IBM Spectrum Fusion appliance.