Recipe for IBM Security Verify Governance (IGI) and IBM Security Verify for Workforce IAM Integration
Architecture
Components
1. Identity Jump Server
This is a common VM used for most IGI-based labs. It contains many tools, utilities and browsers used in many of the training environments.
For this lab it contains three main components:
- The browsers used to access the IGI, CIA Bridge and (optionally) your CI tenant
- DNS (named) to allow name resolution between the VMs and from within the docker containers
- Docker running two containers; the ciabridge container (application and UI) and couchdb3 container (db)
All access to components is performed from the Identity Jump Server or Identity Docker.
2. IGI Virtual Appliance (VA)
This contains the IBM Security Identity Governance and Intelligence (IGI) application in virtual appliance form. It has configuration for the CIA integration.
3. IGI Data Server
This contains the IGI datastores, primarily the DB2 database used. The CIA bridge will connect to this DB in the lab.
You can download the dispatcher from the passport page
https://www.ibm.com/software/passportadvantage/
Initialise the setup
Step 1: Access the Virtual Appliance from IGI Docker or Jump Server
Step 2: Confirming the Adapter Installation/Configuration
- Check the RMI Dispatcher and Adapter Component Installation
- The adapter relies on TDI to be installed, the RMI Dispatcher to be installed and a number of adapter specific files to be installed.
To check these: Start the terminal
I have downloaded an Integrator and named as SDI
To check if the dispatcher has all the relevant files :- ls -l /opt/IBM/SDI/V7.2/timsol
Check if the identity adapters are present in the directory, If not download manually.
ls -l /opt/IBM/TDI/V7.2/jars/connectors/
CloudIDConnector.jar
CloudIDAdapterConnector.jar
Check the relevant third party jar files are present for the connector to work and with the latest version.
/opt/IBM/SDI/V7.2/jars/3rdparty/others
To check the RMI Dispatcher is running
ps -ef | grep ibmdi
The VM is configured to automatically start the RMI Dispatcher and allocate that port using systemd.
sudo systemctl status ibmdisrv_ITIMAd.service
Run the command to test if the port is running:
netstat -an | grep 1099
I have used port 2099
netstat -an | grep 2099
To restart the dispatcher
cd to /opt/IBM/SDI/V7.2/timsol
sudo ./ITIMAd restart
To flush the IP tables run the command
"iptables -F"
To stop the firewall:- sudo systemctl stop firewalld
Check the SSL Cert is Imported for TDI Use
keytool -v -list -keystore serverapi/testadmin.jks -storepass administrator -alias cloudid | more
keytool -selfcert -v -alias server -validity 730 -keystore teststore.jks -storepass mypasswordIf it's not valid then run extend it – Then download the certificate from the CI tenant (IBM Security Verify Tenant)
If there are any issues with the certificates. You can view the certificate in the ikeyman
Open the ikeyman
Password : xxxxxxxxxx
Password : XXXXXX
If there is an issues with validity of the certificates, Extend Validity of Self Signed Certificates in Tivoli Directory Integrator
https://www.ibm.com/support/pages/extend-validity-self-signed-certificates-tivoli-directory-integrator
Stop the dispatcher
Run the following commands to update the cert in the keystore
Change to <TDI>/V7.0/testserver.jks
// Extends the 'server' certificate by (x) days in 'testserver.jks'
jvm/jre/bin/keytool -selfcert -v -alias server -validity 365 -keystore testserver.jks -storepass server
// Exports a public copy of the certificate
jvm/jre/bin/keytool -export -alias server -keystore testserver.jks -storepass server -file mtestserver.crt
// Deletes the public certificate of 'server' in the 'testadmin.jks'
jvm/jre/bin/keytool -delete -alias server -keystore serverapi/testadmin.jks -storepass administrator
// Imports the renewed public certificate into 'testadmin.jks'
jvm/jre/bin/keytool -import -alias server -keystore serverapi/testadmin.jks -storepass administrator -file mtestserver.crt
Change to <TDI>/V7.0/serverapi/testadmin.jks
jvm/jre/bin/keytool -selfcert -v -alias admin -validity 365 -keystore serverapi/testadmin.jks -storepass administrator
jvm/jre/bin/keytool -export -alias admin -keystore serverapi/testadmin.jks -storepass administrator -file serverapi/mtestadmin.crt
jvm/jre/bin/keytool -delete -alias admin -keystore testserver.jks -storepass server
jvm/jre/bin/keytool -import -alias admin -keystore testserver.jks -storepass server -file serverapi/mtestadmin.crt
Optional
Change to AMC and AM jks files
The following 2 jks files are copies of the 'testadmin.jks'.
So the updated testadmin.jks can be copied into these locations (depending on version).
<TDI>/V7.0/bin/amc/ActionManager/testadmin.jks
<TDI>/V7.0/lwi/runtime/isc/eclipse/plugins/AMC_7.0.0/testadmin.jks
Check the version of TLS enabled:-
Open "solution.properties" file and go to the bottom and check the TLS version
If TLS has older version, add the below files to the bottom of the file
com.ibm.di.SSLProtocols=TLSv1.2
com.ibm.di.SSLServerProtocols=TLSv1.2
com.ibm.jsse2.overrideDefaultProtocol=TLSv12
com.ibm.jsse2.overrideDefaultTLS=true
#jdk.tls.disabledAlgorithms=TLSv1,SSLv3
Stop the firewall
sudo systemctl stop firewalld
Retstart the dispatchers
cd to /opt/IBM/SDI/V7.2/timsol
sudo ./ITIMAd restart
Update Java Version
In some cases while configuring the adapter, java could be an issue. So, update the java version to 1.8 and above.
cd /opt/IBM/SDI/V7.2/jvm/jre
Check the java version
java -version
Once the configuration is completed.
Notes: Every time we restart the dispatcher, before testing the connector run the command
- sudo systemctl stop firewalld
Configure IGI
Login to IGI Administrative console:-
Go to Enterprise Connectors
Manage -> Connectors > Actions -> Add
In the right pane, enter the following:
- Name– CI tenant
- Description – Descript of the connector
- Profile Type – Identity Brokerage
- Profile – Cloud Identity Profile
- Entitle – Account
- Trace - ON
- Trace Level – INFO
- History - ON
Click -> Save
If the Adapter profile is missing or not visible. We can add the profile from the connectors.
Go to Manage -> Profile -> Import
Click on upload file and select the connector
Go to the Driver Configuration tab
- For the Tivoli Directory Integrator locationenter: rmi://identity.iamlab.ibm.com:1099/ITDIDispatcher
The dispatcher can have a customer URL, or you can use the below rmi://identity.iamlab.ibm.com:1099/ITDIDispatcherz
Custom in case dispatcher is running on other system:
rmi://192.168.42.128:2099/ITDIDispatcher
For the Cloud Identity URL or IBM Security Verify URL, login to the teant (like:https://iga-enble.ice.ibmcloud.com/)
Switch to admin
- Click the Add API client button above the table
-
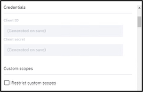
We could have selected individual accesses rather than the lazy approach of "select all". There
are twenty-five (25) accesses required for the adapter according to the adapter guide out of a total of 49 in the security verify today.
Save the new API Client
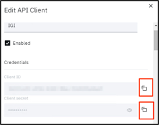
- For the ClientID, Switch back to your CI tenant admin view, open(edit) the API client you specified before
- Scroll down to the Client ID field and click the copy to clipboard icon to the right
- Return to the IGI UI and past the field in For the Client Secret
- Scroll down to the Client Secret field and click the copy to clipboard icon to the right
- Return to the IGI UI and past the field in
- In the Channel-Write To tab and click on the Mapping icon
Click Map and on the Map Attribute select "erCloudIdentityGivenName" and click OK
- In the table find the NAME attribute
- Go to the Channel-Read From tab and click on the Mapping icon
- In the table find the NAME attribute -> Click Map and on the MapAttribute:NAME
- Select "erCloudIdentityGivenName"and click OK
Go to Connector Details ->
Test the connection. If the connection is not successful, check the logs.
Go to the command line, go to timsol directory
cd /opt/IBM/SDI/V7.2/timsol
To flush the IP tables run the command
"iptables -F"
Test the connection – The integration is working
------------------------------
Vandana Verma Sehgal
Security Solutions Architect
------------------------------