IBM Security Verify

 View Only

Writing your own AAC Java Authentication Mechanism

By Lachlan James Gleeson posted Wed August 17, 2022 05:49 PM


In IBM Security Verify Access 10.0.0.0 the custom Java authentication mechanism added support for API functionality. This allows administrators to return JSON responses in addition to HTML responses which are currently supported. This article will implement a simple authentication mechanism to demonstrate how developers can write their own Java based authentication mechanism.

Before you start you will need:

  • Activated IBM Security Verify Access appliance with a reverse proxy configured for use with the AAC Authentication Service

  • Eclipse IDE installed with the Eclipse PDE extension installed

  • Working knowledge of basic Java code

This article should take 1 hour to complete

The code used in this article can be found here.

Getting started:

Navigate to the file downloads section of an IBM Security Verify Access appliance and download the com.ibm.security.access.extension_8.0.0.zip. This archive contains that Java Interfaces that Verify Access will use and will be the starting point of any mechanism you intend to create.


Coding an authentication mechanism in Eclipse:

Now that we have what we need from IBM Security Verify Access lets get started with coding! Extract the zip file you just downloaded and create a new Plug-in project in Eclipse. We will use the extracted jar file as the starting point for the new project. You will need to import the extension jar that was unzipped as well as setting a project name/description.
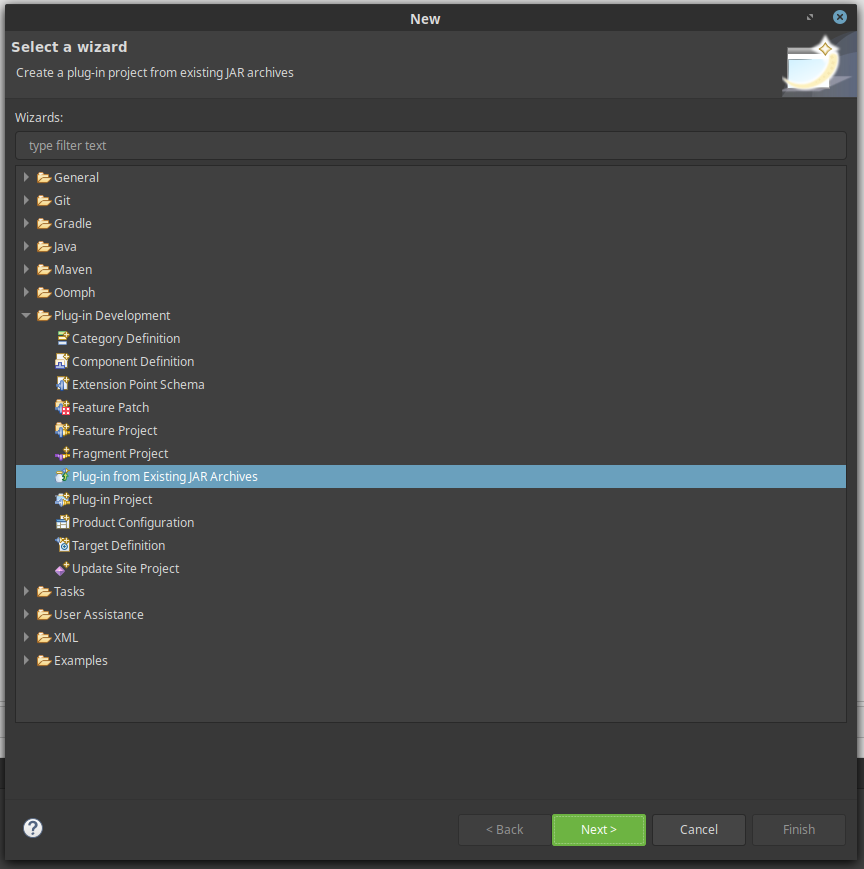


Now we will update our build target. Open the Target Platform configuration menu (window → preferences → plug-in development → target platform) and create a new target platform.


In this target you need to import the extension jar that was downloaded from the appliance (com.ibm.security.access.extension_8.0.0.jar) as well as any other dependencies that your project will require. This example will return JSON as well as HTML so I have imported an implementation of the javax.json interface (com.ibm.websphere.javaee.jsonp.1.1_1.0.30.jar), your project may differ. To import the required jars, add a new Directory to the build target and navigate to the directory which contains the required jars.


Next we need to update the manifest and plugin.xml files. This is easily done with the Eclipse Plug-in Manifest Editor. The Overview tab shows information that was entered during creation. Feel free to update any of the General information as well as setting the singleton parameter.


Update the project dependencies in the dependency tab by adding packages in the Imported Packages window. At a minimum you will need to import some of the packages from the com.ibm.security.access.extension_8.0.0.jar but your exact requirements may vary. For this example I import com.ibm.security.access.extension.* and javax.json (note you may need to select “show non-exported packages” to get your dependencies to be visible).


You will also need to add any dependent jars your mechanism uses to the classpath. If you don’t do this step your project will probably still compile however when you upload your mechanism to IBM Security Verify Access it won’t execute as expected. For convenience I added all the jars I require into a “lib” directory.

In the next tab you will set the parameters of your extension. Here you can set:

  • The name that will appear in the list of Mechanisms available on IBM Security Verify Access

  • The class which should be loaded as the entry point for your extension;

  • Any administrator configured properties which are required for your mechanism to function correctly.

    • The available data types for properties are: Boolean, Double, Integer, String, KeyStore, Email, X500, URI, URL, Hostname, Date, LdapServerConnection, SMTPServerConnection and WSServerConnection.


With our extension project set up we can now get started on coding! This is the point where your mechanism may significantly diverge from this example.


There are several methods in the AuthenticationMechanism Interface which need to be overridden. The start-up method should create any objects which your mechanism will rely on but won’t change between executions of the mechanism; eg. any external persistent connections. The shut-down method should gracefully clean-up any objects created in the start-up method. If you didn’t note the s

The final step in implementing a custom extension is successfully compiling it into a jar that can be uploaded and interpreted by IBM Security Verify Access. This can be quite tricky so I have provided an example build.xml that can be used by the Apache Ant build tool. The build file can be broken down into two steps:

  1. Compiling java into .class files

  2. Packaging the .class files along with any dependencies into a .jar file which can be uploaded to IBM Security Verify Access.

When packaging the jar we need to make sure that we include any dependencies that the mechanism needs. As mentioned previously I added all of my dependencies into a “lib” directory, which makes including them easy. If your dependencies are in a different location you will have to modify the zipfileset tag to point to the jars you need.

The fileset tag ensures that the Eclipse generated plugin.xml is included in the final jar. This xml document is essential for IBM Security Verify Access to be able to understand the parameters required and the class it should execute to run your extension. If your mechanism is not appearing in the list of Authentication Mechanisms after your jar has been uploaded, this may be why.

Creating an authentication policy using your Java authentication mechanism:

Now that we are done with the coding side of things, lets create an authentication policy using the mechanism we just wrote. To start things off navigate to the extensions menu under the AAC mega-menu.


If the name of your extension does not appear beneath the jar you uploaded, the build/packaging of your extension has not worked. Have a look at your build.xml file and unzip the .jar file it produces to make sure that the Manifest and plugin.xml files are present and correct.


Your plugin.xml file will look similar to the one above, you should be able to see your mechanism and any properties you configured.


Navigate to the authentication menu under the AAC mega-menu, then select the mechanisms view to create a new authentication mechanism.


Use the “+” drop down menu to create a new mechanism. The name of the mechanism will depend on the name you gave it when you were defining your extension point in Eclipse.


Configure the uri/name/description of the mechanism and set any properties that you defined when creating your plugin.xml file, in this example I defined the “custom_auth_mech_example_property” which we specified as required.


Once you have created your mechanism you will need to deploy the changes before it can be used in an authentication policy.

Select the Policy view and create a new authentication policy.


In this configuration menu you will have to define the name, uri and an optional description of the policy as well as specifying the steps required

Select the mechanism we just created from the drop down menu

Testing it out:

To try out your new authentication mechanism you can use the Postman collection attached to this blog article. Postman is a great tool to quickly test and develop out API calls. The collection has three requests: one to log in; one to start the authentication policy and one to complete the authentication policy.

To get started with the Postman collection you will need to update the collection variables to suit your test environment. First navigate to the collections variables:


You may need to update: aac_junction; hostname (to dns name or IPv4 address); username; password; or the macro/key/value parameters which are used to construct the JSON response (these can be left as is and updated once you have a baseline understanding of the mechanism).

To return nested JSON (default example) you will also need to add the macro variable value to the sps.page.notExcapedMacros. If you do not do this the mechanism will still run but Postman will not be able to parse the returned JSON. This is because Verify Access HTML encodes macro values by default; to disable it for specific macros they need to be added to an allow list.

Next you need to run the “Login” request; if the username and password collection parameters are valid the request will succeed and you will have an authenticated session which can be used to run your mechanism. You can clear the session by removing the “PD-S-SESSION-ID” cookie from the cookies menu.


Once you have a session you can run the “Start policy” request. What this request returns will depend on the values set for the collection variables: macro; key; and value. The pre-request script takes the values of these three variables and creates an encoded “testParameters” query string which is sent to the mechanism. The AAC Extension mechanism then decodes this information and uses the values to build up a response.

The Postman collection attempts to parse the response and validate that the key/value sent in the request is returned in the response with the expected encoding. It also parses out the rolling state id and sets the collection variable so that the complete policy request can be run successfully.
The final request called “Complete policy” demonstrates how the mechanism can be used to return a success result and either: continue with another authentication mechanism; or augment a user’s credential.

Implementing your own java mechanism:

Hopefully this article has provided some examples of how to use the AAC Extension capabilities to implement your own authentication mechanism. I will end this article with a few warnings of potential costs which you may incur:
  1. Your mechanism may have a significant impact on the performance of your Verify Access VM/Container, particularly if your code is memory intensive or performs multiple external requests.

  2. You will need to perform some encoding/decoding (base64 is good) for nested JSON objects

0 comments
27 views

Permalink