This article was originally posted to Medium by Gaurav Bankar and has been updated.
Hi Folks
I’m guessing you’re here as you want to encrypt your OpenShift Container Platform’s disks on IBM Power Systems.
This document outlines the concepts, how to setup an external tang cluster on IBM PowerVS, how to setup a cluster on IBM PowerVS and how to confirm the encrypted disk setup.
Concepts
When configuring a Linux Server and an OpenShift Cluster for encrypted disks, there are a few concepts that are important to know about:
Network-Bound Disk Encryption (NBDE) ties an encryption key to a set of external servers in a secure and anonymous way across the network.
clevis is a client that enables Linux servers to connect to the server and works in conjunction with Linux Unified Key Setup-on-disk-format (LUKS) to encrypt and decrypt root and non-root storage volumes.
tang is a server for binding data to network presence. It makes a node containing the data available when the node is bound to a certain secure network. Unlike escrow-based solutions, where the key server stores all encryption keys and has knowledge of every encryption key, Tang never interacts with any node keys, so it never gains any identifying information from the node. Tang binds the disk encryption to a Tang server to enable NBDE.
For OpenShift, Red Hat Enterprise Linux CoreOS (RHCOS) uses clevis to encrypt and decrypt storage volumes. When a node starts, it attempts to connect to a predefined set of tang servers by performing a cryptographic handshake. If it can reach the required number of tang servers, the node can construct its disk decryption key and unlock the disks to continue booting. If the node cannot access a tang server due to a network outage or server unavailability, the node cannot boot and continues retrying indefinitely until the tang servers become available again.
The key is effectively tied to the node’s presence in a network, an attacker attempting to gain access to the data at rest would need to obtain both the disks on the node, and network access to the Tang server as well.
Setting up the tang servers IBM PowerVS
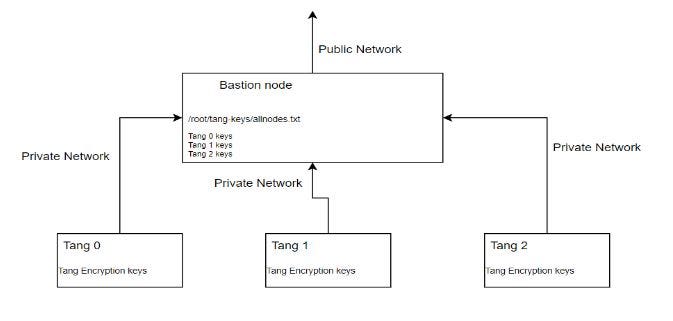
The powervs-tang-server-automation provides Terraform based automation code to help with the deployment of Network Bound Disk Encryption (NBDE) on IBM® Power Systems™ Virtual Server on IBM Cloud. The NBDE Server, also called the tang server, is deployed in a 3-node cluster with a single bastion host. The tang server listens on port 7500.
Figure 1 Topology of the external tang servers
To install the tang infrastructure, you can follow these steps:
- Clone the automation repository
git clone https://github.com/ibm/powervs-tang-server-automation
cd powervs-tang-server-automation
- Update following variables in the var.tfvars based on your environment. There is more detail on the variables included in the documentation in the repository’s docs folder.
ibmcloud_api_key    = "xyzaaaaaaaabcdeaaaaaa"
ibmcloud_region     = "xya"
ibmcloud_zone       = "abc"
service_instance_id = "abc123xyzaaaa"
rhel_image_name     = "<rhel_or_centos_image-name>"
network_name        = "ocp-net"
public_key_file             = "data/id_rsa.pub"
private_key_file            = "data/id_rsa"
rhel_subscription_username  = "user@test.com"
rhel_subscription_password  = "<EXAMPLE>"
- Configure and install using
terraform
# terraform init
# terraform plan --var-file=var.tfvars
# terraform apply -var-file=var.tfvars
- Once the deployment is completed, fetch the keys from Bastion Node:
cat /root/tang-keys/allnodes.txt
From the terraform automation and the allnodes.txt file you have the thumbprints and URLs for the Tang Infrastructure; you can proceed with the ocp4-powervs-upi project.
Setup the OpenShift Cluster on IBM PowerVS
With the thumbprint and IPs of the tang servers, you are ready to setup an OpenShift cluster using ocp4-powervs-upi with LUKS encryption and encrypted disks.
- Clone the repository
# git clone https://github.com/ocp-power-automation/ocp4-upi-powervs.git
# cd ocp4-upi-powervs
- Update below parameters related to LUKS. e.g., for parameters which needs to update in var.tfvars file.
luks_compliant      = true
luks_config         = [ { thumbprint = "*****", url = "*.*.*.*:7500" }, { thumbprint = "*****", url = "*.*.*.*:7500"}, thumbprint = "*****", url = "*.*.*.*:7500"} ]
And below are the parameters if you want to use as user defined then you can update it otherwise you can keep them as commented so that it can use default values.
luks_filesystem_device      = ""
luks_format                 = ""
luks_wipe_filesystem         = ""
luks_device                 = ""
luks_label                  = ""
luks_options                = []
luks_wipe_volume             = ""
luks_name                   = ""
Note: If you want to enable FIPS encryption in same OCP deployment you can update below parameter in var.tfvar file and also if you want to know more about FIPS encryption you can follow this blogpost.
Once you update all the required parameters you can start the deployment using below steps:
- Run the following commands from within the directory.
# terraform init
# terraform plan
# terraform apply -var-file var.tfvars -parallelism=3
Now wait for the installation to complete. It may take around 60 to 90 mins to complete provisioning.
On successful install cluster details are printed.
bastion_private_ip = *.*.*.*
bastion_public_ip = *.*.*.*
bastion_ssh_command = ssh -i data/id_rsa root@bastion_public_ip
bootstrap_ip = *.*.*.*
cluster_authentication_details = Cluster authentication details are available in *.*.*.* under ~/openstack-upi/auth
cluster_id = test-cluster-9a4f
etc_hosts_entries =
*.*.*.* api.test-cluster-9a4f.mydomain.com console-openshift-console.apps.test-cluster-9a4f.mydomain.com integrated-oauth-server-openshift-authentication.apps.test-cluster-9a4f.mydomain.com oauth-openshift.apps.test-cluster-9a4f.mydomain.com prometheus-k8s-openshift-monitoring.apps.test-cluster-9a4f.mydomain.com grafana-openshift-monitoring.apps.test-cluster-9a4f.mydomain.com example.apps.test-cluster-9a4f.mydomain.com

install_status = COMPLETED
master_ips = [
  "*.*.*.*",
  "*.*.*.*",
]
oc_server_url = https://test-cluster-9a4f.mydomain.com:6443
storageclass_name = nfs-storage-provisioner
web_console_url = https://console-openshift-console.apps.test-cluster-9a4f.mydomain.com
worker_ips = [
  "*.*.*.*",
  "*.*.*.*",
Confirm the Disk Encryption
After successful deployment, you can verify LUKS using these steps:
- List the master nodes or worker nodes
# oc get nodes -lnode-role.kubernetes.io/master
NAME          STATUS   ROLES    AGE   VERSION
tor01-master-0 Ready    master   17h   v1.24.6+5157800
tor01-master-1 Ready    master   17h   v1.24.6+5157800
tor01-master-2 Ready    master   17h   v1.24.6+5157800
- Login to debug shell of master node:
# oc debug node/tor01-master-0
- To use host binaries, run
chroot /host:
# chroot /host
- Review the status of the root mapping on the node:
cryptsetup status root
/dev/mapper/root is active and is in use.
  type:    LUKS2
  cipher:  aes-cbc-essiv:sha256
  keysize: 256 bits
  key location: keyring
  device:  /dev/sdg4
  sector size:  512
  offset:  32768 sectors
  size:    250826719 sectors
  mode:    read/write
- List the Clevis plug-ins that are bound to the encrypted device:
# clevis luks list -d  /dev/sdg4
1: sss '{"t":1,"pins":{"tang":[{"url":"http://*.*.*.*:7500"}]}}'
Note, you can verify the settings for all masters and worker nodes
This post you’ve learned the encryption concepts for the OpenShift Container Platform, setting up an external tang cluster and setting up a cluster with encrypted disks, confirming the encrypted disk setup.
If you want to read more, you can read OpenShift 4.14: Tang server installation considerations.
Thanks for reading! I hope you found this helpful :)