
Click Next.
Enter the user’s password in both boxes. The maximum supported password length is 127 characters. Uncheck the “User must change password at next login” box. Check or uncheck the other boxes as desired.
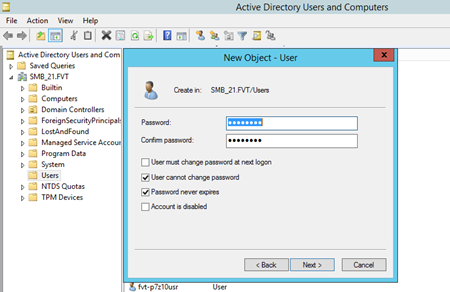
Click Next.
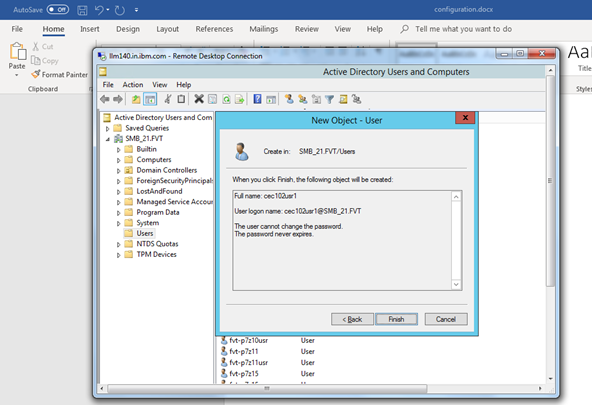
Click Finish to create the user.
4.3. Give the user access to the Windows share
In Server Manager, click on “File and Storage Services” in the left pane and then click “Shares”.
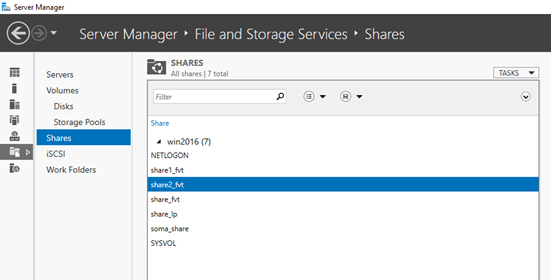
Select the share that the user will access. Right click on the share and select “Properties”. Click on Permissions in the left pane of the Properties box and then click the “Customize permissions” button.
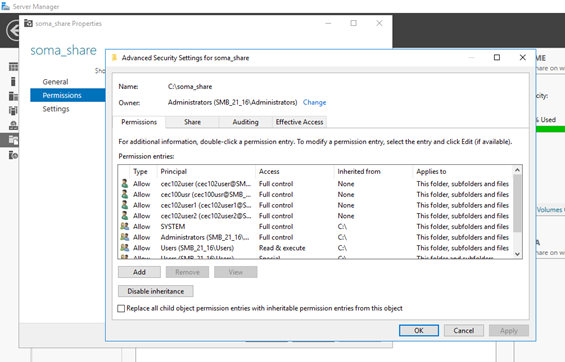
Click the “Add” button. In the “Permission Entry” box, click “Select a principal”. Enter the user name in the “Enter the object name to select” box and click OK.
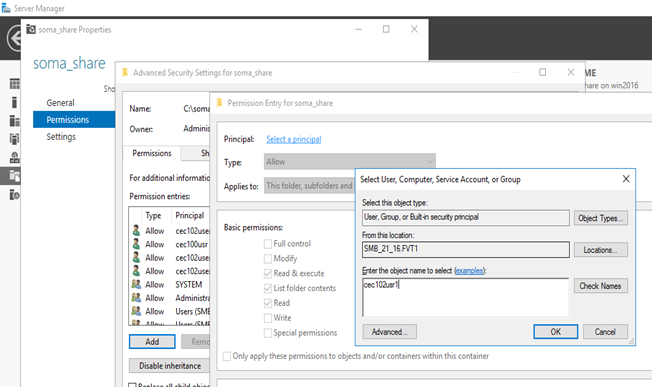
Back in the “Permission Entry” box, select the desired permissions and click OK.
Note: in some environments, the user may need “Full control” permission to be able to mount the share.
4.4. Install smbc.rte fileset on AIX
Download the latest smbc.rte fileset at https://www-01.ibm.com/marketing/iwm/iwm/web/pickUrxNew.do?source=aixbp. The offering name is “SMB CLIENT for AIX”. Select and download fileset ‘7.1.302.x’ for AIX 7.1 and ‘7.2.302.x’ for AIX 7.2 and above.
Install the smbc.rte fileset. Run this command to verify that it installed correctly.

Note: a reboot is required if a previous version of smbc.rte was already installed.
4.5. Mount the share onto AIX
To mount the share onto AIX, use the mount command with the specified options.
mount -v smbc -n <server name>/<user name>/<user password> \
-o wrkgrp=<Kerberos realm name> <share name> <local mount point>
For example,
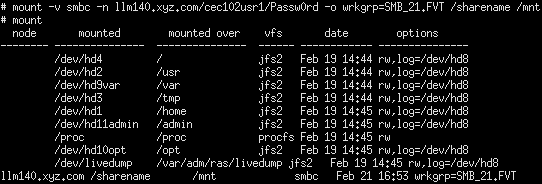
NOTE: The value for the wrkgrp option is used for both the Kerberos realm name and the Active Directory domain name. Although Active Directory domain names are not case sensitive, Kerberos realm names are, and they must always be specified in all upper-case letters. Therefore, the wrkgrp option value must always be in all upper-case letters.
4.6. Configure a share for automatic mounting at boot time
To manage the SMB client file system in the /etc/filesystems file, you can use the lssmbcmnt, mksmbcmnt, chsmbcmnt, and rmsmbcmnt commands. You can also add the SMB client file system entries manually.
Here is the process to do this manually. To mount a share automatically without specifying the password in plain text in /etc/filesystems, create an entry in the encrypted password cache file /etc/smbcred for the share user with the mksmbcred command. The syntax is
mksmbcred -s <server_name> -u <user_name> [-p password]
For example,

If the password option is not specified, then a password prompt will appear.
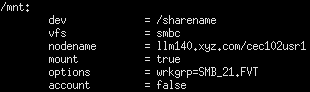
Now add a stanza to /etc/filesystems for the share. Here is an example.
To do this, you may also use 'mksmbcmnt' command. Here's a document on how to use it: https://www.ibm.com/docs/en/ssw_aix_72/m_commands/mksmbcmnt.html
The share may now be mounted manually by simply referring to its mount point and, with the “mount = true” option, it will mount automatically at boot time.
4.7. Managing share user credentials on AIX
The commands mksmbcred, chsmbcred, rmsmbcred, and lssmbcred may be used respectively to create, change, remove, and list cached password entries in /etc/smbcred. All these commands must be run as the root user. The documentation of these commands can be found in the following links:
https://www.ibm.com/docs/en/aix/7.2?topic=m-mksmbcred-command
https://www.ibm.com/docs/en/aix/7.2?topic=c-chsmbcred-command
https://www.ibm.com/docs/en/aix/7.2?topic=r-rmsmbcred-command
https://www.ibm.com/docs/en/aix/7.2?topic=l-lssmbcred-command
4.8. Enable symbolic links on Windows (optional)
The smbc.rte client supports SMB symbolic links. This option is not enabled by default in Windows.
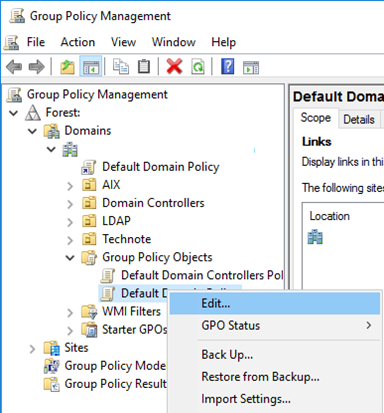
To allow the share user to create symbolic links, press W+R and type “gpmc.msc” in the “Open” box. Click OK.
Open the appropriate Active Directory domain in the left pane, open the “Group Policy Objects” folder and then select the appropriate policy—default domain or default domain controllers. Right click on the policy and select “Edit…”.
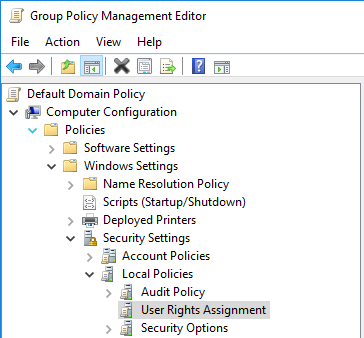
In the Group Policy Management Editor, navigate to Computer Configuration->Policies->Windows Settings->Security Settings->Local Policies->User Rights Assignment.
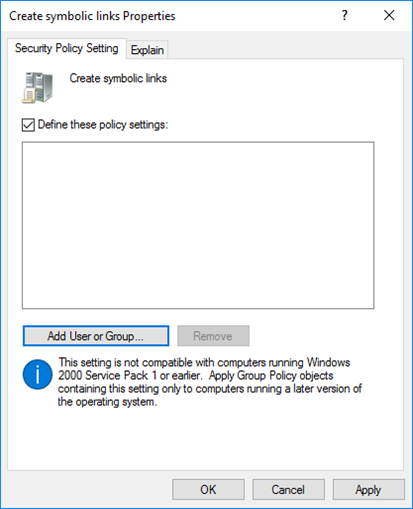
Find the policy “Create symbolic links”, right click on it and select Properties.
In the Properties box, make sure “Define these policy settings” is checked. Then click the “Add User or Group…” button.
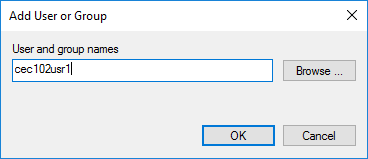
Enter the share user name in the “User and group names” box and click OK.
4.9. Enable SMB packet signing (optional)
By default, packet signing is enabled in Windows. To check or change packet signing policies, Press W+R and type “gpmc.msc” in the “Open” box. Click OK.
Open the appropriate Active Directory domain in the left pane, open the “Group Policy Objects” folder and then select the appropriate policy—default domain or default domain controllers. Right click on the policy and select “Edit…”.
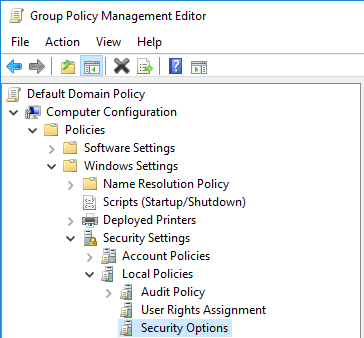
In the Group Policy Management Editor, navigate to Computer Configuration->Policies->Windows Settings->Security Settings->Local Policies->Security Options.
In the “Policy” pane, find the policies “Microsoft network server: Digitally sign communications (always)” and “Microsoft network server: Digitally sign communications (if client agrees)” and set them as desired. Note that defining the “(always)” policy setting as “Enabled” requires all clients to support and use packet signing. The “(if client agrees)” policy, if enabled, allows clients to choose whether to use packet signing or not. If both are enabled, “(always)” takes precedence.
4.10. Enable SMB packet encryption (optional)
By default, packet encryption is disabled in Windows. To check or change packet encryption policies, follow the steps mentioned in below link under section “Enable SMB Encryption” -
https://docs.microsoft.com/en-us/windows-server/storage/file-server/smb-security
4.11. Using SMIT interface
SMIT interface can be used to perform the following tasks:
- List the SMB client mount points
- Display the SMB client tunable parameters
- Configure the SMB client credentials
- Add or mount an SMB client file system
- Remove or unmount an SMB client file system
- Change an SMB client file system
In the SMIT interface, go to Communications Applications and Services > SMB Client for AIX to access the SMB client file system options. You can also use the following SMIT fast path:
smit smbc
4. ‘ls’ performance improvement
Changes are made in SMB Client filesystem code to improve ‘ls command’ performance. This has a dependency on some changes in AIX kernel which are made through APAR IJ35417. To get the ‘ls command’ performance improvement in SMB client filesystem, upgrade to AIX level where changes of the APAR IJ35417 are present or request for an ifix for your level of AIX.
5. References
https://blogs.technet.microsoft.com/sbs/2014/02/21/deploying-windows-server-2012-r2-essentials-in-an-existing-active-directory-environment/
https://blogs.msdn.microsoft.com/openspecification/2009/04/10/smb-maximum-transmit-buffer-size-and-performance-tuning
https://support.microsoft.com/en-in/help/297684/mapped-drive-connection-to-network-share-may-be-lost
https://docs.microsoft.com/en-us/windows-server/administration/performance-tuning/role/file-server/smb-file-server
https://blogs.msdn.microsoft.com/openspecification/2013/03/19/cifs-and-smb-timeouts-in-windows/
https://blogs.msdn.microsoft.com/openspecification/2013/03/27/smb-2-x-and-smb-3-0-timeouts-in-windows/
https://docs.microsoft.com/en-gb/archive/blogs/openspecification/smb-2-and-smb-3-security-in-windows-10-the-anatomy-of-signing-and-cryptographic-keys
SMB client file system: https://www.ibm.com/support/knowledgecenter/ssw_aix_72/network/smbcfs.html
mount command: https://www.ibm.com/support/knowledgecenter/ssw_aix_72/m_commands/mount.html
smbcd Daemon: https://www.ibm.com/support/knowledgecenter/ssw_aix_72/s_commands/smbcd.html
smbcstat command: https://www.ibm.com/support/knowledgecenter/ssw_aix_72/s_commands/smbcstat.html
smbctune.conf file: https://www.ibm.com/support/knowledgecenter/ssw_aix_72/filesreference/smbctune.conf.html
smbctune command: https://www.ibm.com/support/knowledgecenter/ssw_aix_72/s_commands/smbctune.html
Troubleshooting smbc.rte: https://www.ibm.com/support/pages/node/1396083