Overview
To upgrade an existing instance of AIX 7.1 or AIX 7.2 to AIX 7.3, it is required to perform an operating system migration. Planning to migrate an AIX systemrequires careful planning. In this article we discuss different scenarios and available methods for migrating AIX operating system from 7.1 or 7.2 release to 7.3 release. The topics include AIX migration from media and AIX migration of the Network Installation Manager (NIM) master and the clients. The information in this article is using specific versions of AIX. The results you obtain might vary depending on your version and level of AIX.
What is migration
An operating system migration maintains the existing rootvg and all logical volumes and file systems. Software configuration is maintained, and system software will be migrated if the newer levels exist in the software source. When no newer levels exist, the software is still maintained on the system as it was before the migration. Every migration will require additional space, so be sure your rootvg has some free partitions. The boot logical volume, hd5, is required to be 40MB in 7.3, It will be expanded to this size if necessary. For more software specific information on migration, please refer to the
AIX 7.3 Release Notes.
Difference between AIX migration and update
An operating system migration is not the same as an update operation. The update operation is performed through install_all_updates or smitty update_all commands. The update operations are only valid when moving between maintenance or fix levels. Only the M or F fields will change, in VRMF, when an update operation is allowed. In this situation, you cannot perform an operating system migration. For example:
Moving from 7.2 TL 4 SP 1 to 7.3 - Do an operating system migration.
Moving from 7.2 TL4 SP 1 to 7.2 TL5 SP3 - Do an update operation.
In this document, we only cover migration operations. For update operations, please refer to
install_all_updates.
Premigration script
It is recommended you run the pre_migration script before starting the operating system migration. It will give you a quick idea of what will be happening during the migration, and if there are any conditions that should be fixed. The script can be found in usr/lpp/bos, in your mounted ISO image or your NIM 7.3 spot. For example: /export/spot/730_spot/usr/lpp/bos/pre_migration
The pre_migration script will inform you if increasing the boot logical volume will be an issue. It will tell you if your system supports AIX 7.3. It will save information about configuration files, software installed, and any lppchk errors. Please copy the pre_migration script from your mounted ISO image or your NIM 7.3 spot. It can be found in usr/lpp/bos in either source.
For example:
# ./pre_migration

Only POWER 8 or greater systems, are supported

to install version 7.3.

If you are planning to use Mksysb Migration, please

verify that the target system is POWER 8 or greater.

All saved information can be found in: /home/pre_migration.220112085755

Listing software that will be removed from the system.

Listing configuration files that will not be merged.

Listing configuration files that will be merged.

Saving configuration files that will be merged.

Running lppchk commands. This may take a while.

Please check /home/pre_migration.220112085755/software_file_existence_check for possible errors.

Please check /home/pre_migration.220112085755/software_checksum_verification for possible errors.

All saved information can be found in: /home/pre_migration.220112085755

It is recommended that you create a bootable system backup of your system

before migrating.
Best Practices before Migration
-
- Before starting a traditional migration, it is strongly recommended that you create a system backup.
- Before migrating a NIM master, you should back up the NIM database.
- Review AIX 7.3 release notes
- Running AIX 7.3 pre_migration script and reviewing the output to verify that the system is ready for migration.
- Checking that there is sufficient disk space for the file systems in rootvg plus free PPs for file system expansion if required.
- Documenting the system configuration (hardware, AIX, etc.).
- Determine what other software you need to upgrade.
AIX Migration Methods
In the following section we discuss methods of migrating an AIX system. We do not cover in detail how to perform an AIX migration via media. This type of migration is documented
in AIX Documentation – Migrating your system from media. We will discuss prerequisites and benefits of each migration method. The main topics are listed below:
|
Category
|
Traditional Migration Method
|
Additional Migration Method
|
|
Method
|
Traditional migration by media
|
Traditional migration via NIM
(The NIM master must be at AIX 7.3 level)
|
NIM Alternate Disk Migration (NIMADM)
|
|
Installation Source
|
IBM product media (ISO images)
|
NIM resources for AIX 7.3
|
NIM resources for AIX 7.3
|
Traditional Migration Method
The traditional migration is done by the Base Operating System (BOS) installation program. The BOS installation process will be started after the system is booted from AIX product media (USB, physical DVD or virtual DVD) or from network adapter (Network install via NIM). This migration method requires the most downtime. The downtime of the system varies depending on the size of the existing rootvg, other installed software and characteristics of the system. Typically, this migration method takes approximately 2 hours to complete.
Traditional Migration by media
This migration method upgrades the existing rootvg and requires the most downtime. It is highly recommended that you create a backup of the system before migrating.
Prerequisites:
-
- If you do not have an AIX 7.3 physical media, this installation method requires that you download the AIX 7.3 ISO images from the IBM Entitled Software Support (ESS) website.
- If you use a physical media for installation, you will need to burn the ISO images, load the installation media to the attached devices (DVD-ROM drives)
- If you use a USB device for installation, you will need to use the dd command to write the ISO image to the USB device. Download the AIX image from the IBM Entitled Software Support (ESS) website, and use the dd command similar to the following:
# dd if=<iso_file_name> of=/dev/usbms0 bs=4
-
-
- If you use VIOS Virtual Media Library tools, you will need to copy the ISO images to the media library on the VIOS, then load the image into the virtual DVD that is attached to the target LPAR.
Traditional Migration via NIM
This migration method provides both prompted and non-prompted network install of NIM clients. The non-prompted network install removes the requirement of running virtual terminal on the HMC console. This migration method upgrades the existing rootvg and requires the most downtime. It is highly recommended that you create a backup of the system before migrating.
Prerequisites:
-
- The NIM master is at AIX 7.3 level
- The AIX 7.3 resources (spot, lpp_source) have been created
- NIM client (standalone resource) has been defined for each target LPAR
- If you plan to take advantage of non-prompted network install, define a customized bosinst_data resource with the following settings:
INSTALL_METHOD = migrate
PROMPT = no
EXISTING_SYSTEM_OVERWRITE = yes
ACCEPT_LICENSES = yes
Advantages:
Additional Migration Method via nimadm
The nimadm utility offers several advantages for migrating to a later level of AIX, over a traditional migration. For example, you can use nimadm to create a copy of a NIM client’s rootvg to a spare disk on the client and simultaneously migrate the disk to AIX 7.3. Since all changes are performed on the copy of the rootvg, the entire migration process can be done without disruption to the client. After the migration is finished, the only downtime will be a scheduled reboot of the system.
The additional information for using NIMADM can be found later in this document.
Prerequisites:
- The NIM master must have alt_disk_install.rte fileset installed and in the SPOT which will be used for the migration.
- The NIM master should be at the same or higher AIX level than the level of the lpp_source and SPOT resources that have been selected for migration.
- The NIM client must have spare disk (or disks) large enough to clone the existing rootvg, plus additional free space for file system expansion if required. This amount will depend on the client system configuration.
Advantages:
-
-
The migration is executed while the NIM client is up and running as normal.
-
There is no disruption to any of the applications and services.
-
Reduce downtime to just a few minutes for system restart.
-
If the migration fails, the original rootvg is still available and the system has not been impacted.
-
The nimadm utility is very flexible and can be customized to use NIM customization resources such as image_data, bosinst_data, pre and post migration scripts, and so on.
Migrating by Media
Migrating by media with VIOS Virtual Media Library
Migrating by media with a USB device
If you want to use a USB device for migration, follow the steps below.
Create a bootable USB
- If you have not configured the USB device on the AIX system, you need to plug the USB device to the CEC, run the cfgmgr command to configure, and check to see if the USB device is visible:
You should see all the configured USB devices.
-
- Download AIX product image from IBM ESS website. The image to be written to the USB device will have "Flash" in its image name. The following is an example of the image that can be written to the USB device:
AIX_v7.3_Install_7300-00-01-2148_flash_122021_LCD8265300.iso
-
- Write the ISO image by using dd as :
#dd if=<AIX_v7.3_iso> of=/dev/usbms0 bs=4096
Install AIX 7.3 from the USB device:
-
- Open a virtual terminal, restart the target LPAR. As soon as the system comes up, press 1 to select SMS menu:
        IBM IBM IBM IBM IBM IBM IBM IBM IBM IBM IBM IBM IBM IBM IBM IBM IBM IBM IBM IBM
        IBM IBM IBM IBM IBM IBM IBM IBM IBM IBM IBM IBM IBM IBM IBM IBM IBM IBM IBM IBM
        IBM IBM IBM IBM IBM IBM IBM IBM IBM IBM IBM IBM IBM IBM IBM IBM IBM IBM IBM IBM


                1 = SMS Menu                          5 = Default Boot List
                8 = Open Firmware Prompt              6 = Stored Boot List


            Memory      Keyboard     Network     Speaker
2. Press 5 to select "Select Boot Options"
PowerPC Firmware
Version FW860.20 (SV860_064)
SMS (c) Copyright IBM Corp. 2000,2016 All rights reserved.
-------------------------------------------------------------------------------
Main Menu
1. Select Language
2. Setup Remote IPL (Initial Program Load)
3. I/O Device Information
4. Select Console
5. Select Boot Options
-------------------------------------------------------------------------------
Navigation Keys:
X = eXit System Management Services
-------------------------------------------------------------------------------
Type menu item number and press Enter or select Navigation key:5
3. Press 1 to select "Select Install/Boot Device"
PowerPC Firmware
Version FW860.20 (SV860_064)
SMS (c) Copyright IBM Corp. 2000,2016 All rights reserved.
-------------------------------------------------------------------------------
Multiboot
1. Select Install/Boot Device
2. Configure Boot Device Order
3. Multiboot Startup <OFF>
4. SAN Zoning Support
-------------------------------------------------------------------------------
Navigation keys:
M = return to Main Menu
ESC key = return to previous screen X = eXit System Management Services
-------------------------------------------------------------------------------
Type menu item number and press Enter or select Navigation key:1
4. Press 5 to select "List all Devices"
PowerPC Firmware
Version FW860.20 (SV860_064)
SMS (c) Copyright IBM Corp. 2000,2016 All rights reserved.
-------------------------------------------------------------------------------
Select Device Type
1. Tape
2. CD/DVD
3. Hard Drive
4. Network
5. List all Devices
-------------------------------------------------------------------------------
Navigation keys:
M = return to Main Menu
ESC key = return to previous screen X = eXit System Management Services
-------------------------------------------------------------------------------
Type menu item number and press Enter or select Navigation key:5
5. Review the device list. In this case, press 4 to select "USB Disk"
PowerPC Firmware
Version FW860.20 (SV860_064)
SMS (c) Copyright IBM Corp. 2000,2016 All rights reserved.
-------------------------------------------------------------------------------
Select Device
Device Current Device
Number Position Name
1. - Interpartition Logical LAN
( loc=U8247.22L.211E16A-V9-C2-T1 )
2. - SCSI 58 GB Harddisk, part=2 (AIX 6.1.0)
( loc=U8247.22L.211E16A-V9-C109-T1-L8100000000000000 )
3. 1 SCSI 49 GB Harddisk, part=2 (AIX 6.1.0)
( loc=U8247.22L.211E16A-V9-C109-T1-L8200000000000000 )
4. - USB Disk
( loc=U78CB.001.WZS02CA-P1-T5-L1-L0-L0 )
-------------------------------------------------------------------------------
Navigation keys:
M = return to Main Menu
ESC key = return to previous screen X = eXit System Management Services
-------------------------------------------------------------------------------
Type menu item number and press Enter or select Navigation key:4
6. Press 2 to select "Normal Mode Boot"
PowerPC Firmware
Version FW860.20 (SV860_064)
SMS (c) Copyright IBM Corp. 2000,2016 All rights reserved.
-------------------------------------------------------------------------------
Select Task
USB Disk
( loc=U78CB.001.WZS02CA-P1-T5-L1-L0-L0 )
1. Information
2. Normal Mode Boot
3. Service Mode Boot
-------------------------------------------------------------------------------
Navigation keys:
M = return to Main Menu
ESC key = return to previous screen X = eXit System Management Services
-------------------------------------------------------------------------------
Type menu item number and press Enter or select Navigation key:2
7. Press 1 to select "Yes"
PowerPC Firmware
Version FW860.20 (SV860_064)
SMS (c) Copyright IBM Corp. 2000,2016 All rights reserved.
-------------------------------------------------------------------------------
Are you sure you want to exit System Management Services?
1. Yes
2. No
-------------------------------------------------------------------------------
Navigation Keys:
X = eXit System Management Services
-------------------------------------------------------------------------------
Type menu item number and press Enter or select Navigation key:1
8. After the system has restarted and booted from the USB device, press 1 to continue with AIX BOS installation
IBM IBM IBM IBM IBM IBM IBM IBM IBM IBM IBM IBM IBM IBM IBM IBM IBM IBM IBM IBM
IBM IBM IBM IBM IBM IBM IBM IBM IBM IBM IBM IBM IBM IBM IBM IBM IBM IBM IBM IBM
IBM IBM IBM IBM IBM IBM IBM IBM IBM IBM IBM IBM IBM IBM IBM IBM IBM IBM IBM IBM
IBM IBM IBM IBM IBM IBM IBM IBM IBM IBM IBM IBM IBM IBM IBM IBM IBM IBM IBM IBM
-------------------------------------------------------------------------------
Welcome to AIX.
boot image timestamp: 13:55:11 10/05/2021
The current time and date: 19:10:47 02/16/2022
processor count: 1; memory size: 8192MB; kernel size: 57983554
boot device: /pci@80000002000001b/usb@0/hub@1/usb-scsi@4/disk@0,0:\ppc\chrp\bootfile.exe
-------------------------------------------------------------------------------
******* Please define the System Console. *******
Type a 1 and press Enter to use this terminal as the
system console.
Pour definir ce terminal comme console systeme, appuyez
sur 1 puis sur Entree.
Taste 1 und anschliessend die Eingabetaste druecken, um
diese Datenstation als Systemkonsole zu verwenden.
Premere il tasto 1 ed Invio per usare questo terminal
come console.
Escriba 1 y pulse Intro para utilizar esta terminal como
consola del sistema.
Escriviu 1 1 i premeu Intro per utilitzar aquest
terminal com a consola del sistema.
Digite um 1 e pressione Enter para utilizar este terminal
como console do sistema.
Migrating a NIM Master
To perform network installs for AIX 7.3 on the NIM clients, the NIM master must be at AIX 7.3. Therefore, whenever you obtain a new level of AIX, the first step is to upgrade your NIM master. There are two main methods to migrate a NIM master:
Migrating a NIM master using media
See Migrating by Media section above. If you use the VIOS Virtual Media Library (VML):
Chris Gibson, an IBM Power Systems and AIX consultant, has written a detailed article, “Migrating your NIM Master to AIX 7.2 using the VIOS VML”. All the steps in the article are applicable for AIX
Migrating a NIM master with a temporary or new AIX 7.3 NIM master
If you cannot use media to migrate the current NIM master, check if you have another system to install 7.3 using media or VML. Then you can use that system to make a temporary 7.3 NIM master for migrating your current NIM master.
Here are the high-level steps:
-
- Install and prepare a new NIM master
- Define your current NIM master as a client of the new NIM master
- Back up NIM database on the current NIM master and make it a NIM client of the new NIM master
- On the new NIM master, perform migration of the old NIM master
- Redefine the migrated system as a NIM master
- Create 7.3 NIM resources
Once you have installed AIX 7.3 on a system, do the following steps to set up a new NIM master and migrate your current NIM master:
-
Prepare a new NIM master
The fastest way is to run nim_master_setup command on your new AIX 7.3 system.
If your software source is /dev/cd0, then the command is “nim_master_setup -B”, Using -B flag because a mksysb of the NIM master is not required.
Another way is to install bos.sysmgt.nim.master fileset on your new AIX 7.3 system, and then do “smitty nim_config_env”.
This will set up your system as a NIM master and create 7.3 resources from your 7.3 software source.
Run the “lsnim” command, which lists all 7.3 resources
-
Define your current NIM master as a client of the new NIM master
On your new NIM master, run “smitty nim_mkmac” to define your current 7.2 NIM master as a standalone client on your new NIM master.
-
Back up the NIM database on the current NIM master and make it a NIM client of the new NIM master
On your 7.2 NIM master:
- Backup the database, for example:
#/usr/lpp/bos.sysmgt/nim/methods/m_backup_db /home/backup.<date>
(or a safe location of your choice)
- Remove /etc/niminfo
- Deinstall bos.sysmgt.nim.master
- Deinstalling bos.sysmgt.nim.master may create another /etc/niminfo file, so if it exists, then remove it.
- Define the machine as a client to your temporary 7.3 NIM master:
#smitty niminit
-
Perform migration of the old NIM master
On your new NIM master, run the “lsnim” command to list all 7.3 resources. Then perform migration of the old NIM master with those 7.3 resources.
-
Redefine the migrated system as a NIM master
- Install bos.sysmgt.nim.master fileset on the newly migrated NIM master.
- Restore the backup database. You will use the backup database made in Step 3, to redefine the machine as a NIM master. To restore the saved nim database:
# /usr/lpp/bos.sysmgt/nim/methods/m_restore_db/home/backup.<date>
- Verify all prior NIM resources are available
- Your prior volume groups should be available and seen via the lspv command. The “#lsvg -l <volume_group>” will list the logical volumes and mount points.
# lspv
hdisk0          00f87c4f9b81e870                    rootvg          active
hdisk1          00f87c4fed1a7f12                    nimvg1          active
hdisk2          00f87c4fed1b3a8b                    nimvg2          active

# lsvg -l nimvg1
nimvg1:
LV NAME             TYPE       LPs     PPs     PVs  LV STATE      MOUNT POINT
loglv00             jfs2log    1       1       1    open/syncd    N/A
fslv00              jfs2       50      50      1    open/syncd    /cdimages
fslv01              jfs2       288     288     1    open/syncd    /nim1
fslv02              jfs2       207     207     1    open/syncd    /nim2
- Be sure the mount points exist and if not, create them, and then mount the file systems.
- The lsnim command should reflect all your existing resources.
6. Create 7.3 NIM resources
On the migrated NIM master, you now can create 7.3 NIM resources
Migrating a NIM Client
Before migrating a NIM client to AIX 7.3, you need to have AIX 7.3 level lpp_source and spot NIM resources on your AIX 7.3 NIM master. If you used nim_master_setup script to configure your AIX 7.3 NIM master, the NIM resources were already created by the script.
The following examples will define the required NIM resources from AIX 7.3 media (/dev/cd0):
To define lpp_source:
# nim -o define -t lpp_source -a server=master -a location=/export/nim/lpp_source/lpp_7300 -a source=/dev/cd0 lpp_7300
To define spot:
# nim -o define -t spot -a server=master -a location=/export/nim/spot -a source=lpp_7300 spot_7300
NIM Non-prompted Migration Install
For non-prompt migration install, you will need to define a customized bosinst_data resource. The following example shows how to define a bosinst_data from the template bosinst.data in the AIX 7.3 spot resource:
# cp /export/nim/spot/spot_7300/usr/lpp/bosinst/bosinst.template /export/nim/bosinst_data/bosinst_migrate_noprompt

# vi /export/nim/bosinst_data/bosinst_migrate_noprompt
Set the followings in the control_flow stanza and define a new bosinst_data resource:
INSTALL_METHOD = migrate
PROMPT = no
EXISTING_SYSTEM_OVERWRITE = yes
ACCEPT_LICENSES = yes
# nim -o define -t bosinst_data -a server=master -a location=/export/nim/bosinst_data/bosinst_migrate_noprompt bi_migrate_noprompt
Note: If you have copies of the rootvg on other disks, check which disk you want to migrate and specify the disk in the target_disk_data stanza. See the following document for details.
The following example will start non-prompted migration on a NIM client (client1)
# nim -o bos_inst -a source=rte -a lpp_source=lpp_7300 -a spot=spot_7300 -a bosinst_data=bi_migrate_noprompt -a accept_licenses=yes client1
You can periodically check the status using the “lsnim -l” command:
# lsnim -l client1
Check Cstate and Mstate, you will notice the state changes. The migration is complete when:
Cstate = ready for a NIM operation
Mstate = currently running
Cstate_result = success
NIM Prompted Migration Install
For prompted install, you will need to be on the NIM client’s console to select appropriate options in BOS Menus to proceed with the migration installation. In most cases, you will use vtmenu command on a HMC console to open a virtual terminal of the LPAR (the NIM client).
To start a migration install of a NIM client (client1) using the command line:
# nim -o bos_inst -a source=rte -a lpp_source=lpp_7300 -a spot=spot_7300 client1
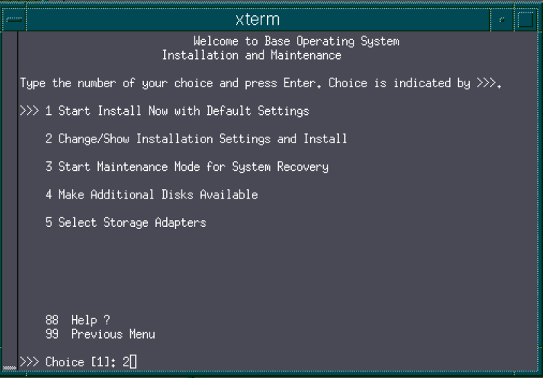
Then on the NIM client’s virtual terminal, after system reboot, after selecting the language to be used with BOS install program, the “Welcome to Base Operating System Installation and Maintenance” menu is displayed. Type 2 to select 2 Change/Show Installation Settings and Install in the Choice field and press Enter.
Verify that
Migration is the method of installation. Verify the hard disk where you want to install. Type 1 to change the disk or press Enter to continue.
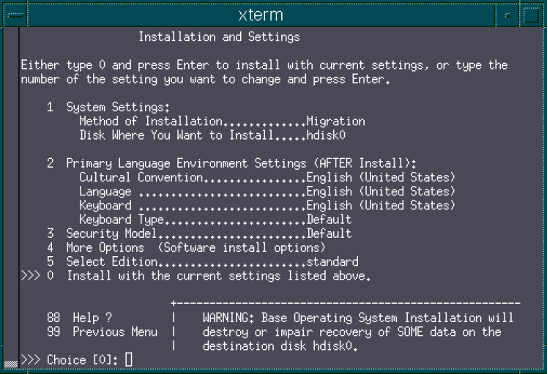
Verify the selections in the Migration Installation Summary screen and press Enter.
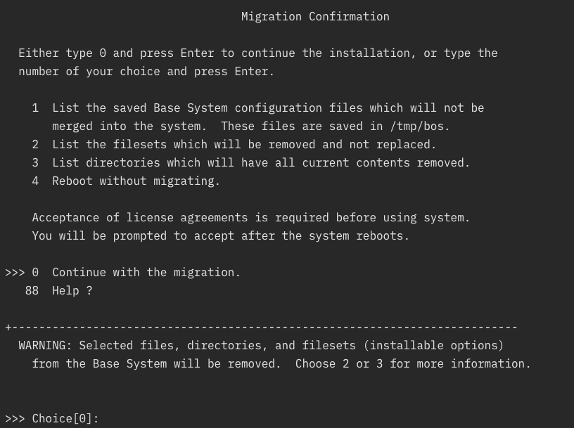
When the Migration Confirmation menu opens, follow the menu instructions to list system information or continue with the migration by typing 0 and pressing Enter.
When the migration install is completed, the system will be automatically restarted, and the Login prompt will be displayed on the virtual terminal.
Migrating a NIM client with nimadm
nimadm provides several options for migrating a NIM client’s rootvg. You will need to select the approach that will work best for your scenarios. Please review the following documents: