PowerVC 1.4.0 allows users to import and export images. This makes moving images between cloud providers or different storage devices a breeze!
There are several use cases that you can use import/export for:
- Move an image hosted on one storage provider to a different storage provider managed by the same PowerVC system.
- Move an image across PowerVC systems on different storage providers, even if you don’t have access to the source storage provider. For example: PowerVC1 has an image hosted on Storwize V7000, and PowerVC2 uses VMAX. In this case you can export the V7000 image from PowerVC1 and import it to VMAX on PowerVC2.
- Import an OVA from an external OpenStack cloud such as IBM Cloud for Skytap Solutions to PowerVC.
- Export an existing PowerVC image as OVA.
- Import a custom raw image file to PowerVC.
[caption id="attachment_1842" align="aligncenter" width="656"]
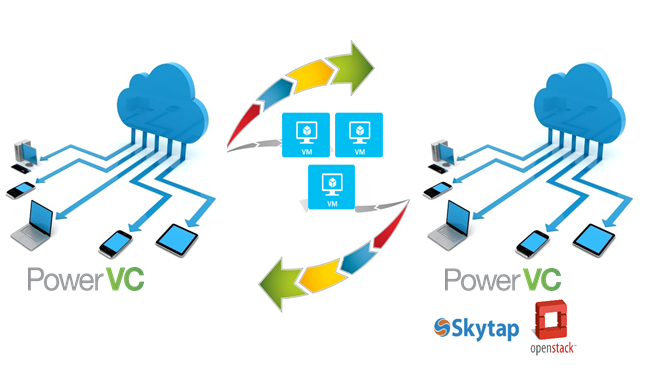
PowerVC Image Export and Import.[/caption]
Use Case 1 can be performed by using the PowerVC user interface. For all other use cases we have a a new CLI option: powervc-image which can be used to list, export and import images.
In this blog post we will show you how to import and export OVA packages by using the powervc-image CLI.
The powervc-image import command supports these source types:
- An OVA package (file ends in .ova or .ova.gz): Use this if you have a standard uncompressed OVA package to import. The OVA package must contain a valid OVF descriptor with sufficient information to describe the image for PowerVC, such as the following:
- Image name and description
- Architecture
- Operating system type
- Volumes' names and data
- Whether a volume is in the boot set
- A TAR package or a TAR archive that contains volume files (file ends in .tar, .tar.gz or .tgz): It must contain .meta file descriptor, which is a set of key=value pairs that describe the image properties. For example:
os-type = rhel
architecture = ppc64
vol1-file = demo-2gb
vol1-type = boot
- A single RAW volume file: If you have a single volume file, you can use this source option. In this case, you can pass the image metadata properties directly on the command line by specifying –metadata [KEY=VAL …].
First, we will give an example of how to import an OVA named aix71.ova.gz into PowerVC.
To do this, we will run this command:
[root@dnd-powervc1 home] # powervc-image import -n pvc-aix71 -p /home/myova/aix71.ova.gz -t f2d4c1a6-47c6-4310-b78c-00de9e34bab9Where:
-n: Specifies the name to give the image in PowerVC (pvc-aix71).
-p: Specifies the path where the image archive to import is located. Both OVA and ova.gz are supported.
-t: Specifies the storage template to use when importing an image volume. New storage volumes are created on the provider specified by the template.
TIP: How can you find the storage template IDs from the command line? Edit the /opt/ibm/powervc/powervcrc file to update OS_USERNAME, OS_PASSWORD and source it. Run the
[cinder type-list] OpenStack command and get the ID:

When the import command successfully completes, you see the below messages:

You can see the created image in the PowerVC UI image page or by using the below command:

As you see, the new image pvc-aix71 is listed and ready to be used for VM deployments.
Similarly, to export an existing PowerVC image into an OVA package, you can run the powervc-image export command:
powervc-image export -i [image_name_or_id]Optional Arguments:
-p: An OVA file name with optional parent path.
TIP: If you want to export the package into your current working directory, you can pass -p with no arguments. By default, the resulting OVA is created in the
default_ova_export_dir/image-name.ova.
-c: Compress the resulting OVA package by using gzip. If -c is not provided, the result will be an OVA tar package.
When run with no arguments, this command creates an uncompressed OVA package in the configured default OVA directory with a file name based on the image name.
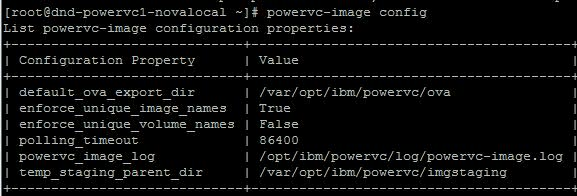
You can check the default configuration properties by running the following command:
For example, to export an image named aix71 into compressed OVA format, run the following command:
[root@dnd-powervc1-novalocal home] # powervc-image export -i aix71 -c -p /home/myovapathWhen the command completes, you will see the following messages:

You can see that the resultant OVA was exported as /home/myova/aix71.ova.gz.
That’s all that is needed for successfully importing and exporting an image using PowerVC. Isn’t it simple?!?
If you have any questions, please post them below. And don't forget to follow us on
LinkedIn,
Facebook, and
Twitter. Until next time!
Authors: Chhavi Agarwal and Carl Pecinovsky
#privatecloud#PowerVC#Cloud#powervccloud#Storage#powervc