By Carl Pecinovsky and Becky Dimock
With PowerVC 1.4.0, you can import and export images using either the command line or
user interface. If you want to move an image from one PowerVC to another, you need to use the CLI
commands to export the image as an OVA, move it to the other PowerVC, then import it there. If you
just need to move the image from one storage provider to another on the same PowerVC, by all means,
stick with the UI. In this blog, we will walk through what happens during an export when you use CLI
commands. And for those of you who persevere through the whole thing, there are some bonus
troubleshooting tips included too!
Note: Before running off and trying to export / import an image, be sure to understand the
requirements for using this function. For example, your PowerVC server must be connected by virtual
Fibre Channel (NPIV). If you use multiple I/O groups, you must install
ifix IT24416. For the whole list of requirements, review this
topic in the PowerVC Knowledge Center:
Exporting and Importing Images.
What happens when you run an export from the command line?
When you run the export, here's what you see on the screen, and what's happening behind the
scenes:
# powervc-image export -i Linux_image_VMAX
Created temporary staging directory /var/opt/ibm/powervc/imgstaging/tmpLYwj7o
Found image with ID '8314b4ad-1ece-441b-88ae-3cc99ac2ec1a' and name 'Linux_image_VMAX'.
Volume data will be downloaded to the staging directory prior to being added to the TAR (OVA)
package.
LYwj7o is the random session ID.
Note: You can specify an
image name and absolute or relative path with the -p option. Use the
-c option to compress the resulting OVA package.
The export directory and the staging directory are on the same file system. Double image size space is required.
While the TAR is being generated, space is needed for both the volume data files and the TAR.
Using the image name 'Linux_image_VMAX' for the default OVA name.
Registered temporary driver PVC-Lite-File_tmpLYwj7o servicing location /var/opt/ibm/powervc/imgstaging/tmpLYwj7o
This temporary pluggable driver gets auto-registered and de-registered during the export. It
manages the files that receive the volume data.
Cloning '016C8+volume-Image_VM1_capture_1' into temporary volume '016C8+volume-Image_VM1_capture_1_tmpLYwj7o'.
The size to clone is 5 GiBs...................Done cloning.
Cloning 'critical-data-vol' into temporary volume 'critical-data-vol_tmpLYwj7o'.
The size to clone is 2 GiBs..............Done cloning.
The source volume is always cloned before the data is exported. This allows the original image to
be used in other operations like a deployment without having to wait for the export to finish.
Warning: Some stale scsi device paths were detected. If an error is encountered, consider running with --debug option to see device path messages and/or running the 'cleanup' subcommand to attempt cleanup of these stale devices that could prevent discovery of newly attached volumes.
This is a common warning when PowerVC has Fibre Channel connectivity. Depending on the type of
stale devices, following the recommendation can clear the warning for the next run.
Migrate volume data for 'volume-Image_VM1_capture_1_tmpLYwj7o' from 'VMAX' to the target storage template 'PVC-Lite-File_tmpLYwj7o base template'.
Attaching volume.................
The system is preparing to copy data. First, the temporary clone is attached to the management
server.
Copying volume-Image_VM1_capture_1 [100%] Rate: 54.83 MiB-per-S, ETA: 0:00:00 [H:MM:SS]
Detaching volume and finalizing metadata...
Copy complete after waiting 0:02:38 [H:MM:SS]
Progress is reported as a percentage, a copy rate, and an ETA as volume copy progresses.
GiBs remaining to copy for image: 2
...
Creating OVF: /var/opt/ibm/powervc/imgstaging/tmpLYwj7o/Linux_image_VMAX.ovf
The OVF is the portable descriptor in XML format. This is supposed to be the first file in the
OVA package.
Adding OVF to OVA /var/opt/ibm/powervc/ova/Linux_image_VMAX.ova
Adding volume 'volume-Image_VM1_capture_1' to OVA.
Adding volume 'critical-data-vol' to OVA.
Here the OVF and volumes are sequentially added to the OVA. This process can take considerable
time if a volume is large.
If you specified that the output should be compressed, the OVA package is zipped via
gzip at this point.
Exported OVA /var/opt/ibm/powervc/ova/Linux_image_VMAX.ova size: 7.00 GiB
The total size of the exported package is shown.
Cleaning up Lite-Volume export resources...
De-register the temporary file driver 'PVC-Lite-File_tmpLYwj7o'.
Cleaning up the temporary staging directory...
Time spent: 0:11:38 [H:MM:SS]
Cleanup activities. This cleanup also happens if an error occurs.
What happens on the user interface when you run an export from CLI commands?
When you export an image via CLI commands, you will see messages such as these on the user
interface:
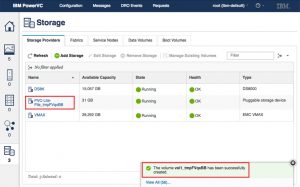
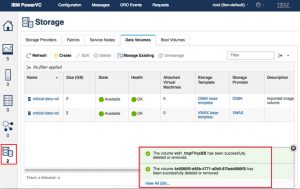
Here's what's happening:
- A temporary staging directory is created with a random session ID.
- A temporary pluggable Lite-File volume driver is registered with the same session ID in its
name.
- Image volumes are cloned.
- For each clone, the retype API is executed with a target volume type of the
Lite-File driver’s base storage template. Remember that storage templates are known as
volume type resources when they are passed in to OpenStack APIs. This is what the
retype API does:
- A temporary volume in the Lite-File driver is created. This “touches” a file name in the
temporary staging directory.
- Both the clone and the Lite-File volume are attached to the PowerVC server. This is a no-op for
the Lite-File because the temp folder is pathname accessible.
- A ‘dd’ copy is run against the clone input device and the Lite-File output device. The
powervc-image CLI is watching for the ‘dd’ process to appear and uses it to report progress
information.
- The source and target volumes are detached.
- The volume properties (metadata and system metadata) are swapped between the source and target
volume records.
- The temporary volume is deleted. Since the metadata has been swapped, this means that the
original clone is deleted.
- An OVF is created, based on image data.
- A TAR file is created to hold the OVA package. The OVF and .meta descriptors are added to it,
then the volume data files are added to it.
- If compression was requested, the Lite-File volume resources are deleted. This frees up space in
the staging area that is no longer needed.
- The TAR is compressed through gzip, if requested, and the standard .gz extension is added to the
.ova extension.
- If they were not cleaned up yet, the cloned volumes are deleted. Since metadata has been
swapped, this actually cleans up the Lite-File resources.
- The pluggable Lite-File driver is deregistered.
- The temporary staging directory tree is deleted.
- All done!
What about importing images?
As you may expect, importing images works pretty much the same way, but in reverse. The basic
import command is powervc-image import -p <path> -t
<target_storage_template_ID>. I'm too lazy to write up all the
information here, and besides, someone else already did it. So if you want all the details, run
powervc-image import -h.
Here's the basic flow:
- Create temporary staging directory.
- Extract the package contents into it.
- Parse the descriptor.
- Register the temporary volume driver.
- Map each volume in the descriptor to a target storage template.
- For each volume, create a lite-file volume record for the extracted file, then run the retype
API against each volume.
- Create the managed image by using the imported volumes and information from the descriptor.
- Clean up.
Troubleshooting your export or import
First, if you're using this information to troubleshoot a problem, I'm sorry that this happened.
Not fun! But try a run-through in debug mode and see if that helps you figure out what happened.
You're not going to get good information in the log unless you run this command, so don't even
bother digging through the logs until you run this.
The basic command is powervc-image -d <subcommand>
<suboptions>, where subcommand is import or
export, and suboptions are the options that you specified when running
the failed command. In debug mode, the command output is logged to the log file and the terminal.
The default log location is: /opt/ibm/powervc/log/powervc-image.log.
For example, say you ran powervc-image export --image rhel_prod2 and it failed
for a non-obvious reason. Then you should rerun the command with the -d option
immediately after the command name, like this: powervc-image -d export --image
rhel_prod2. Then you get the fun of digging through the log!
There are also logs that are likely to have helpful information. Here's where they are and when
you might want to use each one:
- /var/log/cinder/scheduler.log
- You run an import/export and it hangs for a while, and finally fails with a non-specific error.
It is possible that a volume creation/clone never got scheduled, and the only failure indication for
this case would be in the scheduler log.
- /var/log/cinder/volume-<provider>.log
- This is for the provider you are trying to export volumes out of or import into. It may log
details regarding volume errors like mapping from the provider, zoning, or local attachment
failures.
- /var/log/cinder/volume-generic#.log
- This is the PVC-Lite-File-xxx log. This driver is used to allow the OpenStack ‘retype’
infrastructure to copy volume data into or out of files.
Tip: If you suspect a connectivity problem between the PowerVC server and the storage
array and you have verified the physical cabling, try using the following command to add zoning and
verify
connectivity:
powervc-image test-conn --add-zoning <target_storage_template_id>
Hopefully this will get you on the road to understanding (and appreciating!) everything the
PowerVC does when importing and exporting images. If you have questions about that, or any of our
handy troubleshooting tips, let us know below. We'd love to hear from you! And don't forget to
follow us on Facebook, LinkedIn, and Twitter!