How to copy an AIX mksysb archive into a PowerVC imagePowerVC 1.4.0 introduced the ability to import an OVA and a raw disk file into a PowerVC image. This has led to the question: "Can I directly import a mksysb?" No, you can't. A mksysb image uses the AIX backup format and PowerVC runs on Linux, so PowerVC cannot restore the backup directly. An AIX rootvg resides on an AIX LVM volume group, and AIX has its own file systems JFS or JFS2, so PowerVC can't create the raw disk image directly.
"Well, can I somehow indirectly import a mksysb?" Yes, you can! You'll need an AIX helper VM where the mksysb can be processed and uploaded into a volume. This blog will explain the steps necessary to take an AIX mksysb archive and copy it into a PowerVC image.
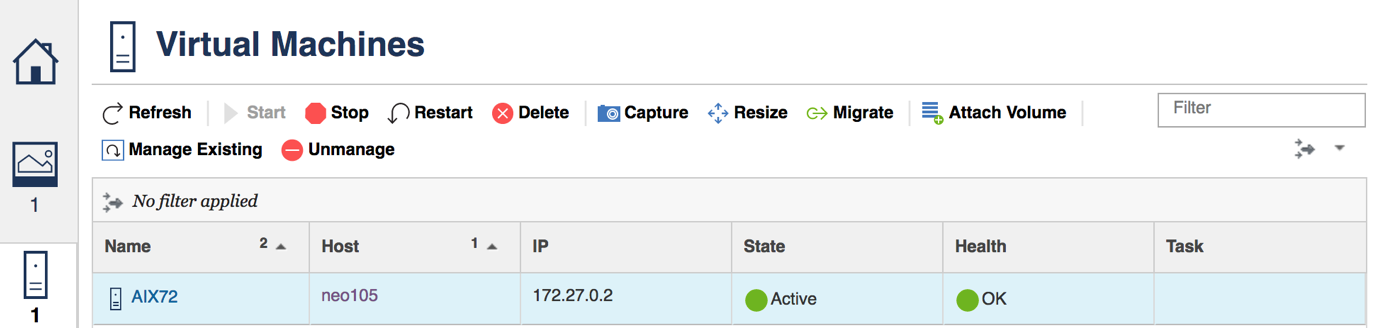
AIX Helper VM.Given that there is an AIX VM that PowerVC is managing, that AIX VM can be used to facilitate the copying of an AIX mksysb archive into a PowerVC image. This blog uses the AIX alt_disk_mksysb command to copy the mksysb archive onto a volume. In this example we are starting with an AIX VM named AIX72 that has already been deployed.
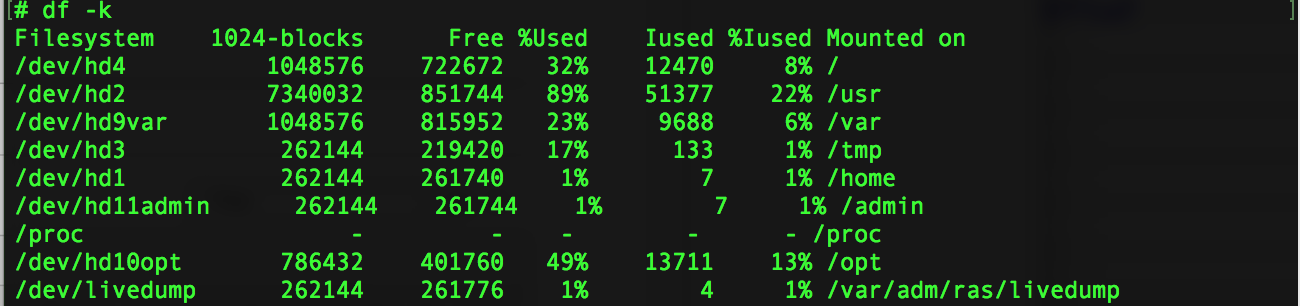
The next step is to determine how much file system space is needed on our helper VM to hold the mksysb image. In our example, the source mksysb image is about 4.8 GB.

We can see that the AIX72 VM does not have a file system with sufficient space to hold the AIX mksysb image.
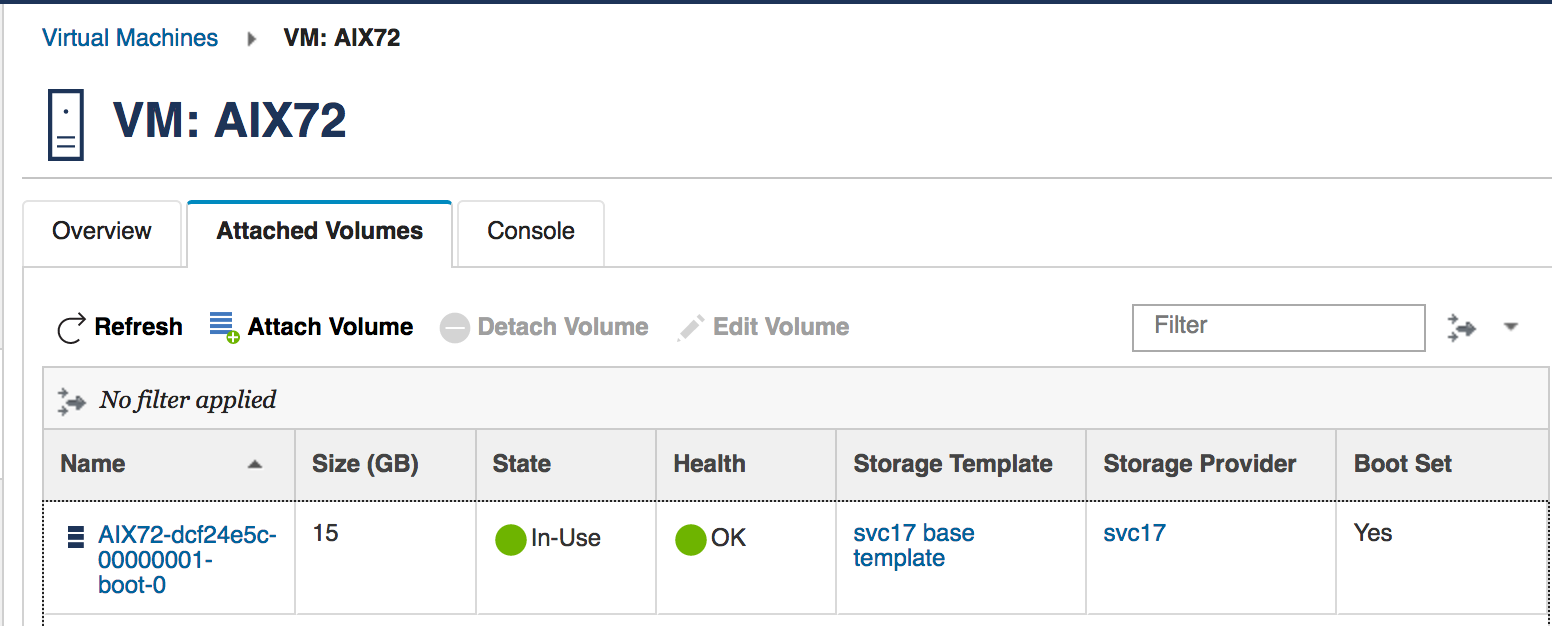
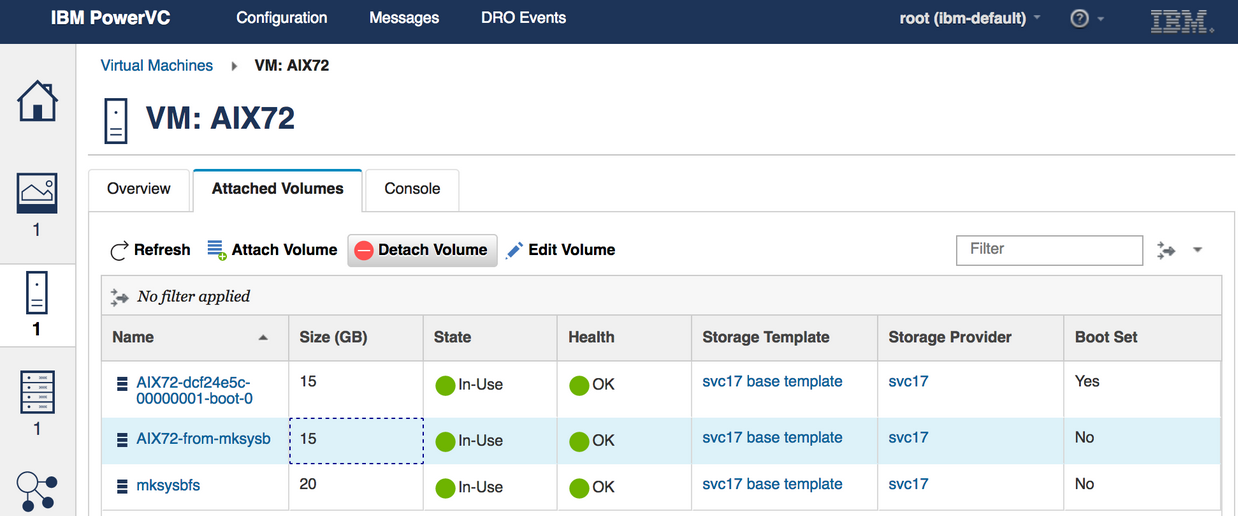
Navigate to the "Attached Volumes" tab of the helper VM. In our example the AIX72 VM has only a boot volume and no data volumes.
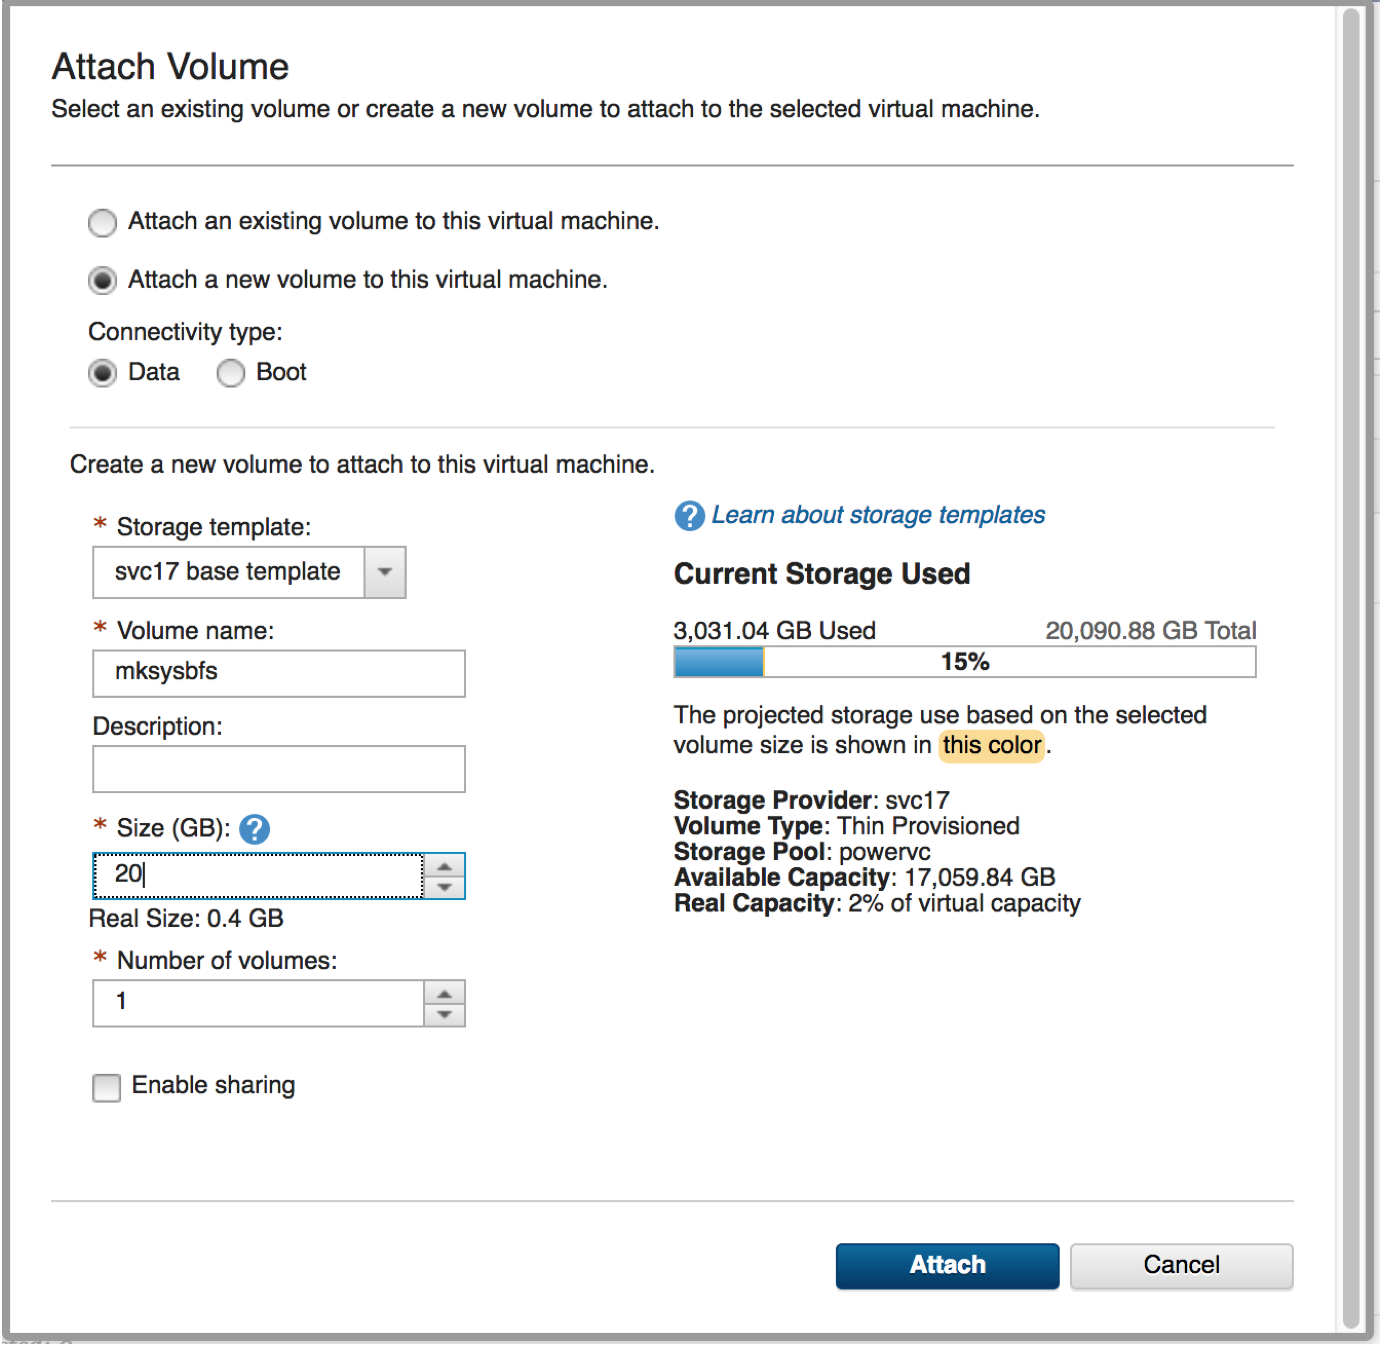
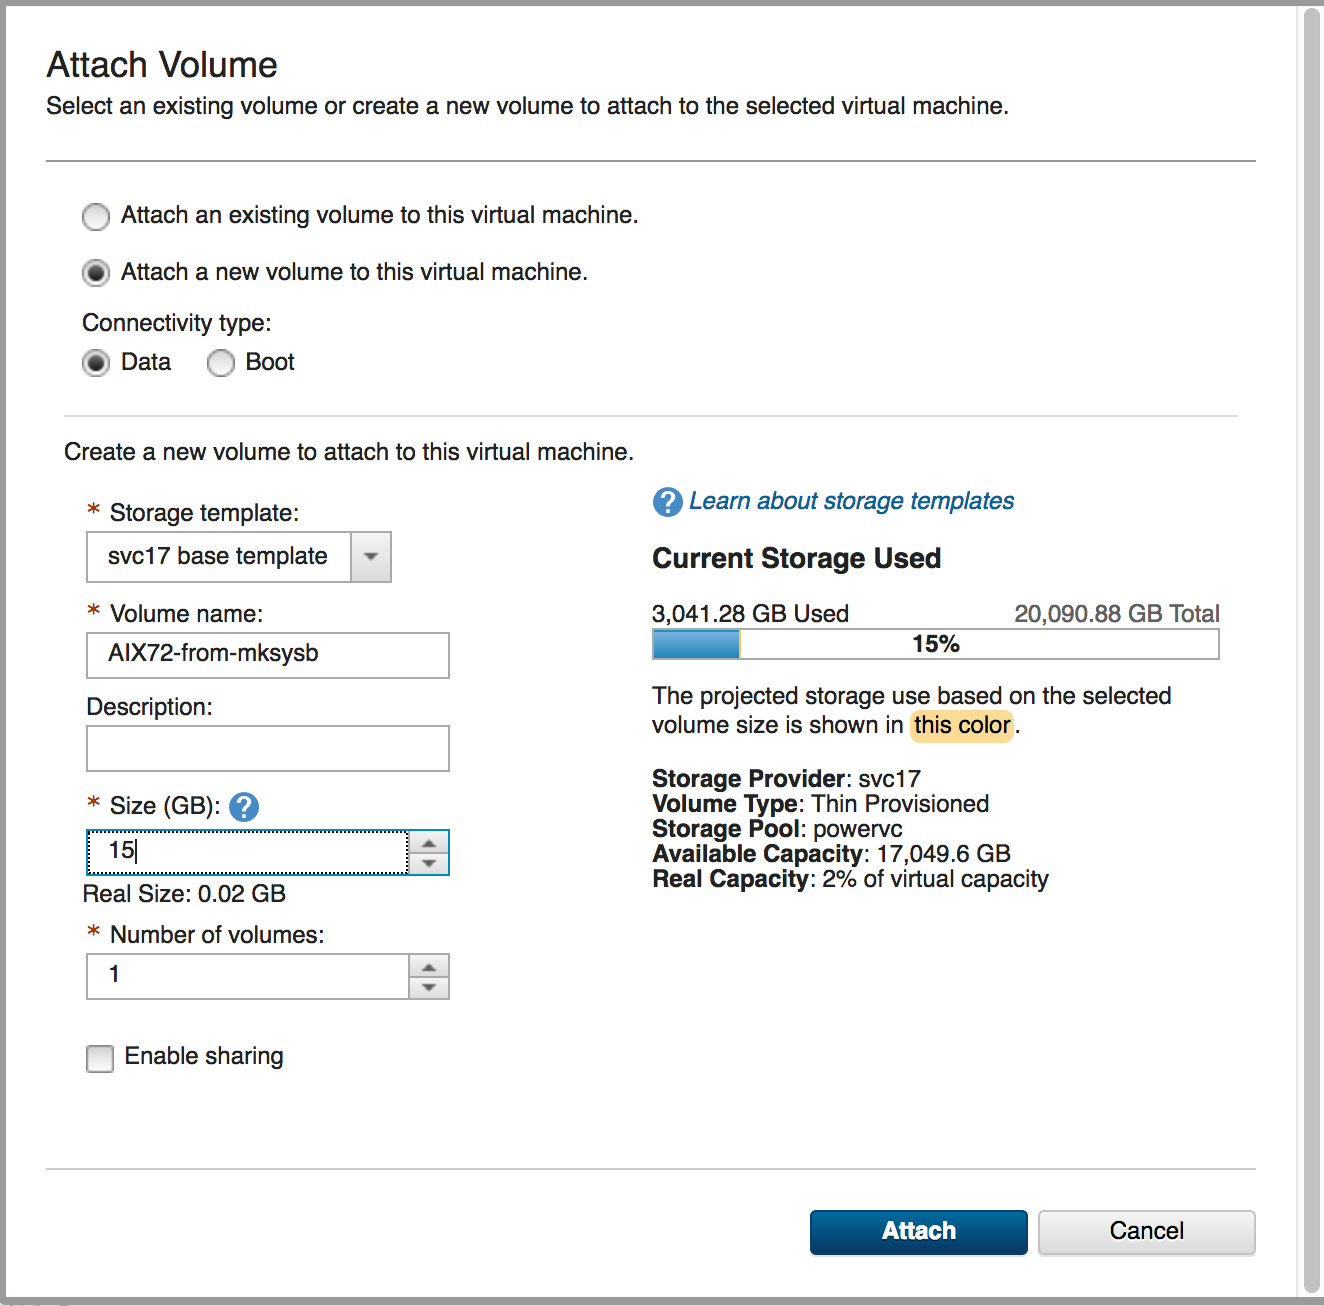
We need to attach a new volume to AIX72, then create a file system to hold the mksysb archive. The example mksysb is 4.8 GB, therefore in our example we have chosen to create a 20 GB volume to allow space for multiple mksysb archive files.
Select "Attach Volume" to create and attach a new volume to AIX72. Select the options to create a new data volume and enter the desired size. In this example I have named the volume mksysbfs.
Once the volume has been attached to the VM, it is time to log into the VM and discover the volume as a new hdisk. Run the lspv command to determine the hdisks that have already been discovered by the VM. In our example VM there is a single hdisk called hdisk0.

The cfgmgr command on AIX will discover devices. After running cfgmgr on the AIX72 VM the lspv command shows a new hdisk called hdisk1.

Now we need to create an AIX Volume Group by running the mkvg command. On the example VM, mksysbvg is the volume group name we are using.

Use the crfs command to create a file system, and the mount command to mount it. In our example we created a new file system called /mksysb and then we mounted it:
 Creating an image volume
Log in to the VM where the mksysb image resides and copy the mksysb image to your helper VM. In our example we are using the scp command to copy the mksysb image to the /mksysb file system. We will then run the cksum command on the source VM and our helper VM to verify that the files are identical.

Logging into our helper VM we cd to /mksysb and run cksum and we see that its cksum is identical.

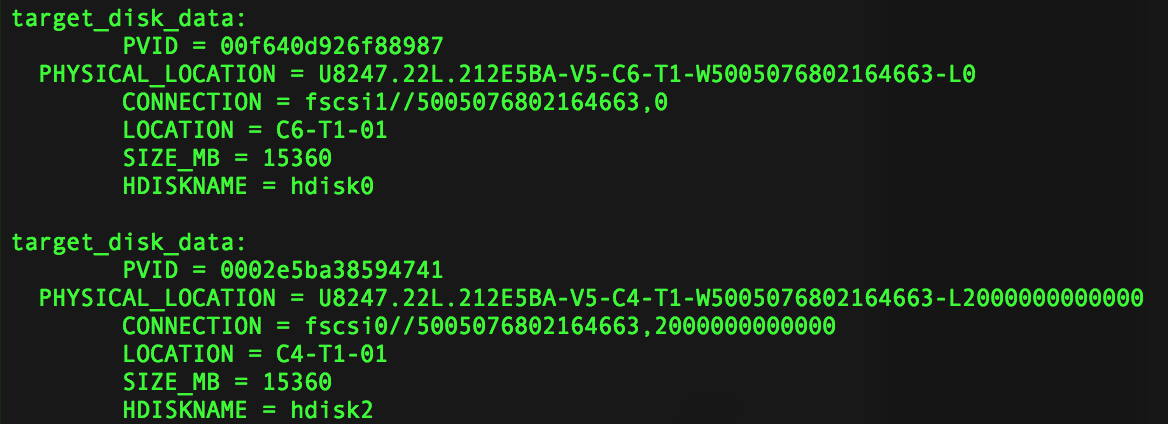
Now we are ready to create a volume we will turn into an image. To determine the necessary volume size, we need to look at the contents of a file in the mksysb archive. The bosinst.data file in the archive contains stanza information that indicates the minimum space required to restore the mksysb. Use the restore or lsmksysb command to extract "./bosinst.data" from the mksysb archive. In this example I'm using the restore command.

With your favorite tool, examine the bostinst.data file to find a stanza called "target_disk_data". This stanza indicates the minium size (in megabytes) of the required volume in a key value pair SIZE_MB = size. In this example we see that the mksysb requires a 15GB volume. We will need to create a 15GB volume and attach it to our helper VM.

Navigate to the "Attached Volumes" tab of the AIX helper VM and press the "Attach Volume" button to create and attach a new volume to our helper VM. In this example we are creating a new 15 GB data volume data named AIX72-from-mksysb. After filling out the details, click "Attach" and the volume creation and attachment is scheduled.
In the VM's "Attached Volumes" tab when we see the volume appear as "In-Use" we can proceed to the next step.

Now we go back to the helper VM to discover the volume. By running the lspv command before and after running the cfgmgr we see that we started with hdisk0 and hdisk1 and hdisk2 is our newly discovered disk is hdisk2

Copy the mksysb on our volume
Now we are finally ready to run the command that will create a AIX boot disk from the mksysb archive. We will run the alt_disk_mksysb command using these settings:
- -m: Specify the mksysb archive that was transferred to the VM in a previous step. In our example, the mksysb is /mksysb/AIX72.mksysb
- -d: Specify the hdisk that was just discovered. Our hdisk is hdisk2.
- -B: Use this option so that bootlist command is not run against on our helper VM.
- -O: Use this to ensure a clean device discovery when a VM is deployed from the AIX instance we are creating.
- -c: Required when using the the -O option. This will set up a console device when a VM is deployed form this volume. If we don't use the -c option, when you deploy a new VM, it won't boot if it needs to open the console for any reason.
In our example the alt_mksysb command is:
alt_disk_mksysb -B -O -c /dev/vty0 -d hdisk2 -m /mksysb/AIX72.mksysb
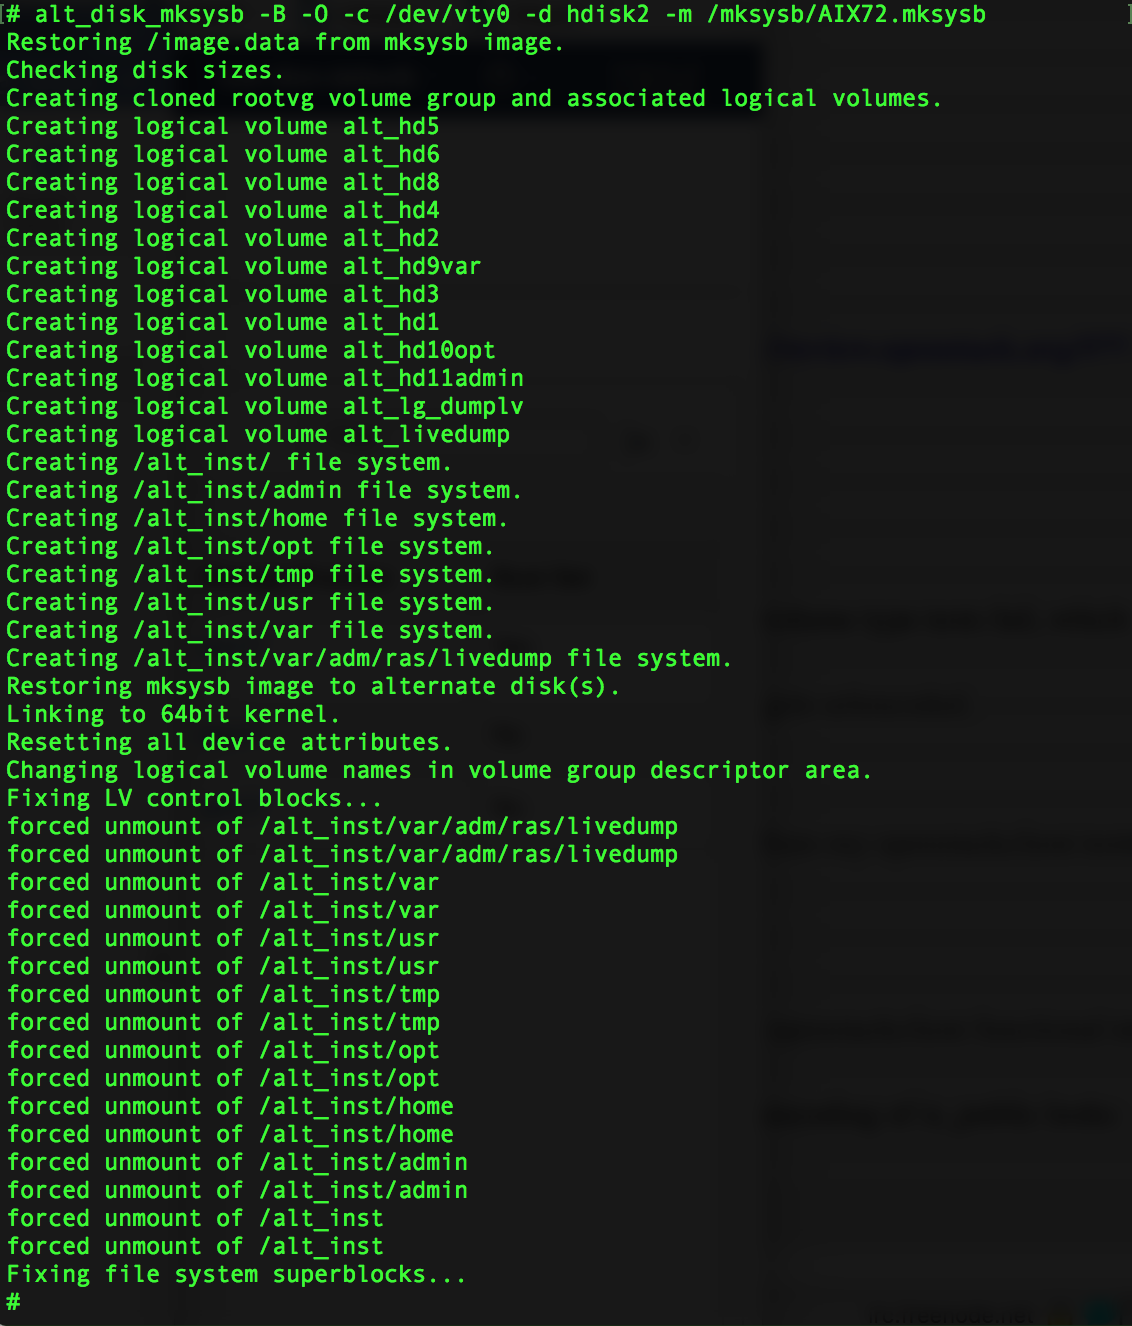
When the alt_disk_mksysb command is complete, the target volume contains a valid rootvg that is ready to be booted.
Now our volume AIX-from-mksysb needs to be detached from the VM. Before detaching, remove altinst_rootvg from the VM. Don't use exportvg on altinst_rootvg. The altinst_roovg vg was created by alt_disk_mksysb and must be removed by using alt_rootvg_op -X.
After the altinst_rootvg is removed, the hdisk can be removed from the VM using rmdev.

Please note that kernel interim fixes or updates may not allow the VM to boot so care should be taken when trying to use a mksysb archive that contains an updated kernel. See https://www.ibm.com/support/knowledgecenter/en/ssw_aix_72/com.ibm.aix.cmds1/alt_disk_mksysb.htm
Cloud-init is required to be installed on the OS before it can be deployed. This blog assumes that cloud-init was already been installed on the AIX VM prior to creating the mksysb archive. If cloud init has not been installed then the alternate rootvg may need to be activated to install cloud-init before creating an image.
Multi-volume mksysb What if your AIX rootvg was mirrored for availability? Or you have multiple volumes in your rootvg?
Each stanza in the bostinst.data file represents a disk that alt_disk_mksysb expects to see. A volume must be created for each stanza and attached to the helper VM and the hdisk discovered. The list of hdisks must then be passed as a quoted string on the alt_disk_mksysb command.
 Creating an image
The volume containing the new rootvg can now be detached from the VM. Open the user interface and navigate to the VM's details page. Open the "Attached Volumes" tab, select the new rootvg volume, and click "Detach volume".
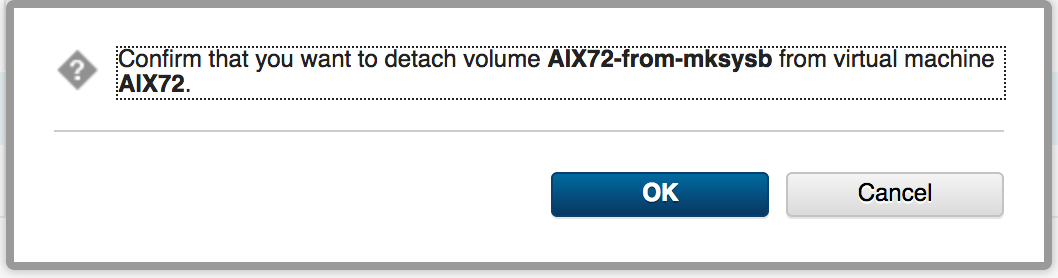
In our example we selected the AIX72-from-mksysb volume and clicked Detach.
Press "OK" in the detach confirmation dialog.
After the volume finishes detaching from the AIX72 VM, it is time to create an image. Navigate to Images and press the "Create" button.

Give the image an appropriate name, set the OS to AIX, and add the volume to boot set of the image. In our example below, the image name is 'AIX-from-mksysb' and our boot set volume is 'AIX72-from-mksysb'
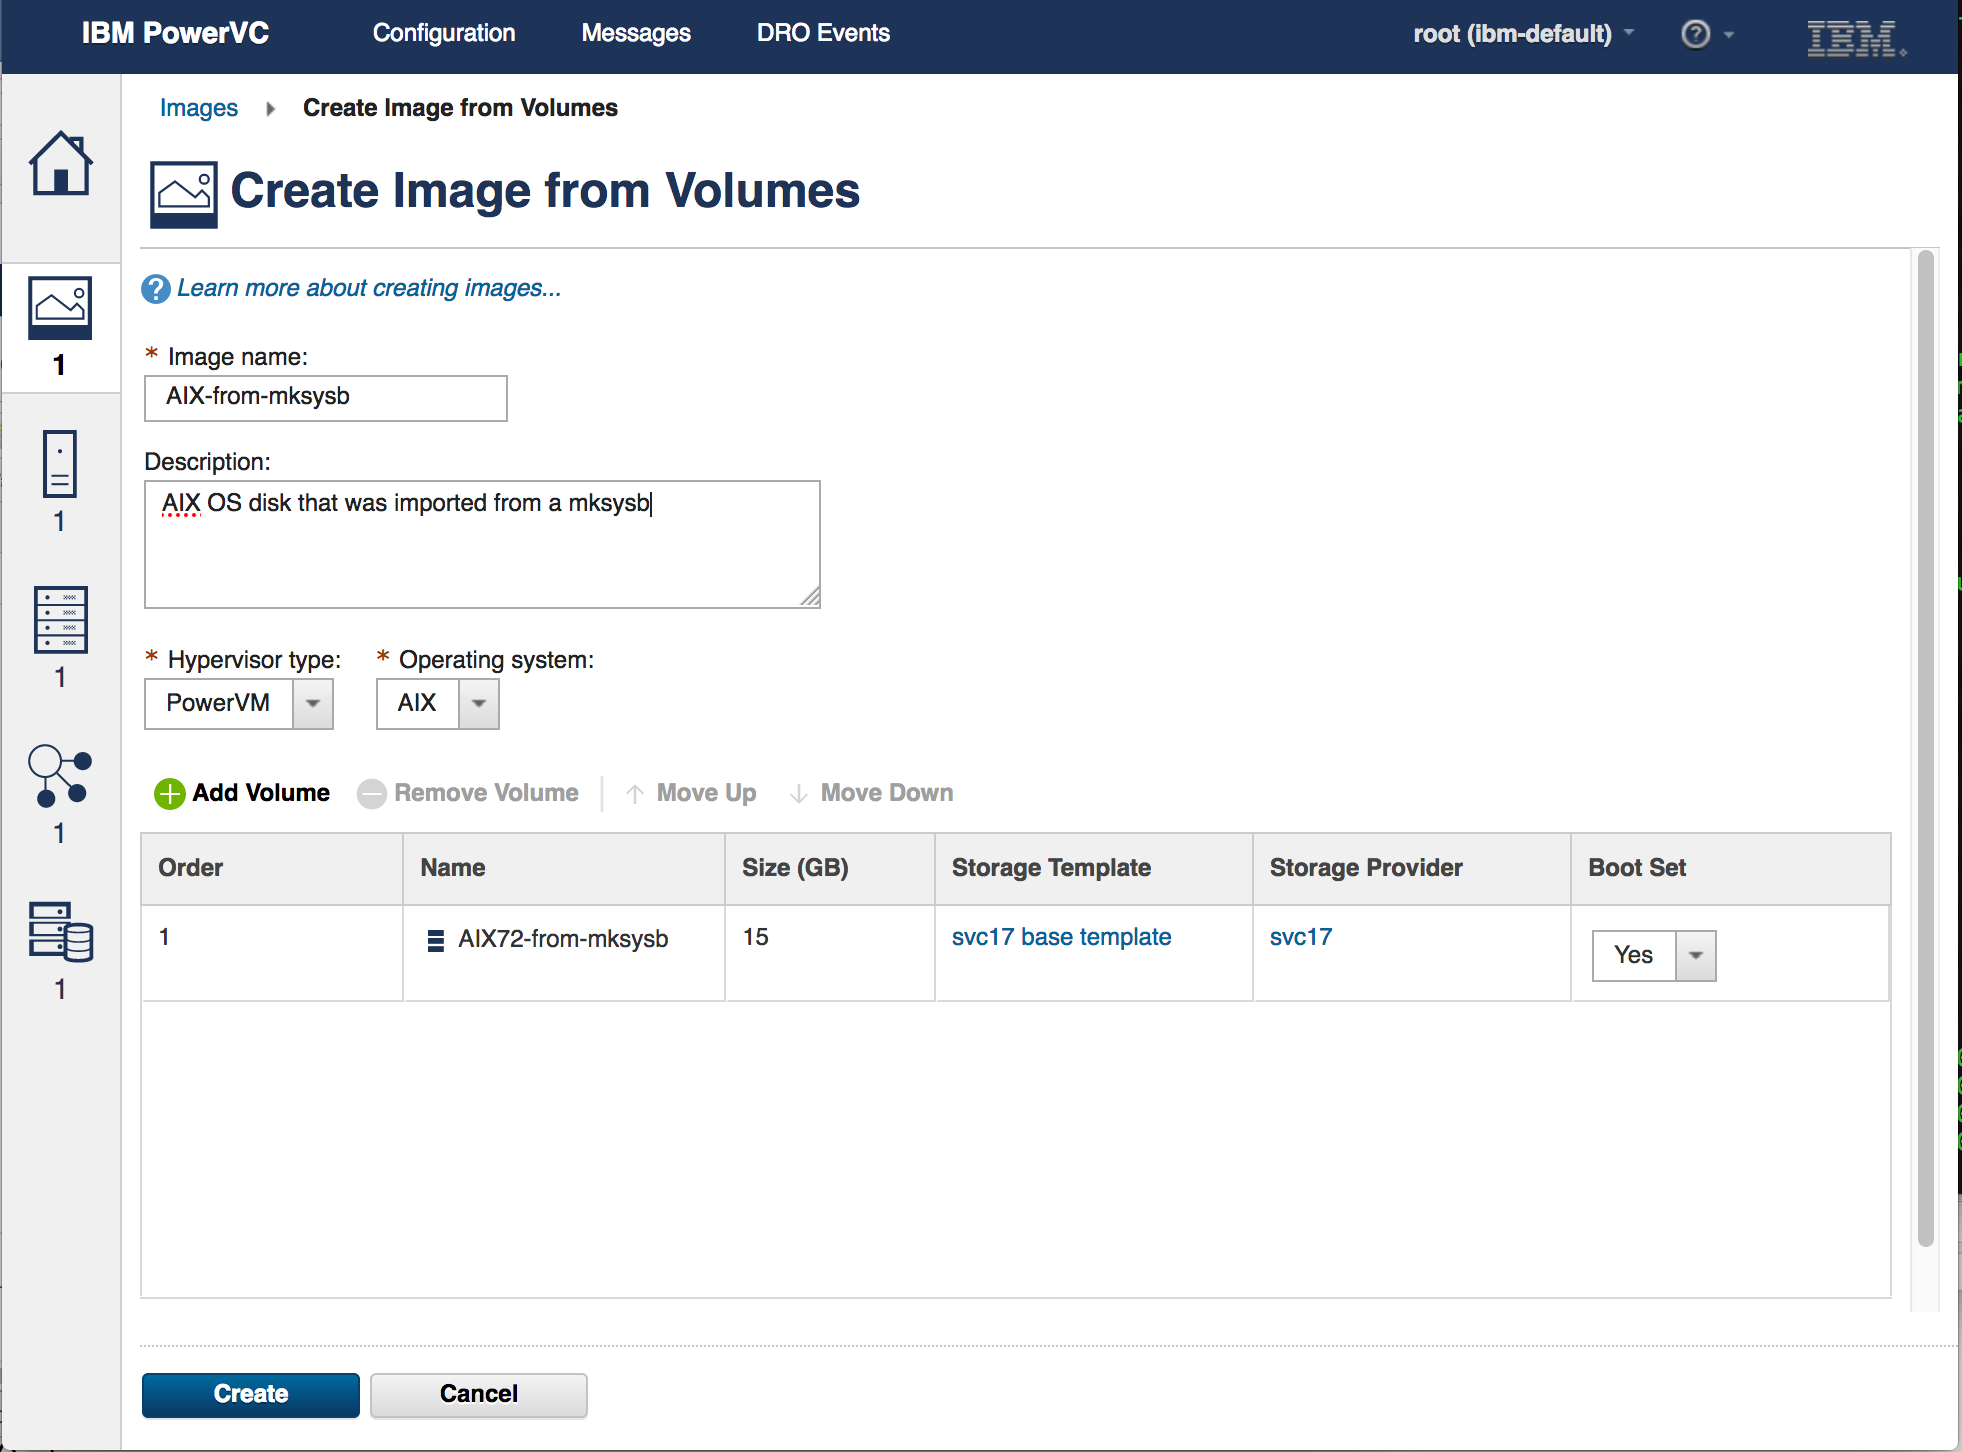
Press the "Create" button. When this operation is complete we will have a new image called "AIX-from-mksysb" that can be deployed.
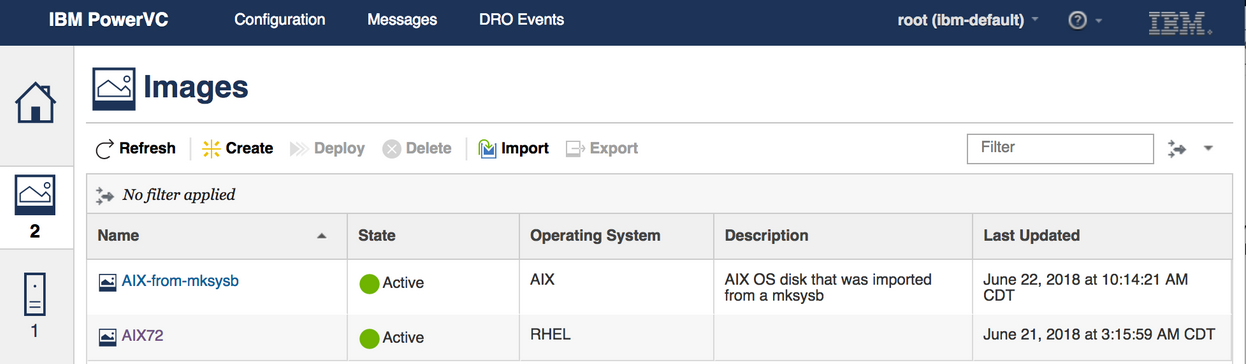
At this point we are done. We have an image created from an AIX mksysb archive that we can now deploy.
This is the entire process to successfully copy a mksysb image archive into a PowerVC image. Hope you found this blog useful and easy to follow.
If you have any questions, please post them below. And don’t forget to follow us on LinkedIn, Facebook, and Twitter. Until next time!
#Storage#installation#Compute#PowerVC