In the Ocata release of OpenStack, the VMAX volume driver has added some support for provisioning replicated volumes and allowing failover to a secondary array. PowerVC v1.3.3 is based on Ocata, and although there is no integrated support for volume replication in the GUI, you may have an interest in utilizing the support in the VMAX volume driver. In this article, I will cover the general use case for volume replication, the limitations in the 1.3.3 support, and an example flow where I walk through the configuration and usage step-by-step.
There is a lot of information here, but not to worry. The general information is up front and the how-to specifics follow that in the middle and end of the article.
Contents
Background Information
The applicable use case for replication in PowerVC 1.3.3 is that of disaster recovery (DR). In this context, failover has nothing to do with a temporary network outage or a spinning disk failure. Instead, you have two VMAX3 arrays (hybrid or all-Flash) and something catastrophic has happened to one of them. Your virtual machines with data hosted on the array are down and you want to recover at least some of your environment or data using volumes that were replicated to a designated failover array.
This is not an automatic failover or high-availabilty situation. It’s just some basic support in OpenStack Cinder that is available to help make the process a bit less painful. For details on the “Cheesecake” version of replication available in OpenStack Mitaka and Ocata, please see the following specification overview:
https://specs.openstack.org/openstack/cinder-specs/specs/mitaka/cheesecake.htmlThe implementation details there may not be accurate as the function came after that was written, but the Use Cases section gives the background. The VMAX3 volume driver is the only driver to support replication that PowerVC 1.3.3 will recognize and that you can configure for such support using the powevc-config command discussed in this article. EMC/Dell discusses their replication support in the VMAX driver documentation page here:
https://docs.openstack.org/ocata/config-reference/block-storage/drivers/emc-vmax-driver.htmlThe relevant section is titled “Volume replication support”. If you are not familiar with how VMAX does replication, it might be more helpful to refer back to this information after finishing the rest of this PowerVC article.
Other volume drivers may support some form of volume replication, but PowerVC makes no claims about them. You may be able to manually configure them for replication, in which case, portions of this article may still be applicable -- the parts that apply to general OpenStack.
Limitations and Considerations
There are a number of limitations to understand when considering this support. I list them up front because it's possible that one or more of the limitations make the current level of support not fit with your PowerVC environment and processes. This information can help you decide. The last column shows the source of the limitation – OpenStack, Dell/EMC, or PowerVC. Note that these limitations are only applicable to PowerVC 1.3.3 and future releases may be different.
#
|
Limitation/Consideration
|
Source
|
1
|
Replication support is only for VMAX3 paired storage arrays. VMAX2 is not supprted.
|
Dell/EMC
|
2
|
For a given VMAX3 storage provider, only a single replication target (failover)
array is supported. You must specifically enable a VMAX provider for replication using the procedure discussed later.
|
Dell/EMC
|
3
|
You must have the proper Remote Replication licenses in place for the VMAX arrays.
|
Dell/EMC
|
4
|
The SRDF group needs to be configured on the arrays prior to PowerVC configuration. SRDF is a family of software called Symmetrix Remote Data Facility.
|
Dell/EMC
|
5
|
Only synchronous replication is supported. This means that I/O requests to the volume do not return until fully written out on the replicated volume as well. There may be decreased performance for this compared with unreplicated volumes.
|
Dell/EMC
|
6
|
Both VMAX arrays must be managed by the same SMI-S Provider even though only one is managed by PowerVC. If the SMI-S Provider goes down in addition to the primary array (or if the SMI-S Provider loses connectivity to the failover array), then there would be extra manual steps to get a backup SMI-S Provider associated with the failed-over storage provider in PowerVC. This is mentioned in the VMAX driver documentation, but willl not be covered in this article.
|
Dell/EMC
|
7
|
You cannot increase the size of replicated volumes unless you specifically use the flag to allow volume extension on the command that configures the replication support. This is discussed further in the Diving Deeper section at the end of the article.
|
Dell/EMC
|
8
|
The target/failover array must support the same service level and workload type specified in the storage template that is enabled for replication. By default, the replication storage template is created without a service level or workload type set.
|
Dell/EMC
|
9
|
Consistency groups and generic volume groups are not supported with replicated volumes. That type of support is planned for a future release of OpenStack.
|
OpenStack
|
10
|
By default, existing volumes that are managed into PowerVC (either directly or by managing existing virtual machines) are not associated with a storage template. Therefore, they are not supported for replication unless an additional manual step is completed to allow them to be managed with a storage template. This is covered later in the Diving Deeper section.
|
PowerVC
|
11
|
You must use the cinder failover-host command to cause the storage provider to failover from the primary array to the target array, and again to failback to the primary. The storage provider and replicated volumes will not be accessible until this is done.
|
OpenStack
|
12
|
PowerVC does not support the cinder freeze-host
and cinder thaw-host commands or APIs for storage providers.
|
PowerVC
|
13
|
After a storage provider is failed-over to the target array, virtual machines do not automatically get access to the replicated volumes. The LUNs are different and the target ports are different. So if you need managed virtual machines to access and use the replicated volumes, extra manual steps are required. And you should consider the ramifications of when/if the primary array is restored to service because now the source volumes will be out of sync with the replicated volumes until the volume data is synced up again.
|
OpenStack
|
14
|
If you enable a storage provider for replication and later disable it, you might not be allowed to perform storage operations on the volumes that were created with the replication-enabled storage template. You would need to enable the provider for replication again in order to work with those volumes. For example, deleting the volume.
|
OpenStack, Dell/EMC
|
15
|
When a storage provider has been failed-over, there is nothing in the PowerVC UI to indicate this. You must use the cinder service-list command to check the provider replication state.
|
PowerVC
|
16
|
You can only associate a single SRDF group from a specific VMAX3 array with a PowerVC management instance. This is because PowerVC does not allow you to register the same array serial ID more than once.
|
PowerVC
|
How-to Overview
Here are basic steps to get replication enabled for your VMAX3 storage provider. In the next section, we will go through a specific detailed example.
- Ensure that you meet all the pre-reqs and limitations documented by EMC/Dell by reviewing: Dell EMC VMAX iSCSI and FC drivers.
- Create an SRDF replication group between your local and remote VMAX3 arrays. The VMAX3 that PowerVC will manage is called the “source” or “primary” array in terms of replication. The array where volume data is replicated to is known as the “target” or “backup” array.
- Create a port group on the remote VMAX array containing the front-end Fibre Channel ports that are used for volume attach operations that happen when the storage provider is in “failed-over” mode.
- Use the
powervc-config storage replication command on the PowerVC management server to enable replication for the provider. At a minimum, you will provide the target array ID, the SRDF group name, and the remote port group. This command will also define a replication-enabled storage template for your use.
- Now use PowerVC as you normally would, but specify the new replication storage template when you deploy virtual machines or create volumes. Volumes created using this storage template will automatically have their data replicated to a mirrored volume on the target array.
- If you need to fail the storage provider over to the target array, then use the
cinder failover-host command.
That’s it! Are you ready to dig into an example with more details? I thought so!
A Replication Example
So let’s dig into each of the 6 steps outlined in the prior section with a concrete example flow and more details.
(1) Check the pre-requisites
I logged into the server running my SMI-S provider and ran the following command:
[smis ~]# symcfg li
                                S Y M M E T R I X

                                       Mcode    Cache      Num Phys  Num Symm
    SymmID       Attachment  Model     Version  Size (MB)  Devices   Devices
    000196800573 Local       VMAX100K  5977      215040        19     12649
    000198701861 Local       VMAX10K   5876       59392         1       278
    000196800508 Remote      VMAX100K  5977      215040         0     14483
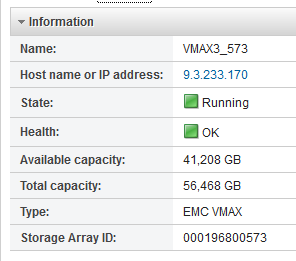
Both VMAX 100K systems are managed here. That’s good. The Local and Remote ones are as I expect. I will refer to these two arrays by the last three digits of their serial or ID. 573 is the primary array that I now register into PowerVC as the VMAX provider:
[caption id="attachment_1620" align="alignnone" width="984"]
Registering the primary array[/caption]
The 508 array I will use for my DR backup. After registering the storage provider for 573, I need to tell PowerVC to use a specific storage port group for my primary array. You may not need to do this. In my case, different teams are assigned to different ports and fabrics and if the VMAX driver picks a port group that has no connectivity to my managed fabrics, deployments will fail. In this case, I know the name of the port group I need to use is 9325075_573_PG, so I run the following command on my PowerVC server:
[powervc ~]# powervc-config storage portgroup --portgroup 9325075_573_PG --set --arrayid 000196800573

Port group names ['9325075_573_PG'] were successfully set as the list of candidate port groups for EMC VMAX storage array configuration 000196800573
This configures the VMAX driver to use only that port group. Next I ran the Verify Environment utility. I scrolled down the results until I found the EMC VMAX validations:
[caption id="attachment_1619" align="alignnone" width="984"]

Validating the VMAX registration[/caption]
In addition to the required licenses for normal operation, I note that the Remote_Replication_Suite is reporting. That’s a prerequisite for this particular array model in order to do the SRDF replication I need.
(2) Create or locate an SRDF replication group for PowerVC’s use.
Rather than using the SMI-S server, I logged into the UniSphere management UI. The following screen shot shows the breadcrumb navigation trail to find your SRDF groups, and it highlights the group that I intend to use: pvcdn198. You can have up to 250 SRDF groups defined, but you will only be associating one with your VMAX storage provider.
[caption id="attachment_1616" align="alignnone" width="984"]

Locating the SRDF group[/caption]
To create a new replication group, you can go to Data Protection à Create SRDF Group. Alternatively, from The SMI-S/Solutions Enabler server, here is a CLI example to create the SRDF group:
[smis ~]# symrdf addgrp -label pvcdn198 -rdfg 198 -sid 000196800573 -dir 01E:31 -remote_rdfg 198 -remote_sid 000196800508 -remote_dir 01E:31
Note that you have to specify appropriate director port(s) for the two VMAXes to communicate (01E:31 in this case). I specify the same replication group number (198 in this case) for both the local and remote arrays for consistency. This number is one of the 250 “slots” available.
(3) Create or locate the remote port group
The remote port group is the port group that the VMAX driver will create masking views with on the target array after the storage provider is placed in failover mode. So you need to identify which ports on your backup array are connected to your managed fabrics and are ones you want to use for this purpose.
For my host environment, I have a single fabric in common with my hosts. I log into Unisphere for my replication target array and navigate to System-->System Dashboard-->Front End. I filter on Director FA-2D and locate port 24 which I was told is hooked up to my fabric.
[caption id="attachment_1615" width="890"]

Locating the Front-End port on the target array[/caption]
The state looks good. Now to check what port groups are already defined with that port. Using the symaccess CLI on the Solutions Enabler system, one can easily list all the port groups and show the ports in a particular port group using commands like the following:
[smis ~]# symaccess -sid 508 list -type port –v
...snip...
[smis ~]# symaccess -sid 508 show vmrt025_PG -type port

Symmetrix ID          : 000196800508
Port Group Name         : vmrt025_PG
...
But if you start from a port number, how do you get to a list of port groups? Here’s a little trick. Fire up the /opt/emc/ECIM/ECOM/bin/ TestSmiProvider utility and use the interactive CIM menuing interface to do it. The ein menu option stands for ‘enumerate instance names’.
(localhost:5989) ? ein
Class: Symm_FCSCSIProtocolEndpoint
++++ Testing EnumerationInstanceNames: Symm_FCSCSIProtocolEndpoint ++++
...
Instance 24:
Symm_FCSCSIProtocolEndpoint.CreationClassName="Symm_FCSCSIProtocolEndpoint",Name="500009735807F058",SystemCreationClassName="Symm_StorageProcessorSystem",SystemName="SYMMETRIX-+-000196800508-+-FA-2D-+-24"
The instance that ends with 2D-+-24 is the one I want as it is for the correct array serial and port number. So now I feed that into an AssociatorNames query, where I look for associated instances of class SE_TargetMaskingGroup.
(localhost:5989) ? an
ObjectPath: Symm_FCSCSIProtocolEndpoint.CreationClassName="Symm_FCSCSIProtocolEndpoint",Name="500009735807F058",SystemCreationClassName="Symm_StorageProcessorSystem",SystemName="SYMMETRIX-+-000196800508-+-FA-2D-+-24"
Assoc Class []:
Result Class []: SE_TargetMaskingGroup
Role []:
Result Role []:
++++ Testing AssociatorNames: Symm_FCSCSIProtocolEndpoint.CreationClassName="Symm_FCSCSIProtocolEndpoint",Name="500009735807F058",SystemCreationClassName="Symm_StorageProcessorSystem",SystemName="SYMMETRIX-+-000196800508-+-FA-2D-+-24" ++++
Associator Name 0:
//9.3.233.170/root/emc:SE_TargetMaskingGroup.InstanceID="SYMMETRIX-+-000196800508-+-pepsi001_SG_PG"
Associator Name 1:
//9.3.233.170/root/emc:SE_TargetMaskingGroup.InstanceID="SYMMETRIX-+-000196800508-+-pvc_srdf_2D24"
Associator Name 2:
//9.3.233.170/root/emc:SE_TargetMaskingGroup.InstanceID="SYMMETRIX-+-000196800508-+-powervc_508_pg24"
Associator Name 3:
//9.3.233.170/root/emc:SE_TargetMaskingGroup.InstanceID="SYMMETRIX-+-000196800508-+-smcho-PG03"

AssociatorNames: 4 associators; repeat count 1;return data in 0.040592 seconds
In this case, it found four port groups. The one I want is called powervc_508_pg24. Let’s say I had to create this port group because one was not defined for me already. No problem – I can use the symaccess CLI to do that.
[smis ~]# symaccess -sid 508 -type port -name powervc_508_pg24 -dirport 2D:24 create
It takes the -dirport value in the format shown where the VMAX Director is 2D and the port on that Director is number 24. Use what is appropriate for your own environment. This command does not output anything, but it will create the port group.
(4) Enable the storage provider for replication on PowerVC
Now we have all the pieces in place to enable replication. In PowerVC 1.3.3, the powerc-config storage replication subcommand was added to integrate with the Dell/EMC support. To see the command help, enter it with the –h option. In the following terminal screen block, I enter the command with only the --storageHost option. This prints the current replication configuration for the specified storage provider.
[powervc ~]# powervc-config storage replication --storageHost 000196800573
Reporting the current replication configuration for VMAX provider VMAX3_573:

replication_device = None

Storage templates with PowerVC replication description:
+--------------------------------------+-------------------------+-------------+-----------+
| ID                                   | Name                    | Description | Is_Public |
+--------------------------------------+-------------------------+-------------+-----------+
[powervc ~]#
As expected, the VMAX storage provider is not yet enabled for replication and there are no storage templates enabled for replication. This does not mean that the backend array is not configured for replication. It is configured per the previous steps that I went through. Now I enable the PowerVC storage provider for replication using the information collected in the prior couple of steps.
[powervc ~]# powervc-config storage replication --storageHost 000196800573 --enable --target_device_id 000196800508 --rdf_group_label pvcdn198 --remote_port_group powervc_508_pg24 --restart

Modified 'VMAX3_573' provider configuration for SRDF replication support. Configuration option set:

replication_device = target_device_id:000196800508, remote_port_group:powervc_508_pg24, remote_pool:SRP_1, rdf_group_label:pvcdn198, allow_extend:False

Storage template 'VMAX3_573 Replication' does not exist. Creating.

Obtained storage pool name SRP_1 from the default storage template: VMAX3_573 base template

Adding extra specs to storage template: type-key "VMAX3_573 Replication" set capabilities:volume_backend_name=000196800573 drivers:display_name="VMAX3_573 Replication" drivers:storage_pool="SRP_1" replication_enabled=" True"

Restart of cinder services requested.
A number of things are happening here, but it should be relatively straightforward now. The
--storageHost option specifies the serial of the managed VMAX array. The
--target_device_id option specifies the serial of the target (backup) VMAX array. The
--rdf_group_label option specifies the SRDF group that I configured between the two arrays, and the
--remote_port_group option specifies the name of the port group on the target array that I defined in the prior section. The rest of the ouput communicates what the command is doing:
- It sets the replication_device configuration option for the storage provider. If you reference the VMAX driver documentation for the Ocata OpenStack release, this should match what is expected to be configured.
- It creates the storage template. There is an optional parameter on the command called
--storage_template where you can override the default name chosen with a name that you choose. A Cinder command is used to define this template. You may be prompted to enter the root user’s password in order to execute the command. Alternatively, you can set the OpenStack OS_USERNAME and OS_PASSWORD environment variables so that you won’t be prompted.
- It finds the SRP_1 storage pool name from the managed storage provider’s base storage template. Typically, this name is correct and the only supported option available for a VMAX3 array. If for some reason it needs to be a different storage pool name, the command will accept the
--remote_pool option to specify that.
- It adds the needed specifications to the storage template so that it is enabled for replication.
- It restarts the Cinder storage services on PowerVC.
OK. Let’s see if the settings took effect in Cinder. This step is completely optional, but it is an easy sanity check to make since I have a number of OpenStack environment variables defined for my session. I just run the
service-list query, specifying the
--withreplication option.
[caption id="attachment_1624" width="1289"]

Confirming replication status for the service[/caption]
Here we see that the Replication Status column shows enabled for the provider. Note that Active Backend ID is blank, which means the backend in the Host column is active. I logged in to PowerVC, hit Refresh on the Storage Templates configuration page, and I can see the new storage template show up as well.
[caption id="attachment_1617" width="725"]
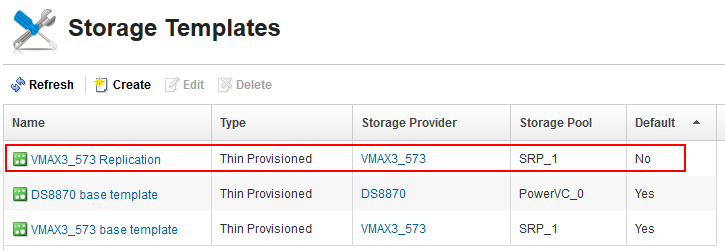
Auto-created storage template for replication[/caption]
This new storage template is not the default storage template for the provider unless I edit it to change that property. The details page for the template will not show any property that indicates replication, so that is why it is important to use something meaningful in the name of the template, like “Replication”. As I stated, since I did not provide the storage template option to the
powervc-config command, it chose the template name for me. VMAX3_573 happens to be the display name of the managed storage provider.
For the curious, here’s what
powervc-config prints out now:
[powervc ~]# powervc-config storage replication --storageHost 000196800573
Reporting the current replication configuration for VMAX provider VMAX3_573:

replication_device = target_device_id:000196800508, remote_port_group:powervc_508_pg24, remote_pool:SRP_1, rdf_group_label:pvcdn198, allow_extend:False

Storage templates with PowerVC replication description:
+--------------------------------------+-------------------------+------------------------+-----------+
| ID                                   | Name                    | Description            | Is_Public |
+--------------------------------------+-------------------------+------------------------+-----------+
| 2d2bf55b-6aee-45dc-a2ac-192ac0a1304d | VMAX3_573 Replication   | For volumes under SRDF | True      |
(5) Using replication in PowerVC
At this point, using replication in PowerVC is as easy as using that new storage template. I can deploy virtual machines or I can create and attach volumes, and my data on those volumes will automatically get replicated to the backup array in case disaster befalls my source array. It does not mean the virtual machines would continue to be up and running through the disaster - that would require extra configuration, setup, and policies. However, I think you will be able to see your way there if we explore a spcecific use case.
Note: When a storage provider is enabled for replication, you don't have to use a replication-enabled storage template. You could still use the base template (initial default) for example and volumes will be created. They just won't be replicated.
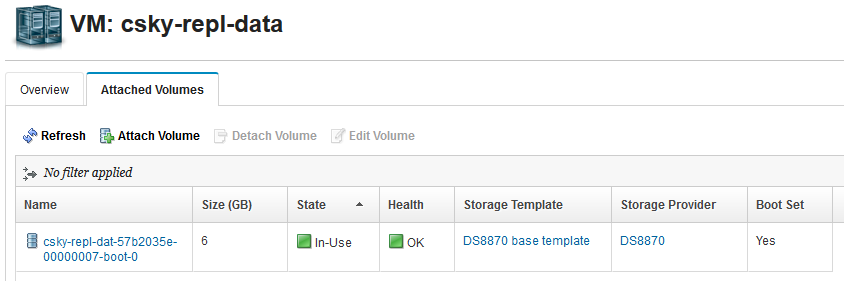
First, I deployed a VM called csky-repl-data with a single small boot volume living on my DS8000 storage array. This is not the replication-enabled array. My DS8000 shouldn’t go down, but if it does, at least I have not lost my data. Just my boot volumes.
[caption id="attachment_1621" width="844"]
VM with boot volume from a DS8K[/caption]
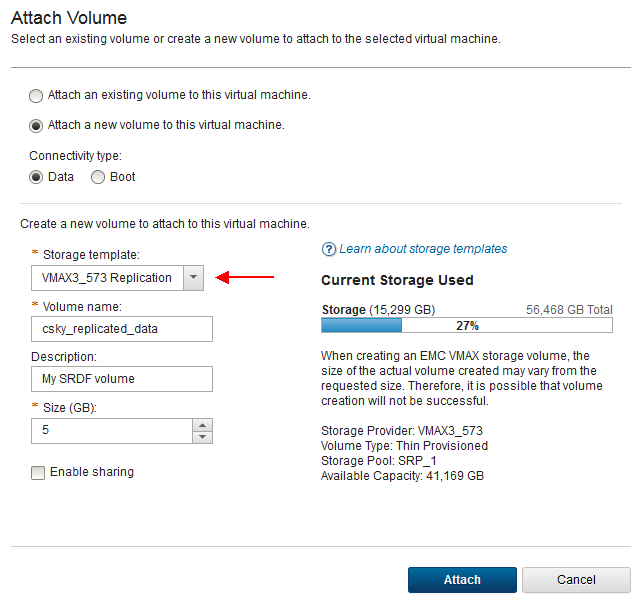
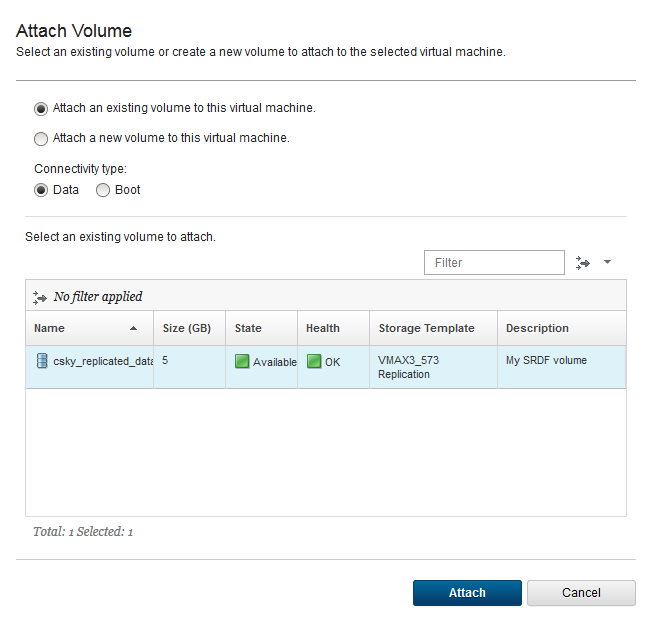
Next, I click Attach Volume and I fill in the properties to attach a new Data volume, specifying the Replication storage template:
[caption id="attachment_1609" width="640"]
Attach a new replicated data volume[/caption]
After clicking Attach and waiting for it to complete, I click into the volume details and scroll down to the bottom. The key to confirming that your volume is being replicated is checking the “Replication pair” property. The value is in the form <remote_array_serial>:<remote_deviceID>.
[caption id="attachment_1622" width="463"]
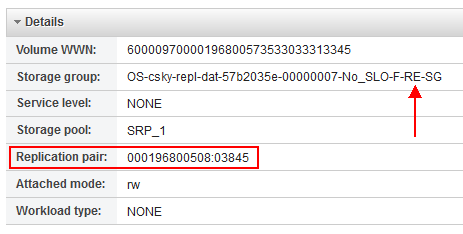
Viewing the replicated device pairing in PowerVC[/caption]
This makes it easy to look up the device in Unisphere or Solutions Enabler. Note that the storage group that the volume was put in is the NPIV attachment group for the VM and its naming convention indicates it is a replication storage group. As a tip, let me break down the whole name format:
<OS=OpenStack>-<Hypervisor partition name>-<Service Level Objective>-<F=Fibre Channel>-<RE=Replication>-<SG=Storage Group>
This would look different for a vSCSI attachment because the Hypervisor partition name would be replaced by the Hypervisor host name followed by the VIOS partition ID.
If I want my replicated volumes to have a service level and possibly a workload type, then I would need to edit the storage template and make those changes because the powervc-config storage replication command that created the template for me does not have the option to add those properties. Fortunately, it is easy to do in the GUI. However, setting a service level may come with extra limitations so make sure that you read through the driver documentation and the
Planning for VMAX Storage Knowledge Center article first.
Something else here is interesting to me - the “Volume WWN”. That is the “Page 83 NAA” identifier for those who care about such things. After the volume attach, I logged in to my RHEL 7 virtual machine, scanned for new devices and then looked for the one with that WWN in /dev/disk/by-id:
[root@csky-repl-data ~]# ls -l /dev/disk/by-id/wwn-0x60000970000196800573533033313345
lrwxrwxrwx 1 root root 9 Jun 13 14:15 /dev/disk/by-id/wwn-0x60000970000196800573533033313345 -> ../../sdb
There it is, and it symbolicly links to the /dev/sdb Linux device. Of course I can get the same information from ‘
parted -l’ if I know what I’m looking for:
Error: /dev/sdb: unrecognised disk label
Model: EMC SYMMETRIX (scsi)
Disk /dev/sdb: 5369MB
Sector size (logical/physical): 512B/512B
Partition Table: unknown
...
The above information indicates that the volume is completely blank. Next I partitioned the disk, gave it a label, formatted it for ext4, mounted it on /mnt/vmax-data and created a test file there. There are plenty of tutorials and blogs on the internet to help you do this if you haven’t before.
[root@csky-repl-data ~]# df -h | grep vmax
/dev/sdb1              4.8G   20M  4.6G   1% /mnt/vmax-data
[root@csky-repl-data ~]# cat /mnt/vmax-data/hello.test
Hello world.
(6) Failover the storage provider
It’s time to cover what happens when the primary VMAX3 storage array actually fails. First, let’s summarize how far we’ve come. In this example, we’ve taken the following actions:
- Created an SRDF group for synchronous replication between our two VMAX3 arrays.
- Created a remote port group on the 508 VMAX backup array containing a front-end FC port that is cabled to the switch fabric that our Power host is cabled to.
- Registered the 573 VMAX array and enabled it for replication using the powervc-config command.
- Deployed a VM with a boot volume coming from a different storage provider in our environment.
- Attached a new data volume coming from the VMAX 573 array, using the Replication-enabled storage template to create the volume.
- Discovered, formatted, mounted, and started using the new replicated disk from our VM.
Array FailureNext, let’s check the DeviceID (03845) we found for our replicated volume and see what storage group it is in on the 508 backup array. I am running the following from the Solutions Enabler server:
[smis ~]# symaccess -sid 508 list -type storage -dev 03845 -v

Symmetrix ID          : 000196800508

Storage Group Name    : OS-no_SLO-RE-SG
Device Count          : 51
Storage Group Count   : 0
Masking View Count    : 0
Last update time      : 01:13:14 PM on Tue Jun 13,2017
Group last update time: 01:13:14 PM on Tue Jun 13,2017
Masking View Names    : None
The storage group is OS-no_SLO-RE-SG, which is the default OpenStack storage group that is replicated and has no service level objective. Note that there are no masking view names associated with this storage group, so the volume is not mapped/attached to any host/VM at this point. Right now, the paired volume on the 573 array is the one in a masking view and is mapped to my VM.
To simulate an array failure, I thought I could just disable the Front-End port cabled to my fabric using Unispere or symcfg CLI. Neither of those were effective. The port went into PendOff status, but it would not go offline and symcfg would report it going back to online status. I presume this is because there are over 1000 volumes exposed through that port and there is a rule about mapped volumes or I/O traffic needing to quiesce, which is not going to happen my case. I considered disabling the port in the fabric switch that the VMAX is connected to as well. But for my setup, I think either of these cases would kill the management path for the 508 backup array, not just the I/O path for the 573 array. And that is because the SMI-S provider manages the 508 array through gatekeeper LUNs provided by the 573 array. They are tethered and management is exposed through the primary. So, it turns out that my particular environment configuration is not ideal to simulate disaster recovery.
No matter – for this article, let’s just assume that 573 has failed. It’s not a small, temporary failure that I can recover from relatively quickly. I want to get access to my data while 573 is down and it may be permanently down. Here’s how you tell Cinder to failover the storage provider managed by PowerVC:
[powervc ~]# cinder failover-host 000196800573
When the failover processing finishes, you will get a message notification pop-up in PowerVC:
[caption id="attachment_1614" width="939"]
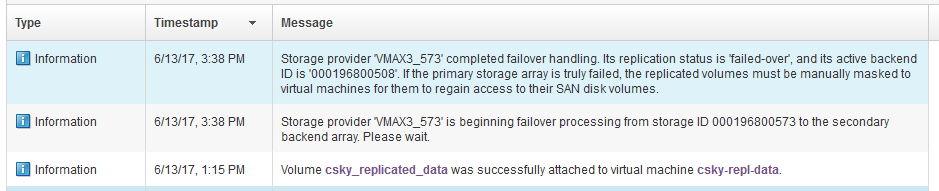
Storage provider fail-over messages[/caption]
I could also confirm this from the PowerVC server command line by running
cinder service-list --withreplication again. It shows the Replication Status is
failed-over and the Active Backend ID is 000196800508.
There is another step you should take after running the
cinder failover-host command, and that is restarting the volume driver service:
[powervc ~]# systemctl restart openstack-cinder-volume-000196800573
Normally, this would not be required. However, a problem was found too late in the release cycle where PowerVC was caching some driver information that does not get updated when the
cinder failover-host command is run. This can cause PowerVC to attempt volume management from the array that previously was the active backend array, but is currently not. And you could see a deploy failure. Restarting the volume driver corrects the problem and this will be addressed in an upcoming fix pack.
Non-replicated volumes
In PowerVC, after a storage provider has 'failed-over', any volume that was created with a non-replication-enabled storage template is going to be in Error status. The volume “csky_demo” in the screen shot below was created with the base template, so it is in Error state, even though the storage failure is assumed/simulated, and the 573 array is actually just fine:
[caption id="attachment_1623" align="aligncenter" width="1093"]
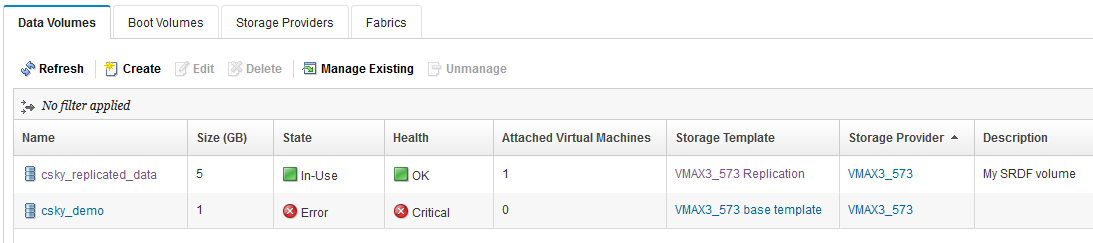
Non-replicated volumes go to Error state[/caption]
While in failed-over mode
[root@jupiter-vm1048 cinder]# cinder service-list --withreplication | grep 573
| cinder-volume    | 000196800573    | nova | disabled | up    | 2017-06-21T18:49:56.000000 | failed-over        | 000196800508      | False  | failed-over     |
You will be quite restricted while in failed-over mode. The reason is that all the storage templates for the provider are defined for the backend name and pool combination for the primary array. But in failover mode, the pool capabilities being advertised by the driver are for the array serial of the
backup array. So if you try to create a new volume, deploy, or capture a VM while in failed-over mode, the operation is going to fail if the operation would normally have used the storage provider that is failed-over. The explanation in the failure message will show "The volume request cannot be scheduled..." The rest of the message may be cryptic.
There's good reason not to allow volume creation in this mode. Since volumes would only be created on the backup array, you would lose access to them once restoring the cinder driver to normal operations on the primary array.
If you need to create new volumes on the backup array for whatever reason, you will need to register a separate storage provider for that array and use that storage provider as you normally would.
Regaining access to my data
Now I navigate to my VM again and detach the data volume because I want to attach it again while the storage provider is in this ‘failed-over’ mode.
[caption id="attachment_1611" width="810"]

Detach replicated volume[/caption]
Next, I do the attach:
[caption id="attachment_1610" width="649"]
Attach replicated volume while in failed-over mode[/caption]
Because the storage provider is in “failed-over” state, the attachment this time happens using resources on the 508 array instead the 573 array. Something I’ll note here is that since array failure is just ‘assumed’ in my environment, this detach—attach process could fail in practice. Let’s say you got a failure trying to detach the volume and it was left in the In-Use state. What could you do? In my case, I could (1) edit the volume and make it sharable, (2) deploy another VM, or and (3) attach the volume to the new VM and access my data from there.
Either way, Let’s check the same command we ran earlier on the Solutions Enabler server to see that the DeviceID is now in a storage group:
[root@logan ~]# symaccess -sid 508 list -type storage -dev 03845 -v

Symmetrix ID          : 000196800508

Storage Group Name    : OS-csky-repl-dat-57b2035e-00000007-No_SLO-F-RE-SG
Device Count          : 1
Storage Group Count   : 0
Masking View Count    : 1
Last update time      : 04:44:40 PM on Tue Jun 13,2017
Group last update time: 04:44:40 PM on Tue Jun 13,2017
Masking View Names    : OS-csky-repl-dat-57b2035e-00000007-No_SLO-F-RE-MV
And that storage group is also in a Masking view, so it is now attached from the backup array where it was not before. So we have manually mapped it using the backup array. We did not register that array in PowerVC in order to do that. In the terminal window for the VM, I run
lsblk again to see the new device and mount it.
[root@csky-repl-data ~]# lsblk --fs | grep replicated
└─sdb1        ext4        replicated-data 8724adb9-b707-46cc-b197-40deafdd98af   /mnt/vmax-data
└─sdc1        ext4        replicated-data 8724adb9-b707-46cc-b197-40deafdd98af
[root@csky-repl-data ~]# mkdir /mnt/vmax508-data
[root@csky-repl-data ~]# mount -o defaults /dev/sdc1 /mnt/vmax508-data
[root@csky-repl-data ~]# cat /mnt/vmax508-data/hello.test
Hello world.
Note that sdb1 is still there only because my array failure is “assumed”. In case of a real failure it would not be present or it would present I/O failures trying to read/write with it. Here we can see that the sdb1 and sdc1 devices have the same UUID, and they have the same WWN if I look in /dev/disk/by-id.
[root@csky-repl-data ~]# ls -l /dev/disk/by-id/ | grep 3435
lrwxrwxrwx 1 root root  9 Jun 13 17:45 scsi-360000970000196800508533033383435 -> ../../sdc
lrwxrwxrwx 1 root root 10 Jun 13 17:45 scsi-360000970000196800508533033383435-part1 -> ../../sdc1
lrwxrwxrwx 1 root root  9 Jun 13 17:45 wwn-0x60000970000196800508533033383435 -> ../../sdc
lrwxrwxrwx 1 root root 10 Jun 13 17:45 wwn-0x60000970000196800508533033383435-part1 -> ../../sdc1
So if the sdb device was really down or gone, this could be pretty seamless for the same VM to continue to access its data using the device from the backup array because that device has the same WWN and UUID.
Fail-back
Cinder also provides a facility to failback the storage provider so that it is interacting with the primary array again, instead of the backup array. So this is the case where the primary array has been recovered, the storage volumes are accessible, and the front-end ports are active again on the FC fabric(s). Use the same Cinder subcommand we used before to perform the failover. Only this time, pass the
--backend_id option with a value of “default”:
[powervc cinder]# cinder failover-host 000196800573 --backend_id default

[powervc cinder]# cinder service-list --withreplication | grep -v jupiter

+------------------+----------------+------+----------+-------+----------------------------+--------------------+----
---------------+--------+-----------------+

| Binary           | Host           | Zone | Status   | State | Updated_at                 | Replication Status |
 Active Backend ID | Frozen | Disabled Reason |

+------------------+----------------+------+----------+-------+----------------------------+--------------------+----
---------------+--------+-----------------+

| cinder-volume    | 000196800573   | nova | disabled | up    | 2017-06-14T17:22:08.000000 | failing-over       |
 000196800508      | False  | failed-over     |

| cinder-volume    | HST_DS8K       | nova | enabled  | up    | 2017-06-14T17:22:07.000000 | disabled           | -
                | False  | -               |

+------------------+----------------+------+----------+-------+----------------------------+--------------------+----
---------------+--------+-----------------+

[powervc cinder]# cinder service-list --withreplication | grep -v jupiter

+------------------+----------------+------+---------+-------+----------------------------+--------------------+-----
--------------+--------+-----------------+

| Binary           | Host           | Zone | Status  | State | Updated_at                 | Replication Status |
Active Backend ID | Frozen | Disabled Reason |

+------------------+----------------+------+---------+-------+----------------------------+--------------------+-----
--------------+--------+-----------------+

| cinder-volume    | 000196800573   | nova | enabled | up    | 2017-06-14T17:25:39.000000 | enabled            |
                  | False  |                 |

| cinder-volume    | HST_DS8K       | nova | enabled | up    | 2017-06-14T17:25:38.000000 | disabled           | -
                | False  | -               |

+------------------+----------------+------+---------+-------+----------------------------+--------------------+-----
--------------+--------+-----------------+
Here I piped the output into grep so that I filtered out the lines that had to do with other Cinder services running on my management server. Note that the storage provider is “disabled” while it is in transition and don’t try to do anything with it during that time. Transitioning to a failed-over state or back to an “enabled” state can take some minutes, depending on how many volumes you have managed. Eventually, PowerVC will give you a message that failback handling has completed.
[caption id="attachment_1612" width="888"]

Failback handling[/caption]
As before when I used the Cinder failover-host command, I need to restart the volume driver if on PowerVC 1.3.3.0 to sync PowerVC’s cached data up with the new active backend (note that this step should not be necessary after the release of an upcoming fix pack):
[powervc ~]# systemctl restart openstack-cinder-volume-000196800573
If I now go to the Volumes area of PowerVC and click Refresh, I see the volumes that were in Error state go back to their correct state with a Health value of OK. Ideally, this is the configuration you want to get back to.
But let’s say that the primary array is not recoverable and you want to use the backup array as a regular storage provider. You have a couple of choices. For one, you can just manage the backup array as a new provider in PowerVC and start using it. You’d want to be careful not to manage existing volumes that are already being managed by the storage provider that is in the failed-over state. Alternatively, for the use case that has been discussed in this article, I would say your best bet is to detach the replicated volumes from your VMs, unamage the storage provider, manage the backup array as a new storage provider, and then manage the volumes back in and re-attach them to your VMs.
Diving Deeper
We have covered a lot, but there are actually a number of aspects that we have not touched on yet. In this section, I will briefly discuss a few.
Onboarding Replicated Volumes
The first item concerns onboarded volumes -a.k.a existing volumes that are managed into PowerVC. This is a common use case for PowerVC. The problem with managing existing volumes that are currently part of an SRDF group, is that these volumes do not automatically get associated with a storage template at management time. And if they are not associated with a replication-enabled storage template, then the VMAX driver does not recognize them as being under replication control and will not treat them as such. So what can you do about this situation?
Fortunately, PowerVC provides a
powervc-config subcommand that will allow an administrator to specify a specific storage template to associate with volumes brought under management from a specific storage provider. Here is an example using a Cinder command to list out the volume types (a.k.a. storage templates), and then using the powervc-config storage onboard-voltype command to configure PowerVC to associate the storage template with managed volumes when they are onboarded:
[powervc ~]# cinder type-list
+--------------------------------------+-------------------------+------------------------+-----------+
| ID                                   | Name                    | Description            | Is_Public |
+--------------------------------------+-------------------------+------------------------+-----------+
| 2d2bf55b-6aee-45dc-a2ac-192ac0a1304d | VMAX3_573 Replication   | For volumes under SRDF | True      |
| db75b24e-9059-4e46-a0ad-3ebdd3882c69 | VMAX3_573 base template | -                      | True      |
| f25fd1e0-fe0b-4129-9385-5584370f5874 | DS8870 base template    | -                      | True      |
+--------------------------------------+-------------------------+------------------------+-----------+
[powervc ~]# powervc-config storage onboard-voltype --storageHost 000196800573 --volumeType 2d2bf55b-6aee-45dc-a2ac-192ac0a1304d --restart
The onboard_volume_type configuration option has been set.
Restart of cinder services requested.
Now when I instruct PowerVC to manage volumes or virutal machines from the user interface, the volumes that come under management from the storage provider (--storageHost option) will have the storage template set with the specified ID. Note that this behavior is new in PowerVC 1.3.3. In PowerVC 1.3.2, the powervc-config storage onboard-voltype subcommand will only allow a “dynamic” association of volumes with a storage template so that they can be put in a consistency group – it is not a hard association, so you would not see the storage template name show up in the volume properties prior to PowerVC 1.3.3.
In the example here, since I’m specifying the ID for the replication-enabled storage template, I can then use PowerVC to delete the volume later and it will delete correctly. Otherwise, if it does not have the replication-enabled template set and it is a replicated volume, when I go to delete it, the target replicated volume on the backup array won’t be deleted with it. In fact, the Cinder driver may return a failure for that case. On the other hand, use caution with setting the onboard_volume_type configuration option. If you specifiy a replication-enabled storage template and then manage a volume that is not replicated, you will see failures when you try to use that volume later because the Cinder driver will be confused about it.
Extending Replicated Volumes
The second diving-deeper topic to cover is that of extending the size of a replicated volume. You can’t do that unless you specified the --allow_extend option on the powervc-config storgage replication command. This is not the default case when enabling a storage provider for replication because the replication relationship needs to be temporarily broken while both the source and target volumes are being extended independently.
Disabling Replication Support
Next, we consider the case where you have previously enabled a VMAX driver for replication, but now want to disable it. Disabling the replication support means that the driver will no longer fully support volumes that were created with a replication-enabled storage template. You may be able to detach such a volume if it was already attached, but other operations like delete and resize will likely fail. Also, you will not be able to create new volumes using a replication-enabled template. If you try to do this, the operation will fail with a message like the following:
An error occurred while performing a storage operation for the volume csky_repl-del.
Explanation:
The volume request cannot be scheduled. Ensure the requested size of 1 is free on the storage and that a matching storage provider is reporting capabilities that support the request. Storage template extra specs: {u'drivers:storage_po [messsage_truncated]
The error message is truncated in the GUI, but it is basically saying that the creation request could not be scheduled to the VMAX driver because the template requires the 'replication' capability and the driver is not enabled for replication.
Following is how you use the PowerVC CLI to disable replication support in your VMAX driver. We then run the command again to show that it is disabled:
[root@jupiter-vm1048 ~]# powervc-config storage replication --storageHost 000196800573 --disable --restart
Disabled previous replication configuration: target_device_id:000196800508, remote_port_group:powervc_508_pg24, remote_pool:SRP_1, rdf_group_label:pvcdn198, allow_extend:False
NOTE: Storage templates that were enabled for replication are not disabled. You may delete these templates from the PowerVC management interface if desired.
Restart of cinder services requested.
[root@jupiter-vm1048 ~]#
[root@jupiter-vm1048 ~]# powervc-config storage replication --storageHost 000196800573
Reporting the current replication configuration for VMAX provider VMAX3_573:

replication_device = None

Storage templates with PowerVC replication description:
+--------------------------------------+-------------------------+------------------------+-----------+
| ID                                   | Name                    | Description            | Is_Public |
+--------------------------------------+-------------------------+------------------------+-----------+
| 2d2bf55b-6aee-45dc-a2ac-192ac0a1304d | VMAX3_573 Replication   | For volumes under SRDF | True      |
Replace the VMAX array serial in the
--storageHost option with your own serial. This demonstrates that although the driver configuration has resplication disabled, the storage template that was originally created and enabled for replication has not been disabled or deleted. This is important because that template may have been used to create volumes, and they would lose their template setting if it was deleted. This way, if replication support is enabled later, the template will again become applicable.
The Future of Replication
The third item to mention is that the “Cheesecake” version of replication available in OpenStack Ocata is administrator-centric with the adminstrator creating one or more volume types (storage templates) to use with replication and the entire storage provider is failed-over for a D.R. use case. In a future release of OpenStack, there is a plan to adopt “Tiramisu” replication, which will provide more granularity and use generic volume groups to allow tenants to failover specific groups of volumes together, rather than the whole provider. You can read more about Tiramisu replication here:
https://specs.openstack.org/openstack/cinder-specs/specs/pike/replication-group.html.
Please note, however: At the time of this writing, PowerVC makes no claims about when or if it would be able to integrate with such support, and Dell/EMC has not published when they would support Tiramisu replication either.
Wrapping Up
Let’s review. In this post, we looked at the new replication support that has been put in the VMAX cinder driver for PowerVC 1.3.3. We examined the limitations for the intial offering and discussed how PowerVC has been able integrate with the support using the
powervc-config storage replication subcommand. Then we looked at a specific example and broke out each of the high-level steps into commands and operations peformed across UniSphere, SMI-S, PowerVC, and a deployed virtual machine. We restored the storage provider to its original state with the source VMAX3 array, and finally, we briefly covered three diving deeper topics that the reader is invited to investigate more on his or her own.
It’s been quite a journey, but I hope you have found this useful. If you have any questions or comments, feel free to post them below.
We’d love to hear from you! And don’t forget to follow us on Facebook, LinkedIn, and Twitter.
#vmax#Storage#Storage#powervc133#powervc#replication#PowerVC