Using key-based authentication for SSH connections is both easier and more secure than password-based authentication. In fact, some operating systems (e.g. Ubuntu) default to prohibiting password-based SSH authentication for the root account. PowerVC 1.3.2 added a new capability to inject an SSH public key into the virtual machine when it is deployed. The corresponding private key can then be used to authenticate SSH connections to the virtual machine without having to enter a password. In this blog, we will show you how to create and use key pairs with PowerVC 1.3.2.
It is important to note that PowerVC does not need to know the private key which, along with the public key, comprises the key pair. It is possible to use OpenStack compute APIs to generate a key pair, including the private key, and then download the private key, but this is not necessary or recommended. Create the key pair offline and then upload only the public key to PowerVC, via either the web console or the OpenStack compute API. If PowerVC doesn't know the private key, it is not a possible attack vector to gain virtual machine access.
Working with Key Pairs
Step 1 – Create a key pair
There are many resources on the web that will explain how to generate SSH key pairs. The most common method is to use the ssh-keygen command, as shown in the following example:
# ssh-keygen -t rsa -b 4096
Generating public/private rsa key pair.
Enter file in which to save the key (/root/.ssh/id_rsa):
Enter passphrase (empty for no passphrase):
Enter same passphrase again:
Your identification has been saved in /root/.ssh/id_rsa.
Your public key has been saved in /root/.ssh/id_rsa.pub.
The key fingerprint is:
86:93:7f:d8:c0:a7:aa:43:91:9a:7b:5c:ee:40:47:c5 root@example.com
The key's randomart image is:
+--[ RSA 4096]----+
|       ..        |
|       .E        |
|     ..          |
|    o. +         |
|   o..= S .      |
|  o....+ *       |
|   +.o  + o      |
|  . +... .       |
|   ..+o          |
+-----------------+
Step 2 - Import the public key into PowerVC
To import the key pair into PowerVC, perform the following steps:
- From the user account menu in the upper right corner of the user interface, select Key Pairs.
- Click Import Key Pair.
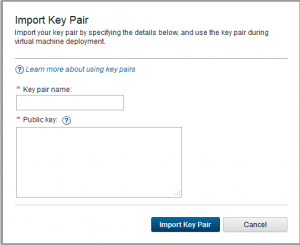
- Enter a name for the key pair and paste in the public key that was generated earlier, then click Import Key Pair.
The new key pair will now appear in the table.

Note that a user can have multiple key pairs setup in PowerVC, adding and removing them at will. Different keys could be used when deploying different virtual machines, or you may want to periodically swap out an old key for a new one.
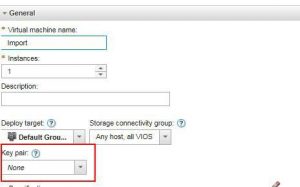
Step 3 - Deploy a virtual machine with the key pair
When deploying a virtual machine in PowerVC, you will see a dropdown box where you can specify a key pair. Specify the key that you just imported in the previous step to add that key to the deployment.
Step 4 - Sign in to the virtual machine with your private key
After deploying a virtual machine with the key pair selected, you can SSH to that virtual machine with the private key instead of with a password. For example:
ssh -i path_to_my_private_key_file root@192.0.2.47Conclusion
As you can see, using SSH key pairs is quite easy. As always, you can find more information on this and other PowerVC features in the
IBM Knowledge Center. Give this cool new feature of PowerVC a try and let us know what you think! Also be on the lookout for more blogs about other new PowerVC enhancements, and don’t forget to follow us on
LinkedIn,
Facebook, and
Twitter!
Co-authored by - Sri Ram Pisupati and Matthew Edmonds#Compute#privatecloud#PowerVC#SSH#Framework#security