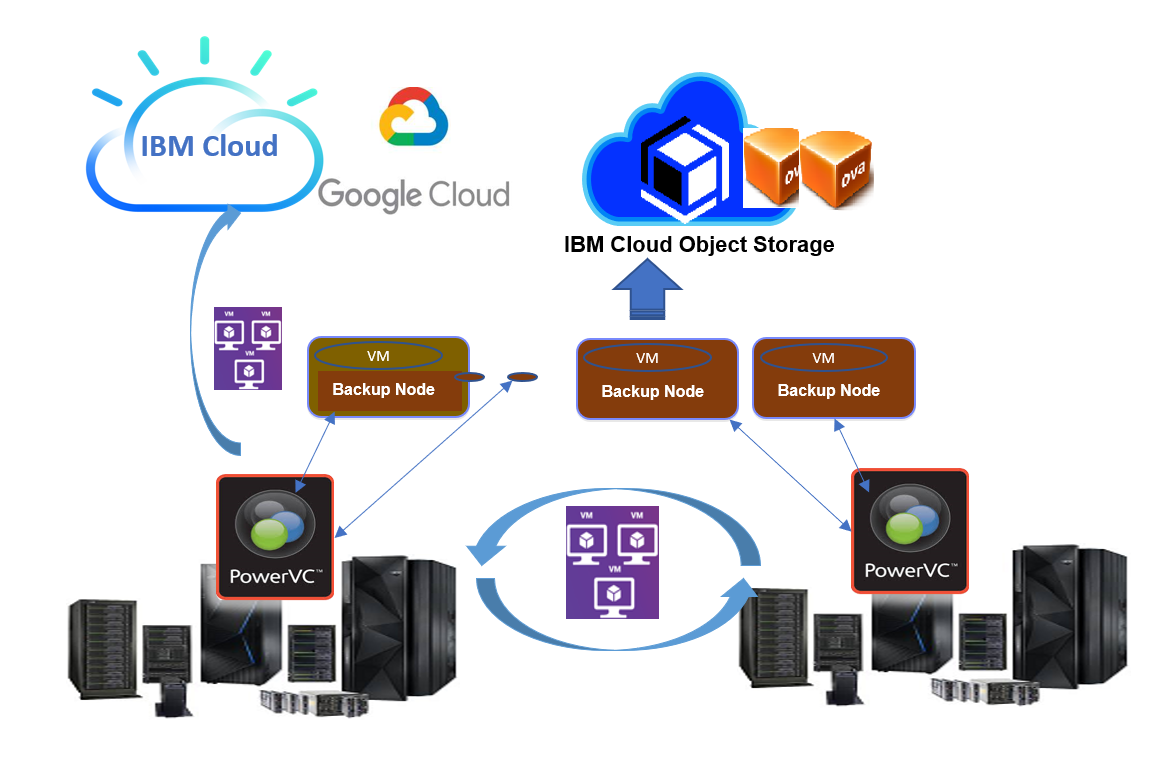
Prior to PowerVC 2.0.2, image export/import functionality required PowerVC management controller to have Fiber Channel (FC) connectivity. Starting PowerVC 2.0.2, cinder-backup service is enhanced to run as a remote standalone service on a node called as backup node. With a remote backup node into picture, dependency on FC connectivity on a PowerVC management node is removed.
With the latest version of PowerVC, IBM Cloud Object Storage (COS) integration is also provided allowing you to upload and download images packaged as an OVA to and from an IBM Cloud Object Storage (COS) bucket via the Backup Node.
In this blog, we will talk about how you can work with backup nodes in PowerVC 2.0.2. We will look at the procedure on how to register a backup node, deregister a backup node, edit backup node details, fetch backup node details, discover OVAs, and some troubleshooting tips.
What is a backup node?
A backup node is a virtual machine which has Fiber Channel connectivity with the SAN storage. During image export, the storage volume is attached to the backup node and copied to the mounted filesystem using the OpenStack cinder backup POSIX driver. The volume backup files are then compressed to a tar file and packaged into an OVA file.
You can also register multiple backup nodes in a single PowerVC instance, which provides scalability and concurrent backups.
Backup node can either be a remote backup node (an NPIV deployed VM on PowerVC) or a local backup node (PowerVC management node).
Pre-requisites for backup nodes
Please refer to the PowerVC knowledge center to know about the various hardware and software requirements for a backup node.
For a remote backup node
-
- Deploy an NPIV RHEL/SLES virtual machine with public IP address. The VM deployed above is on PowerVC, so it will have FC connectivity with the storage.
- Perform RHN registration on the deployed VM, if it is a RHEL VM. This VM can now be used for backup node registration.
For a local backup node
-
- The deployed PowerVC management node should have FC connectivity to be used as a local backup node.
Backup node actions
Register a backup node
Perform these steps to register a backup node by using PowerVC GUI.
- In the 'Storage' section, select Backup nodes.
- On the 'Backup nodes' tab, click Add node. The 'Add backup node' dialog appears.
- Specify Backup node details such as Name, IP (virtual machine’s IP which follows backup node registration prerequisites), User ID, Password, and Default COS (optional parameter – can be set later also).
You can set ‘Default COS’ parameter as the COS bucket name only if you have already registered IBM Cloud Object Storage (COS) in PowerVC. After providing necessary details, click Add.
It takes approximately 15 minutes for the health of backup node to come to ‘OK’ state in PowerVC GUI (It can take longer depending on network connectivity). When backup node is registered, cinder conf file - /etc/cinder/cinder.conf and cinder backup log file - /var/log/cinder/backup.log are generated on backup node.
Also, a proxy conf file: /etc/cinder/backup-<host>.conf is generated on the management node which can be used for powervc-services remote and powervc-config storage backup-service CLIs. You can see the backup node registered like below if registration is successful.
Once backup node is registered successfully in PowerVC, you can see cinder-backup service will get created for your backup node whose state should show as ‘up’ as an output of cinder service-list command on the management node.
Once the backup node is registered, we can use it to export/import OVA.
Edit a backup node
You can choose to edit backup node credentials if required. Perform the following steps to edit a backup node.
- In the 'Storage' section, select Backup nodes.
- In the 'Backup nodes' tab, select a backup node. Click Edit Connection.
In the dialog that appears, you can edit backup node connection credentials.
You can also edit backup node name and cos default on the details page of the backup node.
- Click Save after making changes.
Deregister a backup node
Let’s see how we can deregister backup node from PowerVC GUI.
- In the 'Storage' section, select Backup nodes.
- On the 'Backup node' tab, select a backup node that must be deregistered and click Remove.
- In the dialog that appears, select an option for removing the backup node. You can select either one, both, or none of the options.
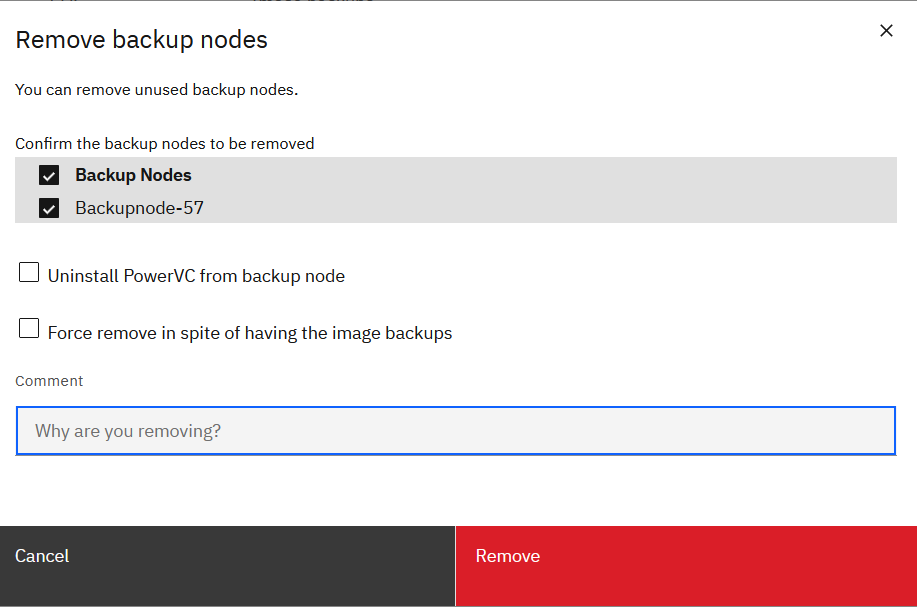
If Uninstall PowerVC from backup node option is selected, PowerVC packages will be uninstalled from the backup node. If there are existing image backups on the backup node, the backup node deregistration is not allowed. If you still want to remove the backup node, you can choose the Force remove despite having the image backups option and deregister the backup node.
The image backups will still not be removed from the backup node’s OVA location even if force option is chosen. When the same backup node is re-registered, OVAs if present in the OVA location is auto discovered and added to PowerVC as image backups.
Discover OVAs
Perform the following steps to discover OVAs
- In the 'Storage' section, select Backup nodes.
- Click on a specific backup node name on the ‘Backup nodes’ tab. Go to ‘Image list’ tab and click Discover.
The OVAs which are manually placed at the OVA location on the registered backup node are discovered by PowerVC. The OVAs are listed as image backups which can be imported to PowerVC.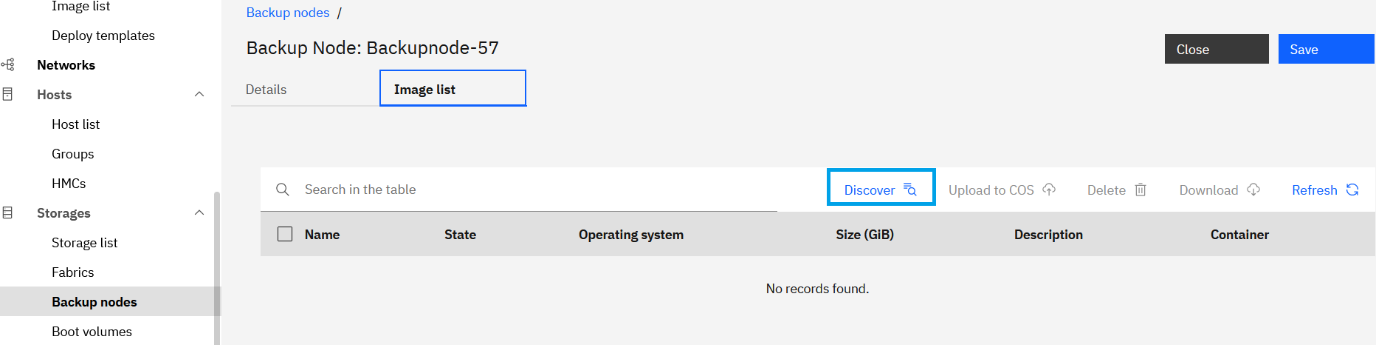
Get backup node details
To fetch the backup node details, perform these steps.
- In the 'Storage' section, select Backup nodes.
- In the 'Backup nodes' tab, click a backup node name. You will find backup node details in the 'Details’ tab.
Troubleshooting tips
- When registering a backup node, install issues can be encountered. To check the same, do an ssh to the backup node VM and check the install logs at path: /opt/ibm/powervc/log/powervc_install_<timestamp>.log.
- Registration issues can be checked under /var/log/cinder/api.log on the PowerVC Management node. If your powervc is installed as multinode cluster with 3 node system, you need to check on all 3 nodes to determine on which node is the API triggered for backup node registration.
- When de-registering the backup node, you may get uninstall issues. To check the same, do an ssh to the backup node VM, and then check the uninstall logs at /var/log/powervc-cinder-backup-node-uninstall.log.
- De-registration issues can be checked under /var/log/cinder/api.log on the PowerVC Management node. If your powervc is installed as multinode cluster with 3 node system , you need to check on all 3 nodes to determine on which node is the API triggered for backup node de-registration.
You can find more information on integration of cloud object storage and export/import of images in the upcoming blogs. Hope this information was helpful. Reach out to us for any queries :)
Knowledge center link: PowerVC
Don't forget to follow us on LinkedIn, Twitter, YouTube, and Facebook.
Blog Authors:
Ankit Arora
Ramyasree Sankepally
#PowerVC