This article helps to understand a use case of Microgateway integration with Service Registry and API Portal. It also describe the steps to configure the products to invoke Microgateway APIs from API Portal and Manage Microgateways from API Gateway.
Supported Version: 10.4 onwards
About the Author
Shivaraj Hegde
Email:shivaraj.hegde@softwareag.com
SIQA
Use case description:
An API available on Backend server is protected on API Gateway with multiple policies (which are also supported on Microgateway). This API is then provisioned on Microgateway by using custom configuration file which consist of API Gateway details, Service Registry details on which API to be made available and all other Microgateway configurations. Once the API is provisioned on Microgateway, same API will be pushed to Service Registry which is mentioned on configuration file. Now the API can be accessed / invoked using the Microgateway endpoint from external clients. For accessing the API using Microgateway endpoint on API Portal, respective service registry and Portal to be configured on API Gateway and then the Microgateway endpoints of API should be published to API Portal.
Configuration steps:
- Configure Service Registry on API Gateway:
API Gateway currently supports the following service registries.
- Eureka
Eureka is a REST-based service for locating services for the purpose of load balancing and failover of middle-tier servers. It has been primarily designed for applications in the AWS cloud.
- Service Consul
Service Consul is a tool for discovering and configuring services in IT infrastructure.
To configure/update service registry details on API Gateway follow the below instructions.
- Switch to Administration screen
- Select the available Service registry alias and update the details.
- Configure API Portal on API Gateway:
User has to configure API Portal as a destination to establish communication channel between API Gateway and API Portal to exchange data.
To configure API Portal details on API Gateway follow the below instructions.
- Login to API Gateway
- Switch to Administration screen
- Click Destinations
- Click API Portal Configuration
- Publish the Portal details
- Microgateway Custom Configurations:
User can establish a Microgateway instance with a customized configuration setting environment. On start the Microgateway server picks up the specified customized settings.
A sample sequence for instance-based provisioning with custom settings looks as follows.
- Create and Configure APIs on API Gateway:
Create the API on API Gateway and apply the required policies to API. Make sure that applied policies are supported on Microgateway.
Below API Gateway policies are supported on Microgateway:
- Transport
- Identify and Access
- Identify and Authorize Application
- Request Processing
- Request Transformation
- Data Masking
- Routing
- Straight Through Routing
- Content-based Routing
- Context-based Routing
- Outbound Authentication – Transport
- Traffic Monitoring
- Log Invocation
- Throttling Traffic Optimization
- Response Processing
- Response Transformation
- Data Masking
- CORS
- Error Handling
- Conditional Error Processing
- Data Masking
- Instance-based Provisioning of Microgateway with Custom Settings:
Execute below command after adding highlighted text on above mentioned configuration file.
microgateway.bat start -c custom-settings.yml
Once the Microgateway is started, validate the API data by hitting the below URL:
http://<hostname>:<microgateway_port>/rest/microgateway/assets
- Validate Microgateway endpoint on API Gateway:
Once the Microgateway is provisioned with APIs available on API Gateway, user will be able to see the Microgateway endpoint on API details page of API Gateway. Microgateway endpoint will be present only when API Gateway and Microgateway is pointing same Service Registry.
- Publish Microgateway endpoint to Portal:
The process of publishing an API to API Portal is initiated from API Gateway and is carried out on the API Portal server.
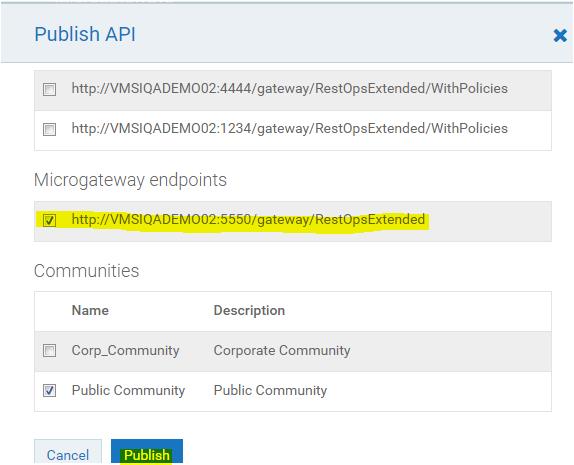
To publish the Microgateway endpoint to API Portal, follow the below steps:
- Login to API Gateway
- Click on APIs
- Click publish icon in front of API which is provisioned on Microgateway
- Select the Microgateway endpoint
- Click Publish button

- Invoke API with Microgateway endpoint from API Portal:
APIs published from API Gateway to API Portal can be invoked and validated by providing respective inputs and authorization if applied any.
To invoke the API from API Portal follow the below instructions:
- Login to API Portal
- Click API Gallery
- Click ‘View details’ button under published API Name
- Click Try API
- Validate Microgateway endpoint
- Provide all the details and Click SEND button.
- Manage running Microgateway from API Gateway:
API Gateway enables you to monitor the Microgateways that are connected to it. You can view the active APIs, policies applied those APIs and detailed analytics for each Microgateway that is connected to the API Gateway.
Following details are available on Microgateway management page:
- The number of Microgateways that are part of the group(Pool)
- The number of APIs that are available in that group(Pool)Note: Pool name will be mentioned in the custom configuration file which is provided while starting Microgateway. If pool name is not provided, Microgateway will be part of Default pool.
- Port details on each running Microgateway instance
- APIs part of each Microgateway
- Policies applied for the APIs in each Microgateway
- Analytics data for the Microgateway APIs
#Integration#API-Gateway#webMethods#Integration-Server-and-ESB#wiki#groci#Microgateway#API-Portal