The purpose of this post is to describe the steps of a lightweight Autoscaling DataPower Pods scenario, running in a laptop for example, the instructions are not Production ready recommendations and are solely for demo and POT purposes.
The Kubernetes implementation used was
MicroK8s.
Hardware used
Apple Mac Mini (Late 2012)
Processor: 2.6Ghz Quad-Core Intel Core i7
Memory: 16GB RAM

As a first step, let’s install MicroK8s on your machine by running the following commands:
Because we are doing this on a Mac, first thing we need is to install Homebrew
/bin/bash -c "$(curl -fsSL https://raw.githubusercontent.com/Homebrew/install/master/install.sh)"
Install MicroK8s
Now let's install MicroK8s:
brew install ubuntu/microk8s/microk8s
microk8s install
microk8s status --wait-ready
Troubleshooting
There are scenarios where the Microk8s installation command fails, this is because for some reason, in some cases macOS’s built-in DNS server is broken.
If that happens, we need some additional steps to finish MicroK8s installation. First let’s configure DNS inside the VM instance to use an external working DNS server.
Access the VM:
multipass shell microk8s-vm
Then let’s append the DNS server to resolv.conf, we will use 1.1.1.1 which is a free DNS service provided by CloudFlare. From inside the VM:
sudo vi /etc/resolv.conf
Append the following line:
nameserver 1.1.1.1
ATTENTION - resolv.conf file will be rewritten at logon time. You need to do this workaround every time you logon or keep the session open, an alternative is to use a custom cloud-init to set /etc/resolv.conf for you on first boot
Next step, is to install MicroK8s directly inside the VM:
sudo snap install microk8s --classic --channel=latest/stable
sudo iptables -P FORWARD ACCEPT

sudo usermod -a -G microk8s $USER
sudo chown -f -R $USER ~/.kube
Now on the host machine from a new terminal window, check MicroK8s status:
microk8s status --wait-ready
Enable MicroK8s add-ons
MicroK8s is a lightweight Kubernetes implementation, and only install the bare minimum components, to have the additional capabilities installed, we need to enable the add-ons. Run the following commands to enable add-ons:
microk8s enable dashboard
microk8s enable dns
microk8s enable ha-cluster
microk8s enable helm3
microk8s enable ingress
microk8s enable metrics-server
microk8s enable registry
microk8s enable storage
Since we are running this on a Mac, MicroK8s requires Multipass, a VM system for running
Ubuntu and other packages required by MicroK8s. The default VM created on the installation is not enough and we need to change its memory and CPU. Here we used 4 CPUs and 12GB of RAM
# stop multipassd
sudo launchctl unload /Library/LaunchDaemons/com.canonical.multipassd.plist
# edit the values
sudo vi /var/root/Library/Application\ Support/multipassd/multipassd-vm-instances.json
{
"primary": {
"deleted": false,
"disk_space": "5368709120",
"mac_addr": "52:54:00:5c:f4:14",
"mem_size": "12884901888",
"metadata": {
},
"mounts": [
],
"num_cores": 4,
"ssh_username": "ubuntu",
"state": 0
}
}
# start multipassd again
sudo launchctl load /Library/LaunchDaemons/com.canonical.multipassd.plist
Because we are using a lightweight Kubernetes implementation, we will use Helm to install the DataPower operator that will be used later.
brew install helm
Here are the steps to install
DataPower operator:
First you download
1.3.1 release.
Unpack it
cd charts/stable/datapower-operator
helm install datapower-operator .
Create DataPowerService operand
For testing purpose, we will be using an XML Firewall that is simply a passthrough to a public API, on this case hosted on mockable.io, the XML FW is configured on the xmlfirewall.cfg file.
xmlfirewall.cfg
%if% available "xmlfirewall"
xmlfirewall "XMLFirewall"
local-address "0.0.0.0" "2048"
summary "an example XML Firewall Service"
priority normal
default-param-namespace "http://www.datapower.com/param/config"
query-param-namespace "http://www.datapower.com/param/query"
no force-policy-exec
monitor-processing-policy terminate-at-first-throttle
debugger-type internal
debug-history 25
remote-address "demo8484097.mockable.io" "80"
xml-manager default
stylesheet-policy default
max-message-size 0
request-type json
response-type unprocessed
request-attachments strip
response-attachments strip
root-part-not-first-action process-in-order
front-attachment-format dynamic
back-attachment-format dynamic
mime-headers
rewrite-errors
delay-errors
delay-errors-duration 1000
soap-schema-url "store:///schemas/soap-envelope.xsd"
wsdl-response-policy off
no firewall-parser-limits
bytes-scanned 4194304
element-depth 512
attribute-count 128
max-node-size 33554432
forbid-external-references
max-prefixes 1024
max-namespaces 1024
max-local-names 60000
attachment-byte-count 2000000000
attachment-package-byte-count 0
external-references forbid
credential-charset protocol
ssl-config-type proxy
exit
http "XMLFirewall" xmlfirewall
http-timeout 120
persistent-timeout 180
host-rewriting "on"
no silence-warning
no compression
no include-response-type-encoding
no always-show-errors
no disallow-get
no disallow-empty-reply
persistent-connections
client-address "X-Client-IP"
http-global-tranID-label "X-Global-Transaction-ID"
httpproxy-port 800
version "HTTP/1.1" "HTTP/1.1"
no chunked-uploads
exit
%endif%
And for the DataPower operand custom resource, a YAML file (my_datapowerservice_cr.yaml) is used. This is where the DataPower CPU, Memory, and Autoscaling is configured.
For testing purposes, we are setting up the DataPower resources with the bare minimal supported, 1 initial replica with 1 CPU and 4Gi RAM. And Horizontal Pod Autoscaling with a 10% target CPU utilization and max of 2 replicas.
my_datapowerservice_cr.yaml
apiVersion: datapower.ibm.com/v1beta3
kind: DataPowerService
metadata:
name: mydatapower
spec:
license:
accept: true
use: developers-limited
license: L-RJON-BYDQZF
resources:
requests:
cpu: 1
memory: 4Gi
limits:
memory: 4Gi
podAutoScaling:
method: HPA
hpa:
targetCPUUtilizationPercentage: 10
targetMemoryUtilizationPercentage: 0
maxReplicas: 2
minReplicas: 1
domains:
- name: "test-domain"
dpApp:
config:
- "xmlfirewall-config"
version: 10.0-cd
replicas: 1
users:
- name: admin
passwordSecret: admin-credentials
accessLevel: privileged
These are the commands to create all the objects necessary for the DataPower operand:
microk8s kubectl create secret generic admin-credentials --from-literal=password=admin
microk8s kubectl create configmap xmlfirewall-config --from-file=xmlfirewall.cfg
microk8s kubectl apply -f my_datapowerservice_cr.yaml
Create Service
There are multiple ways to expose a service to external network requests, the simplest way is using
NodePort. NodePort is a configuration setting you declare in a service’s YAML. Set the service spec’s type to NodePort. Then, Kubernetes will allocate a specific port on each Node to that service, and any request to your cluster on that port gets forwarded to the service.
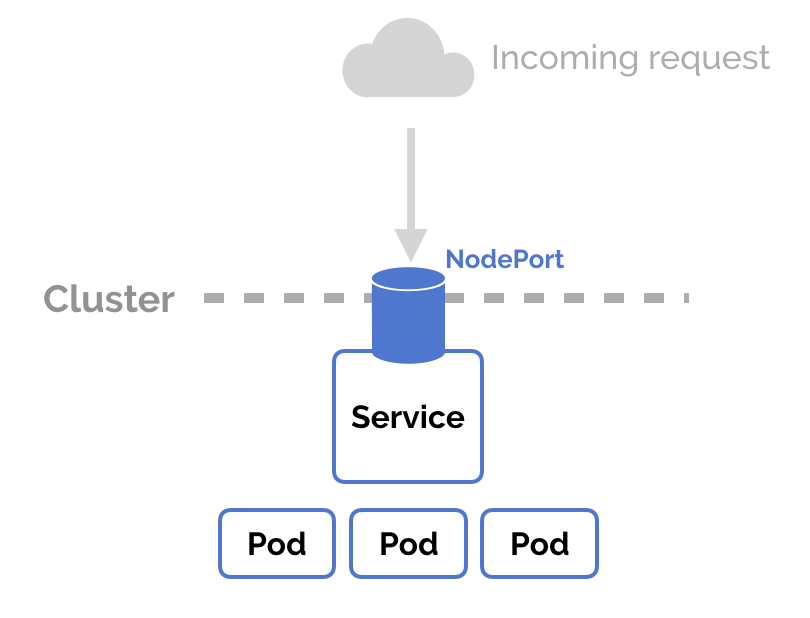
On this case we created a service called xmlfirewall, defined on xmlfirewall_service.yml. Port 2048 is the one used by the XML Firewall.
xmlfirewall_service.yml
apiVersion: v1
kind: Service
metadata:
name: xmlfirewall
spec:
type: NodePort
selector:
app.kubernetes.io/component: datapower
app.kubernetes.io/instance: default-mydatapower
ports:
- protocol: TCP
port: 2048
targetPort: 2048
name: xmlfirewall
These are the commands to create the Service that will be exposed using NodePort:
microk8s kubectl apply -f xmlfirewall_service.yml
microk8s kubectl get service
You should write down the node port, you will need later.
Next step is to get the Multipass VM IP address that can be accessed from the host machine, your laptop for example.
multipass list
Write down the IP address that belongs to the same network as the host machine.
The service endpoint will be
http://<<ip address>>:<<node port>>
Load Test
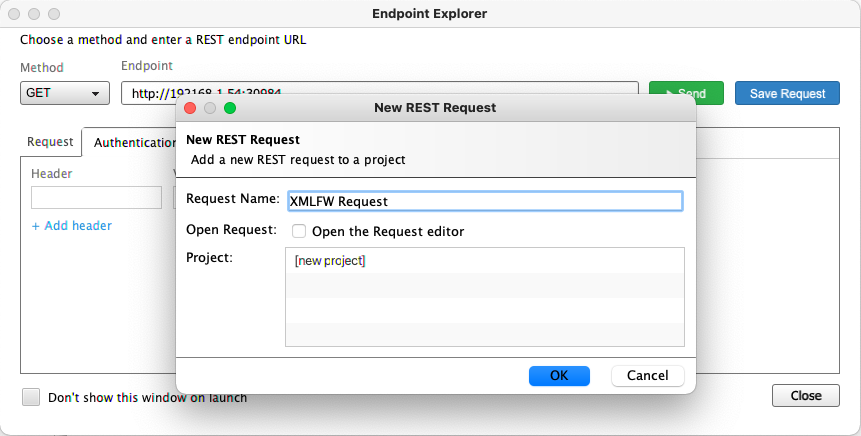
For the Load Test, we will use SOAP UI and the LoadTEST feature. Here are the steps:
Download and Install SOAP UICreate new REST Request
Generate new Test Suite with a Load Test
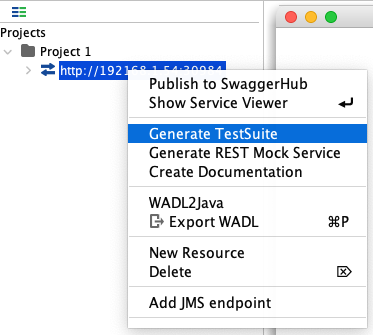
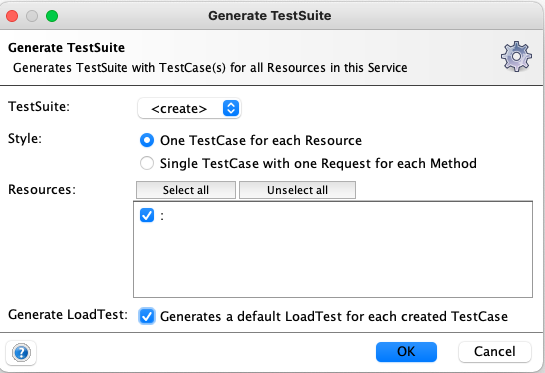
Edit the Load Test for the desired settings

Run the Test Suite and observe the pod scaling on the Dashboard or on CLI
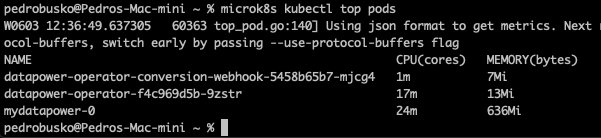
CLI
microk8s kubectl top pods
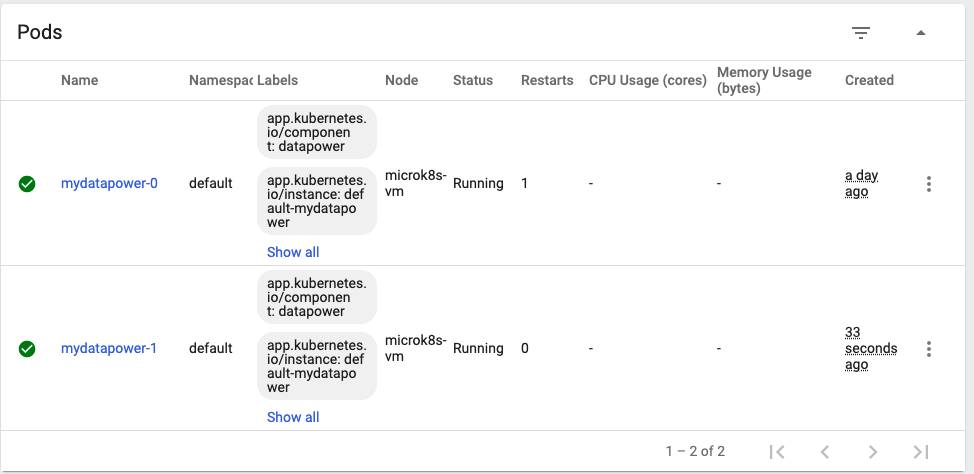
Scale up

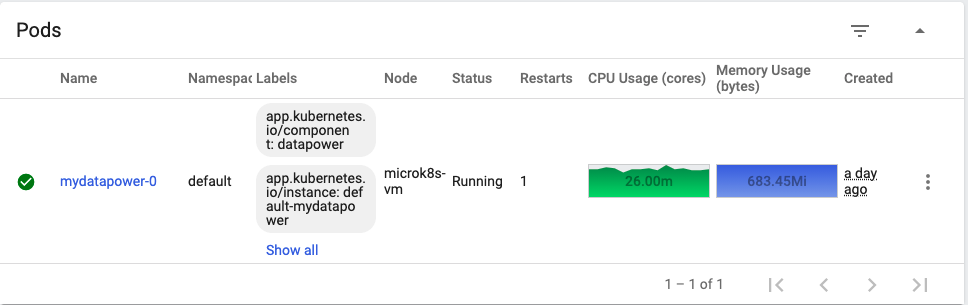
Scale down
Dashboard
Scale up
Scale down
I'd like to thank
@Bruno R Neves and
@Aidan Harbison for the help troubleshooting and reviewing this material.
FAQ
mkdir /etc/microk8s
microk8s.config > /etc/microk8s/microk8s.conf
export KUBECONFIG=/etc/microk8s/microk8s.conf
Error: .microk8s/config: no such file or directory
To fix this error, do the following steps:
cd $HOME
mkdir .microk8s
cd .microk8s
microk8s config > config
How to access the Multipass VM?
multipass shell microk8s-vm
How to access Kubernetes dashboard?
Simplest way is with the following command:
microk8s dashboard-proxy
#write down the token
https://127.0.0.1:10443If that fails, there is a second alternative:
token=$(microk8s kubectl -n kube-system get secret | grep default-token | cut -d " " -f1)
microk8s kubectl -n kube-system describe secret $token
#write down the token
microk8s kubectl port-forward -n kube-system service/kubernetes-dashboard 10443:443
https://127.0.0.1:10443
How to access DataPower WebGUI?
microk8s kubectl attach mydatapower-0 --stdin --tty
idg# co
idg(config)# web-mgmt
idg(config web-mgmt)# admin-state enabled
idg(config web-mgmt)# exit
microk8s kubectl port-forward mydatapower-0 9090:9090
https://127.0.0.1:9090admin/admin
How to start and stop MicroK8s?
microk8s start
microK8s stop
References
https://brew.sh/https://microk8s.io/https://multipass.run/https://helm.shhttps://kubernetes.io/https://github.com/IBM/datapower-operator-charthttps://ibm.github.io/datapower-operator-doc/https://www.soapui.org/