App Connect

 View Only

Explore the new features in App Connect Enterprise version 11.0.0.11

By Ben Thompson posted Thu December 17, 2020 01:03 PM

  
iStock_000020343379_XXXLarge


IBM App Connect Enterprise v11.0.0.11 is the eleventh fix pack released for App Connect Enterprise software. We provide regular fix packs, approximately once per quarter, which often also include new functional enhancements as well as regular product maintenance. This blog summarizes all the latest and greatest capabilities:

  • The new IBM App Connect Dashboard
  • Admin log enhancements in the ACE Web UI
  • DB2 ODBC Driver is now available on Linux and UNIX systems as part of ACE install and configuration
  • Support for using SSL certificate labels when forming MQ client connections
  • Redeploy of monitoring profiles in policy projects

The new IBM App Connect Dashboard

Administration of ACEv11 is easily achieved by pointing a web browser either at an integration node or an independent integration server. Earlier fix packs of ACEv11 have also provided a more advanced form of the admin web UI using an integration server which has been started through a command console session with the ACE_DASHBOARD=TRUE environment variable set. This "special" integration server was intended to act like a portal and serve web pages to your browser (as opposed to support directly deployed artifacts). This combined web UI could be used to connect to multiple integration nodes and servers, showing them all together in a single web browser tab. We received positive feedback on this capability, but many users wanted the interface to be served with a lighter-weight footprint, and to have the interface support the display of replicated integration servers running within Kubernetes platforms such as IBM's Cloud Pak for Integration. Enter, the latest fix pack 11 release of ACE which provides these new options!

To start the new IBM App Connect Dashboard, users should run the new Dashboard command passing in parameters for a work directory to use (mandatory), the port number through which the dashboard listens for requests (optional) and an SSL password (optional). When launched, if the work directory doesn't already contain one, the dashboard will create a dashboard.conf.yaml configuration file which holds other important properties for how the dashboard should behave. By default the dashboard uses port 7700. When initially launched the dashboard will look like this:

When first starting off, click the link to Create a new account and fill out the required information:

Multiple users can log on to the same IBM App Connect Dashboard. You can view the connections that you create under your account, and you can export them to be viewed by other users in the same dashboard, or in a different dashboard. When you export connections, you can encrypt credentials by specifying a password, which other users must use when they import your connections. By selecting the appropriate toggle in the top right corner of the dashboard, you can choose between Integrations (shows a combined list of what is deployed across all the servers which the dashboard knows about), Servers (shows a combined list of all servers that your account is authorized to view) or Nodes (shows a combined list of all nodes that your account is authorized to view). 

To start with the dashboard display will be empty:

Switch to the Deployment Locations page (using the icon at the far left of the page) where you can configure connections to runtime systems:

Try clicking the Create connection button and explore the new dashboard further by creating connections to your integration nodes, integration servers and switch servers throughout your network!

Admin log enhancements in the ACE Web UI

In the last fix pack, ACEv11.0.0.10, the product introduced a dedicated administration log within the web user interface. This log provided an audit record of when particular changes were made, what happened, and who applied the configuration updates. The Admin Log data included details such as the timestamp, BIP message number, message text, and the user name and authorized role of the user who carried out each action. Now, in ACEv11.0.0.11 we have further enhanced this feature:

  • New support for filtering entries that are displayed in the web user interface, by using wildcard searches and regular expressions.
  • Admin log entries are now created for administration actions that are made through all MQSI commands, regardless of whether the integration node or server is running
  • Support has been added for writing admin log entries to the console in ibmjson format.

The example picture below shows the admin log for an integration server which has a Tags column in the table populated with tag values reflecting properties such as APP_NAME, BAR_FILE, and MSGFLOW:

You can apply filters to control the set of events that are displayed in the web user interface, by entering a search string which acts on these tags. You can include one or more tags in the search string, and use exact matching, wildcards, and full regular expressions. Taking the example above, we could search for all entries that relate to a message flow called MyExampleFlow by entering the MSGFLOW: tag followed by the name of the message flow in the search field:

MSGFLOW:MyExampleFlow
As a result of this search, the entries are filtered to display only the activities that were carried out against the MyExampleFlow message flow:

The Knowledge Center has dedicated pages with more detail on these topics:

DB2 ODBC Driver is now available on Linux and UNIX systems as part of ACE install and configuration

Although IBM App Connect Enterprise (and IBM Integration Bus before it) has always provided support for message flows to connect with DB2 databases, this fix pack makes it much easier to get this use case running immediately once the product is installed. Previously on Linux and UNIX systems, it was the user's responsibility to install the DB2 ODBC client driver on to their machine in addition to ACE, but now there is no need for this extra installation step. This will also help immensely for those users building container images who previously had to add this database driver as an additional build step in their pipeline.

In case readers are not aware, ACE has a very flexible support position regarding connections to third party database systems. On Linux and UNIX systems, IBM Integration ODBC Database Extender, which encapsulates unixODBC, is provided as the driver manager. ACE provides DataDirect ODBC drivers for interfacing with Oracle, Sybase, and SQLServer databases, and now provides the DB2 driver client too. For other databases, you must provide the appropriate ODBC driver yourself.

Although not impacted by the fix pack we are discussing here, for completeness it is worth noting that on Windows, the ODBC driver manager is provided by the operating system. On Windows, ACE provides DataDirect ODBC drivers for interfacing with Oracle and Sybase. For other databases, ACE relies on operating system installed ODBC drivers (which includes users bringing along drivers of their own choosing).

In an effort to limit the increase in the ACE installation footprint size, it should be noted that whilst the new packaging on Linux and UNIX systems which is described above provides the ODBC driver, other DB2 capabilities (such as the Call Level Interface libraries for C/C++ client applications) are not included. This means that for some deeper use cases (like running DB2 commands or DB2 tracing) you may still need to install one of the DB2 client packages which are available here

Full instructions for connecting to a DB2 database via ODBC from Linux and UNIX systems are available in the Knowledge Center, but for users familiar with this process from prior releases, or those wanting to see a worked example for using the Data Server driver for ODBC that is now supplied as part of the ACE install, then these example steps below may be helpful when configuring Linux and UNIX systems:

  1. Copy the odbc.ini sample file that is supplied in the install_dir/server/ODBC/unixodbc/ directory to a location of your choice, ensuring that it is given 664 permissions and is owned by the mqbrkrs group. Set the relevant environment variable to point at the file:
    cp /opt/IBM/ace-11.0.0.11/server/ODBC/unixodbc/odbc.ini ~/db2connections/odbc.ini
    chmod 664 ~/db2connections/odbc.ini
    chown root:mqbrkrs ~/db2connections/odbc.ini
    ODBCINI=~db2connections/odbc.ini
    export ODBCINI
  2. Copy the odbcinst.ini sample file that is supplied in the install_dir/server/ODBC/unixodbc/ directory to a location of your choice, ensuring that it is given 664 permissions and is owned by the mqbrkrs group. Set the relevant environment variable to point at the file:
    cp /opt/IBM/ace-11.0.0.11/server/ODBC/unixodbc/odbcinst.ini ~/db2connections/odbcinst.ini
    chmod 664 ~/db2connections/odbcinst.ini
    chown root:mqbrkrs ~/db2connections/odbcinst.ini
    ODBCSYSINI=~/db2connections
    export ODBCSYSINI
  3. Copy the db2cli.ini sample file that is supplied in the install_dir/server/ODBC/unixodbc/ directory to a location of your choice, ensuring that it is given 664 permissions and is owned by the mqbrkrs group. Set the relevant environment variable to point at the file:
    cp /opt/IBM/ace-11.0.0.11/server/ODBC/unixodbc/db2cli.ini ~/db2connections/db2cli.ini
    chmod 664 ~/db2connections/db2cli.ini
    chown root:mqbrkrs ~/db2connections/db2cli.ini
    DB2CLIINIPATH=~/db2connections
    export DB2CLIINIPATH
  4. Edit the db2cli.ini file to provide the location of your database:
    [MYDB2DB]
    Hostname=9.145.146.224
    Port=50000
    Database=MYDB2DB
  5. Edit the odbc.ini file. In the first stanza, list the DSN of your database:
    ;#######################################
    ;#### List of data sources stanza ######
    ;#######################################
    [ODBC Data Sources]
    MYDB2DB=IBM Data Server Driver included in ACE
  6. Lower down the odbc.ini file, for each database that you intend to connect to, create a data source stanza in the odbc.ini file. The entries in the stanza will depend on the database manager, but for a DB2 database instance using the driver which is now provided as part of ACEv11.0.0.11 the stanza will look like this:
    ;# IBM Data Server Driver included in ACE
    [MYDB2DB]
    DRIVER=/opt/IBM/ace-11.0.0.11/server/ODBC/dsdriver/odbc_cli/clidriver/lib/libdb2o.so
    Description=IBM DB2 ODBC Database accessed using IBM Data Server Driver included in ACE
    Database=MYDB2DB
  7. At the base of the odbc.ini file fill out the InstallDir part of the mandatory information stanza:
    ;##########################################
    ;###### Mandatory information stanza ######
    ;##########################################
    [ODBC]
    InstallDir=/opt/IBM/ace-11.0.0.11/server/ODBC/drivers
    UseCursorLib=0 IANAAppCodePage=4
    UNICODE=UTF-8
  8. Create an integration node and check you can connect to the database:
    mqsicreatebroker ACEV110011
    mqsistart ACEV110011
    mqsisetdbparms ACEV110011 -n MYDB2DB -u db2admin -p mysecretpassword
    mqsistop ACEV110011
    mqsistart ACEV110011
    mqsicvp ACEV110011
    BIP8873I: Starting the component verification for component 'ACEV110011'.
    BIP8876I: Starting the environment verification for component 'ACEV110011'.
    BIP8894I: Verification passed for 'Registry'.
    BIP8894I: Verification passed for 'MQSI_REGISTRY'.
    BIP8894I: Verification passed for 'Java Version - 1.8.0 IBM Linux build 8.0.6.20 - pxa6480sr6fp20-20201120_02(SR6 FP20)
    BIP8894I: Verification passed for 'MQSI_FILEPATH'.
    BIP8878I: The environment verification for component 'ACEV110011' has finished successfully.
    BIP8882I: Starting the IBM MQ verification for component 'ACEV110011'.
    BIP8290I: Verification passed for the ODBC environment.
    BIP8299I: User 'db2admin' from security resource name 'MYDB2DB' will be used for the connection to datasource 'MYDB2DB'.
    BIP8270I: Connected to Datasource 'MYDB2DB' as user 'db2admin'. The datasource platform is 'DB2/NT64', version '11.01.0000'.
    BIP8275I: Verification passed for User Datasource 'MYDB2DB'.
    BIP8292I: '10' User data sources were not verified, because they do not have credentials.
    BIP8874I: The component verification for 'ACEV110011' has finished successfully.
    BIP8071I: Successful command completion.

    Remember, you may also have configuration to do on the remote DB2 database server with which ACE is communicating, and also remember you may have to set up your firewall to allow inbound connections to that platform too!

    You should now be able to deploy a message flow to utilise this configuration. A full tutorial is available from the Toolkit (Help > Tutorials Gallery > "Databases - Configuring ACE on Linux to connect with a remote DB2 database via ODBC").

Support for using SSL certificate labels when forming MQ client connections

Fix pack 11 introduces new configuration options for use by message flows which interact with IBM MQ queue managers using secured SSL client connections. Prior to this fix pack, when connecting to a secured MQ Server Connection channel, ACE looked within its designated keystore, and selected the key which had a label of the form ibmwebspheremqmyusername where myusername was the textual user identifier under which the integration server was running. Whilst fine for many users, this approach had some limitations for architectural topologies, such as forcing users to deploy message flows which need to run under different identities under different servers.

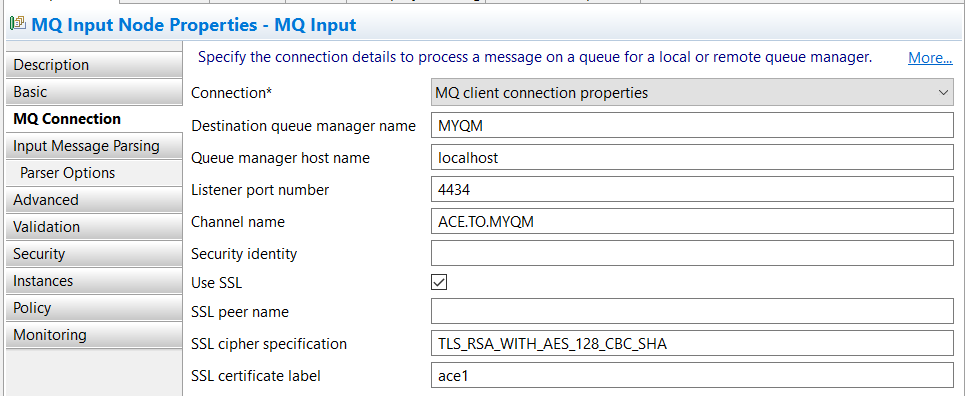
To take advantage of this new feature, examine the MQ Connection properties on the MQInput, MQOutput, MQGet and MQReply nodes. You will find a new property named SSL certificate label which can be used to select a specific SSL certificate from the integration server MQ key repository when using a SSL client channel to send or receive messages to a remote queue manager.

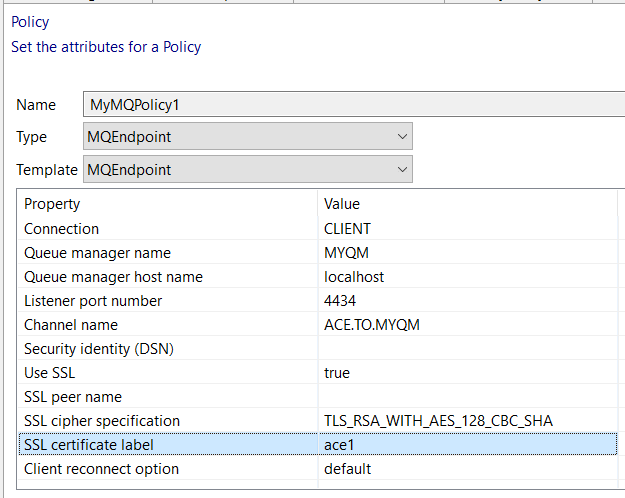
If you wish to abstract connection details away from the message flow node, you can use an MQ Endpoint policy, so the same property, named SSL certificate label has also been added to the MQ Endpoint policy as shown below:

When you configure an MQ connection from an MQ node to an IBM MQ queue manager, you can optionally configure the connection to use a security identity for authentication, SSL for confidentiality, or both. In the example that follows we will focus just on using SSL.

You can specify that the SSL protocol is to be used when a client connection is made to a remote queue manager, by selecting the Use SSL property on the MQ node or MQEndpoint policy. You can use SSL for client connections that are configured using either the MQ client connection properties or a client channel definition table (CCDT). If you specify SSL on the client connection, you must also specify the location of an SSL key repository which holds the required private and public certificates. The instructions below include commands to generate the certificates and also the SSL key repository password stash file, which is created in the same folder as the key repository itself.

To demonstrate this new ACE feature the example below describes how to set up mutual authentication between ACE and a queue manager using self-signed TLS certificates (for test purposes). This particular example assumes the use of Windows, although of course the commands could be amended for other platforms.

Create key repositories and certificates for both ACE and the queue manager:
  1. Create a key database for your queue manager from the command line, using the following command:
    runmqakm -keydb -create -db C:\sslformyqm\key.kdb -pw myqmpassword -type cms -stash
    This will generate the following files:
    C:\sslformyqm\key.kdb
    C:\sslformyqm\key.rdb
    C:\sslformyqm\key.sth
  2. Create a key database for ACE (acting as an MQ Client application) from the command line, using the following command:
    runmqakm -keydb -create -db C:\sslforace\key.kdb -pw acepassword -type cms -stash
    This will generate the following files:
    C:\sslforace\key.kdb
    C:\sslforace\key.rdb
    C:\sslforace\key.sth
  3. In this worked example, the queue manager we are using is named "MYQM". Folding this queue manager name to lower case and appending it to the fixed string "ibmwebspheremq" provides the required label when generating a personal self-signed certificate for use by the queue manager. Create the certificate in the key database from step 1, using this command:
    runmqakm -cert -create -db C:\sslformyqm\key.kdb -pw myqmpassword -label ibmwebspheremqmyqm -dn "CN=MYQM, OU=Test, O=IBM, C=GB"
  4. Use this kind of command again to generate a personal self-signed certificate, but this time for use by ACE. Create the certificate in the key database from step 2, using this command:
    runmqakm -cert -create -db C:\sslforace\key.kdb -pw acepassword -label ace1 -dn "CN=ACE1, OU=Test, O=IBM, C=GB"
  5. Extract the public part of the queue manager self-signed certificate:
    runmqakm -cert -extract -db C:\sslformyqm\key.kdb -pw myqmpassword -label ibmwebspheremqmyqm -target C:\temp\myqmcert.cer -format ascii
  6. Extract the public part of the ACE self-signed certificate:
    runmqakm -cert -extract -db C:\sslforace\key.kdb -pw acepassword -label ace1 -target C:\temp\acecert.cer -format ascii
  7. Add the public part of the queue manager self-signed certificate into the ACE key repository:
    runmqakm -cert -add -db C:\sslforace\key.kdb -pw acepassword -label ibmwebspheremqmyqm -file C:\temp\myqmcert.cer -format ascii
  8. Add the public part of the ACE self-signed certificate into the queue manager key repository:
    runmqakm -cert -add -db C:\sslformyqm\key.kdb -pw myqmpassword -label ace1 -file C:\temp\acecert.cer -format ascii
Defining the queue manager SSL configuration:
  1. Begin by creating and starting a queue manager. In this example we will be using a queue manager named MYQM:
    crtmqm MYQM
    strmqm MYQM
  2. Start an interactive runmqsc MYQM command session (the last command below defines a local queue named IN which your ACE message flow will be reading input messages from):
    ALTER QMGR SSLKEYR('C:\sslformyqm\key')
    REFRESH SECURITY TYPE(SSL)
    DEFINE LISTENER(MYLISTENER) TRPTYPE(TCP) PORT(4434)
    START LISTENER(MYLISTENER)
    DEFINE CHANNEL(ACE.TO.MYQM) CHLTYPE(SVRCONN) TRPTYPE(TCP) SSLCIPH(TLS_RSA_WITH_AES_128_CBC_SHA) SSLCAUTH(REQUIRED)
    DEFINE QLOCAL(IN)
Defining the ACE SSL configuration:
  1. Point your integration node at the ACE key repository:
    mqsichangeproperties ACEv110011 -o BrokerRegistry -n mqKeyRepository -v C:\sslforace\key
  2. Alternatively, if you prefer, you can achieve the same outcome through configuration in the node.conf.yaml file rather than executing the command above:
    BrokerRegistry:
    mqKeyRepository: 'C:\sslforace\key'

With this configuration now complete, you can deploy a message flow which takes advantage of the secured SSL MQ client connection which we just created!

Redeploy of monitoring profiles in policy projects

In ACEv11, to help simplify the product's externals, several product concepts from IBM Integration Bus v10 product were brought together into Policy Projects:

  • IIBv10 configurable services and IIBv10 policies
  • IIBv10 policy sets and bindings (for controlling WS-Security settings)
  • IIBv10 monitoring profiles

To control message flow behavior at run time, you can create one or more policies inside one or more policy projects and then deploy the policy projects. We would like to focus this section of the blog on the last of these categories. We will discuss here how to create a monitoring profile, how they can be deployed in a policy project, and from today's Fix Pack 11 release, how they can be altered and redeployed. In this dynamic way, you can apply changes to the way in which monitoring is configured without needing to restart the integration server.

A monitoring profile XML file lists event sources in a message flow that emits events, and defines the properties of each event.

The monitoring profile XML must conform to XML schema file MonitoringProfile.xsd, which you can find in the samples directory of the ACE installation (). The XML file must be given an extension of .monprofile.xml (for example, MyMonitoringProfile.monprofile.xml). You can create a monitoring profile "from scratch", either by copying the example in the Knowledge Center and editting the xml file with appropriate values for your message flow, or by configuring monitoring events in a flow which is deployed, and then export the profile using the mqsireportflowmonitoring command. In the following example we will walk through this latter method for creating a monitoring profile, which we will then deploy and redeploy in order to showcase this option in the latest fix pack release.

  1. Consider a simple message flow MyExampleFlow inside an application MyExampleApplication, which has a monitoring event configured to fire when messages are propagated through the HTTPInput node:

  2. Deploy the flow and extract the monitoring profile using a command like this:
    mqsireportflowmonitoring ACEv110011 --integration-server default --application MyExampleApplication --flow MyExampleFlow --extract-profile C:\temp\MyMonitoringProfile.monprofile.xml

    The extracted monitoring profile looked like this:

  3. Returning to the flow in the Toolkit, and add a second monitoring event, redeploy the flow and repeat the command to extract the monitoring profile but this time use a new name for the new monitoring profile:
    mqsireportflowmonitoring ACEv110011 --integration-server default --application MyExampleApplication --flow MyExampleFlow --extract-profile C:\temp\MyMonitoringProfileWithExtraEvent.monprofile.xml
    The extracted monitoring profile looked like this:

  4. At this stage, we have two alternative monitoring profiles available which can be applied to the message flow. Return to the flow in the Toolkit and remove the events from the HTTPInput and HTTPReply nodes. Save the flow. Create a policy project named MyPolicyProject and copy the first of the monitoring profiles MyMonitoringProfile.monprofile.xml into the project. Create a BAR file and build both MyExampleApplication and MyPolicyProject into it. If you select the message flow in the BAR, you can associate it with the monitoring profile as shown in the picture below. Deploy the BAR file:

  5. If you like, you can check that the profile has been applied using the mqsireportflowmonitoring command:
    mqsireportflowmonitoring ACEv110011 --integration-server default --application MyExampleApplication --flow MyExampleFlow
    BIP15069I: Integration Server 'default' Active state='inactive', profile=''
    BIP15070I: Integration Server 'default' Configured state='inactive', profile=''
    BIP15069I: Application 'MyExampleApplication' Active state='inactive', profile=''
    BIP15070I: Application 'MyExampleApplication' Configured state='inherit', profile=''
    BIP15069I: MessageFlow 'MyExampleFlow' Active state='inactive', profile='{MyPolicyProject}:MyMonitoringProfile'
    BIP15070I: MessageFlow 'MyExampleFlow' Configured state='inherit', profile='{MyPolicyProject}:MyMonitoringProfile'
    BIP8071I: Successful command completion.
  6. Back in the Toolkit, delete MyMonitoringProfile.monprofile.xml from MyPolicyProject. Copy MyMonitoringProfileWithExtraEvent.monprofile.xml into MyPolicyProject instead, and then rename the file back to the original name MyMonitoringProfile.monprofile.xml. Deploy the policy project to the runtime. You will see a success message as shown in the picture below:


    This result is in sharp contrast to the message you would receive if you followed this sequence of actions using ACEv11.0.0.10 where the redeploy of the monitoring profile would fail with the result shown in the picture below:

    So, in summary, we have demonstrated the new feature in ACEv11.0.0.11 whereby monitoring profiles can be dynamically redeployed to an integration server.

#AppConnectEnterprise(ACE)
#ACEV11
2 comments
150 views

Permalink

Comments

Mon February 22, 2021 12:03 PM

Two thumbs up for the new admin log enhancements!

About the new IBM App Connect Dashboard, instead of creating new accounts, Is it possible to configure the RestAdminListener section with the Admin Security Authentication & Authorization properties when using ldap authorization?

Thanks again for the addition of new features and enhancements to the product.

Sat January 23, 2021 09:21 AM

Thanks for the details, was looking forward to DB2 configuration with IIB