Co-Author - Amar Shah
The approaches discussed here are applicable for the IBM Cloud Pak for Integration operators-based release and have been validated on CP4I 2020.4 and CP4I 2021.1.
User Defined Properties (UDPs) have been a great tool in IBM Integration Bus/WebSphere Message Broker to control the runtime behavior of message flows. We have seen extensive usage of UDPs across many customer’s IIB/WMB deployments. So it makes this use case a worthy candidate to discuss the migration strategy of IIB flows that use UDPs.
In this blog, we will talk in detail about the migration of IIB flows (that use UDPs) to IBM App Connect running on IBM Cloud Pak for Integration (CP4I).
Let us just take a quick recap of use-cases of UDPs in the traditional deployment of App Connect or in IIB. The UDPs have been primarily used to:
- Supply environment specific values for defined parameters and use mqsiapplybaroverride to generate the environment specific overridden BAR files.
- Change the value of a UDP in a deployed message flow. This allows customers to control the behavior of the message flow without a need of redeployment. The changed value of the UDP persists the restart of the message flow/integration server/integration node.
Let us now see how Kuberenetes/Openshift handle such use cases. To control the runtime behavior of applications, ConfigMaps and/or Secrets are used. You can have your configurable parameters defined in ConfigMaps or Secrets (if they contain sensitive information) and mount them onto your application pods (as environment variables or as volumes). So anytime when you want to change certain parameters that you have defined, you can simply update the ConfigMap/Secret and trigger to update the deployment/deploymentConfig/StatefulSet. Doing this kills the current pod(s) and creates new pods of application with the updated values from ConfigMap/Secret. The defined deployment strategy (rolling or recreate or custom) determines how pods are created and deleted while rolling out the update.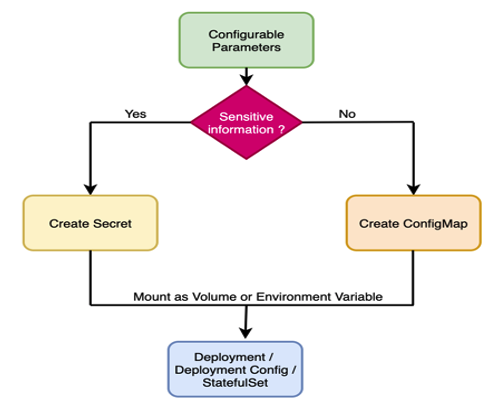
If you observe carefully, you can easily understand that whatever use-cases you implemented using UDPs, can be implemented using ConfigMaps/Secrets also i.e. in a container-native way.
Now we understand that UDPs are the IIB/App Connect Enterprise native way to control the behavior of the message flow at runtime while ConfigMaps/Secrets can do the same thing in a container-native way. So when we deploy the IIB/ACE flow on CP4I, we have the option to either choose the IIB/ACE native way of UDPs or go with the container native way of using ConfigMaps/Secrets.
Let us now look at the migration approach for such flows to CP4I.
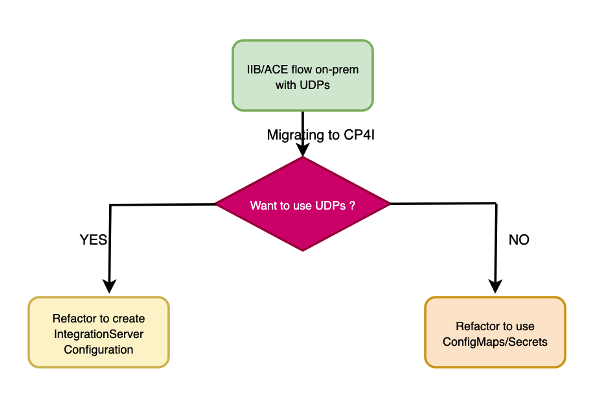
IBM App Connect Operator for OpenShift provides IntegrationServer Configuration API a.k.a operand to supply the configuration for the IntegrationServer. You can create such configurations in the namespace where you are deploying your integration server and reference to them in your IntegrationServer yaml file during deployment. At any point down the line, you can update the required configuration and this will result in the rollout of all the integration servers (that were referring to that configuration) with updated configuration.
So you might have guessed it now; IntegrationServer configurations do nothing but create secrets and are mounted to the integration server pods that referred to it.
Integration Server Configuration reference
Having explained this, let us see what the options are that are available for us to achieve the similar functionality that UDPs provide us in non-container world.
The diagram below explains the three approaches to handle configurable properties for ACE in CP4I.
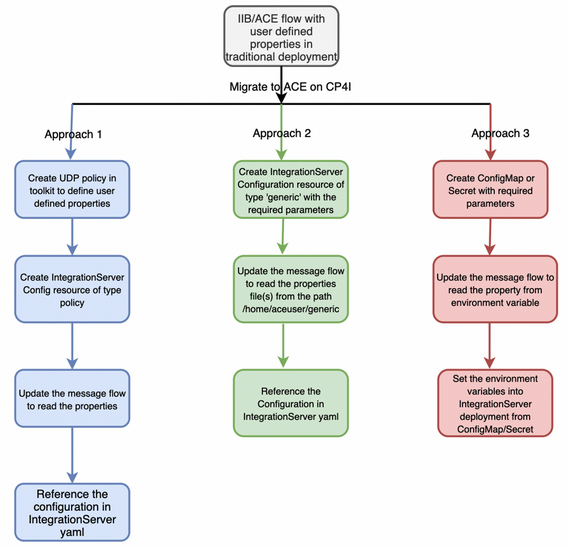
Now let us take more of a technical deep dive to understand the steps involved in implementing the approaches shown in the diagram.
Before you get deep into these approaches, we would recommend you to look at the documentation below if you have not already gone through it:
Integration Server Configuration reference
Configuration types for integration servers
Approach 1: User Defined Properties in ACE on CP4I
Step 1.1: Create a Policy in the toolkit
Create a policy in the ACE toolkit to define the User Defined properties.
You can create a User Defined policy with the following structure by using a text editor.
<?xml version="1.0" encoding="UTF-8"?>
<policies>
<policy policyType="UserDefined" policyName="MyUDCS" policyTemplate="">
<prop1>a value</prop1>
<prop2>another value</prop2>
<prop3>100</prop3>
</policy>
</policies>
Step 1.2: Create the Configuration Resource
You can create a configuration resource either from the App Connect Dashboard or from Openshift CLI. IBM Documentation explains both the procedures in great detail. For our use case here, we need to create a configuration of type ‘policy'. First compress your policy file into a zip file. To create the Configuration Resource from the Dashboard, follow the steps documented at the link below:
Configuration types for integration servers
If you want to do it in a CI-CD way or from the Openshift console, you can use the steps documented at the link below:
Integration Server Configuration reference
Step 1.3 Read the UDPs from the Message Flow
If you created a user-defined policy, and created properties for that policy, you can query those properties in a JavaCompute node.
Refer to following IBM documentation for more information on policy.
User Defined policy (UserDefined)
Create the Java class for the JavaCompute node from which you want to access the user-defined policy. Add the user code as shown below to the Java class to define the user-defined policy. In the example shown, a user-defined policy called MyUDCS has been defined in a policy project called PP1.MbPolicy.
myPol = getPolicy("UserDefined", "{PP1}:MyUDCS");
//Use the following code to access the policy.
if (myPol != null) {
System.out.println(" prop1: "+myPol.getPropertyValueAsString("prop1"));
System.out.println(" prop2: "+myPol.getPropertyValueAsString("prop2"));
System.out.println(" prop3: "+myPol.getPropertyValueAsString("prop3"));
}
If you created a user-defined policy, and created properties for that policy, you can query those properties by using a Java class method that can be called from ESQL.
Step 1.4 Reference the Configuration resource in IntegrationServer
If you are deploying from the Dashboard, you can follow the steps at the link below:
Creating an integration server to run IBM App Connect Enterprise Toolkit integrations
If you are deploying via CLI or the CI-CD pipeline, you can reference the configuration in the IntegrationServer ConfigResource yaml file. Below is a sample yaml file. Look at the ‘configurations’ section. You can reference to one or more configurations.
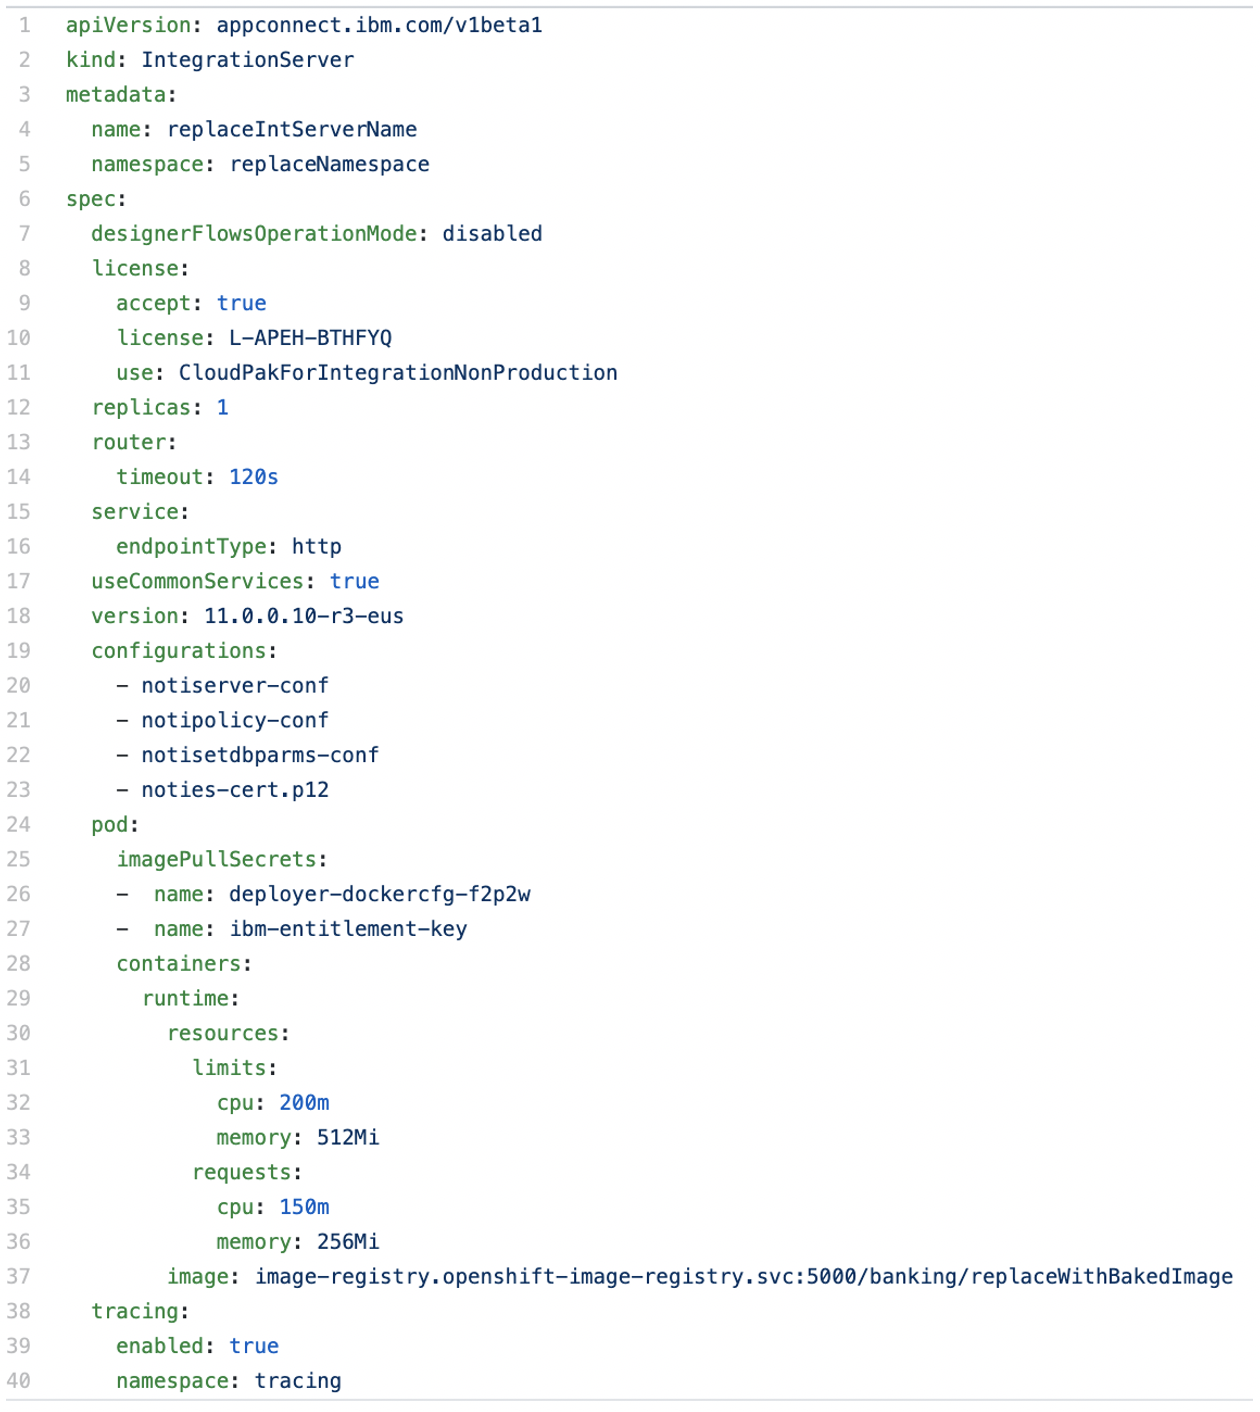
To deploy the IntegrationServer, you can simple use `oc apply -f <IntegrationServerCR.yaml>.
Step 1.5 Updating the Configuration Parameters
You can update a Configuration resource either from the Dashboard or via the CLI/CI-CD pipeline. To update it from the Dashboard, follow the steps mentioned in the link below. Updating a configuration will lead to the rollout of the changes to all the integration servers that reference to it.
Managing configuration objects from the Configuration page
Approach 2: Use Integration Server Configuration API
Step 2.1: Create the Configuration Resource
You can create a configuration resource either from the App Connect Dashboard or from Openshift CLI. IBM Documentation explains both the procedures in great detail. For our use case here, we need to create a configuration of type ‘generic’. First compress your properties file(s) into a zip file. To create the Configuration Resource from the Dashboard, follow the steps documented at the link below:
Generic files type
If you want to do it in a CI-CD way or from the Openshift console, you can use the steps documented at the link below:
Integration Server Configuration reference
Step 2.2 Modify your flow(s) to read the properties
The Generic files type requires a zip file of arbitrary files that are required for custom configurations beyond the scope of types already provided. The zip file contents will be extracted into the directory /home/aceuser/generic, and can be referenced from other configurations or logic in the integration flows.
You need to write a small Java procedure/function to read the properties from the files mounted at /home/aceuser/generic. In a generic implementation in an enterprise, you could write a small re-usable Java procedure that can be invoked from a compute node in the message flow to read the parameters. Below is a very simple example Java procedure and the content of the properties file (config.properties):
Properties file:

Below is the sample Java function that reads the value of ‘response’ parameter from this properties file and returns its value:
public static String GetConfigProperties(){
try (InputStream input = new FileInputStream("/home/aceuser/generic/config.properties")) {
Properties prop = new Properties();
// load the properties file
prop.load(input);
// get the property value
return prop.getProperty("response").toString();
} catch (IOException ex) {
ex.printStackTrace();
return "Error";
}
}
Now you can call this Java procedure from the ESQL in compute node as usual. Below is the example:
CREATE FUNCTION GetConfigProperties()
RETURNS CHARACTER
LANGUAGE JAVA
EXTERNAL NAME "com.ibm.ace.CommonProcs.GetConfigProperties";
CREATE COMPUTE MODULE CustomProperties_Demo_Flow_Compute
CREATE FUNCTION Main() RETURNS BOOLEAN
BEGIN
SET OutputRoot.XMLNSC.Ping.Response = GetConfigProperties();
RETURN TRUE;
END;
END MODULE;
Step 2.3 Reference the Configuration resource in IntegrationServer
If you are deploying from the Dashboard, you can follow the steps at the link below:
Creating an integration server to run IBM App Connect Enterprise Toolkit integrations
If you are deploying via CLI or the CI-CD pipeline, you can reference the configuration in the IntegrationServer ConfigResource yaml file. Below is a sample yaml file. Look at the ‘configurations’ section. You can reference to one or more configurations.
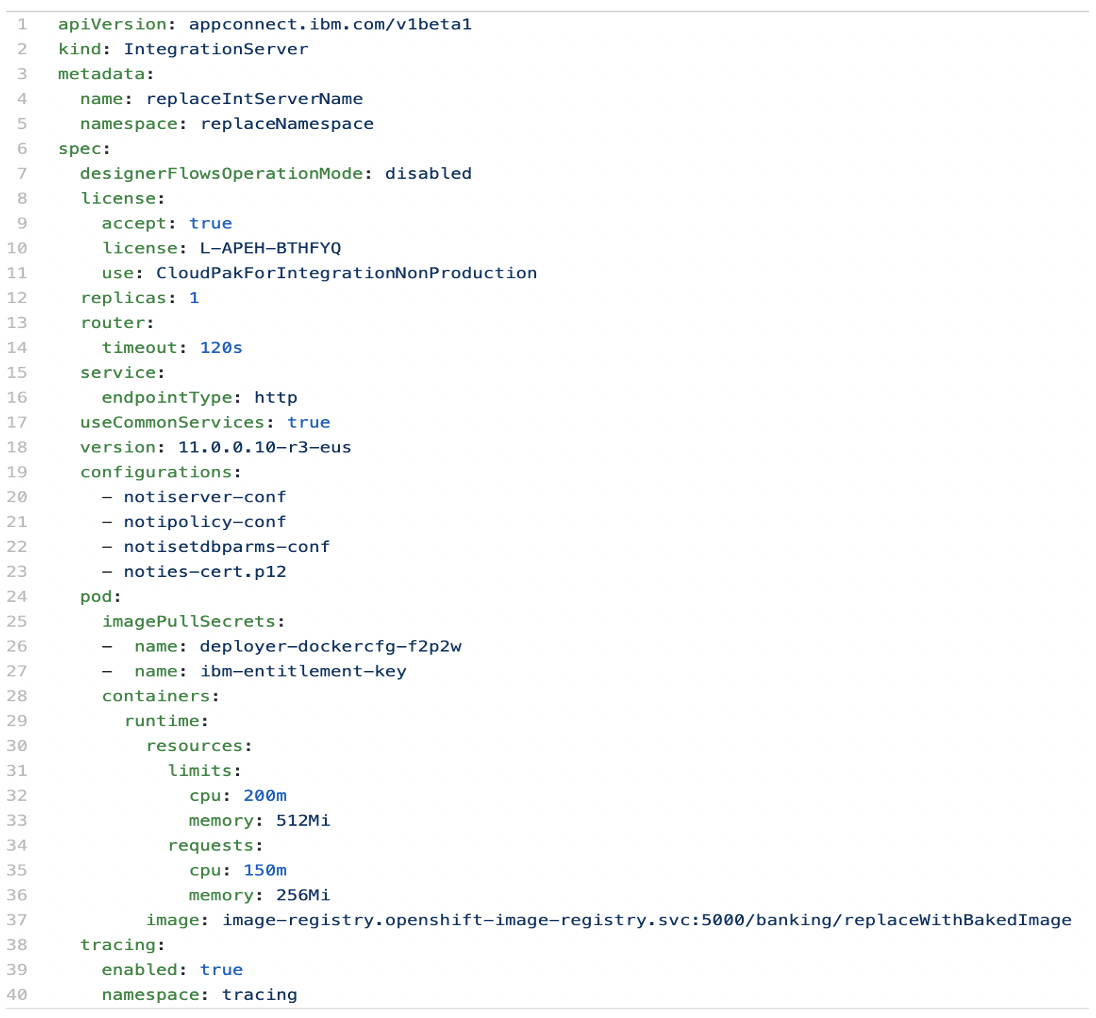
To deploy the IntegrationServer, you can simple use `oc apply -f <IntegrationServerCR.yaml>`.
Step 2.4 Updating the Configuration Parameters
You can update a Configuration resource either from the Dashboard or via the CLI/CI-CD pipeline. To update it from the Dashboard, follow the steps mentioned in the link below. Updating a configuration will lead to the rollout of the changes to all the integration servers that reference to it.
Managing configuration objects from the Configuration page
Approach 3: Use ConfigMap or Secret
Developers from a Kubernetes background may prefer to handle the configurations using ConfigMaps/Secrets.
Step 3.1: Create the ConfigMap/Secret
Create the ConfigMap or Secret, depending on the scenario, from literal values or from the file. For example:
`oc create cm testcm --from-literal=”addonresp=Hi from App Connect” --from-literal=”email.to=support@xyz.com”`
`oc create secret testsecret --from-literal=”addonresp=Hi from App Connect” --from-literal=”email.to=support@xyz.com”`
Step 3.2: Update the Message flow code to read from the environment variable
You need to write a small Java procedure/function to read the properties from the environment variables. In a generic implementation in an enterprise, you could write a small re-usable Java procedure that can be invoked from a compute node in the message flow to read the required environment variables. Below is a very simple example of Java function to read an environment variable. Note that all the environment variables are created with the ‘upper-case’ within the container; so make sure to reference them from your message flow appropriately. It is good practice to create the parameter names in upper case to avoid any possible issue.
package com.ibm.ace;
public class CommonProcs {
// Read Environment Variable
public static String GetAddonResp(){
return System.getenv("ADDONRESP");
}
}
Below is the sample ESQL code to call this function to read the value of the environment variable:
CREATE FUNCTION GetAddonResp()
RETURNS CHARACTER
LANGUAGE JAVA
EXTERNAL NAME "com.ibm.ace.CommonProcs.GetAddonResp";
CREATE COMPUTE MODULE CustomProperties_Demo_Flow_Compute
CREATE FUNCTION Main() RETURNS BOOLEAN
BEGIN
SET OutputRoot.XMLNSC.Ping.Response = GetAddonResp();
RETURN TRUE;
END;
END MODULE;
Step 3.3: Deploy the IntegrationServer
Deploy the integration server using the App Connect Dashboard or Openshift Console or CLI or CI-CD pipeline.
Step 3.4: Set the environment variables from the ConfigMap/Secret
The deployment name of the integration server is in the format <IntegrationServerName>-is. Which means, if you are creating the integration server with the name ‘testserver’, the corresponding deployment name will be ‘testserver-is’.
You can inject the environment variables from the ConfigMap/Secret into the IntegrationServer deployment with a single command. Below is the example:
`oc set env deployment/<deploymentName> --from=configmap/<ConfigMapName>`
`oc set env deployment/<deploymentName> --from=secret/<ConfigMapName>`
This will rollout the changes to the deployment. To perform any update to the parameters, you can update the configMap/Secret using the command line (or oc replace -f <configMap/Secret definition yaml file>) and execute the`oc set env` command as mentioned above or put the steps in the CI-CD pipeline.
Note that any environment variables injected to the IntegrationServer deployment, are tolerated when the App Connect operator performs reconciliation.
Note: You can use any permutations/combinations of these approaches depending on the use-cases and preference.
#IBMIntegrationBus#IntegrationBus(IIB)#AppConnect#AppConnectEnterprise(ACE)#Openshift#CP4I#cloudpak4integration#UDPs#messageflow#migration