IBM Data Server Gateway for OData
Introduction
IBM Data Server Gateway for OData enables you to quickly create OData RESTful services to query and update data in IBM DB2 LUW.
IBM Data Server Gateway for OData is built upon Apache Olingo V4 which implements the OASIS standard Open Data Protocol (OData), embedded Derby Database, HTTP, Atom/XML, JSON and standard Java web technologies. IBM Data Server Gateway for OData supports OData version 4.
IBM Data Server Gateway for OData creates HTTP-based data services, which allow resources identified using Uniform Resource Identifiers (URIs) and defined in an abstract data model, to be published and edited by Web clients using simple HTTP messages. IBM Data Server Gateway for OData provide access to data from any platform/device without requiring any new client drivers.
IBM Data Server Gateway for OData is based on Java platform
- IBM Data Server Gateway for OData is built upon Apache Olingo V4 Java library which implements the Open Data Protocol (OData)
Advantages of IBM Data Server Gateway for OData
- Using IBM Data Server Gateway for OData you can build an app without the need to embed a database driver in it, and can take advantage of regular Web protocols to transmit data back and forth.
- Standards based way to leverage DB2 in modern Cloud and Mobile Application Models
- You can access Data from non-traditional platforms like Mobile platforms (Android, Windows, iOS etc.) using REST API endpoints.
- You do not need to invest valuable project time in inventing, documenting and supporting a new Application Programming Interface (API). It will reduce your time, cost, and barriers to make data open.
- Reduces the overall complexity of an n-tier application by eliminating the need to write middle-tier components that do nothing but transform data into JSON or XML.
Download
IBM Data Server Gateway for OData Version 1.0 Latest version, download from here.
IBM Data Server Gateway for OData Features:
IBM Data Server Gateway for OData supports the following features:
- Publish OData V4.0 REST API endpoints/Services for selected database tables.
- Support for all data types except LOBs (CLOB, BLOB, DBCLOB) and XML.
- Support for CRUD operations
- GET (SELECT)
- POST (INSERT)
- PUT (UPDATE a full row)
- PATCH (UPDATE selected columns in a row)
- DELETE (Delete a row)
- URL Option $top – To fetch the top N entities.
- URL Option $filter – To apply selection criteria on a GET e.g. 'contains', 'gt', 'lt'.
- URL Option $select - To select specific columns from table.
- URL Option $count=true - To count the number of rows present in table.
- JSON and XML request/response payload are supported
- Persistence of REST API endpoints/services in Derby database.
- Authentication and Authorization during OData REST API endpoints/services generation.
- SSL support
Following features have been added in the latest version of IBM Data Server Gateway for OData.
For detailed information, refer this article.
- URL Option $skip
- URL Option $orderby
- Create a service with user given service Id
- Service Administration Dashboard
- List all the services in tabular format
- Edit a service
- Add tables to a service
- Remove tables from a service
- Change the Db2 user password of a service
- Change the Id of a service
- Disable a service
- Enable a service
- Delete a service
- Restart a service
- IBM OData Connector APIs to manage services
- Create a service with user given service Id
- Edit a service to update database credentials, Add/Remove tables
- Change the Db2 user password of a service
- Change the Id of a service
- Disable a Service
- Enable a Service
- Delete a Service
- Restart a service
Prerequisite
- Requires Java Version 7 and above
The release bundle
IBM Data Server Gateway for OData is released in two formats.
1. Integrated with WebSphere Liberty profile
IBM Data Server Gateway for OData release is integrated with WebSphere Liberty Profile Application server. It is configured with a default server that enables you to quickly start the server and get started.
2. War file
IBM Data Server Gateway for OData is also released as a war file that can be deployed to any Java servlet container (Application server) of your choice.
Installation of IBM OData Gateway Server
- Integrated with Liberty profile
If you get Permission denied error while running start_ibm_gateway_server_odata or stop_ibm_gateway_server_odata scripts, run below commands to provide permission.
chmod 555 start_ibm_gateway_server_odata
chmod 555 stop_ibm_gateway_server_odata
chmod 555 server/bin/server
- After server is started, Open below URL in browser to get started with IBM Data Server Gateway for OData.
http://<host_name>:9080/ODataOne/
Note – You can create your own server in WebSphere Liberty. For more information please refer below IBM Knowledge center link:
http://www.ibm.com/support/knowledgecenter/SSD28V_8.5.5/as_ditamaps/was855_welcome_liberty_core.html
To Stop the server
-
In Windows run stop_ibm_gateway_server_odata.bat
-
In Linux, AIX or Mac run ./stop_ibm_gateway_server_odata
- war file
- You can deploy war file in any Application Server of your choice following your application server guidelines to deploy a war file.
Create a Service
a) Create Service Via Browser/GUI
IBM Data Server Gateway for OData provides an user interface to quickly create REST API endpoints/service for your database tables in a few steps as listed below.
-
Start the application server after IBM Data server Gateway for OData is installed successfully.
-
Open http://<host_name>:9080/ODataOne/ link in Browser. Change the host name, port number accordingly in the URL.
-
Click on “Create OData Service” button. You will see welcome page. Refer Figure 1.
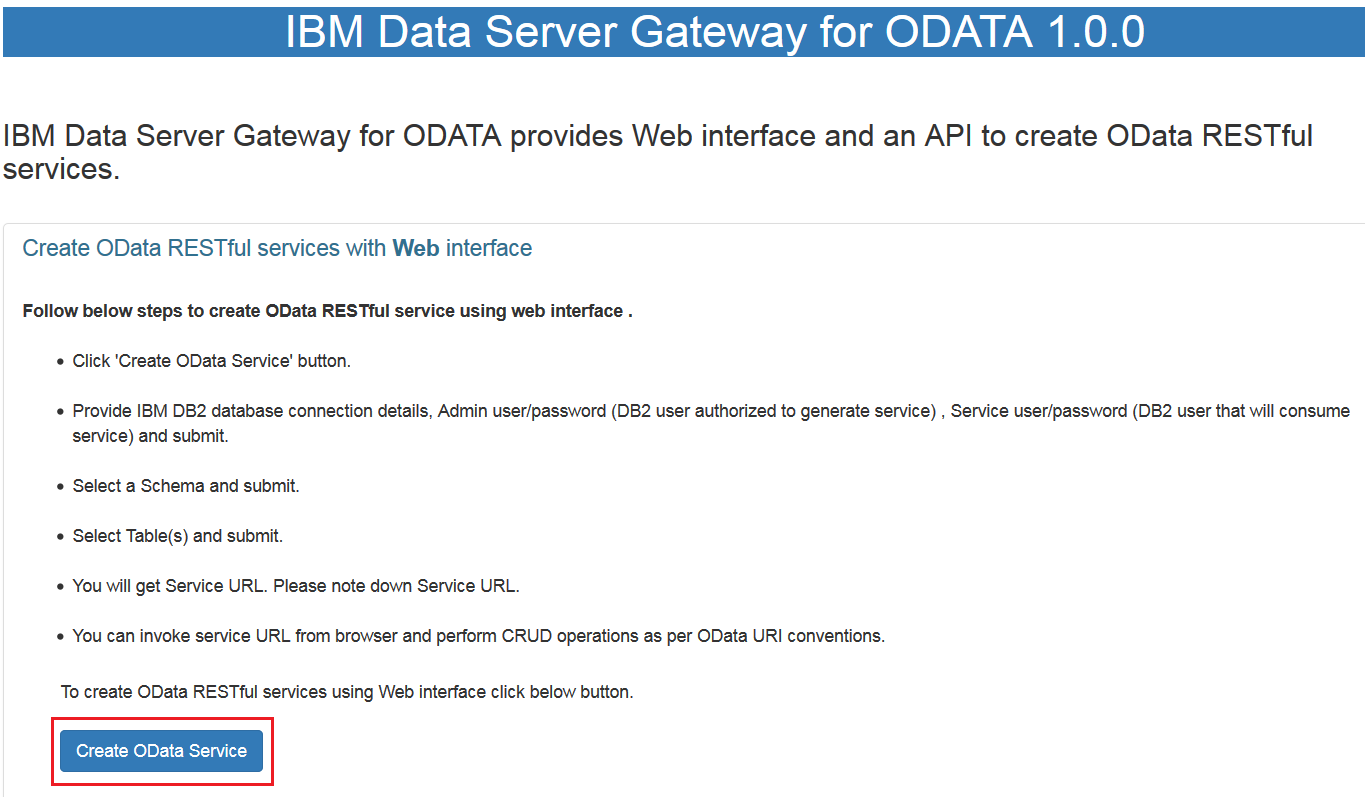
Figure 1: Welcome page after the war deployed successfully
- In "Configure IBM DB2 Data Source for OData Service Generation" page, provide DB2 database connection details and click Submit button. Refer Figure 2.
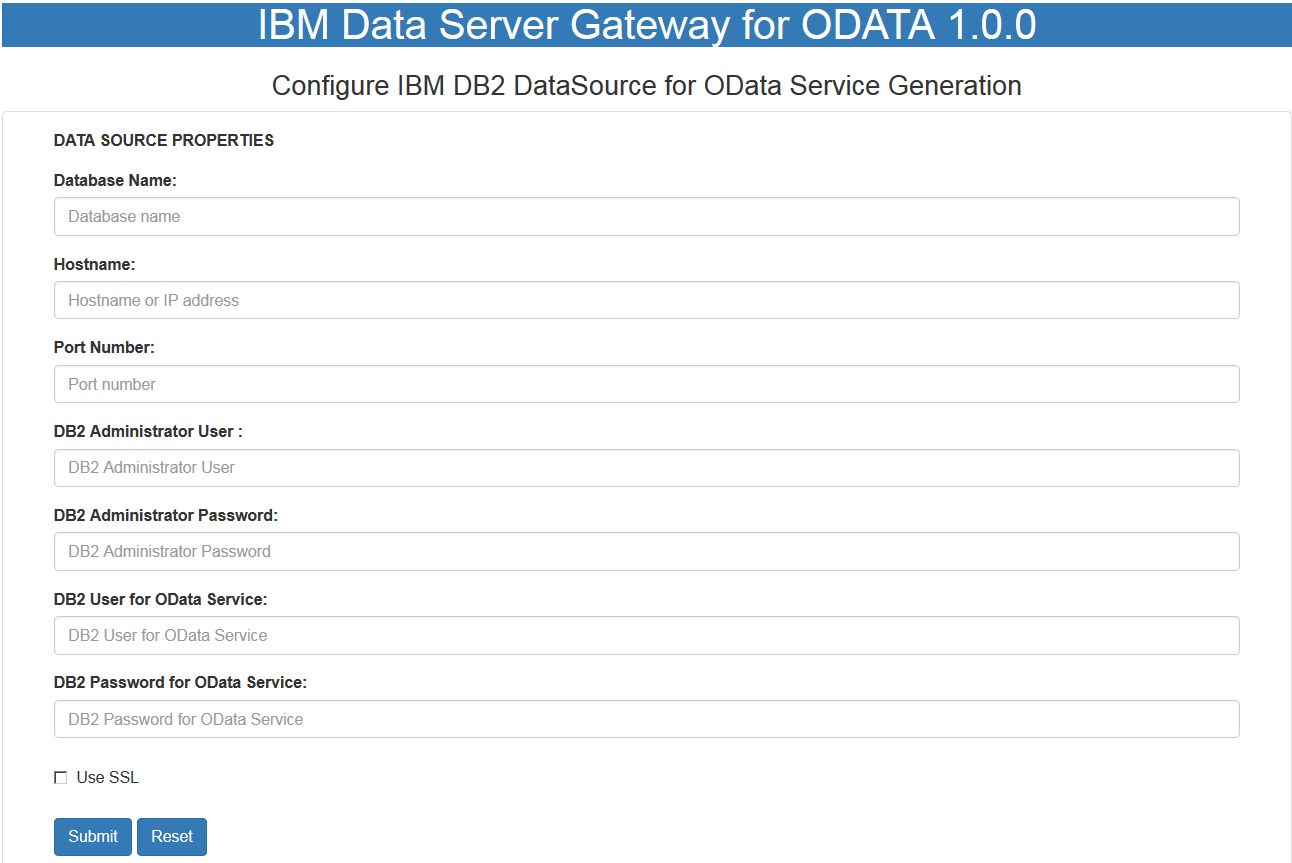 Figure 2: Configure IBM DB2 Data Source for OData Service Generation
The details of fields shown in Figure 2 are as below
|
DB2 Administrator User
|
- This User must have DBADMAUTH privilege to generate REST API endpoints/services.
- The "DB2 Administrator user" can create REST API endpoints/services only for the tables that "DB2 User for OData Service" have been authorized to access.
|
|
DB2 User for OData Service
|
- This "DB2 user for OData Service" is specified in connection string to connect to target DB2 database when REST API endpoints/services are being consumed.
- The OData REST API endpoints/services can be created only for those tables that “DB2 User for OData Service” have been authorized to access.
- OData REST API endpoints/services will support CRUD operations based on the privileges this user has on the selected table(s) e.g. INSERTAUTH, DELETEAUTH , SELECTAUTH ,UPDATEAUTH, ALL.
|
|
Use SSL
|
To create SSL connection between Application server and target DB2 server while creating and consuming service, Select the “Use SSL"checkbox.
To get SSL connectivity ensure you have
|
- In next page, select Schema and Tables to create OData Service and click Submit button. Refer Figure 3.
 Figure 3: Select the Schema and tables to create OData Service
- You will see message “Your Service is created successfully. Below is your Service URL.” And Service Root URL. Refer Figure 4.
The OData Service for selected table(s) is ready and working. Note down the Service Root URL.

Figure 4: Service created successfully
- Click on “View Service Metadata” button to view service metadata. You will see service metadata details as below. Refer Figure 5.
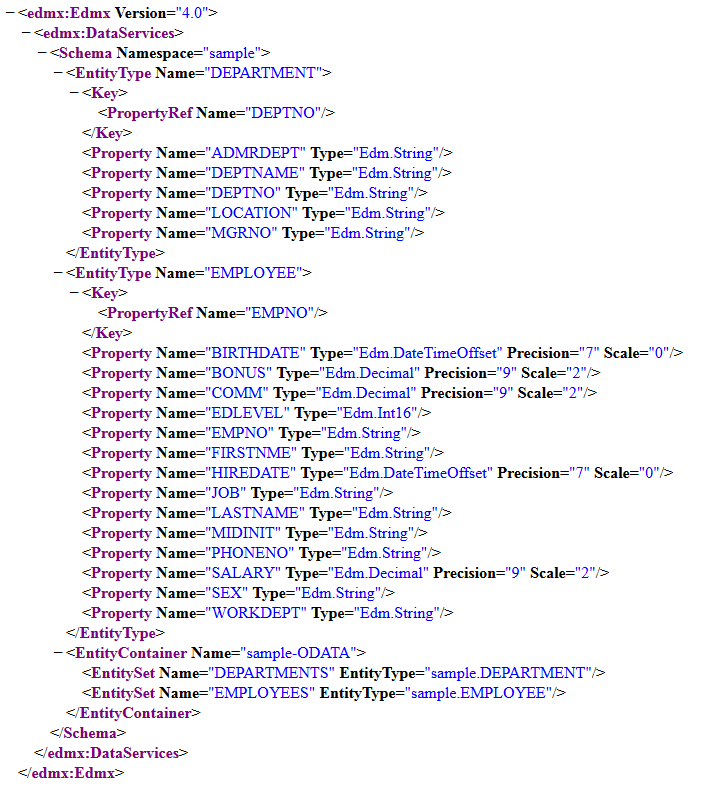 Figure 5: Service Metadata details
b) Create Service Via API
IBM Data Server Gateway for OData provides another way to create REST API endpoints/services for your tables via calling an API via http request that can be called from any programming languages that supports http protocol.
Follow below steps to create a REST API endpoints/service for your table with API
- Create a http request with URL http://<host_name>:9080/ODataOne/createService
- Set request Content-Type as application/json.
- Set http request method to POST.
- Create a JSON string in below format and set it in Request Header.
|
{
"database": "<database_name>",
"host": "<database_host>",
"port": "<database_port>",
"db2AdminUser": "<db2_admin_user>",
"db2AdminPassword": "<db2_admin_password>",
"db2ServiceUser": "<db2_service_user>",
"db2ServicePassword": "<db2_service_password>",
"ssl": false,
"schema": "<schema_name>",
"tablenames": ["table1", "table2"]
}
|
- Submit the request.
- Server will return response like below
Your service is created successfully!
Service Root URL
http://<host_name>:<port>/ODataOne/ODataService/sample-a1085cdc671c4b5dbd969c3be3e411e8
Service Metadata URL:
http://<host_name>:<port>/ODataOne/ODataService/sample-a1085cdc671c4b5dbd969c3be3e411e8/$metadata
Consuming Service
-
Consuming Service Via Browser
Once OData service is created it can be quickly verified via Browser.
Open browser and type service Root URL. You can also add OData URI options and hit enter. You will get response from your service.
Example: The service URL is
http://localhost:9080/ODataOne/ODataService/SAMPLE-bc2ebebbcc3840fdbdde8db60efcc910/
- Fetch the data from table EMPS with primary key 30000
http://localhost:9080/ODataOne/ODataService/SAMPLE-bc2ebebbcc3840fdbdde8db60efcc910/EMPS(30000)

Figure 6: Fetch operation by consuming OData service
- Fetch top 10 rows from table EMPS in JSON format
Service Request URL:
http://localhost:9080/ODataOne/ODataService/SAMPLE-bc2ebebbcc3840fdbdde8db60efcc910/EMPS?$top=10&$format=json
Service Response :
{"@odata.context":"$metadata#EMPS","value":[
{"EMPID":30000,"EMPNAME":"aim","EMPDEPT":null},
{"EMPID":500,"EMPNAME":"Alex","EMPDEPT":"Security"},
{"EMPID":501,"EMPNAME":"Alice","EMPDEPT":"Release"},
{"EMPID":1,"EMPNAME":"Amanda","EMPDEPT":"HR"},
{"EMPID":2,"EMPNAME":"July","EMPDEPT":"BI"},
{"EMPID":3,"EMPNAME":"Reene","EMPDEPT":"ID"},
{"EMPID":4,"EMPNAME":"Yash","EMPDEPT":"DDF"},
{"EMPID":5,"EMPNAME":"Mac","EMPDEPT":"DRDA"},
{"EMPID":6,"EMPNAME":"Ashok","EMPDEPT":"sqlcompatibility"},
{"EMPID":10,"EMPNAME":"Amanda10","EMPDEPT":"HR10"}]}
-
Consuming Service Via API/Web application programmatically
OData Service can be consumed programmatically via any language that supports http. Follow below steps to consume service programmatically
- Create a http request with the service URL as per OData URI conventions.
- For Select query set http request method to GET.
- For Insert queries set http request method to POST.
- For Update queries set http request method to PUT/MERGE.
- For Delete queries set http request method to DELETE.
- Submit the request.
- Verify the service response.
Examples using Java language:
For below examples, a REST API endpoints/service was created for EMPS table with below service root URL.
http://localhost:9080/ODataOne/ODataService/SAMPLE-b0fa542952bd4db2bc9a0438ccf1db83/EMPS
1. Insert a record in EMP table row with EMPID as 30.
|
URL url = new URL( "http://localhost:9080/ODataOne/ODataService/SAMPLE-b0fa542952bd4db2bc9a0438ccf1db83/EMPS" );
HttpURLConnection httpURLConnection = (HttpURLConnection) url_.openConnection();
httpURLConnection.setRequestMethod("POST" );
httpURLConnection.setRequestProperty("Accept", "application/json" );
httpURLConnection.setRequestProperty("Content-Type", "application/json; charset=UTF-8" );
httpURLConnection.setDoInput(true);
httpURLConnection.setDoOutput(true);
String jsonData =
"{ "
+ "\"EMPID\": "30", "
+ "\"EMPNAME\": \"Arvind\", "
+ " \"EMPDEPT\": \"DEPT1\" }";
OutputStreamWriter wr = new OutputStreamWriter(httpURLConnection.getOutputStream());
wr.write(jsonData);
wr.flush();
|
2. Update a record in EMP table row with EMPID as 30, using PUT.
When using PUT method, send all the column's name and value in order to avoid any column's value set to null.
URL url = new URL("http://localhost:9080/ODataOne/ODataService/SAMPLE-b0fa542952bd4db2bc9a0438ccf1db83/EMPS(30)" );
HttpURLConnection httpURLConnection = (HttpURLConnection) url_.openConnection();
httpURLConnection.setRequestMethod("PUT" ) ;
httpURLConnection.setRequestProperty("Accept", "application/json" );
httpURLConnection.setRequestProperty("Content-Type", "application/json; charset=UTF-8" );
httpURLConnection.setDoInput(true);
httpURLConnection.setDoOutput(true);
String jsonData =
"{ "
+ "\"EMPID\": "30", "
+ "\"EMPNAME\": \"Arvind\", "
+ " \"EMPDEPT\": \"DEPT2\" }";
OutputStreamWriter wr = new OutputStreamWriter(httpURLConnection.getOutputStream());
wr.write(jsonData );
wr.flush();
|
3. Update EMP table row where EMPID = 30, using PATCH.
Using PATCH method, single column value can be updated without need to send values of the all column's.
|
URL url = new URL("http://localhost:9080/ODataOne/ODataService/SAMPLE-b0fa542952bd4db2bc9a0438ccf1db83/EMPS(30)" );
HttpURLConnection httpURLConnection = (HttpURLConnection) url_.openConnection();
httpURLConnection.setRequestMethod("POST" );
conn.setRequestProperty("X-HTTP-Method-Override", "PATCH" );
httpURLConnection.setRequestProperty("Accept", "application/json" );
httpURLConnection.setRequestProperty("Content-Type", "application/json; charset=UTF-8" );
httpURLConnection.setDoInput(true);
httpURLConnection.setDoOutput(true);
String jsonData =
"{ "
+ " \"EMPDEPT\": \"DEPT3\" }";
OutputStreamWriter wr = new OutputStreamWriter(httpURLConnection.getOutputStream());
wr.write(jsonData );
wr.flush();
|
4. Delete a record in EMP table.
|
URL url = new URL("http://localhost:9080/ODataOne/ODataService/SAMPLE-b0fa542952bd4db2bc9a0438ccf1db83/EMPS(30)" );
HttpURLConnection httpURLConnection = (HttpURLConnection) url_.openConnection();
httpURLConnection.setRequestMethod("DELETE" ) ;
httpURLConnection.setRequestProperty("Accept", "application/json" );
httpURLConnection.setRequestProperty("Content-Type", "application/json; charset=UTF-8" );
httpURLConnection.setDoInput(true);
httpURLConnection.setDoOutput(true);
|
IBM Data Server Gateway for OData Configuration
-
odataconnector.properties
IBM Data Server Gateway for OData uses odataconnector.properties file to specify configuration options.
-
db2.jcc.traceFile=odata_jcc_trace.log
The odataconnector.properties is also a global property file that is used for IBM Data Server for JDBC and SQLJ driver tracing and monitoring. IBM Data Server for JDBC and SQLJ driver is used for internal connection to DB2 database. It allows to configure all the IBM Data Server for JDBC and SQLJ global properties.
The end user query executions (CRUD operations) will be logged as SQL executions in jcc trace file. You can specify all the applicable properties in this file. For example trace file can be specified as
db2.jcc.traceFile=odata_jcc_trace.log
Note - This property should be used only for troubleshooting purpose.
By default, IBM Data Server Gateway for OData limits rows returned by a query is 200. If you want to increase the number of rows, set this value accordingly.
User can specify as limitRows=500
IBM Data Server Gateway for OData uses embedded Derby database to store service information.
By default, derby database is created under the logged-in user home directory. You can change the derby database directory and specify derbyHome property value to absolute path of directory where you want Derby to create its database directory.
-
log4j.properties
IBM Data Server Gateway for OData uses log4j for logging. By default this property file is used to track warnings and errors that may occur during generation and consumption of REST API endpoints/services.
Configure the host name in Liberty server
You can add the defaultHostName variable to the server.xml file to set the default host name by which a Liberty server is identified. The default host name is localhost.
To set the default host name by which a Liberty server is identified, add the defaultHostName variable to the server.xml file.
For example:
<variable name="defaultHostName" value="host_name" />
For more information please refer IBM Knowledge center link:
http://www.ibm.com/support/knowledgecenter/SSAW57_liberty/com.ibm.websphere.wlp.nd.doc/ae/tagt_wlp_set_defaulthostname.html
Derby Database
IBM Data Server Gateway for OData uses embedded Derby database to store service information.
-
Setup file system path where the Derby database to be created
By default, derby database is created under the logged-in user home directory. You can change the derby database directory path of your choice by setting derbyHome property in odataconnector.properties file. It should be absolute path.
You should take backup of derby database periodically, so that when needed you can restore it. Take the backup of directory specified in derbyHome property under odataconnector.properties.
Security
IBM Data Server Gateway for OData provides security via following ways.
- SSL Communication: To get complete SSL connectivity from Client ↔ Application Server ↔ target Database, you will need to configure SSL at DB2 Server, Configure Java Runtime Environment to use SSL in Application server, and Configure https port in Application server.
- DB2 Administrator User: The User with DBADMAUTH privileges can only generate REST API endpoints/services.
- DB2 User for OData Service: The OData REST API endpoints/services can be created only for the tables for which the "DB2 user service user" have been authorized to access. OData REST API endpoints/services will support CRUD operations based on the table privileges this user has on the selected table(s) e.g. INSERTAUTH, DELETEAUTH, SELECTAUTH, UPDATEAUTH, ALL.
Limitations
- IBM Data Server Gateway for OData do not have Authorization/Authentication while consuming the service. You can use WebSphere Liberty Profile server security features mentioned in Reference section.
- After service is created, it cannot be updated or deleted via web interface, though services can be modified/deleted manually from Derby database.
- At present LOBs (CLOB, BLOB, DBCLOB) and XML datatypes are not supported.
- Navigation/Relationship is not supported.
- OData Batch request is not supported.
Troubleshooting
- As per OData specification, all database tables must have Primary key.
- Verify that you have the required privileges on the table for the operation you are performing on the service.
- Verify that the table exists in database.
- Verify that the target DB2 database is started.
- If you get error SRVE0095I: Servlet has become temporarily unavailable for service: /ODataOne/
Restart Liberty server and try again.
- After you deploy a war file, the server takes a few seconds to get ready to serve the request.
- If you get Permission denied error in Linux, AIX while running start_ibm_gateway_server_odata or stop_ibm_gateway_server_odata script run below commands.
Chmod 555 start_ibm_gateway_server_odata
Chmod 555 stop_ibm_gateway_server_odata
Chmod 555
Chmod 555 <install_path>/v1.0.0_ibm_gateway_server_for_odata/server/bin/server
- Use below properties file to collect logs for troubleshooting. You should revert these properties back to default value after logs are collected for troubleshooting.
odataconnector.properties :
- IBM Data Server for JDBC and SQLJ driver tracing and monitoring can be enabled dynamically without restarting the Application server. To enable jcc trace add the below line in odataconnector.properties file.
db2.jcc.traceFile=odata_jcc_trace.log
log4j.properties :
- Change log level from default value WARN to TRACE in log4j.properties file to capture the all the messages as below.
- User can update the property file “log4j.properties” dynamically without restarting the Application server.
log4j.logger.com.ibm.connect.odata=TRACE
References
IBM Data server Gateway for OData Version 1.0
OData Version 4.0 Part 2: URL Conventions
http://docs.oasis-open.org/odata/odata/v4.0/csprd02/part2-url-conventions/odata-v4.0-csprd02-part2-url-conventions.html
WebSphere Liberty Profile server - Configure security with Liberty
http://www.ibm.com/support/knowledgecenter/SSAW57_liberty/com.ibm.websphere.wlp.nd.multiplatform.doc/ae/twlp_sec_quickstart.html
WebSphere Liberty Profile server - Steps to authorize access to resources via Liberty
http://www.ibm.com/support/knowledgecenter/SSAW57_liberty/com.ibm.websphere.wlp.nd.multiplatform.doc/ae/twlp_sec_authorizing.html
http://www.ibm.com/support/knowledgecenter/SSAW57_liberty/com.ibm.websphere.wlp.nd.multiplatform.doc/ae/twlp_sec_rolebased.html
#DataManagementGlobal#DataServerDrivers