We have enhanced this agent to support posture and vulnerability management, please refer to this blog post.
Workload Protection is a Cloud Native Application Protection Platform (CNAPP) that combines multi-cloud compliance, security posture management (CSPM), threat detection, and vulnerability scanning in one unified solution. Serving as a versatile tool, this platform empowers users to obtain a unified view of potential risks across their infrastructure, addressing diverse environments including containers, Kubernetes, and both virtual and physical hosts across well-known cloud platforms providers such as IBM Cloud, Amazon Web Services, Google Cloud, and Microsoft Azure. Furthermore, the product includes a pre-established set of rules for validating compliance in containers and cloud environments, promoting a secure operational landscape.
In this guide, we will walk you through installing the IBM Security and Compliance Center Workload Protection (SCC WP) Agent in Windows hosts to detect real-time runtime threats and respond to them.
What Windows Threat Detection Agent brings to the table?
The IBM Security and Compliance Center Workload Protection (SCC WP) Windows Agent provides Runtime Threat Detection for the Windows operating system.
The IBM SCC WP Windows Agent is installed on a Windows host and collects data from that host. Once the agent has started, it gathers system calls and leverages Falco rules to detect well-known malicious threats and binaries. Falco rules are meticulously crafted and curated by the Sysdig Threat Response Team to keep them one step ahead of bad actors, but SCC WP users can also create custom rules.
Installation requirements
To install the Windows Agent, the following requirements need to be met:
-
Windows Server 2019 and above.
-
Visual C++ 2015-2022 Redistributable package. It can be downloaded from the official Microsoft link.
-
ACCESS_KEY: The Agent access key.
-
COLLECTOR: IBM SCC WP endpoint. Set it accordingly, endpoints for each IBM Cloud region are available on this list.
-
Administrator permissions on the Windows host to perform the setup.
How to install IBM SCC WP Agent
Installing the IBM SCC WP Agent using either GUI or CLI operation is possible.
Both methods require downloading the IBM SCC WP Agent, which is available in the following link in MSI format.
GUI installation
The MSI can be executed using a GUI, and the installation process will prompt acceptance of the EULA and entry of the Collector and Access Key details.
CLI Installation
To install the IBM SCC WP Agent through the CLI, run the MSI in silent mode via CommandLine or PowerShell:
> msiexec /i sysdig-agent.msi COLLECTOR_URL=<COLLECTOR> COLLECTOR_PORT=6443 ACCESS_KEY=<AGENT_ACCESS_KEY> ACCEPT_TERMS_CONDITIONS=True /qn
After installing the IBM SCC WP agent, it doesn’t matter what method, two new services should be running in the host.
Enabling Windows Workload security policies
After agent installation, a new policies group called Windows Workload is available within the SCC WP instance and under the Policies > Runtime Policies section.
Once the new set of Falco rules for Windows is enabled, Windows Agent will receive them, and the evaluation process against the system calls based on the new policies will start. This mechanism ensures that the agent always has the latest set of rules available.
If an event matches any security rule, it will be collected and sent to the SCC WP instance. After collecting the event, several actions could be taken (alert only, prevent, or even stop the process in certain situations).
.png)
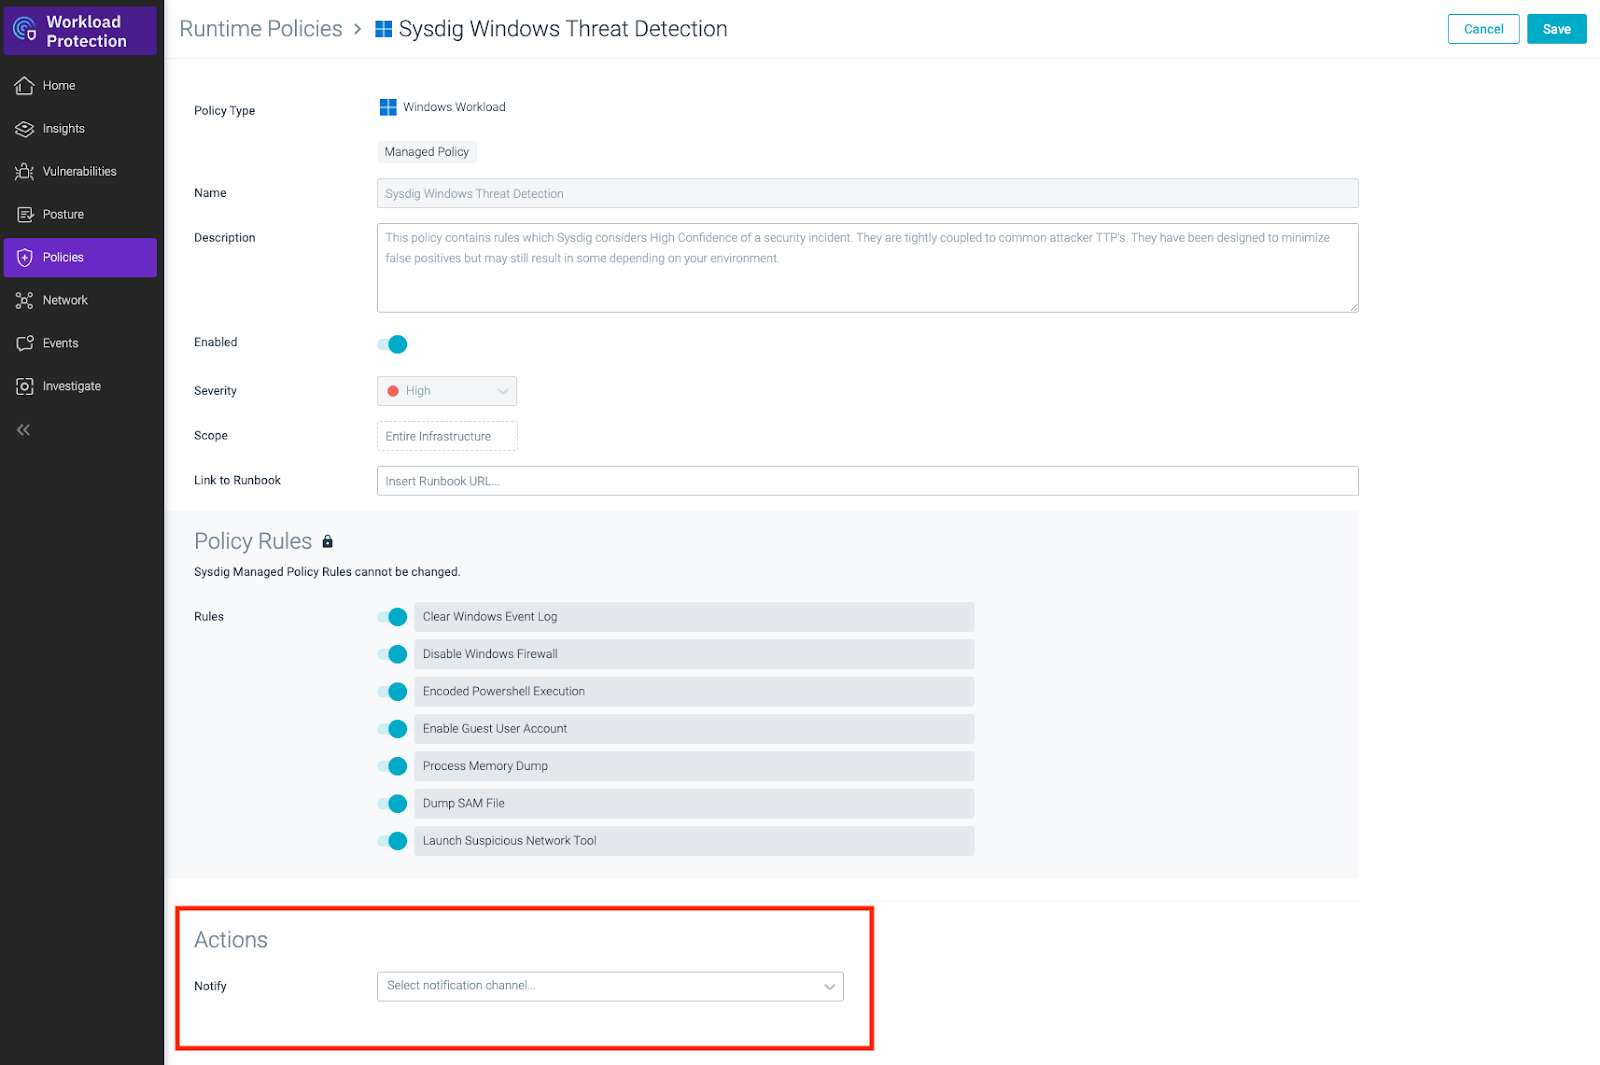
Additionally, an alert could be triggered when a security event happens using the SCC WP notification channels. To do that, just configure the proper destination for each Policy:

As mentioned before, the Sysdig Threat Response Team maintains a huge well, curated set of rules, but they could be expanded by users creating custom ones:
.png)
Antivirus/EDR exceptions
IBM SCC WP Windows Agent may conflict when coexisting with Antivirus software or EDR sensors. To prevent termination of the IBM SCC WP Windows Agent processes, setting up exclusions for the Agent root installation directory is recommended.
Carbon Black Cloud
-
From the Carbon Black Cloud Console, go to Enforce > Policies
-
Select the desired Policy and click on the Prevention tab
-
Add a new Permission by clicking on the + sign
-
Add a new application path in the Permissions section and provide the directory exclusion *:\Program Files\Sysdig\Agent\**
-
Check Bypass option box for Performs Any Operation
-
Click Confirm
Windows Defender
-
Open Windows Security > Virus & threat protection
-
Under Virus and threat protection settings, select Manage Settings
-
Under Exclusions, select Add or Remove exclusions
-
Click on the Add an Exclusion button and choose Folder
-
Browse the drive where the IBM SCC WP Windows Agent was installed, and select the Program Files\Sysdig\Agent directory
Conclusion
In conclusion, the IBM Security and Compliance Center Workload Protection (SCC WP) Agent emerges as a formidable guardian for Windows hosts, offering a dynamic blend of runtime detection and policy enforcement that can replace your existing EDR solution.