By: Todd Johnson (toddjohn@us.ibm.com)
Neela Shah (neela@us.ibm.com)
Purpose
The purpose of this blog is to create a Client to Site VPN Service that you can use to connect client machines such as Macs and PCs to your VPC network, Cloud Service Endpoints (CSE), IaaS services, and to your private classic subnets. This blog is intended as a quick start to get you familiar with the service and quickly create a working VPN connection from a Mac to your VPC and other IBM Cloud private networks. This blog is not intended to serve as a comprehensive guide or best practices. Prior to putting the Client VPN service into production you should read the official documentation which is referenced in the References section. Note: This blog covers the beta version of the client to site VPC VPN.
Overview
There are 5 major parts to successfully create a working VPN connection:
- Create and upload the VPN Server and Client certificates to Certificate Manager.
- Use IAM Authorizations to grant the Client VPN service access to your Certificate Manager instance where you uploaded the certificates.
- Create the Client VPN Service.
- Setup the security groups and VPN routes.
- Setup and use a supported VPN client on your client machine. For the blog we'll use the Tunnelblick application. See the documentation for other supported VPN clients.
In addition we discuss accessing your classic infrastructure private subnets.
Certificates
The VPN requires use of certificate manager to store the certificates used by the Client VPN service. (Note: Certificate Manager is a deprecated service. Currently the beta only supports Certificate Manager so we will use it.)
Create certificate manager instance.
For this blog we used the UI so you must specify both private and public endpoints. Optionally you can use your existing Certificate Manager instance. To create a new instance:
-
Select Catalog -> Search for Certificate Manager
-
Select Certificate Manager
Do the following:
- Choose the location where the certificate manager instance will be created.
- Select your pricing plan.
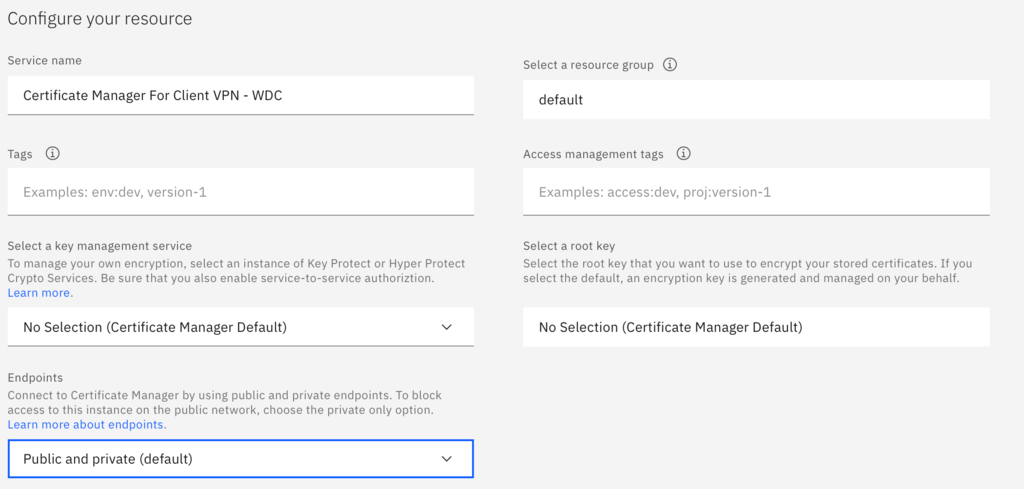
- Under Configure your resource:
- - Enter a service name.
- - Select public and private endpoints.
- - The rest of the fields can be left at their default values.
- Read and agree to the license terms and press Create.
Create Certificates
For this blog we'll use a tool called easyrsa, however you can use openssl or other certificate creating software that you are used to. The next steps assume you have git client installed on your machine and can access GitHub repositories.
- Install easyrsa from GitHub and switch to the current release tag:
- Initialize easyrsa:
- cd easyrsa3
- ./easyrsa init-pki
- Create the CA:
- ./easyrsa build-ca nopass
- Note: You'll get prompted to specify a common name, for example
4. Create the server certificate:
-
- ./easyrsa build-server-full vpn-server.vpn.ibm.com nopass
5. Create the client certificate:
-
- ./easyrsa build-client-full vpn-client.vpn.ibm.com nopass
Easyrsa puts the certification files in the following locations:
-
- Certificates: easyrsa/easyrsa3/pki/issued
- CA certificate: easyrsa/easyrsa3/pki/ca.crt
- Private keys: easyrsa/easyrsa3/pki/private
Import your certificates into the certificate manager instance
Important: You must use the Chrome browser to import the certificates directly using the .crt file extension. Other browsers such as Safari will only allow you to load the certificates with a .pem file extension. Under Your Certificates press the Import button:
Import your VPN Server certificate:
Import your client authentication certificate:
Grant the Client VPN for VPC service writer access to your certificate manager
You must grant Writer access otherwise you will receive a warning message when you try to use the certificate from the VPN creation panelsAlso, we show granting access to all our certificate manager instances, you can limit the instance only the only you want to use.Do the following:
- Manage -> Access (IAM) -> Authorizations
- Press Create
- Select Resources based on selected attributes
- Check Resource type
- Use the pulldown to select Client VPN for VPC
- For Target service use the pull down to select Certificate Manager
- Select all resources (or optionally you can select an individual Certificate Manager instance)
- Check Writer for Service Access
Press the 'Authorize' button. You now have granted the Client VPN service writer access to your certificate manager instances.
Client-to-Site VPN Service
Now that the certificates are imported and we have given the Client VPN service access to our certificate manager instance, we can create the Client VPN service instance.
Do the following:
- VPC Infrastructure -> VPNs
- Click on the Client-to-site servers "tab" at the top
- Press the Create button on the left.
For the Details section do the following:
- Give the VPN server a name. This can be anything you want that conforms to the name specifications.
- Select the VPC you want to use.
- Specify the client address pool. When a client connection is created, this is the address pool from which the client IP address is chosen. It's important that this address range does not overlap with any ranges in your network and that it does not overlap with any destination address ranges including the VPC subnets, other VPN client address pools, and any classic subnets you need access to. Also, it must have a minimum size of 1024 addresses (/22). For more information about this field, please refer to the documentation. We chose a range from the private address space, 172.21.0.0/22
For the Subnets section, do the following:
- Select either Stand-alone mode or High Availability mode. For our purposes, Stand-alone mode is fine.
- Verify the VPN will be attached to the subnet you want. The choice here doesn't really matter in that you can easily add routes to other subnets in your VPC and have your client communicate with resources on those subnets. See below for route configurations.
For the Authentication section, do the following:
- Select the certificate manager instance that you uploaded your certificates to from the Certificates section above in this document.
- Select the your server certificate in the Server section and your client authentication certificate in the Client Authentication section.
- Ensure the Userid and password field is unchecked.
- Note: We are using client certificate authentication and not userid/password authentication. If you want userid/password authentication please see the documentation.
Note: If you see the following warning box, your IAM service to service authorization is not correct. Go back and correct IAM service to service authorization.
In the Security groups section, do the following:
- Select at least 1 security group that the VPN's network interfaces are attached to. In our case, we are using the VPC's default security group.
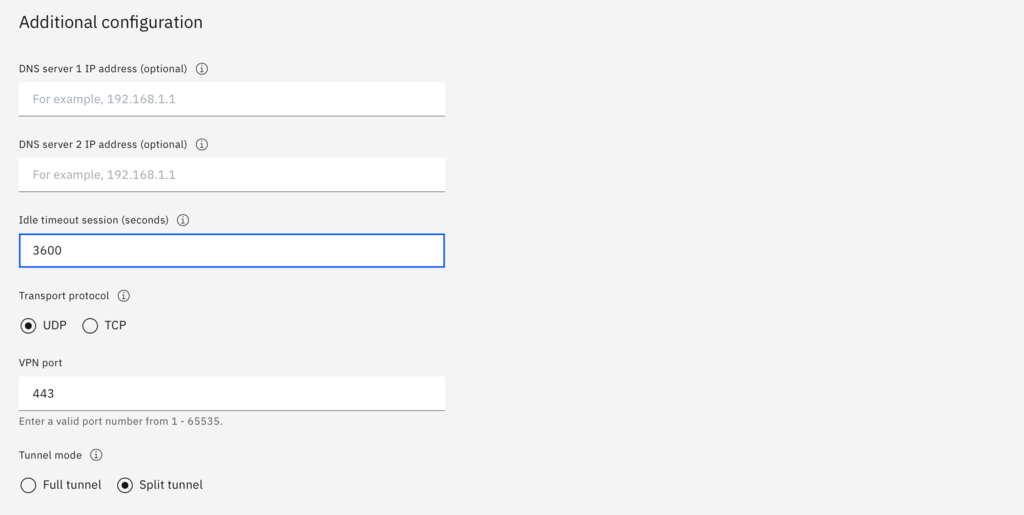
In the Additional configuration section, do the following:
- If you have any DNS servers that the VPN connection will need on the client side you can enter those here. These DNS servers are propagated to the client. For example, if you need to access private IBM Cloud DNS entries from your client, you can add the private DNS servers of 161.26.0.10 and 161.26.0.11. These values are optional.
- Adjust the Idle timeout session. The VPN server will terminate the connection when there is no traffic flowing from the client to the VPN server for this amount of time. We found that default of 600s is too short to be practical, so changing to 3600s. This value can be changed after the VPN is created so you can adjust it later to meet your needs.
- Select UDP as the Transport protocol. See the documentation for a discussion of the advantages and disadvantages of each protocol type.
- Set the tunnel mode. The tunnel mode determines if your client sends all network traffic through the VPN connection (Full tunnel) or if only network traffic destined for the private subnets handled by this VPN server are sent through the VPN and other client network traffic destined for other networks are sent via their normal routes (Split tunnel). In our case we want Split tunnel.
Security Group SetupThe security group that is attached to the VPN server instance interfaces needs to allow both inbound and outbound UDP traffic, since that is how we setup the transport protocol for our VPN server instance.
Do the following:
- From the VPN servers list select the wdc-vpc-vpn VPN service you just created.
- Select Attached Security Groups from the the "tab" at the top.
Note: Our security group allows all outbound traffic, however if yours does not, you will need to create another rule to allow outbound UDP traffic.
Routes to private network resources
When the VPN client establishes a connection to the VPN server, the VPN server will send the client a list of routes that are then propagated to the client's routing table. When a client makes a network request to an IP address on one of those subnets, the client knows to send the request over the VPN connection and not to the client's normal network interface. Therefore, you must update the VPN server's routes so that the client can connect to those resources on the private VPC network or other IBM Cloud private networks. In this example, we will create routes for each of the 3 VPC subnets, the private IBM Cloud service endpoint subnet (cse), and the private IBM Cloud IAAS services endpoint subnet (DNS servers, etc).
Do the following:
- Get the list of subnets for the VPC:
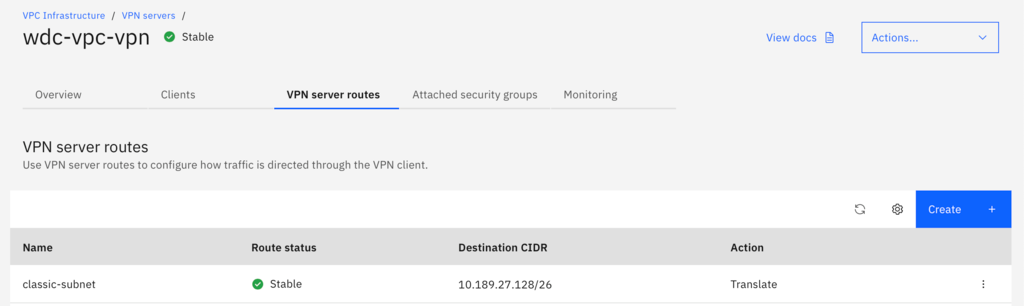
From the VPN server, select the VPN server routes tab and do the following:
- Create a route for each subnet with the Deliver action
- Create a route for the CSE subnet, 166.8.0.0/14 with the Deliver action
- Create a route for the IAAS services subnet, 161.26.0.0/16 with the Translate action
Note: In order for the VPN server to forward traffic to the destination service, your outbound security group must allow that traffic to those destinations. For example:Since our default security group outbound rule allows all traffic, there is nothing we need to do, however your security group might be different so verify the security group will allow the correct outbound traffic to those destinations for example you will need to allow TCP traffic to 166.8.0.0/14 and the other subnet routes you added.
Client Setup
For this blog we will use the TunnelBlick VPN Client app (3.8.6a) on Mac Monterey OpenVPN clients work as well for the Mac and other platforms. See the documentation for a complete list and versions of supported VPN clients.
From your VPN Client Server instance select the Clients tab at the top:
Click the Download client profile button which will download the open vpn configuration file to your workstation. If you are you using client certificatie authentication then you need to edit this file and add your client certificate and client private key in the file. These are the client ones you uploaded to certificate manager.
<cert>
Your client certificate here
</cert>

<key>
Your client private key here
</key>
For example:
<cert>
-----BEGIN CERTIFICATE-----
MIIDWjCCAkKgAwIBAgIRAL1geBRRS/XKtQiUBVjZ/iwwDQYJKoZIhvcNAQELBQAw
              .......
2bhUIzb17tkO1roUzTHTktTGZwnjjxDwjHIPbx9vFAGQFzmsmAVZvKVUrxXPIg==
-----END CERTIFICATE-----
</cert>

<key>
-----BEGIN PRIVATE KEY-----
MIIEvQIBADANBgkqhkiG9w0BAQEFAASCBKcwggSjAgEAAoIBAQC8kRNP+6Y9v7z1
              ........
Ms69ixF4euDZCPh9AonrITI=
-----END PRIVATE KEY-----
</key>
Once you've saved the changes to the file, you can drag and drop this file into Tunnelblick configurations and connect to the VPN. Once Tunnelblick connects to the VPN server, try pinging one of your VSI instances or you can now connect to your private IKS or ROKS clusters.
Besides verifying from the client side, you can check your VPN Server instance on the Clients tab and see if the client is connecting:
A note about client authentication certificates.
When you upload your client certificate to your Certificate Manager instance, the Client VPN service really only is looking for the CA. This means each client can have its own client authentication certificate as long as it's signed by that CA. Since the Clients list in the UI displays the common name in the certificate each client using their own certificate will make tracking easier. Just create a new client certificate with a unique common name and use that certificate and private key in the open vpn configuration file.
For example if you are using easyrsa:
- ./easyrsa build-client-full <client name> nopass
Where <client name> is any value that you use to identify a client.
There is no need to upload it to certificate manager.
Connecting to your classic private networks
There are 2 ways to connect your VPN to classic private networks:
- Enable classic access when you create the VPC or
- Creating and using the transit gateway service.
Once you've established connection with either of the above the methods, you can simply add VPN routes to those subnets. For example, if we need to access classic resources on the classic subnet 10.189.27.128/26 create the route with the translate action and restart the vpn client. Note: The action must be Translate for classic routes.
That's it. You have successfully created a Client to Site VPN service and connected your Mac to it. You can now access your resources using the IBM Cloud private network.
References