Using Tekton Pipelines with OpenShift
Red Hat OpenShift recently added an Operator to support Tekton pipelines, an open-source pipeline for GitOps CI/CD operations. The overall simplicity in the Tekton design makes getting started an easy proposition. But where to start? The Tekton HelloWorld tutorial is an excellent place for learning the very basics of Tasks and Pipelines and how to run them. But getting from HelloWorld to a sophisticated CI/CD pipeline can be daunting. This tutorial walks you through a simple example beyond the HelloWorld tutorial to learn more about the components of a Tekton pipeline and how they interact. Then, in the future when you create or use a pipeline, the concepts and process will be familiar to you.
Tekton pipelines are designed to automate continuous integration of developer code. Developers check in their code, test automation is kicked off, and changes are merged when the tests pass. For this tutorial, we chose a simpler but related use case – posting a message to Slack when code is committed to a GitHub repo. Of course there are many easier and simpler ways to achieve this, but we use this scenario to demonstrate additional fundamental components of a Tekton pipeline.
The HelloWorld tutorial introduces the process of building a Task which is composed of Steps. Pipelines can then be constructed by stringing together one or more Tasks to accomplish a series of activities. This tutorial expands on that scenario by triggering the execution of the pipeline by using the TriggerBinding, TriggerTemplate, and EventListener objects.
Note: All of the assets described in this tutorial are available in GitHub which you can clone and use.
In our scenario, the Task simply posts a message to a Slack channel. The Pipeline trigger is a GitHub Webhook event that is emitted when code is merged into the repository as shown in the following diagram:

We begin with the Task and Pipeline definition and then explore the TriggerBinding, TriggerTemplate, and EventListener. But before we can do that, we need to install the Operator.
Step 1: Install the for Red Hat OpenShift GitOps Operator
In your OpenShift web console, navigate to the Operators > Operator Hub and search for Red Hat OpenShift GitOps. Click the tile and install it.

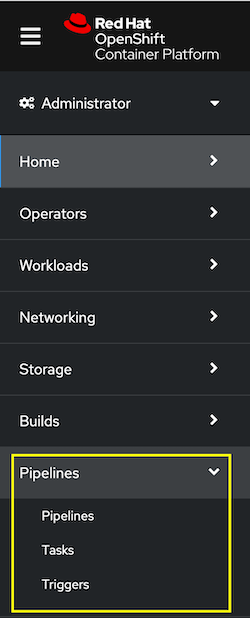
After the operator is installed, you’ll notice a new Pipelines section in your left nav that you can use to interact with the components:
The operator installation also creates a new ServiceAccount named pipeline that can be used to run the pipeline. This is convenient because when you run a pipeline, a new pod is deployed, and the pod’s service account can be set to pipeline which has all the required permissions. We’ll see how this is used in a later step.
Step 2: Create a Slack App
Additionally, not required by Tekton, but essential for our scenario to work, you need to create a Slack App which generates the target endpoint URL in Slack and then bind it to your slack channel. It’s a simple process that is described in the Slack documentation.
TIP: Before deploying the Tekton components, we recommend that you create a Project in your OpenShift cluster where they can all reside to make them easy to locate and work with. Do that through the web console, Home > Projects > Create Project, or use the OpenShift CLI:
oc new-project <your_project_name>
Throughout this tutorial, we use the project (or namespace) webhook-to-slack-pipeline.
Step 3: Create a Task
Let’s begin by creating our Tekton task .yaml file that will post a message to slack. Before writing your own task, check out the Tekton catalog of tasks to see if one already exists. It turns out, a task already exists that we can customize:
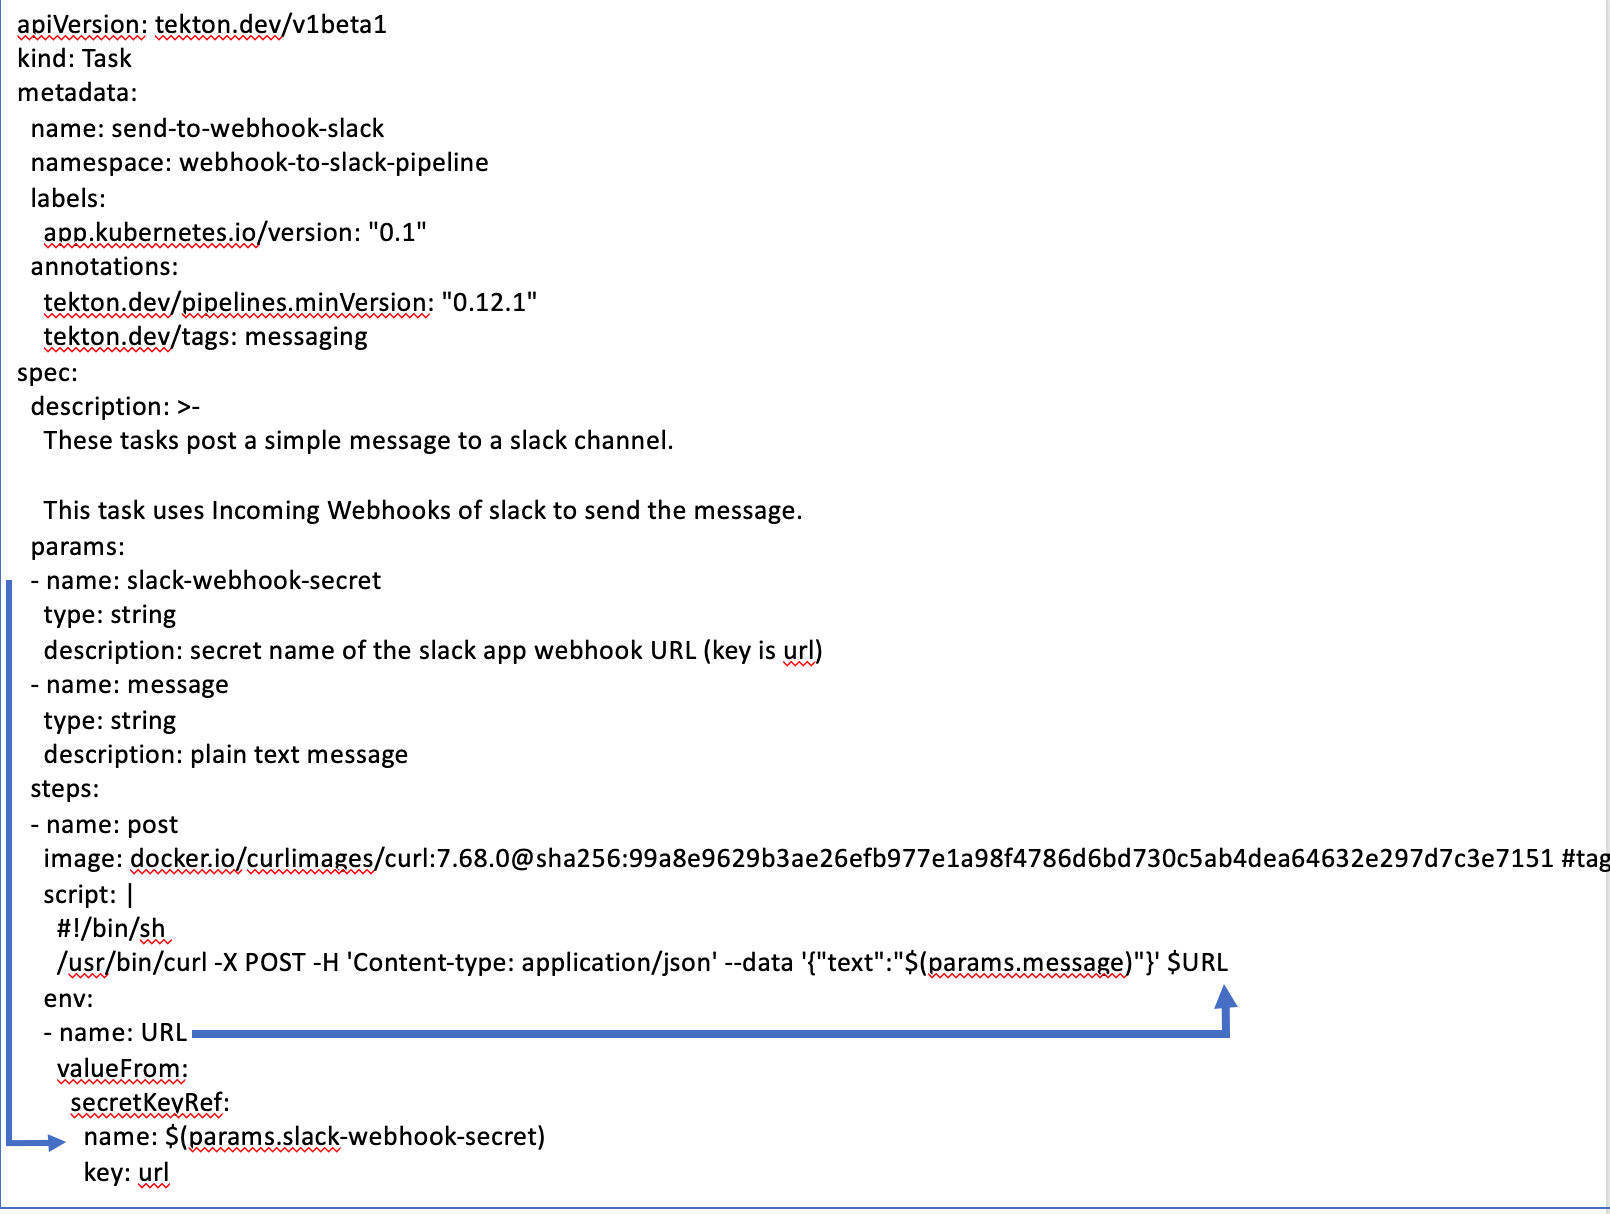
We name our task send-to-webhook-slack. And it has two parameters:
- slack-webhook-secret: We need to create a secret by this name and provide the URL of our Slack. For example:
kind: Secret
apiVersion: v1
metadata:
name: slack-webhook-secret
namespace: webhook-to-slack-pipeline
stringData:
url: "<your_slack_app_url>"
- message: A cURL command inside the task posts the message to the Slack channel.
This task .yaml definition can be deployed via the CLI oc apply command or you can deploy it via the OpenShift web console, by navigating to Pipelines > Tasks > Create > Task. Paste in the contents of your .yaml file and click Create.
Before proceeding, it’s always a good idea to test your task to ensure that it works. Create a TaskRun object where we pass the slack-webhook-secret and the message that we want to post on the Slack channel. You can use the CLI to apply the following file or create a TaskRun object by navigating to Pipelines > Tasks > Create > TaskRun. Paste in the contents of the TaskRun .yaml file and click Create.
apiVersion: tekton.dev/v1beta1
kind: TaskRun
metadata:
name: run-send-to-webhook-slack
namespace: webhook-to-slack-pipeline
spec:
params:
- name: slack-webhook-secret
value: slack-webhook-secret
- name: message
value: "Hello from Tekton!"
taskRef:
name: send-to-webhook-slack
Verify that the message was posted to your Slack channel. If it fails, examine the logs of the generated pod for any errors.
Step 4: Create a Pipeline
The pipeline simply invokes our task.
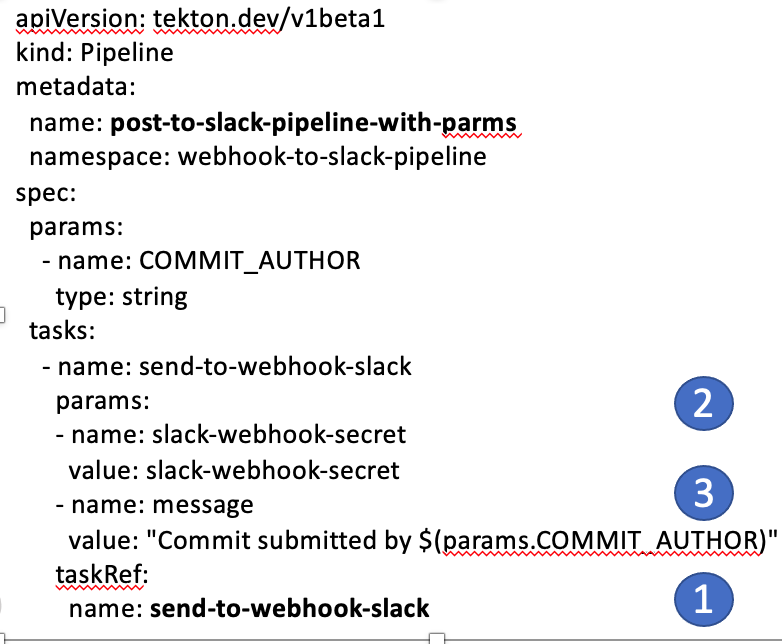
It has one parameter, COMMIT_AUTHOR, that we extract from the GitHub Webhook event.
The tasks: section lists the task (or tasks) that we want to invoke:
- taskRef: provides the name of the task send-to-webhook-slack.
- params: is used to specify the two parameters that the task expects, the slack-webhook-secret and the contents of the message that we want to post to the slack channel. In our case, we will post the message: Commit submitted by <COMMIT_AUTHOR>.
Again, this pipeline .yaml definition can be deployed via the CLI or you can deploy it via the OpenShift web console, by navigating to Pipelines > Pipelines > Create > Pipeline. Click Edit YAML and paste in the contents of the .yaml file and click Create.
It is also important to test the pipeline before proceeding by creating a PipelineRun object. If you ran the HelloWorld tutorial, then you know the simplest way to do that is to use the Tekton CLI and run the command:
tkn pipeline start post-to-slack-pipeline-with-parms
Otherwise you can navigate to Pipelines > Pipelines > Create > PipelineRun. Verify the message was posted to your Slack channel.
Now we are ready to explore the other Tekton components that are not covered in the HelloWorld tutorial.
Step 5: Create a TriggerBinding
In Tekton, a TriggerBinding is used to define the data that you want to extract from the Webhook event and map it to the fields in the event itself:
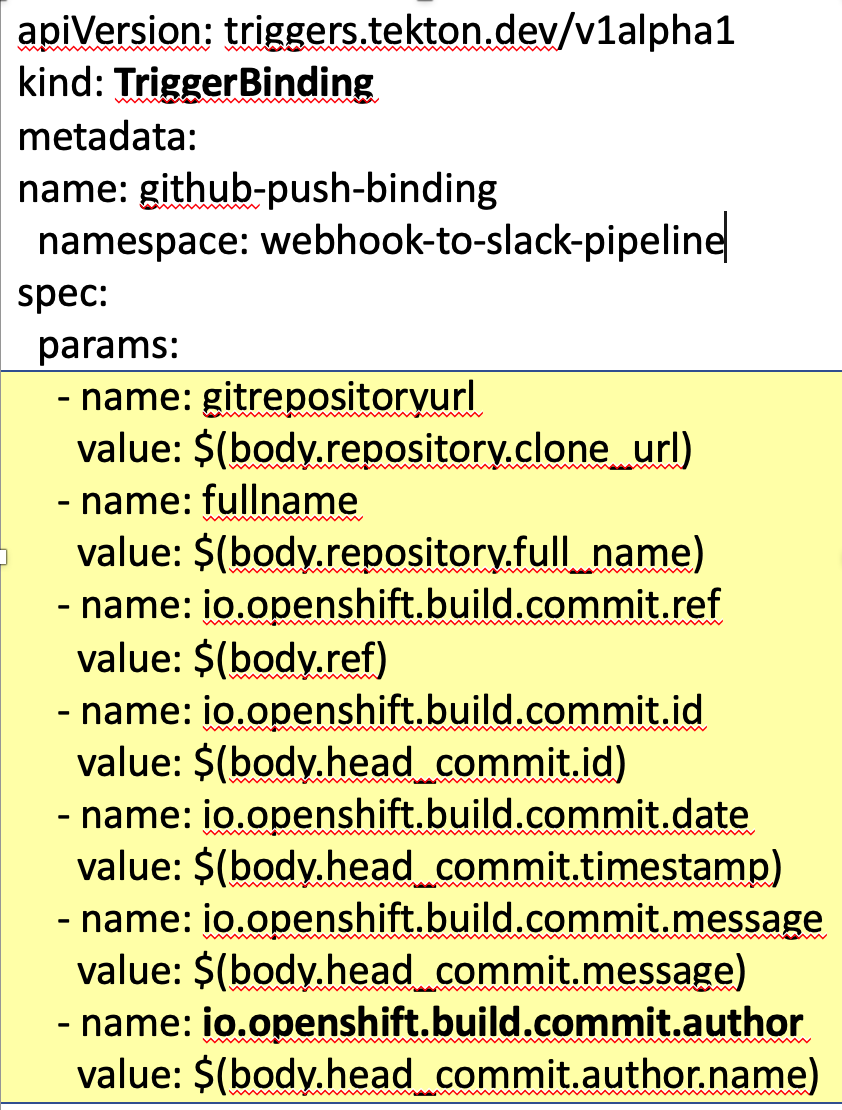
Our TriggerBinding is named github-push-binding.
The fields highlighted in yellow are just some of the fields that you can extract from a Git Webhook push event. To keep things simple, we only use one of them, body.head_commit.author.name, which we map to the parameter io.openshift.build.commit.author. You can explore all of the fields available in your push event after we configure the webhook later in the tutorial.
Deploy the TriggerBinding .yaml from the command line or via the OpenShift web console, by navigating to Pipelines > Triggers > Create > TriggerBinding. Paste in the contents of your .yaml file and click Create.
Step 6: Create TriggerTemplate
The Tekton TriggerTemplate uses the parameters from the TriggerBinding when it launches the pipeline. The TriggerTemplate performs the same actions as the PipelineRun in the HelloWorld tutorial. In fact you will notice the TriggerTemplate contains kind:PipelineRun.
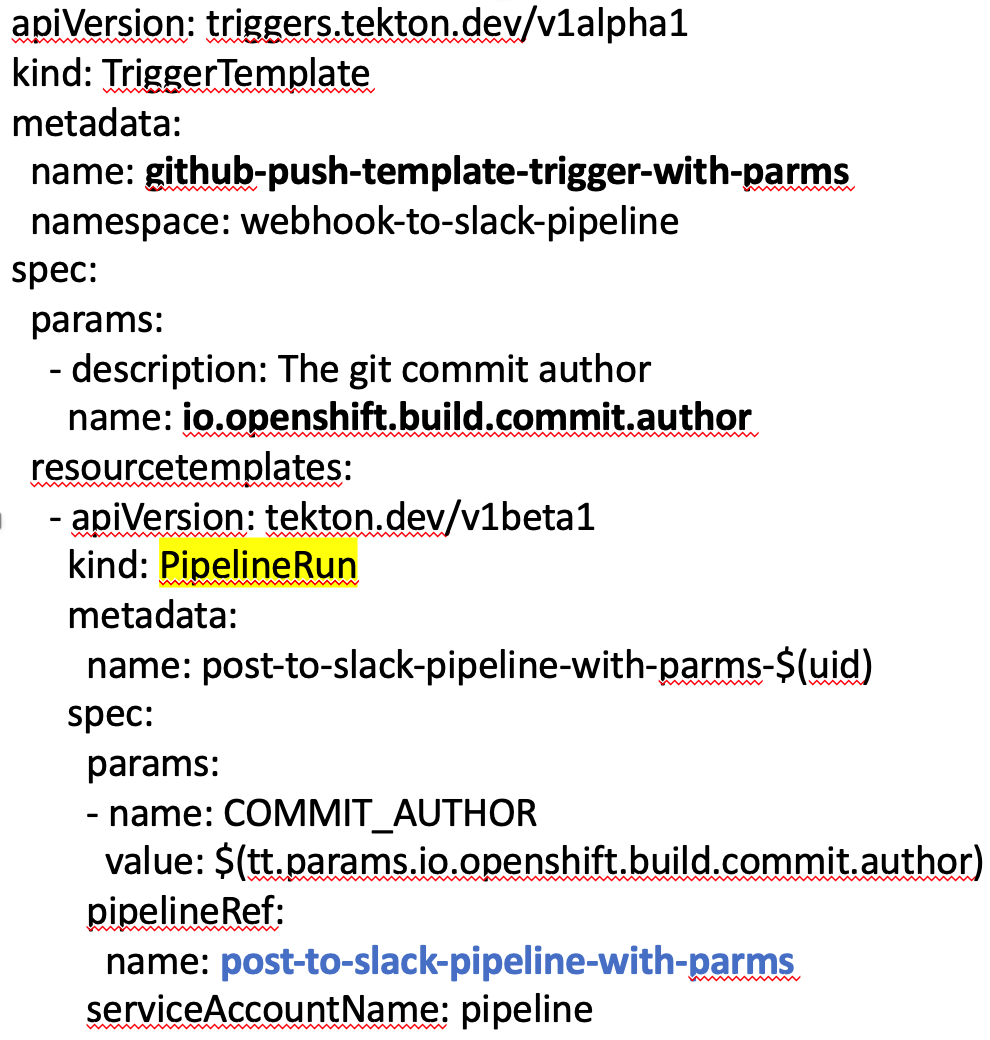
Our TriggerTemplate name is github-push-template-trigger-with-parms.
It contains one parameter io.openshift.build.commit.author that we mapped in the TriggerBinding and passes that parameter to the pipeline in the spec: section. Notice that the pipeline ServiceAccountName is specified for the pod that gets launched when the pipeline runs.
Deploy the TriggerTemplate .yaml from the command line or via the OpenShift web console, by navigating to Pipelines > Triggers > Create > TriggerTemplate. Paste in the contents of your .yaml file and click Create.
Step 7: Create an EventListener
Finally, we define an EventListener that listens for the Webhook push events from your GitHub repository and then launches the pipeline. The EventListener ties together the TriggerBinding and the Trigger Template definitions.

Our EventListener is named bringup-site-cicd-event-listener.
The interceptors: section ensures that the EventListener only fires when a push event is emitted from the specified repository. Notice we also must provide a Kubernetes secret, named web-hook-secret-key in this example, although you can name the secret anything you want. You need to create this simple Kubernetes Key-Value secret in the same project or namespace where your pipeline is running and it must contain a key with the name WebHookSecretKey. The value of the key must be a BASE64 encoded string. Navigate to Workloads > Secrets > Create > Key/Value Secret. Or use the CLI to apply this web-hook-secret-key .yaml file:
kind: Secret
apiVersion: v1
metadata:
name: web-hook-secret-key
namespace: webhook-to-slack-pipeline
data:
WebHookSecretKey: <base64_encoded_string>
type: Opaque
TIP: There are plenty of utilities available online that can BASE64 encode your string.
When a matching event is received, the EventListener will fire our TriggerTemplate github-push-template-trigger-with-parms which uses our TriggerBinding definition github-push-binding.
Deploy the EventListener .yaml from the command line or via the OpenShift web console, by navigating to Pipelines > Triggers > Create > EventListener. Paste in the contents of your .yaml file and click Create.
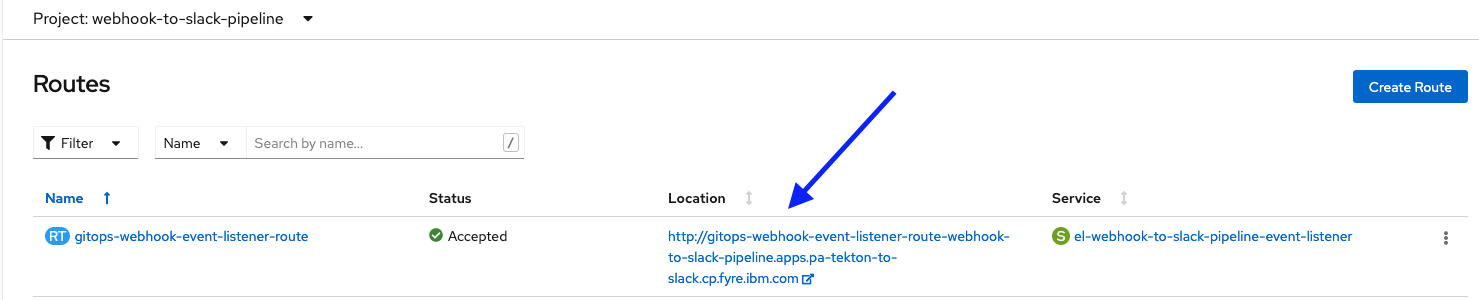
There is one additional step we need to perform outside of the Tekton pipeline components. In order to deliver the events to our EventListener, the GitHub Webhook needs an endpoint URL for the EventListener. So we need to expose our EventListener as a route in the OpenShift cluster. The following .yaml creates a route definition named gitops-webhook-event-listener-route.

Deploy the route .yaml from the command line or via the OpenShift web console, by navigating to Networking > Routes> Create Route > Edit YAML. Paste in the contents of your .yaml file and click Create. Ensure that you are in your OpenShift project when you do this. The generated route URL is visible in the Location column of the table.
Step 8: Configure Webhook
The final configuration step is to configure a Webhook between your GitHub repository and your OpenShift EventListener. Navigate to the Settings tab of your GitHub repository and click Hooks > Add webhook.
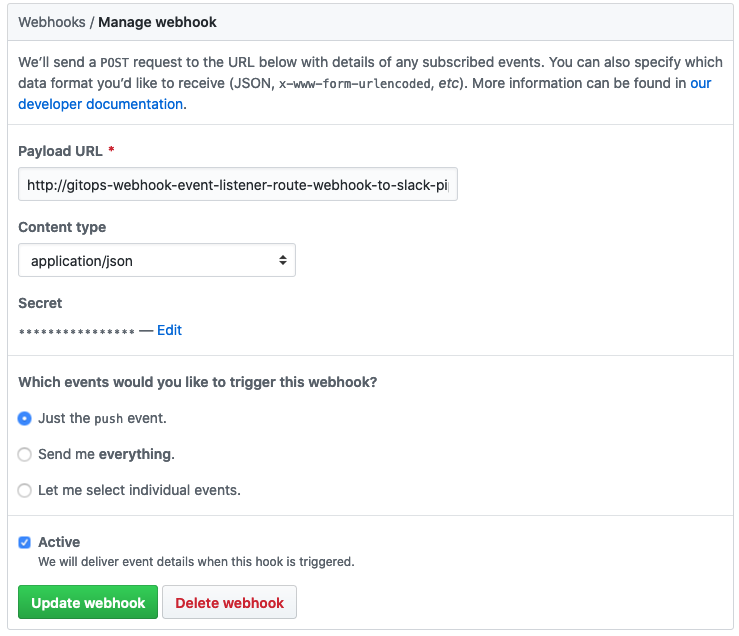
In the Payload URL field, paste the URL from the previous step when you exposed the route.
Set the Content type to application/json.
In the Secret field, enter the non-BASE64 encoded value of the WebHookSecretKey (i.e. the value of the string before you BASE64 encoded it).
Click Update Webhook.
It immediately issues a ping event to your EventListener to verify the connection info and that the EventListener is available. You should get back a 202 response code, which indicates that your webhook is configured and active.
To verify that it all works, simply merge a commit from your GitHub repository and then verify a message is posted on your Slack channel.
Summary
Throughout this tutorial you have learned how to use a Tekton pipeline to monitor for push events emitted from a GitHub webhook to an EventListener on our OpenShift cluster. The Eventlister includes a TriggerBinding which defines the data (fields) from the event that we are interested in. It also includes a TriggerTemplate which defines what to do when the event is received, in our case to kickoff our pipeline. The pipeline contains a single task that posts a message to slack that includes the name of the commit author.
Next steps
Now that you’ve learned about the key components of a Tekton pipeline, you are ready to create your own pipeline.
Reference
Tekton has excellent documentation and examples of pipelines, triggers, templates, and bindings that are useful when creating your own versions of these files.
#Featured-area-2
#Featured-area-2-home
#Openshift#Tekton