- By Neela Shah, Todd Johnson
Introduction
Your enterprise has lots of data. But your data is useless if you can't trust it or access it. You need to use your data to generate meaningful insights that can help you avoid problems and reach your goals. IBM Cloud Pak for Data enables you to connect to your data, govern it, find it, and use it for analysis. IBM Cloud Pak for Data also enables all of your data users to collaborate from a single, unified interface that supports many services that are designed to work together.
IBM Cloud Pak for Data can run on your OpenShift cluster on various cloud providers. This blog will walk you through how to install IBM Cloud Pad for Data v4.0.x on an IBM Cloud Redhat Openshift Kubernetes Service cluster. The cluster can be either on the IBM Cloud Classic Infrastructure or on the IBM Cloud VPC infrastructure.
Storage options
IBM Cloud Pak for Data supports a couple different storage options - OpenShift Data Foundation (ODF) as well as Portworx. Ensure that one of these storage solutions are installed on your cluster.
To install Portworx on your cluster
Pre-requisites
- IBM Cloud Account
- IBM Cloud Redhat Openshift Kubernetes Service cluster with at least 3 worker nodes, 16x64 each.
- The minimum recommendation for Cloud Pak for Data is 16 cores, 64GB RAM, 1 TB Persistent storage. This minimum recommendation is not sufficient to install all of the services. You must ensure that you have sufficient resources for the services that you planned to install. The installation does not verify whether there are sufficient resources on the cluster to install Cloud Pak for Data. You can add additional worker nodes even after the cluster is created. If you are running other applications on your Red Hat OpenShift cluster, ensure that you have sufficient resources on the cluster before you install Cloud Pak for Data. For more information, see System Requirements for IBM Cloud Pak for Data. We used a 3 node 16x64 cluster with 200GB persistent storage disks on each worker node. This is enough to install Cloud Pak for Data and the Watson Studio and Watson Machine Learning services for demo purposes.
- OpenShift Data Foundation (ODF) or Portworx installed on your ROKS cluster
- A valid Cloud Pak for Data license
We will cover two different ways of installing IBM Cloud Pak for Data on a cluster on IBM Cloud. You can install using the IBM Cloud Catalog or via the Operator Hub. Here are some considerations for choosing between installing via the catalog or the OperatorHub
- Storage options for the install from the catalog are limited to IBM cloud file storage and Portworx
- Choose the catalog install if you would like a simplified installation.
- All storage options are available for operator including ODF and Portworx, in addition you can specify which storage class to use.
- Choose operator install If you would like the Cloud Pak for Data operators to be in a separate namespace.
Installing IBM Cloud Pak for Data v4.x via IBM Cloud Catalog
Note: This install and the instructions in this section were done using v4.0.5.
1. Log in to your IBM Cloud account.
2. Select Catalog from the top right toolbar.
3. For Delivery Method filter on the left side navigator, select Cloud Paks which will show you the list of Cloud Paks as shown in Figure below.
4. Click on the Cloud Pak for Data tile.
Do the following:
- Click on Provision as Software link to go to the next panel to begin the installation configure.
5.
6. Select your cluster.
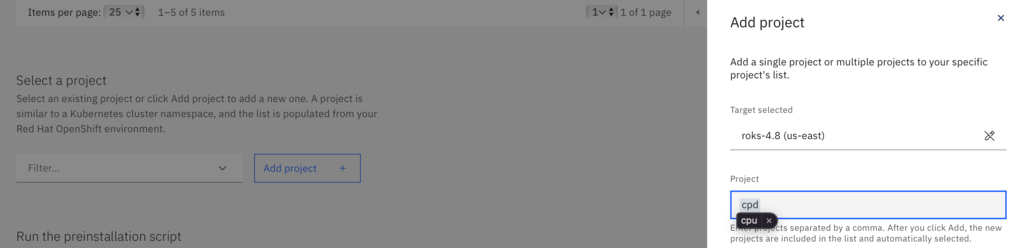
7. Select a project - this is the namespace where Cloud Pak for Data is installed
Do the following:
- Use the pull down to select the project or click the Add project button. Shown below, we will add the `cpd` project by clicking the Add project button
8. Run the pre-installation script.
Do the following:
- Click on the Run script button. This will run the script on your cluster and create the necessary kubernetes resources for Cloud Pak for Data.
Once the script is running you will see the following message.

Wait until you see that the script runs successfully. This can take several minutes.

9. Configure the schematics workspace.
The schematics workspace is a service in IBM Cloud that interacts with your cluster to install Cloud Pak for Data. This service is provisioned automatically for the installation to use. It also provides the installation log file in case there are errors.
Do the following:
Specify which of your resources groups should run the schematics service instance.
- Select the Location where you want the schematics workspace to run.
- Optionally you can change the name or leave the default
10. Set the deployment values. You can use the defaults in most cases, however there are 3 important values you need to consider, they are clusterconfig, storage, and optionally apikey. See below for a more detailed discussion of these values.

The Cloud Pak for Data catalog installation sets up the Cloud Pak for Data kubernetes resources such as pods to pull from the IBM Entitled Registry. This registry is secured and can only be accessed with your entitlement key. In order for kubernetes to download the images for the pods, your entitlement key needs to be configured in the config.json file on each worker node. When this value is set to true, the catalog installation will automatically add your entitlement key to the openshift global image pull secret and automatically reload your worker nodes. This can take a significant amount of time if you have a large number of worker nodes. You must also provide your IBM Cloud API key in the optional deployment values section. This is so the the catalog installer can access your account to reload the worker nodes.
Note: If you are re-running the catalog installation to add Cloud Pak for Data services to your existing Cloud Pak for Data installation, make sure to set this value to false.
Do the following:
- If this the first time running the Cloud Pak for Data catalog installer, set this value to true and provide your API key in the optional deployment values section.
- If you are re-running the catalog installer to install additional services set this value to false.
11. Select the storage type
Do the following:
- In the storage property, select which storage type Cloud Pak for Data should use. In this example we selected Portworx, however IBM Cloud Endurance or Performance File Storage is also an option (only when using a classic cluster).
- Note: If you are using Portworx, the catalog installer automatically will create the necessary storage classes.
12
Do the following:
- If you selected true for clusterconfig, provide your apikey.
When finished agree to the license agreements and press the install button.
A schematics workspace will be created for you and the installation will begin. To monitor you can navigate to the schematics workspace and you can see the logs of the installation:
Note: The installation will take some time. In our test environment a 3 node cluster took about an hour and 15 mins.
Installing IBM Cloud Pak for Data v4.0.x services using IBM Catalog
Once the base Cloud Pak for Data installation is complete, you can add services by running the catalog install again and setting the services you want to install to true in the Deployment values section. Make sure to to the following:
- Select the same cluster from the list
- Use the pulldown to select the the same project, cpd in our example.
- Verify the preinstallation script has run.
- Set the location for the schematics workspace
- In the deployment values section:
- Verify the clusterconfig property is false
- Select the same storage option
- Set each service you want to install to true.
For example, we installed Watson Studio and Watson Machine Learning:
Accept the license agreement and click the Install button. In our case, installing both Watson Studio and Watson Machine Learning took about 2.5 hours. You can view the logs in the Schematics workspace.
Installing IBM Cloud Pak for Data v4.0.x via the Openshift OperatorHub
In this setup, we will install similar to a specialized install, where all Cloud Pak for Data operators will be installed in a separate namespace called `cpd-operators` which will install the dependent foundational services operators in the `ibm-common-services` namespace. We will create the Cloud Pak for Data service instances in its own namespace called `cpd`.
We will be using Openshift Data Foundation (ODF) for the storage for this setup so it is assumed you already have ODF installed on your cluster. Let's begin-
Prepare for Install
1. Add a catalog source for IBM Content by following these instructions: https://github.com/IBM/cloud-pak/blob/master/reference/operator-catalog-enablement.md
2. The IBM Cloud Pak for Data Platform operator should now show up in the Operator hub.
3. Create the cpd-operators namespace: `oc new-project cpd-operators`.
4. Create the cpd namespace: `oc new-project cpd`.
5. IBM Cloud Pak for Data requires an IBM entitlement key to be set on each of the workers nodes. This can be done either by-
With all the above preparation, we are now ready to install IBM Cloud Pak for Data from the Openshift Operator Hub console.
Install Cloud Pak for Data
1. From the IBM Cloud UI, select your cluster and click on `Openshift Console`.
2. Go to the OperatorHub from the Left Nav bar. Search for Cloud Pak for Data and select the Cloud Pak for Data Platform Operator
3. Install the operator in the cpd-operators namespace by choosing to install in a specific namespace. Click Install.
4. Once the operator is ready (this may take a few mins), Go to the operator and choose to create an instance of ibmcpd in the cpd namespace. Do the following on this screen-
- Update the name, as needed.
- Select the type of License and Accept the License
5. We will need to switch to the yaml view to specify the ns of cpd (the form view does not allow this option). Do the following on this screen -
- Change the namespace to cpd
- Make sure license is still showing accepted
- Change the storage class to `ocs-storagecluster-cephfs` as indicated below
- Click on Create
6. This will take upwards of an hour or so to finish. To check on when the Cloud Pak for Data service is ready, go to Administrator --> CustomResourceDefinitions.
- Search for ibmcpd and click on it.
- Select the instance you created.
- Switch to the instances tab.
- Scroll down to see the Details section and if the creation has completed successfully you will see the Type as `Running` and Reason as `Successful` as below -
Accessing Cloud Pak for Data Console
Once the instance is ready as above, to access the Cloud Pak for Data Console, lets first get the credentials for the user `admin`.
- - These can be found by going to Workloads -->. Secrets in the Openshift Console.
- - You will see a secret here called `admin-user-details` (Make sure you are in the cpd project.)
- - Select the secret and at the bottom you will see the Data section has the user_admin_password. You can use the copy button to copy these credentials.
To get the URL for the Cloud Pak for Data console. go to Networking --> Routes in the Left Nav and you will see the route that you can use to get to the console.
- - Click on the URL in the Location field and login using the credentials you retrieved above for user `admin`.
Once you login, you should see the Cloud Pak for Data console similar to this - 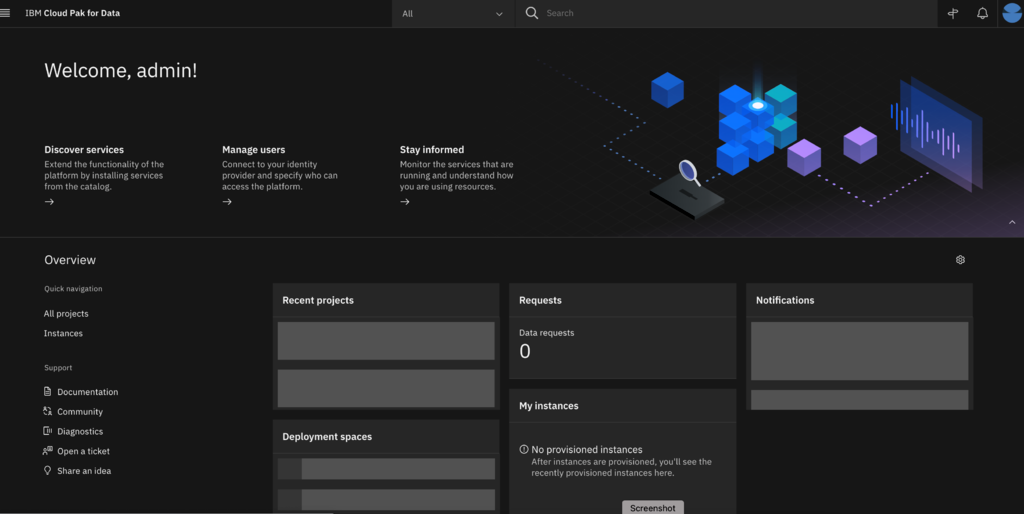
Installing IBM Cloud Pak for Data v4.0.x services
We will take you through installing 2 additional services, Watson Studio (ws) and Watson Machine Learning (wml), for IBM Cloud Pak for Data so you get the idea of how to go about installing any other additional services after IBM Cloud Pak for Data is installed.
1. Install the Namespacescope operator in the cpd-operators namespace as follows by going to the OperatorHub and search for it.
2. Once the Namespacescope operator is ready, we can create an instance of it as follows-
3. Scroll down to see more options.
- Change the Namespace Members to `cpd-operators` and `cpd`.
- Click on Create.
Now we are ready to install the individual services.
Watson Studio Install
- To install Watson Studio, go to the OperatorHub and search for Studio and click on the Watson Studio tile. Install the operator in the cpd-operators namespace by choosing to install in a specific namespace. Click Install.
2. Once the operator is ready (this may take a few mins), Go to the installed operator and choose to create an instance of watson studio in the cpd namespace. Do the following on this screen-
- Update the name, as needed.
- Select the type of License and Accept the License
3. Scroll for further options and do the following -
- For Storage Class select `ocs-storagecluster-cephfs`
- For Storage Vendor, select `ocs`
- Switch to the yaml view
4. In the yaml view, change the namespace to cpd. This option is not available in the form view. Select Create.
5. This will take approximately 1.5 hour or so to finish. To check on when the Watson Studio instance is ready, go to Administrator --> CustomResourceDefinitions.
- Search for ws and click on it.
- Select the instance you created.
- Switch to the instances tab.
- Scroll down to see the Details section and if the creation has completed successfully you will see the Type as `Running` and Reason as `Successful` as below -
6. Additionally, you should also see the service as Enabled on the Cloud Pak for Data console on the services page as follows-
Watson Machine Learning Install
- To install Watson Machine Learning (wml), go to the OperatorHub and search for wml and click on the IBM WML Services tile. Install the operator in the cpd-operators namespace by choosing to install in a specific namespace. Click Install.
2. Once the operator is ready (this may take a few mins), Go to the installed operator and choose to create an instance of wml in the cpd namespace. Do the following on this screen-
- Update the name, as needed.
- Select the type of License and Accept the License
3. Scroll for further options and do the following -
- For Storage Class select `ocs-storagecluster-cephfs`
- For Storage Vendor, select `ocs`
- Make sure to uncheck the ignoreForMaintenance checkbox
- Switch to the yaml view
4. In the yaml view, change the namespace to cpd.
- Remove the quotes around the false for ignoreForMaintenance field as below
- Select Create.
5. This will take approximately 1 hour or so to finish. To check on when the Watson Machine Learning instance is ready, go to Administrator --> CustomResourceDefinitions.
- Search for wml and click on WmlBase.
- Select the instance you created.
- Switch to the instances tab.
- Scroll down to see the Details section and if the creation has completed successfully you will see the Type as `Running` and Reason as `Successful` as below -
6. Additionally, you should also see the service as Enabled on the Cloud Pak for Data console on the services page as shown above in the Watson studio install section.
Conclusion
If you want a simple installation of IBM Cloud Pak for Data, the IBM catalog installation approach might give you an easy way to get the Cloud Pak installed as shown above. If you want a specialized setup for IBM Cloud Pak for Data, installing via the IBM Cloud OperatorHub would give you more flexibility and customization options on how its setup.
References
Appendix
The Cloud Pak for Data kubernetes resources such as pods are set up to pull from the IBM Entitled Registry. This registry is secured and can only be accessed with your entitlement key. In order for kubernetes to download the images for the pods, your entitlement key needs to be configured in the config.json file on each worker node. To update the config.json file on each worker node, we used a daemonset in our test environment.
- ```oc create secret docker-registry docker-auth-secret \--docker-server=cp.icr.io \--docker-username=cp \--docker-password=<entitlement-key> \--namespace default```
Once the secret is created, you can use a daemonset to update your worker nodes. If you choose to use a daemonset make sure it's working on each node prior to starting the installation.
NOTE: Below is an example of a daemonset yaml that can accomplish updating the global pull secret on each of your worker nodes. This is intended only as a reference.
 apiVersion: apps/v1
 kind: DaemonSet
 metadata:
   name: update-docker-config
   labels:
     app: update-docker-config
 spec:
   selector:
     matchLabels:
       name: update-docker-config
   template:
     metadata:
       labels:
         name: update-docker-config
     spec:
       initContainers:
         - command: ["/bin/sh", "-c"]
           args:
             - >
               echo "Backing up or restoring config.json";
               [[ -s /docker-config/config.json ]] && cp /docker-config/config.json /docker-config/config.json.bak || cp /docker-config/config.json.bak /docker-config/config.json;
               echo "Merging secret with config.json";
               /host/usr/bin/jq -s '.[0] * .[1]' /docker-config/config.json /auth/.dockerconfigjson > /docker-config/config.tmp;
               mv /docker-config/config.tmp /docker-config/config.json;
               echo "Sending signal to reload  crio config";
               pidof crio;
               kill -1 $(pidof crio)
           image: icr.io/ibm/alpine:latest
           imagePullPolicy: IfNotPresent
           name: updater
           resources: {}
           securityContext:
             privileged: true
           volumeMounts:
             - name: docker-auth-secret
               mountPath: /auth
             - name: docker
               mountPath: /docker-config
             - name: bin
               mountPath: /host/usr/bin
             - name: lib64
               mountPath: /lib64
       containers:
         - resources:
             requests:
               cpu: 0.01
           image: icr.io/ibm/alpine:latest
           name: sleepforever
           command: ["/bin/sh", "-c"]
           args:
             - >
               while true; do
                 sleep 100000;
               done
       hostPID: true
       volumes:
         - name: docker-auth-secret
           secret:
             secretName: docker-auth-secret
         - name: docker
           hostPath:
             path: /.docker
         - name: bin
           hostPath:
             path: /usr/bin
         - name: lib64
           hostPath:
             path: /lib64
             hostPathType: Directory
#Openshift#cloudpakfordata#tutorials