Pre-requisites
· IBM Cloud Account
· IBM Cloud Account permissions – Cloud Security Posture Management
o Account owner
o Administrator role on all account management services
o Administrator role on the IAM Identity Service
IBM Cloud Resource Names
|
Resource
|
Resource Name
|
|
|
|
|
SCC WP Service Name
|
bhargav0125-sccwp-serv
|
|
SCC WP Trusted Profile Name
|
bhargav0125-sccwp-trustedprof
|
|
SCC WP App Config Name
|
bhargav0125-sccwp-appconfig
|
|
SSH Key Name
|
bhargav0125-sccwp-rhelvsi-sshk
|
|
VPC Name
|
bbhargav0125-sccwp-vpc
|
|
VSI Name
|
bhargav0125-sccwp-rhelvsi
|
|
Boot Disk Name
|
bhargav0125-sccwp-rhelvsi-boot
|
|
VNIC Name
|
bhargav0125-sccwp-vnicvsi
|
|
Floating IP Name
|
bhargav0125-sccwp-rhelvsi-fip
|
|
Monitoring Service Name
|
bhargav0125-sccwp-mon
|
End-to-End Use Case Workflow - Recipe
|
Step
|
Purpose
|
|
|
|
|
Step 1
|
Create IBM Security and Compliance Center Workload Protection cloud service
|
|
Step 2
|
Create SSH keys to be used with virtual server instance
|
|
Step 3
|
Create virtual private cloud to host virtual server instance
|
|
Step 4
|
Create a virtual server instance
|
|
Step 5
|
Create a floating-point IP address for virtual server instance to be accessible to clients using public internet
|
|
Step 6
|
Verify virtual network interface created along with its subnets
|
|
Step 7
|
Attach a public gateway to the subnet connected to virtual server instance
|
|
Step 8
|
Verify and adjust security group inbound rule for virtual server instance in order for clients to connect using public internet
|
|
Step 9
|
Verify access control list rules (inbound and outbound) for the subnets of virtual server instance
|
|
Step 10
|
Configure virtual server instance – install agent and verify
|
|
Step 11
|
Configure enabling of runtime policies for file integrity monitoring and verify
|
|
Step 12
|
Trigger a runtime policy violation and confirm violation detection on dashboard
|
Step 1:
In this step, you are provisioning an instance of Security and Compliance Center for Workload Protection cloud service by performing the steps provided below.
Choose Navigation Menu -> Security -> Resources -> Create -> Security and Compliance Center Workload Protection
Select a location -> Washington DC
Select a plan -> Graduated Tier
Configure resource details:
Name -> bhargav0125-sccwp-serv
Tags -> bhargav0125-sccwp-serv
Resource group -> cloud-techsales
Enable Cloud Security Posture Management (CSPM) for your IBM Cloud account
Trusted profile -> Edit -> Name -> bhargav0125-sccwp-trustedprof -> Save
App configuration -> Edit -> Name -> bhargav0125-sccwp-appconfig -> Save
Check box I have read and agree to the following license agreements: Terms -> Create


Step 2:
SSH keys are used by IBM Cloud created server instances to identify a user or device through public-key cryptography.
In this step, you are creating an instance of SSH key by performing the steps provided below.
Choose Navigation Menu -> Infrastructure -> Compute -> SSH keys -> Create
Location
Geography -> North America
Region -> Washington DC (us-east)
Details
Name -> bhargav0125-sccwp-rhelvsi-sshk
Resource group -> cloud-techsales
Tags -> bhargav0125-sccwp-rhelvsi-sshk
SSH key type -> RSA
Select Radiobutton -> Generate a key pair for me
Create
Keep the downloaded private key safely, to be used later when connecting to instance using SSH protocol.


Step 3:
IBM Cloud® Virtual Private Cloud (VPC) is a highly resilient and highly secure software-defined network (SDN) enabling you to build isolated private clouds for your business needs and use while also maintaining essential public cloud benefits such sharing of pooled resources for cost optimization in a multi-tenant infrastructure. In this step, you are creating an instance of VPC by performing the steps provided below.
Choose Navigation Menu -> Infrastructure -> Network -> VPCs -> Create
Location
Geography -> North America
Region -> Washington DC (us-east)
Details
Name -> bhargav0125-sccwp-vpc
Resource group -> cloud-techsales
Tags -> bhargav0125-sccwp-vpc
VPC default access control list -> Default ACL rules (Allow all)
Default security group -> Check Box -> Allow SSH, Allow ping
Default address prefixes -> Check box -> Create a default prefix for each zone
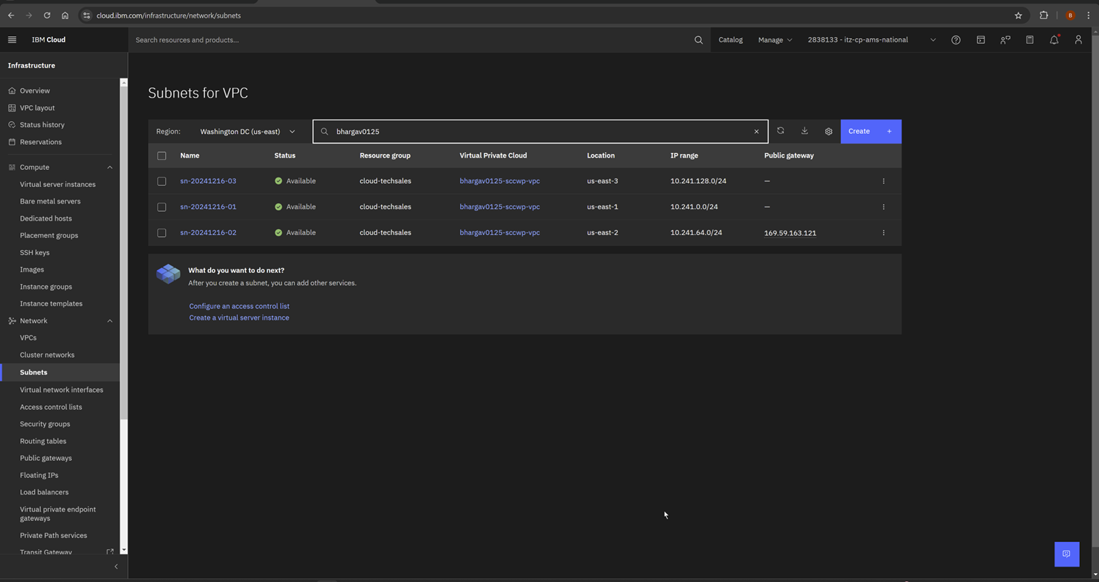
Verify Subnets – One subnet created for each zone with a prefix
Create virtual private cloud


Step 4:
Virtual Server instance in an IBM Cloud VPC is a highly scalable, multi-tenant virtual machine that you can launch fast for maximum network isolation and control.
In this step, you are creating an instance of a virtual server by performing the steps provided below.
Choose Navigation Menu -> Infrastructure -> Compute -> Virtual Server Instances -> Create
Location
Geography -> North America
Region -> Washington DC (us-east)
Zone -> us-east-2
Details
Name -> bhargav0125-sccwp-rhelvsi
Resource group -> cloud-techsales
Tags -> bhargav0125-sccwp-rhelvsi
Server configuration
Image -> ibm-redhat-9-4-minimal-amd64-5
Profile -> cx2-2x4
SSH keys
SSH keys -> bhargav0125-sccwp-rhelvsi-sshk
Storage
Boot volume -> bhargav0125-sccwp-rhelvsi-boot
Tags -> bhargav0125-sccwp-rhelvsi-boot
Networking
Virtual private cloud -> bhargav0125-sccwp-vpc
Network attachments with Virtual network interface -> Edit -> Virtual network interface name (optional) -> bhargav0125-sccwp-vnicvsi -> Next (3 times) -> Save
Eth0 Primary bhargav0125-sccwp-vnicvsi New sn-20241216-02 1 3.0 Gbps
Advanced Options
Attach to reservation -> Off
Create virtual server
Note: Floating IPs can be attached after virtual server instance is created.


Step 5:
Floating IP addresses are IP addresses that are provided by the IBM Cloud system and these addresses are reachable from the public internet. They are allocated in an IPv4 address format and they can be used for connectivity.
In this step, you are creating an instance of a floating IP addess for connecting to an instance of virtual server you created by performing the steps provided below.
Choose Navigation Menu -> Infrastructure -> Network -> Floating IPs -> Reserve
Location
Geography -> North America
Region -> Washington DC (us-east)
Zone -> us-east-2
Details
Floating IP name -> bhargav0125-sccwp-rhelvsi-fip
Resource group -> cloud-techsales
Tags -> bhargav0125-sccwp-rhelvsi-fip
Resource to bind -> bhargav0125-sccwp-rhelvsi
Network interface -> bhargav0125-sccwp-vnicvsi
Reserve


Step 6:
A virtual network interface (VNI) in an IBM Cloud is a logical abstraction of a network interface in a subnet. It can be attached to a target resource such as a virtual server instance, providing that resource with network connectivity.
In this step, you verify the details of VNI by performing the steps provided below.
Verify the Virtual network interfaces created.
Review Virtual private cloud, Subnet, Device name, Security groups, Floating Ips sections.


Step 7:
A public gateway enables a subnet and all its attached virtual server instances to connect to the internet.
In this step, you are attaching a public gatewayto one of your chosen subnet by performing the steps provided below.
Select the Subnet where Floating IPs is reserved and toggle the public gateway toggle button.
This action would enable a client machine connecting to virtual server instance using public internet with public gateway attached, provided security groups and access control lists are properly configured for connecting protocol.


Step 8:
An IBM Cloud® security group is a set of IP filter rules that define how to handle incoming (ingress) and outgoing (egress) traffic to both the public and private interfaces of a virtual server instance. The rules that you add to a security group are known as security group rules.
In this step, you are reviewing and adjusting the inbound rule by performing the steps provided below.
Review and adjust the inbound rule for access to virtual server instance for a client machine using public internet, public gateway using the floating IPs address reserved for the virtual server instance.
Change Security Group rule - to connect from address rather than named security group as in <oppressed-goldsmith-rotate-gents>
Inbound Rule - Use caution when enabling this policy rule as this would allow traffic from any client (very open). A safer approach would be to white list client IP or connect from a bastion/jump host.
ALL Any 0.0.0.0/0 Any 0.0.0.0/0


Step 9:
Network access control lists (ACL) can be used to control all incoming and outgoing traffic in IBM Cloud® Virtual Private Cloud.
An ACL is a built-in, virtual firewall, similar to a security group. In contrast to security groups, ACL rules control traffic to and from the subnets, rather than to and from the instances. Network ACLs are stateless unlike security groups which are stateful, specified at an instance level.
In this step, you are reviewing and verifying the details of NACL instance by performing the steps provided below.
Review and verify the access control list rules for the virtual server instance.


Step 10:
You are now ready to deploy the Workload Protection agent on your Linux host to collect events and protect your workloads. You can configure which threats you want to detect in each environment and conduct forensic processes to understand security breaches or unauthorized accesses.
Collector endpoints are ingestion endpoints that you can use to send data and these can be private or public.
In this step, you are connecting your client machine to your virtual server instance created to setup and configure an agent by performing the steps provided below.
Connect to virtual server instance from a ssh client using ssh command line interface as shown.
Use the private key that was downloaded to client machine previously and using the root user id and floating ip address of virtual server instance you created in your virtual private cloud instance.
ssh -i ./bhargav-sccwp-target-linux-ftpserver-sshkey_rsa.prv root@169.63.190.64
yum -y install kernel-devel-$(uname -r)


curl -sL https://ibm.biz/install-sysdig-agent | sudo bash -s -- -a 06baba5a-ba1a-458b-bb3e-adb4060d3723 -c ingest.private.us-east.security-compliance-secure.cloud.ibm.com --collector_port 6443 --tags bhargav-sccwp-rhel-agent --secure true --additional_conf 'sysdig_api_endpoint: private.us-east.security-compliance-secure.cloud.ibm.com\nhost_scanner:\n enabled: true\n scan_on_start: true\nkspm_analyzer:\n enabled: true'
curl -sL https://ibm.biz/install-sysdig-agent | sudo bash -s -- -a 06baba5a-ba1a-458b-bb3e-adb4060d3723 -c ingest.us-east.security-compliance-secure.cloud.ibm.com --collector_port 6443 --tags bhargav-sccwp-rhel-agent --secure true --additional_conf 'sysdig_api_endpoint: us-east.security-compliance-secure.cloud.ibm.com\nhost_scanner:\n enabled: true\n scan_on_start: true\nkspm_analyzer:\n enabled: true'


cat /opt/draios/etc/dragent.yaml
cat /opt/draios/etc/dragent.yaml
customerid: 06baba5a-ba1a-458b-bb3e-adb4060d3723
tags: bhargav-sccwp-rhel-agent
collector: ingest.us-east.security-compliance-secure.cloud.ibm.com
collector_port: 6443
ssl: true
sysdig_api_endpoint: private.us-east.security-compliance-secure.cloud.ibm.com
host_scanner:
enabled: true
scan_on_start: true
kspm_analyzer:
enabled: true
Perform the following steps to confirm your agent correctly configured and running:
ps -ef | grep Sysdig
tail -4f /opt/draios/logs/draios.log
grep -m 4 error /opt/draios/logs/draios.log
systemctl start dragnet
systemctl stop dragnet
systemctl status dragent
service dragent status

Step 11:
As of now you can launch the IBM Cloud Security and Compliance Center Workload Protection web UI from the IBM Cloud Observability Security dashboard.
You can navigate to policies view and enable default policies provided by Sysdig by performing the steps provided below.
Using Command Line Interface approach involving Workload Protection CLI, Compliance CLI, Policy CLI and Version CLI components - you have option of tailoring your needs more surgically instead of enabling collection bundle of Sysdig default policies and posture management. Additionally, you can perform automation using these CLI components once your UI created policies are working, proven valuable and accurate. Please see the references section resources for documentation details on CLI specifics.
Using API programmatic Interface approach involving posture management, inventory, policies (Falco and File Integrity Monitoring), vulnerability management, etc. components - you have option of tailoring your needs more fine-grained instead of enabling default policies and posture management. Additionally, you can perform automation using these API components once your UI created policies are working, proven valuable and accurate. Please see the references section resources for documentation details on API specifics.
Choose Policies view on the left side options menu item and select Use Sysdig Default Policies option.


Enable Medium and Info category policy collection bundles respectively, as shown below:


Step 12:
In this step, you want to create a soft link named /tmp/test to the file /etc/shadow. This operation is a potential serious exposure, to be strongly discouraged because /etc/shadow is a critical system file containing encrypted user passwords. Creating a named symbolic link to it could potentially expose sensitive information contained in it by allowing unauthorized access to its location or contents using the named soft link so created.
Performing the steps provided below.
Run the following command from connected client machine to the remote virtual server instance.
ln -s /etc/shadow /tmp/test

At this point, review using the Workload Protection UI, each of the views on left side menu. From the shown view, you can further drill down the dashboard visuals.
Review and drill down the Home view contents.
At this point, review using the Workload Protection UI, each of the views on left side menu. From the shown view, you can further drill down the dashboard visuals.
Review and drill down the Home view contents.


Review and drill down the Inventory view contents.


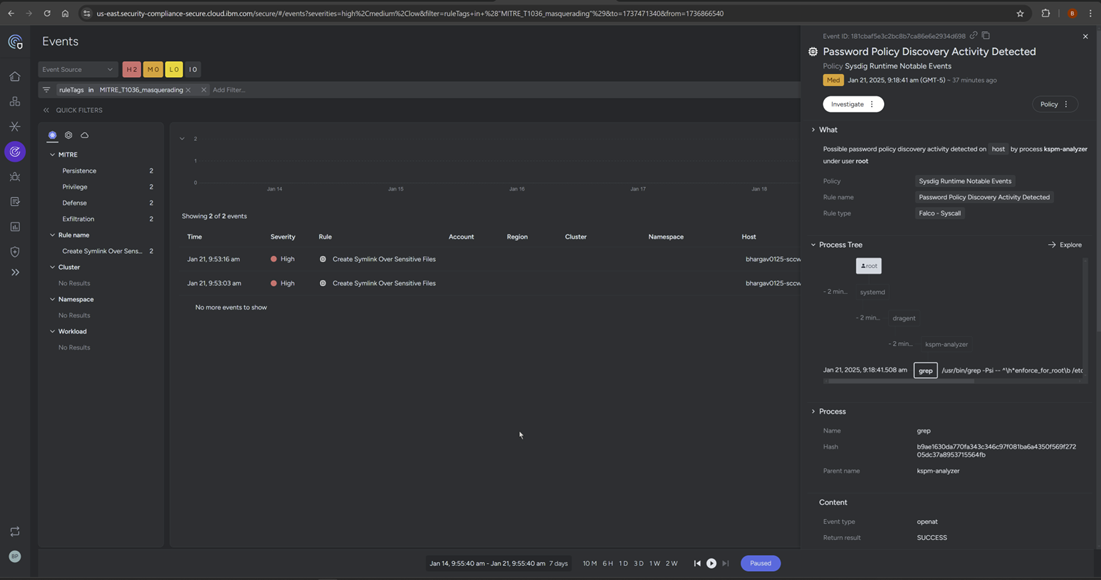
Review and drill down the Threats view contents. Each of white highlighted tile is a threat exposure and is capable of being drilled down. Review the seventeen tiles.
TA0003, TA0004, TA0005, TA0006, TA0007, TA0010, T1078, T1547, T1036, T1552, T1087, T1078, T1083, T1201
Persistence, Privilege Escalation, Defense Evasion, Exfiltration, Boot or Logon Autostart Execution, Masquerading, etc.
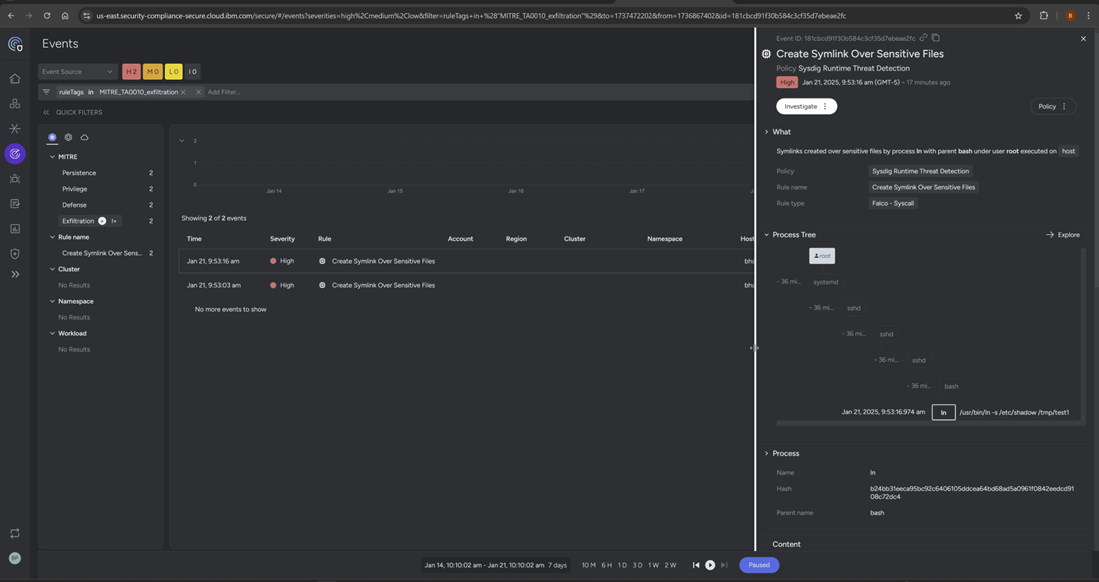
Symlinks created over sensitive files by process ln with parent bash under user root with cmdline.
TAO0010 tile named Exfiltration captures the event as shown below.
Falco – Syscall


Review the enabled Sysdig Default Policies for workload protection.

Review the Rules Library contents of policies that are relevant to File Integrity Monitoring.
As indicated previously, you have an option of automating the policy configuration customizations or enforcement - using CLI or curl or API approaches, once you validated your policies using UI.

Review the email notification channel configuration information for notification forwarding.


Review the configured email notification.

Test configured email notification.

Confirm configured email notification working for policy violation observability notifications.

Acknowledgements
My sincere and grateful thanks are due to Carlos Tolon Martin of Sysdig for sharing his skills and wisdom unconditionally with me. My sincere thanks are also due to my management team of Roger Snook, Randall Tal, and Martin Obianwu – for empowering me to use our team and IBM Cloud resources. I gratefully acknowledge help and guidance received from my offering and product development team members, Janet Van, Milind Phase and Stephanie Schmader.
References
https://cloud.ibm.com/docs/account?topic=account-create-trusted-profile&interface=ui
https://cloud.ibm.com/docs/workload-protection?topic=workload-protection-protecting-linux-hosts
https://cloud.ibm.com/docs/workload-protection?topic=workload-protection-endpoints#endpoints_ingestion
https://docs.sysdig.com/en/sysdig-secure/threat-detection-policies/runtime_policy_tuning/
https://falco.org/
https://cloud.ibm.com/docs/workload-protection?topic=workload-protection-workload-protection-cli&interface=cli
https://cloud.ibm.com/apidocs/workload-protection#introduction
https://cloud.ibm.com/apidocs/workload-protection#set-the-custom-rules-files-e-g-the-set-of-falco-ru