Introduction
Cognos Analytics 11 leverages OIDC (OpenID Connect) Identity Provider supporting customers who wish to take advantage of federation security with web applications. The purpose of this blog is to provide a lab experience of setting up an OIDC authentication provider using OKTA with Cognos Analytics 11 R8+ by walking through the experience in a ‘step-by-step’ format.
Basics/Terminology - OpenID Connect (OIDC)
OIDC allows client applications to verify the identity of an authenticating user performed by an OIDC Provider.
In its simplistic form it’s an open standard identity protocol built on top of the OAuth 2.0 protocol.
Claims – name/value pairs that contain information about a user, examples like ‘family_name’, ‘given_name’, ‘locale’, ‘name’, ‘sub’, ‘zoneinfo’.
ID Token – A JSON Web Token (JWT) which contains claims about the authenticated user
OpenID Connect Provider (OIDCP) – An OAuth 2.0 Authorization Server which can authenticate users and provide claims to a client.
Further information can be found here:
http://openid.net/connect/faq/
Environment
Single Server Installation
Windows 2016
CA11 R8
IIS
Gateway with SSL over HTTP
OKTA
Lab Experience – Step-by-Step Guide
Create an Application
- Log into the OKTA Developer Portal and create a new Application


- For the Platform Drop-Down, select ‘Native’ and click on ‘Create’

- Provide a name for the application and also the Login Redirect URI(s) that is used when configuring the provider in cognos configuration as the Return URL configured with the OpenID Connect identity provider.
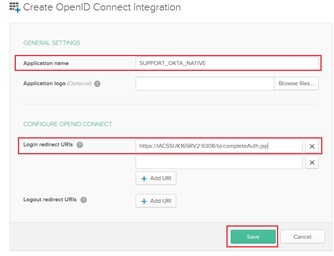
The ‘Login redirect URIs’ take the format : https://dispatcherHOST:dispatcherPORT/bi/completeAuth.jsp or https://webserverHOST:webserverPORT/ibmcognos/bi/completeAuth.jsp. This URL completes Cognos Analytics authentication using the OpenID Connect identity provider.
So, the above ‘Login redirect URI(s)’ will match the Redirect URI in the OKTA OIDC Provider in Cognos Configuration (see below)
- Now, click on the ‘General’ tab and then the ‘edit’ in the right-corner and select the following options for both ‘General Settings’ – ‘Allowed grant types ’ and ‘Client Credentials’:

- On ‘Save’ the ‘Client Credentials’ section will generate three important pieces of information that will be part of the required OKTA configuration settings in Cognos Configuration which are: Redirect URL, Client ID and Client Secret:

Click on the "Sign-On" tab and in the section "OpenID Connect ID Token" click "edit" and for "Groups Claim Type" - Filter and "Group Claim Filter" - "Groups" - Regex -
.* The next stage is to create a user, group and assign these to the above created application.
Create a user
- Create a new user with a valid email address.

- Once a validation email is sent, reset the password.
Create a Group
- From the main menu select ‘Directory’– ‘Groups’ - Add Group
 Assign user to the newly created Group
- From the same groups page, search for the newly created group

- Click on the Group name, search for the user or select from the list and click on ‘Add All’ then ‘Save’

Assign user to application
- Now, assign the user to the newly created application by selecting ‘Applications’ and then click on the newly created application, in this case ‘CASUPPORT_OKTA_NATIVE’
- Click on ‘Assign’ – ‘Assign to People’

- Select the new user (email) created from the list and click on ‘Done’

- The User dialog box appears listing the properties which can be filled in where needed. Otherwise click on ‘Save and Go Back’. Then click ‘Done’
Create the Cognos OIDC OKTA Provider
Now, using the information captured from creating the application, a new Authentication Provider is created in Cognos Configuration
- Launch Cognos Configuration and create a NEW Authentication Provider

- Fill in the details using the information obtained in point 5 above
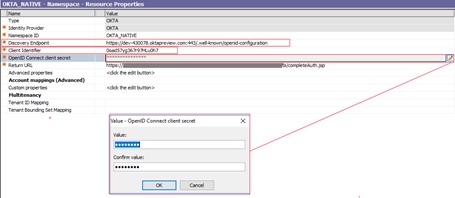
Details to add are:
Discovery Point: https://
dev-430078.oktapreview.com:443/.well-known/openid-configuration
 Client Identifier
:
 OpenID Connect Client Secret
:
 Return URL
:

NB: Its possible to include additional redirect URIs as multiple environments can share the same OKTA Application
- Now, save the configuration and EXIT (do NOT start)
Export Certificate
Next step is to export the OKTA Certificate (Issuer) and import that into the CAM Keystore.
- Using Firefox click on the secured padlock key:

- Click on ‘>’ to show connection details and then click on ‘More Information’

- Export the certificate -oktapreviewcom.crt, removed the ‘~’ from the file name so its ‘oktapreviewcom.crt’
Import into the Cognos CAM Keystore
- Copy the file to the Cognos Analytics installation directory analytics/bin64
- Navigate to the analytics/bin directory and run the following command line:
E:\Program Files\ibm\cognos\analytics1108\bin>
ThirdPartyCertificateTool.bat -i -T -r oktapreviewcom.crt -p NoPassWordSet
- Open Cognos Configuration and change ALL the Dispatcher URI’s protocol from HTTP to HTTPS.
NB: If the optional gateway is used then switch to SSL
- Restart via Cognos Configuration and log in.
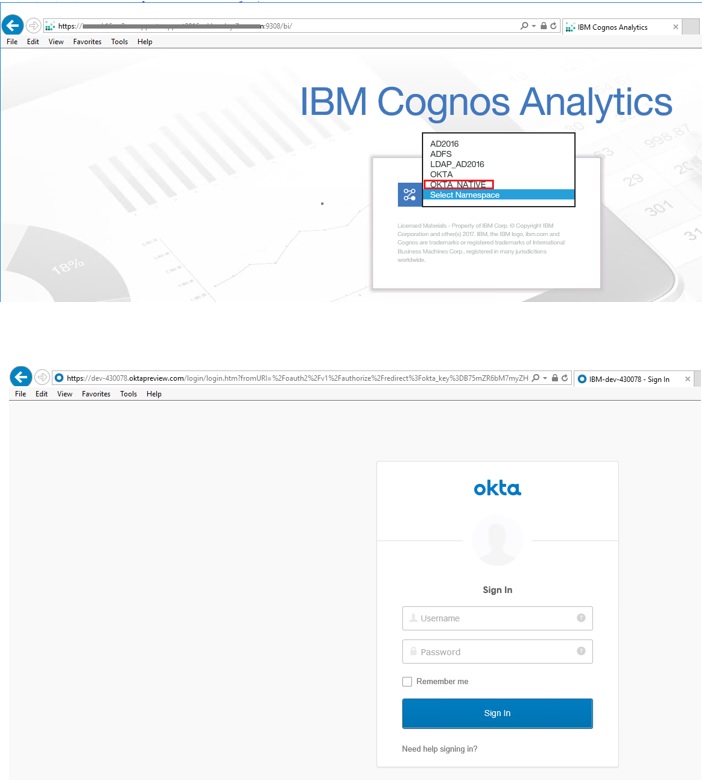

- To check the Group associated with the user’s identity by going to ‘My Preferences’ – ‘Personal’ – ‘Advanced ‘ – ‘Groups and Roles’ – ‘View Details’ the group is visible.

- Adding additional OKTA Groups (Claims), these are visible when using the #CSVIdentityNameList()# macro in FM
 Additional Details
Using the Cognos Analytics OIDC Custom Topic for Diagnostic Logging
Steps are as follows:
- Log On - Manage – Configuration – Diagnostic Logging
- Click on ‘AAA’ and select the properties (vertical 3 dots) and download as AAA.json
- Edit the json file and add the following entry:
OIDC Tracing
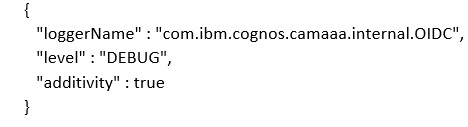
So to focus ONLY on ODIC tracing, the json file looks like this:

- Save the json file and then upload it by clicking on Manage – Configuration – Diagnostic Logging – Custom Topics – ‘upload topic’. Navigate to the json file and upload. Then log out and back in.
- Check the /logs/cognosserver.log file and details such as below will be captured:
 Additional Information:
In 11.1.4+ there are 4 new advanced configuration items:
Additional Information:
In 11.1.4+ there are 4 new advanced configuration items:
name
authorizeEPAddParms (authorize redirect)
pgTokenEPAddParms (on password grant flow to the token endpoint)
rtTokenEPAddParms (on refresh token flow to the token endpoint)
codeTokenEPAddParms (on authorization code flow to the token endpoint)
This allows you to control exactly what addition parameters are added and specifically to which endpoints. Given the "resource" parameter could be represented using the new advanced configuration items, the value let's you put whatever you want in the URL... as a consequence, the value must include the &, the parameter name, and the parameter value which MUST be url encode e.g.
name value
authorizeEPAddParms &resource=HTTPS%3A%2F%2FADFS_SERVER #Administration#CognosAnalyticswithWatson#cognosanalyticssupport#GettingStarted#home#LearnCognosAnalytics#oidc#Resources#Support#Tips#Tutorials