A common challenge I come up against is to list out a number of processes that need to be run on an ad-hoc or trigger based format.
Pre-workspace we would generate excel sheets with each process behind an action button, as new processes were introduced or changes to parameters come into play then we would need to redesign the sheet to make it all fit in an orderly manner. Running processes across multiple models meant you had to ensure you were logged in but in the main it worked.
Workspace changed the game somewhat with a different UI and cross model processes were easier to work with but you didn't get the same power to set parameter values as you could in excel (via named ranges with dynamic content). Adding new buttons into an existing sheet was much easier and organising content in general was, and is much easier.
With the REST API I am looking to see what is possible, initially I just want to run a process, eventually, I want to be able to replicate/ replace the excel dynamic capabilities and have the ability to add a new process and have it automatically appear on the sheet with parameter fields displayed and where appropriate already populated with dynamic content.
I create a new file named blogProcess.html
I use Emmet Abbreviation to define the structure of my HTML page by typing an exclamation mark:
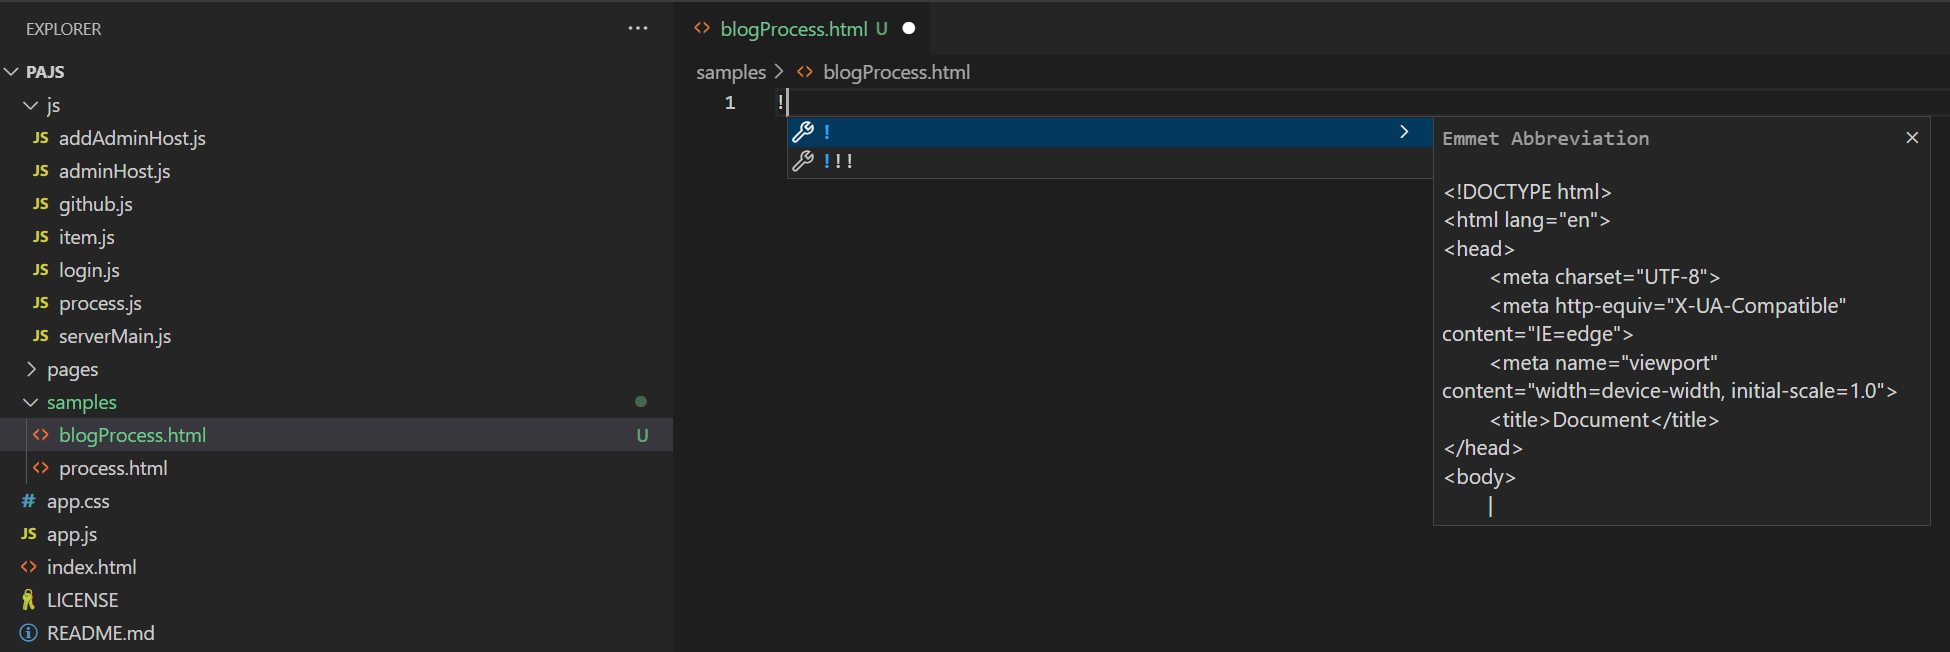
This creates the following HTML, I have updated the title to "Blog Process Example":
<!DOCTYPE html>
<html lang="en">
<head>
<meta charset="UTF-8">
<meta http-equiv="X-UA-Compatible" content="IE=edge">
<meta name="viewport" content="width=device-width, initial-scale=1.0">
<title>Blog Process Example</title>
</head>
<body>
</body>
</html>
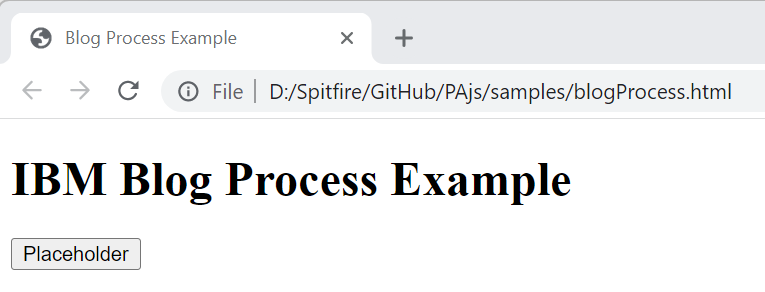
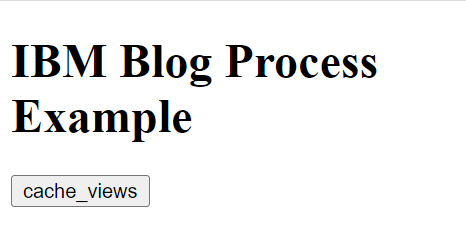
I add a header element and a button to the page by adding the following inside the <body></body> tags:
<h1>IBM Blog Process Example</h1>
<button>Placeholder</button>
When I open my HTML page I should now see:
I want to add a process to the button so I now need to add an "EventListener" to the button and also add a script to the page which will run once the button is clicked.
We update the button to use the onclick attribute and give this attribute a function to run, in this case "myProcess":
<button onclick="myProcess()">Placeholder</button>
At the bottom of the <body> tag we then add a <script> tag and create our function:
<body>
<h1>IBM Blog Process Example</h1>
<button onclick="myProcess()">Placeholder</button>
<script>
function myProcess() {
console.log('I clicked the button!');
}
</script>
</body>
Going back to my HTML page, I reload the page with "Control R" or right click and select Reload. Then Inspect the page with "Control Shift i" or right click and select Inspect.
Now select the Placeholder button:
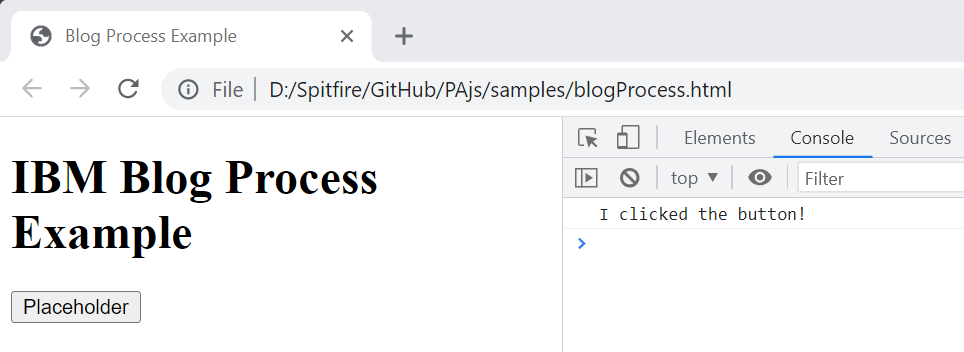
Ensure you have selected the Console section in the console window and we should see our console.log message displayed to confirm that our function works.
Excellent. Now we want to change our console.log with a function that calls a process:
<script>
function myProcess() {
var myHeaders = new Headers();
myHeaders.append("Content-Type", "application/json");
myHeaders.append("Authorization", "Basic YWRtaW46YXBwbGU=");
var requestOptions = {
method: "POST",
headers: myHeaders,
redirect: "follow",
};
fetch(
"http://Spitfire-Prod:52670/api/v1/Processes('cache_views')/tm1.ExecuteWithReturn",
requestOptions
)
.then((response) => response.json())
.then(
(result) =>
(console.log(result))
)
.catch((error) => console.log("error", error));
}
</script>
The key points to note here are:
myHeaders.append("Authorization", "Basic YWRtaW46YXBwbGU=");For TM1/ Native Security then use "Basic " + base64 encoded hash of your "username:password"
For CAM Security use "CAMNamespace " base64 encoded hash of your "username:password:namespace"
If you are planning on sharing these HTML pages with
ANY other users or saving these pages to a network drive then it is bad practice to store credentials/ authentication in so called "flat files". Not to mention you could be breaching the licensing conditions for using Planning Analytics with Watson (sharing login details). Please ensure you are compliant and if you are unsure please contact your IBM Representative or your IBM Business Partner for clarification.
method: "POST",To execute a "function" with the REST API we need to POST to the server (as opposed to a GET request to pull data from the server, PATCH to Overwrite/ Update, DELETE to delete)
"http://Spitfire-Prod:52670/api/v1/Processes('cache_views')/tm1.ExecuteWithReturn",
This is comprised of multiple options into a single string call:
- TransferProtocol: Is your server HTTP or HTTPS e.g. http://
- ServerName: The name of the server that your Planning Analytics model is running on e.g. "Spitfire-Prod"
- HTTPPortNumber: The HTTPPortNumber as displayed in tm1s.cfg e.g. 52670
- API String: The API version and object being called: e.g. /api/v1/Processes
- Process Name: The name of the process to run e.g. "cache_views"
- REST API Function to run process e.g. "/tm1.ExecuteWithReturn"
As a one off for this page we build the URL ourselves but we can automate aspects of this and we will see this in future iterations.
We reload our HTML page and we click our Placeholder button:

We can see from the console.log response that we received a "ProcessExecuteStatusCode" value of "CompletedSuccessfully"
I can then check my tm1server.log and confirm that the process ran:

Excellent. Now I want to change my button to display the process name I ran, I could have named this "cache_views" but I wanted to dynamically update the name via a variable inside my function.
I update the button with a class attribute "processName":
<button class="processName" onclick="myProcess()">Placeholder</button>
Then I create a new function named loadPage() and create a variable which calls all elements with the className "processName" and set the HTML for this element to be "cache_views"
function loadPage() {
const processName = document.querySelector(".processName");
processName.innerHTML = "cache_views";
}
We need to call this script as the page is opened/ reloaded, so we add a loadPage() call outside the functions but inside the <script> this means the loadPage() function will always run on loading the page
<script>
function loadPage() {
const processName = document.querySelector(".processName");
processName.innerHTML = "cache_views";
}
function myProcess() {
var myHeaders = new Headers();
myHeaders.append("Content-Type", "application/json");
myHeaders.append("Authorization", "Basic YWRtaW46YXBwbGU=");
var requestOptions = {
method: "POST",
headers: myHeaders,
redirect: "follow",
};
fetch(
"http://Spitfire-Prod:52670/api/v1/Processes('cache_views')/tm1.ExecuteWithReturn",
requestOptions
)
.then((response) => response.json())
.then(
(result) =>
(console.log(result))
)
.catch((error) => console.log("error", error));
}
loadPage();
</script>
On reloading our HTML page we see our button with the ProcessName:
In future blogs we will look to build an array of processes and we will dynamically create a series of buttons to match the processes in the array. Note that we could configure our list of processes via a dynamic subset which is derived from an attribute against each process.
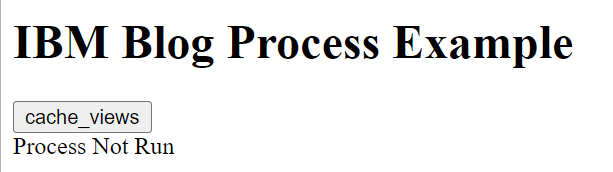
Excellent. Now I want to show the response from the process run on the page as well
We add a new element to the page to hold our response:
<div class="processResponse">Process Not Run</div>
We add a variable inside myProcess to pick up this element:
const processResponse = document.querySelector(".processResponse");
and we update our console.log inside myProcess to display the ProcessExecuteStatusCode:
(processResponse.innerHTML = result.ProcessExecuteStatusCode)
Our final code looks like this:
<!DOCTYPE html>
<html lang="en">
<head>
<meta charset="UTF-8">
<meta http-equiv="X-UA-Compatible" content="IE=edge">
<meta name="viewport" content="width=device-width, initial-scale=1.0">
<title>Blog Process Example</title>
</head>
<body>
<h1>IBM Blog Process Example</h1>
<button class="processName" onclick="myProcess()">Placeholder</button>
<div class="processResponse">Process Not Run</div>
<script>
function loadPage() {
const processName = document.querySelector(".processName");
processName.innerHTML = "cache_views";
}
function myProcess() {
const processResponse = document.querySelector(".processResponse");
var myHeaders = new Headers();
myHeaders.append("Content-Type", "application/json");
myHeaders.append("Authorization", "Basic YWRtaW46YXBwbGU=");
var requestOptions = {
method: "POST",
headers: myHeaders,
redirect: "follow",
};
fetch(
"http://Spitfire-Prod:52670/api/v1/Processes('cache_views')/tm1.ExecuteWithReturn",
requestOptions
)
.then((response) => response.json())
.then(
(result) =>
(processResponse.innerHTML = result.ProcessExecuteStatusCode)
)
.catch((error) => console.log("error", error));
}
loadPage();
</script>
</body>
</html>
When we open the page we see our heading and the process name button with "Process Not Run" listed below the button
When we click the button we now see that the process has completed successfully:
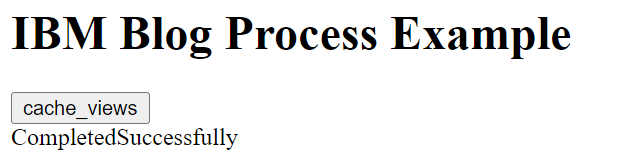
Excellent! We have a HTML page with a button that runs our process and gives us the feedback on the process run.
If I update this to another process we can see what would change if the process does not complete successfully:
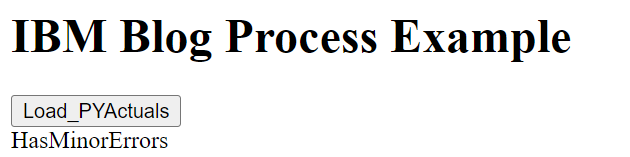
In future blogs we will look to pull the MessageLog entries to identify the error message and display these on screen.
Thanks for reading and look out for the next Blog post coming soon