The purpose of this blog is to appreciate the extent of which OIDC can be implemented across multiple Identity Providers supported by Cognos Analytics 11 R8+ which include ADFS (Active Directory Federation Services).The steps below will outline the steps to creating an Application and configuring the Namespace Provider OpenID Connect using ADFS. This will allow federating users within the 2016 AD Domain environment.Environment:Windows 2016CA 11 R9Sub Domain: CASUPPORTADFS installedSteps are as follows:1. Create an ADFS application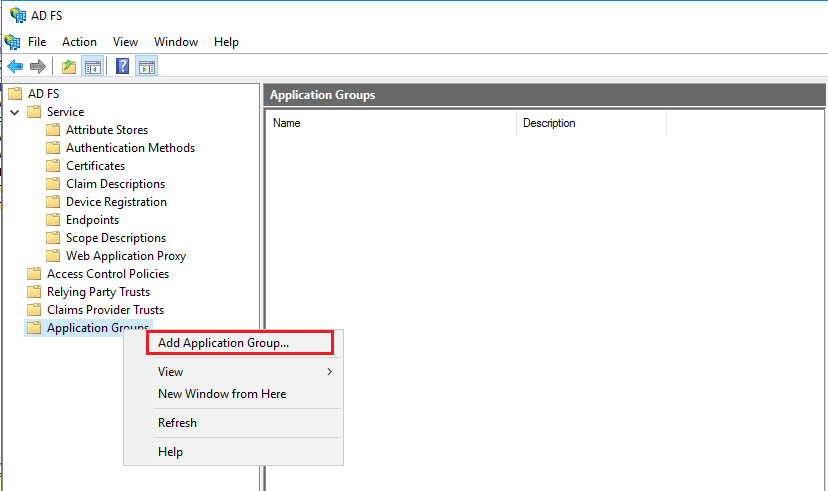
 2. Add the CALLBACK URI to the CA 11 Application
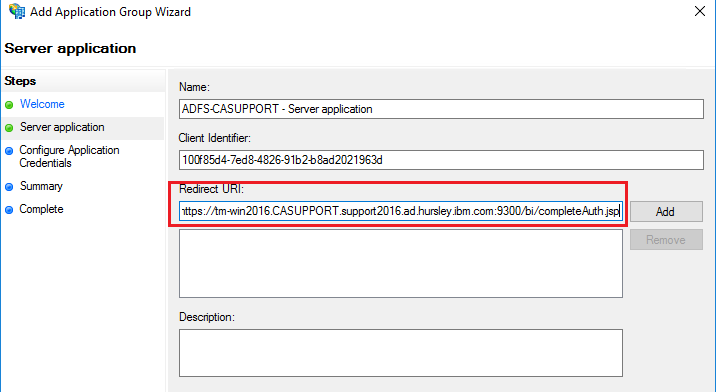
 Click ‘NEXT’3. Generate the Shared Secret
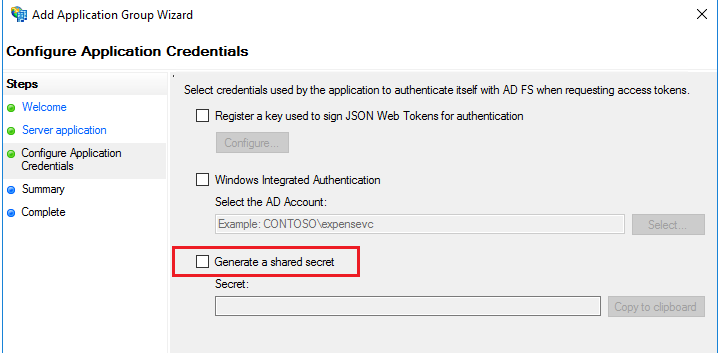
 Client Secret - XW8CH_3qW__rl2t5UEElcm68MRk1Gq6J2doiYws5Click ‘NEXT’Summary Info
 Click ‘NEXT’ and ‘CLOSE’4. So we know have the required information to setup the OIDC and that is:Client ID - 100f85d4-7ed8-4826-91b2-b8ad2021963dRedirect URI - https://tm-win2016.CASUPPORT.support2016.ad.hursley.ibm.com:9300/bi/completeAuth.jspClient Secret - XW8CH_3qW__rl2t5UEElcm68MRk1Gq6J2doiYws55. To capture the Discovery Point, it’s simply the ADFS host where in this example it’s the same machine where CA11 is installed but can be on any server.
 6. Now using the information captured from the ADFS Application, the details are used when creating the OIDC/ADFS Namespace. See below
 7. Switch ALL the URI’s to use https
 8. If the optional gateway is used then enable SSL at the gateway
 9. Export the Issuer Certificate used for signing the webserver
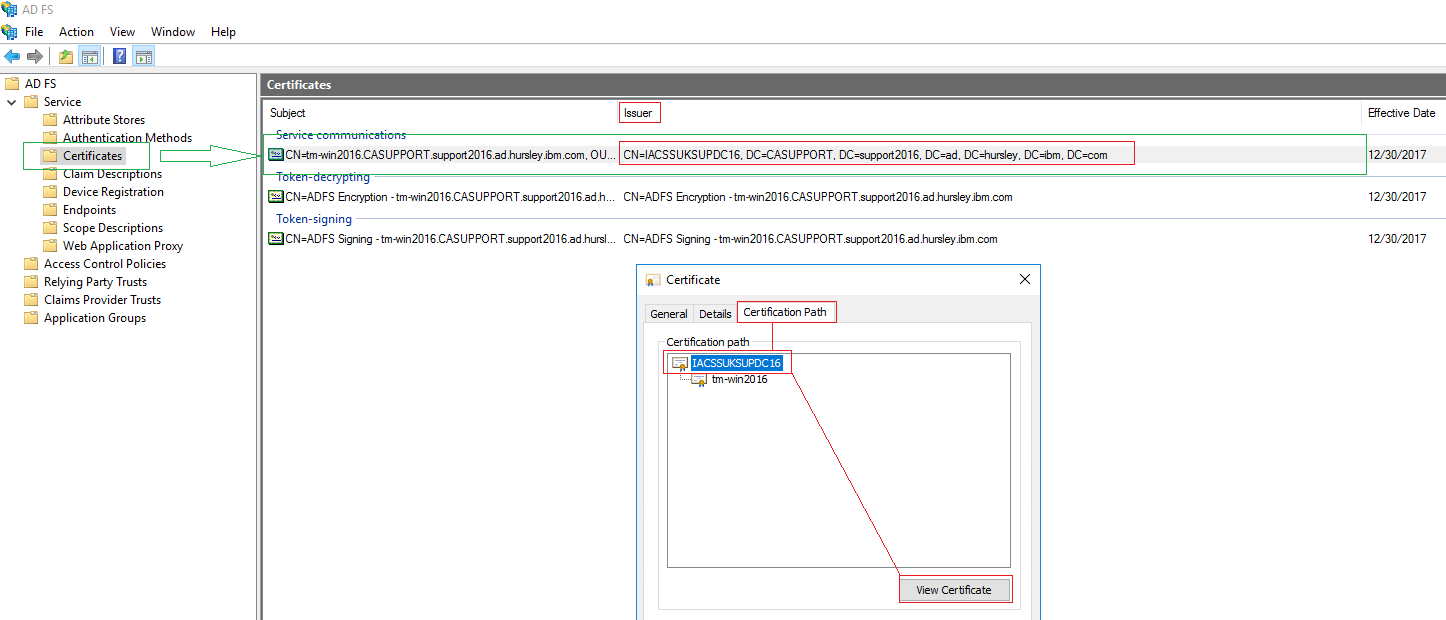
 10. Select ‘NEXT’ and select ‘Base-64 encoded X.509 (.CER)’
 Give it any name and location
 11. Click ‘NEXT’ and ‘FINISH’Now, we need to import the exported certificate into the CAM Keystore using the following command line but first stop the service:
 12. Start the service by opening the cognos configuration, save and start.When you launch the browser and try to access the URI :https://tm-win2016.casupport.support2016.ad.hursley.ibm.com:9300/bi/v1/dispIt appears there are issues with the certificate
 Click on “Continue to this website (not recommended) and despite the certificate error, you successfully log in.
 Click on ‘View certificates’
 Click on “View Certificate” and then select “Install…” and select ‘Local Machine’ and select the ‘Trusted Root Certification Authorities’ Certificate Store.
 TroubleshootingWhen initially setting up the OIDC provider, saving/starting the configuration, the namespace will fail with the following exception:
 This is due to the missing issuers certificateIf you switch to the optional gateway and change the Gateway URI to :
 The problem is the callback URI doesn’t contain a gateway URI so to resolve this, make sure the call back URI exists in the ADFS Application and in the OIDC Provider Settings. See below:
 Add the callback URI using the gatewayModify the OIDC Provider Setting ‘Redirect URI’
 Restart
How to pass Group Memberships as a claim
1. Go to the properties of the Application Group

2. Click "Add application" and select "Web API"

3. Give the application a name and add an Identifier URI which could be the Cognos Server FQDN

4. Select the Access Control Policy and in this case its 'Grant access to everyone". Note: You can to select the policy

5. Click "Next" and select the permitted scopes as listed below:

6. Click "Next" and then "Finish"
7. Edit the new Application Created and click "Edit"

8. Click "Add Rule" and select "Send LDAP Attributes as Claims"

9. Click "Next"
10. Give the Claim Rule a name and for the Attribute store select "Active Directory" and for the "Mapping of LDAP attributes
to outgoing claim types" select the attribute and claim type as below:

11. Click "Apply" and "OK"

12. Restart ADFS Service and then log into Cognos Analytics using the ADFS Namespace
 Additional Information:
In 11.1.4+ there are 4 new advanced configuration items:
Additional Information:
In 11.1.4+ there are 4 new advanced configuration items:
name
authorizeEPAddParms (authorize redirect)
pgTokenEPAddParms (on password grant flow to the token endpoint)
rtTokenEPAddParms (on refresh token flow to the token endpoint)
codeTokenEPAddParms (on authorization code flow to the token endpoint)
This allows you to control exactly what addition parameters are added and specifically to which endpoints. Given the "resource" parameter could be represented using the new advanced configuration items, the value let's you put whatever you want in the URL... as a consequence, the value must include the &, the parameter name, and the parameter value which MUST be url encode e.g.
name value
authorizeEPAddParms &resource=HTTPS%3A%2F%2FADFS_SERVER#adfs#Administration#CognosAnalyticswithWatson#cognosanalyticssupport#ExpertPost#GettingStarted#home#LearnCognosAnalytics#oidc